10NSTRU MENTS Penta Sound Source

1. Introduction
IO Instruments is proud to bring you Himalia Penta Sound Source (PSS) to your Eurorack. This module was developed in close cooperation with Sven Braun (zMors Modular, Dadamachines `doppler’ platform) who took care of all the digital aspects.
Being able to provide a wide range of sounds due to its multiple identities by nature, there is even more possible with this little fellow you might think of at first sight. We decided to make the code of the digital section available to the public as open-source (see links & Infos in according section of this manual).
So you will indeed have the possibility to define/update Himalia with ie. own samples, different chord progressions, and timbres, 8bit melodies, or completely reprogram the foundation and make it evolve into something completely different. We are looking forward to what the community is coming up with IO Instruments team will provide alternative firmware in the future, which we will offer as a download from our website, www.io-instruments.de.
2. Analog noise

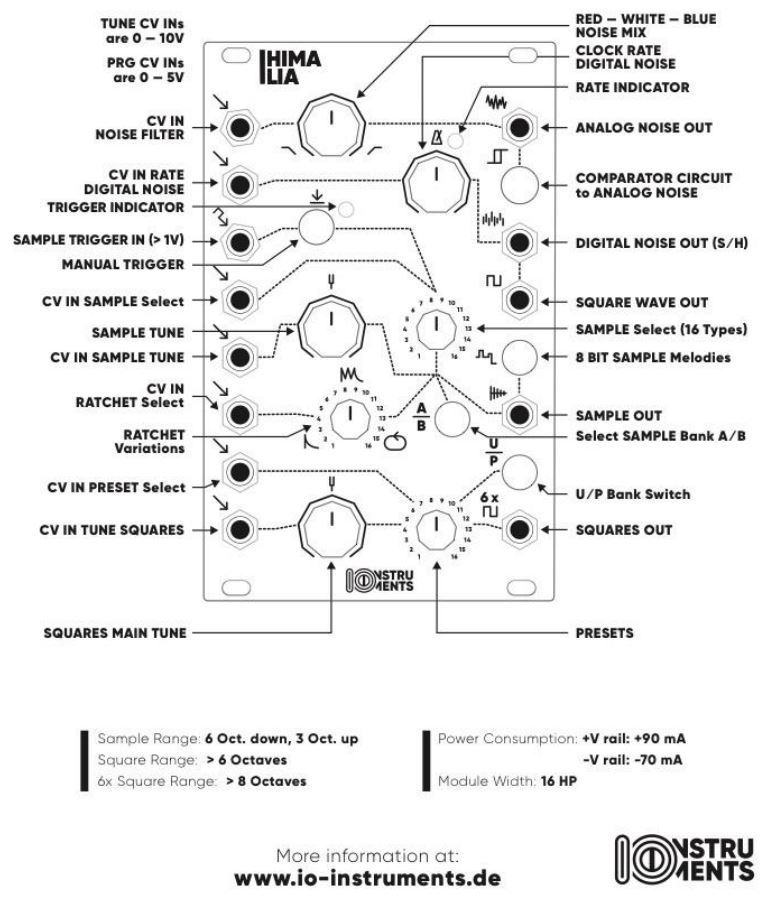
The analog noise section provides you with a variety of 3 noise characters. Using the noise mix potentiometer or via the CV noise filter input, you can gradually sweep between the different noise characters.
Pot position full left = RED noisePot position mid (12 o’clock) = WHITE noisePot position full right = BLUE noise
The comparator switch once engaged activates a circuit which results in the noise signal sounding more harsh and chaotic. Be careful with your PA levels when using this!
If a control voltage is received via the CV input, The noise mix potentiometer is acting as an attenuator.
3. Digital noise / Sample & Hold
The digital noise section can provide sounds ranging from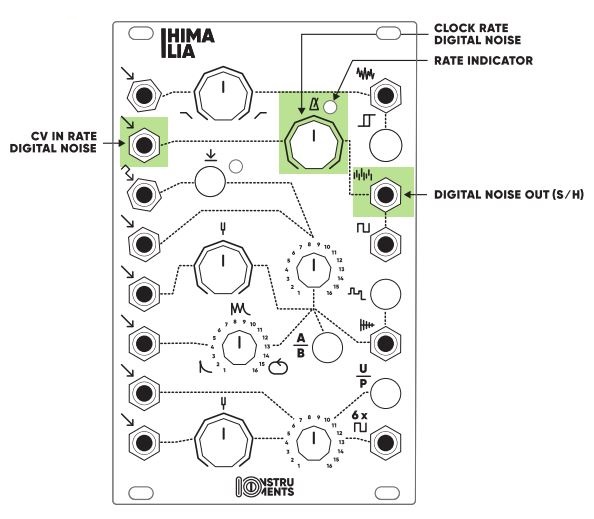 lofi to harsh/clipping characters. The digital noise and Sample & Hold tempo are controlled by the rate potentiometer or the CV rate input.The rate level is indicated by a LED located right next to the rate potentiometer.
4. Mono square oscillator
The mono square oscillator shares the rate potentiometer and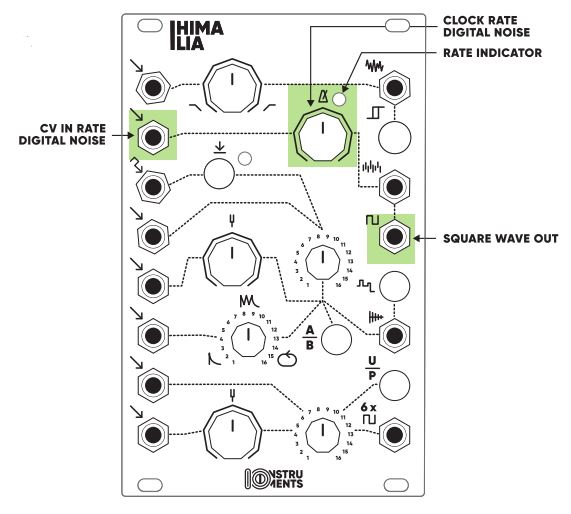 the CV rate input with the digital noise / S&H section.By using the CV rate input or rate potentiometer, you can adjust the pitch level of the square oscillator output.
5. Samples / 8bit melodies
The sample section consists of two banks (A/B) with 16 sample slots each (total of 32 samples).
The sample can be selected by using the Sample select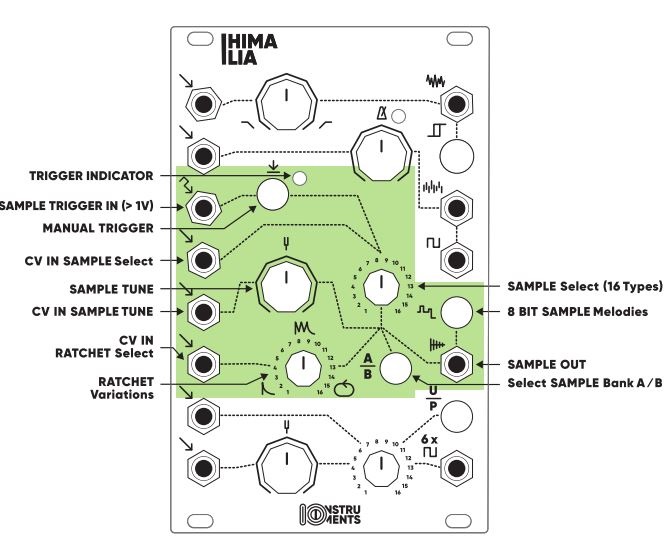 potentiometer or the CV sample select input. By dis-/engaging the Sample bank A/B pushbutton, you can access a total of 32 samples.
You can adjust the pitch of the selected sample by using the Sample tune potentiometer or the CV Sample tune input.
Trigger the samples by using the manual trigger button or the Sample trigger input.
You have also control over how often a sample will be triggered (once, multiple, Infinite (loop).We have included 16 Ratchet variations which you can either select via using the Ratchet variation potentiometer or the CV Ratchet select input.
And there is more…We have included a nice goodie into this section: by engaging the 8bit sample button, you can switch from playing samples into an 8bit melody player.
This will give you access to 16 predefined melodies by using the Sample select potentiometer or CV sample select input. You can pitch the melodies by using the Sample tune potentiometer or CV Sample tune-in.
As with the Samples, you can trigger the melodies with the manual trigger button or the Sample trigger input.
The Ratchet variation potentiometer and the CV Ratchet select input will have no effect on the melodies. Also the Sample bank A/B pushbutton is currently not in use in 8bit melody mode.
6. Unison / Chords / Drones
The polyphonic section is inspired by the Roland TR-808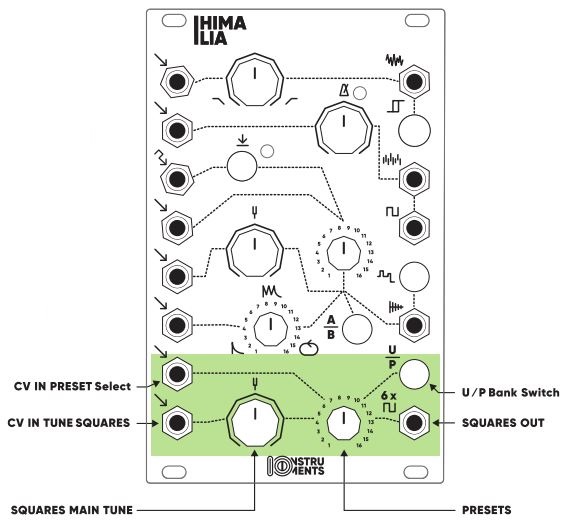 cymbal sound and is generated using six square wave voices. Using different note spreads it is possible to achieve very different sound flavors.From the typical cymbal sound (using a VCA with a short envelope) to unison sounds with different timbres to chords and drone sounds. Himalia provides two banks of unison and chord/drone sounds with 16 variations each. The pitch of the sound can be tuned via the squares tune potentiometer or the CV tune squares input.
Further, you can control the sound preset selection (1-16) by using the preset potentiometer or the CV preset input. Banks can be switched from unison to chord presets and vice versa via the U / P bank button. (disengaged: unison; engaged: chord sounds)
7. Open Source
The source code of the digital sections (digital noise, square/S&H, samples/transients/8bit, and poly/unison sounds) are freely available on GitHub.Access the repository via this link: https://github.com/noscene/himaliaClone the repository, tweak and reprogram as you like & build a new firmware.
8. Install new firmware
You can update Himalia with new firmware versions which are made available from IO Instruments or the community.
Note:you might want to backup the present firmware which is installed on Himalia first, before installing a new firmware as described below. For this just walk through the below guide until step j). Then back up the file `current.uf2′ from Himalia flash drive to your computer.
How to update Himalia with new firmware:a) Download the desired firmware file to your computer (Filename: XYZ.UF2)b) Himalia needs to be powered via the modular bus power (+/-12V)c) The backside of the module needs to be accessible, ie the module should not be fixed to your cased) Power on Himalia, it works, as usual, / expectede) Turn the module so you look at the back of the module (= side where the power ribbon cable connector is located)f) Locate the button next to the only LEDg) Double click the buttonh) Himalia will reset itself and restarts in bootloader modei) Connect Himalia to a micro USB cable; connect the other end of the USB cable with your computerj) Once the USB is connected, Himalia will appear as a flash drive on your computerk) Simply drag and drop the.UF2 file from your computer to Himalia flash drivel) Savely eject the Himalia flash drive from your computerm) Press the button on the back of Himalia once to reset the modulen) Himalia is rebooting and will restart with the updated firmware running
9. Technical Specifications
References
[xyz-ips snippet=”download-snippet”]