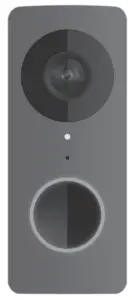
2GIG Intelligent Video Doorbell
System Description
*Not included. Refers to existing home device.
Doorbell Camera Components
|
|
|
|
|
|
|
|
|
|
|
|
|
|
|
 SMART DOORBELL CAMERA
 POWER KIT
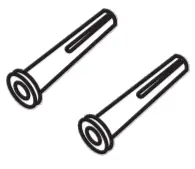 ANCHORS (2)
 DOORBELL WIRE EXTENDERS
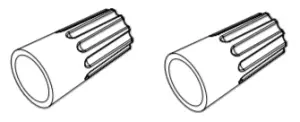 TWIST-ON WIRE CONNECTORS (2)
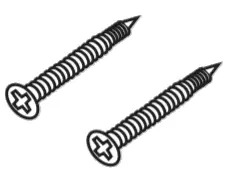 PHILLIPS SCREWS (2)
Tools For Installation

PHILLIPS SCREWDRIVER |
OPTIONAL
|
|
|
Install Overview

TWO WIRES: CONNECT TO EITHER DOORBELL TERMINAL
Prepare for Installation
SHUT OFF POWER TO DOORBELL
- Shut off power to existing doorbell from the circuit breaker panel.
- Go to existing doorbell location.
VERIFY POWER SUPPLY
- The Doorbell camera is rated for 8-24 Volt AC. We recommend at least a 16V-10VA transformer.
- For some chimes that require more power, such as an electronic chime, it may require a 16V-30VA transformer.
- Visually inspect the doorbell transformer for power rating (VA or Watts) and Voltage.
- Measure the doorbell wiring at the installation location with a AC Volt meter.
Install Power Kit in Chime Box
✔ NOTE: It is recommended to TURN POWER OFF before performing any wiring.
Power Kit installation is required for proper functioning of the mechanical and electrical chime with the video doorbell. It is not needed if a chime is not used.
Existing Doorbell Removal
- Remove existing doorbell pushbutton from location.
- Disconnect wires from back of pushbutton.

Mount the Doorbell Camera Plate
- Mount the plate to a flat surface. If possible, use the holes from the previous doorbell with the accompanying screws and anchors (if required).
- Use the attached level to ensure the mounting plate is level.
- If required, use the included horizontal wedge to angle the doorbell left or right.
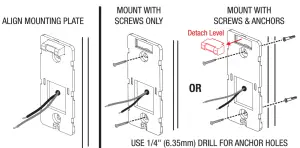
✔ Important: Once mounted, squeeze/pull the Level to detach it from the plate.
(Optional) Installing the Mounting Plate/Wedge
- An angled mounting plate is included with your doorbell camera for positioning the viewing field 15 degrees to the right or left.
- The facing direction is determined by how you install the wedge.
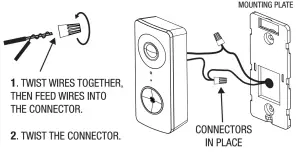
Connect the Wire Extenders
- Connect the existing wire from the house directly to the video doorbell.
- Or, attach the two provided wire extenders to the hole locations on the back of the doorbell.
Install Doorbell Camera with Wire Extenders to Mounting Plate
- If needed, use the provided twist-on wire connectors to join the two existing AC wires to the doorbell wires.
- Push extra wire and/or connectors into the wire access hole of the mounting plate.
Hang Doorbell on Mounting Plate
- Align the notches on the doorbell and mounting plate, then push downward.
- NOTE: If you don’t feel the doorbell SNAP into place, please check to ensure the Set Screw is all the way down.
Finalizing Installation

- Tighten the security set screw until snug.
- TURN power ON.
- The Doorbell Camera LED will be Solid Red.
- In less than a minute, the LED should flash Green.
(Optional) Wiring Camera WITHOUT Chime
BLACK WIRE: TRANSFORMER WIRE
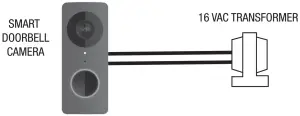
✔Important: During doorbell setup in the 2GIG App, please choose ‘None’ when selecting the chime type. Choosing a mechanical/ electronic chime can potentially damage your transformer with no chime installed.
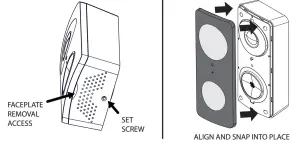
(Optional) Changing the Faceplate
- Using your hands, tightly grip the body of the doorbell in one hand and firmly pull the current faceplate away from the doorbell body. This may take some effort.
- Once the old faceplate has been removed, align and snap into place the alternate faceplate.
Setup Operation
- Download Smartphone AppOn the resident’s Smartphone, download and install the “2GIG Doorbell” App from the Google Play Store (for Android phones) or from Apple App Store (for iOS phones). Minimum handset version requirement: iOS 10 or Android 9.0
- Create an AccountWith the Smartphone connected to the local network router via WiFi, select “Create Account.” Enter a name, valid email address, and password for the account, then select “Create Account.”Receive the verification e-mail from [email protected].Click on the Verify Email button to verify your e-mail. NOTE: Check junk/ spam email folder. This code expires in one day after the email is sent. After verified, login to the 2GIG app.
- Connecting to Doorbell CameraDoorbell should flash Green only during the connection process. The doorbell will automatically enter this process if the device is connecting for the first time.
- If it has connected to a service previously, the doorbell will be Blue. You will need to factory-reset the doorbell to begin the provisioning process.
LED States and Colors
| Camera State | LED Color | LED State |
| Powering Off | OFF | NA |
| Booting Up | Red | Solid |
| Wi-Fi in Provisioning Mode | Green | Flash Slow |
| WiFi Provisioning in Progress | Green | Flash Fast |
| Factory Reset | Red | Flash Fast |
| Live Streaming | Blue | Flash Slow |
| Doorbell Powered On | Blue | Solid |
Troubleshooting – Power
Q: Why doesn’t the doorbell camera power up?A: Refer to installation instructions:
- Confirm transformer power is turned ON.
- Confirm Power Kit is installed correctly. Refer to the “Install Power Kit in Chime Box” section.
- Confirm wiring / connections are correct and secure.
- Confirm transformer power is 8 to 24 Volt AC, and with a minimum of 10VA. If the doorbell flashes Red briefly when initially supplying power, try a 20VA+ transformer instead as it could signal there is insufficient power from the transformer.
Q: The doorbell power cycles off and on?A: Check that the doorbell camera power wires are securely connected. The existing doorbell wiring may be bad. (Refer to Steps 6 and 7.)Q: Why does the doorbell blink Red and not trigger the chime when I press the doorbell button?A: If you have not enabled Do-Not-Disturb mode and your doorbell has not been powered on for some time, the internal doorbell battery could be on low charge. Please keep the doorbell powered on to allow the internal battery to charge for at least 30 minutes and the doorbell button should start triggering the chime again.
Troubleshooting – Network
Q: The doorbell doesn’t register on the Wi-Fi network. Why?A: The smart doorbell camera may be out of range of your Wi-Fi network. Move the router or install a Wi-Fi extender.Q: The Intelligent Video Doorbell Camera occasionally loses network connectivity?A: The Intelligent Video Doorbell may be near the limit your WiFi network range. Test your network speed from the 2GIG app in ‘Doorbell Settings -> About -> Network -> Test Network Speed’. If you are connected to the Wi-Fi over 5Ghz and have a poor network speed, you may have better speeds connected over 2.4Ghz. If the connection still remains poor over 2.4Ghz, please move the router closer to the doorbell or install a Wi-Fi extender.Q: How can I connect the video doorbell to a different Wi-Fi network?A: Unmount the video doorbell from the mounting plate. Press the Factory Reset button for 5 seconds to reset the device. (Refer to Box 5 for Reset button locations.) It should then flash Green, making it available for a new connection process.
Regulatory Information
FCC & IC NoticeThis device complies with Part 15 of the FCC Rules and Industry Canada license exempt standard(s). Operation is subject to the following two conditions:
- This device may not cause harmful interference, and
- This device must accept any interference received, including interference that may cause undesired operation.
This equipment has been tested and found to comply with the limits for a Class B digital device, pursuant to Part 15 of the FCC Rules. These limits are designed to provide reasonable protection against harmful interference in a residential installation.
Regulatory Information
This equipment generates, uses, and can radiate radio frequency energy and, if not installed and used in accordance with the instructions may cause harmful interference to radio communications. However, there is no guarantee that interference will not occur in a particular installation.If this equipment does cause harmful interference to radio or television reception, which can be determined by turning the equipment off and on, the user is encouraged to try to correct the interference by one or more of the following measures:
- Reorient or relocate the receiving antenna.
- Increase the separation between the equipment and receiver.
- Connect the equipment into an outlet on a circuit different from that to which the receiver is connected.
- Consult the dealer or an experienced radio/TV technician for help.
Warning: Changes or modifications not expressly approved by the manufacturer could void the user’s authority to operate the equipment.
The device for operation in the band 5150–5250MHz is only for indoor use.
Limited Warranty
This Nortek Security & Control LLC product is warranted against defects in material and workmanship for one year. This warranty extends only to wholesale customers who buy direct from Nortek Security & Control LLC or through Nortek Security & Control LLC’s normal distribution channels. Nortek Security & Control LLC does not warrant this product to consumers. Consumers should inquire from their selling dealer as to the nature of the dealer’s warranty, if any.
There are no obligations or liabilities on the part of Nortek Security & Control LLC for consequential damages arising out of or in connection with use or performance of this product or other indirect damages with respect to loss of property, revenue, or profit, or cost of removal, installation, or reinstallation. All implied warranties for functionality, are valid only until the warranty expires. This Nortek Security & Control LLC Warranty is in lieu of all other warranties expressed or implied.
This equipment complies with FCC radiation exposure limits set forth for an uncontrolled environment. This equipment should be installed and operated with minimum distance 20cm between the radiator & your body.
Nortek Security & Control LLC | 2GIG ®5919 Sea Otter Place, Ste. 100, Carlsbad, CA. 92010
For technical support in the USA and Canada:855-2GIG-TECH (855-244-4832)
Email: [email protected]Visit www.nortekcontrol.com for technical support hours of operation.
For technical support outside of the USA and Canada:Contact your regional distributor.Visit www.2gig.com/dealers/ for a list of distributors in your region.
 report this ad
Copyright © 2020 Nortek Security & Control LLC
References
[xyz-ips snippet=”download-snippet”]