
![]() COMPRESSOR NEBULIZERManualMODEL: QN1000
COMPRESSOR NEBULIZERManualMODEL: QN1000
![]() Read this manual before operating the nebulizer.Save these instructions for future reference.
Read this manual before operating the nebulizer.Save these instructions for future reference.
INTRODUCTION
Thank you for purchasing the 3B Medical ” branded (Dube Nebulizer Compressor. It is a compact medical device designed to efficiently deliver physician-prescribed medication to the bronchial lung passages and is intended for home health care use. With proper care, it will provide you with many years of reliable treatment.This product is developed for the successful treatment of asthma. allergies and other respiratory disorders. It creates a stream of air that travels through a clear tube to the nebulizer. When air enters the nebulizer, it will convert the prescribed medication into an aerosol mist for easy inhalation.Your nebulizer compressor should be used under the supervision of a licensed physician and/or a respiratory therapist. We encourage you to thoroughly read this manual to learn about the features of this product. Any use of this product other than its intended use should always be avoided.
ILLUSTRATION OF PARTS
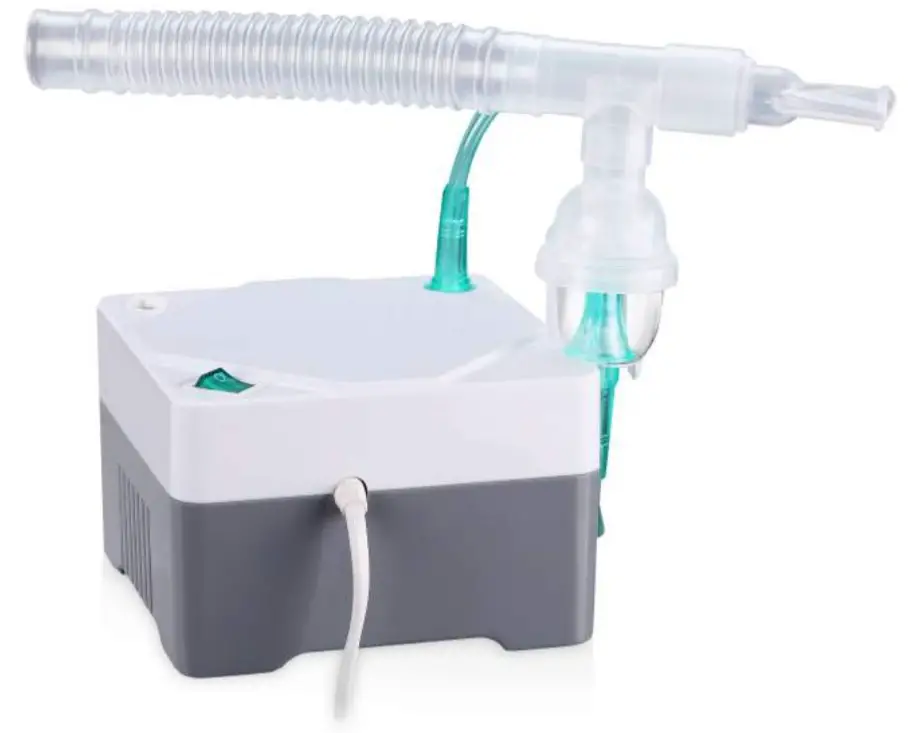
NEBULIZER COMPRESSOR UNIT
- Compressor
- Air Outlet
- Power Switch
- Power Cord
- Air Filter

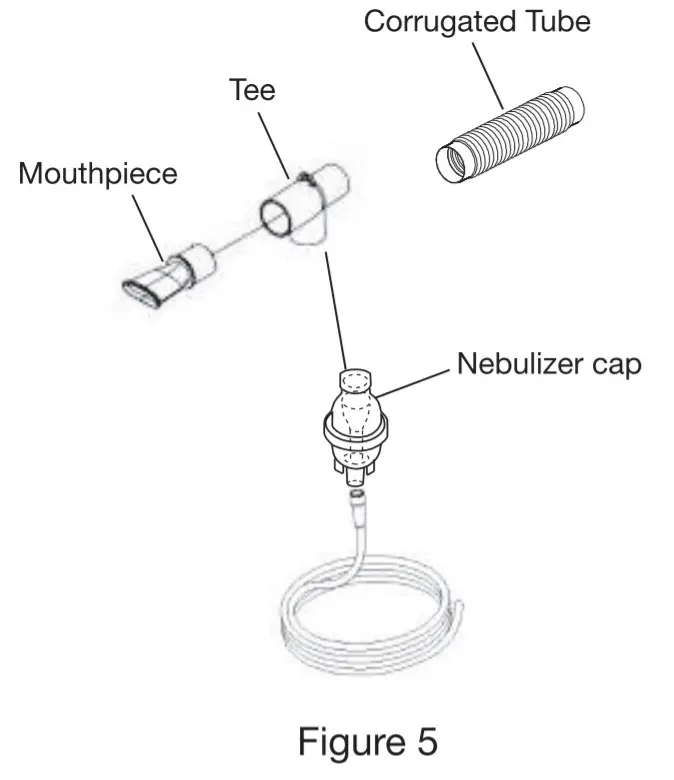
NEBULIZER ASSEMBLY AND ACCESSORIES ILLUSTRATION
|
|

SAFETY SYMBOLS USED IN THIS MANUAL![]() DANGER Indicates a potentially hazardous situation vMdch. If not avoided. could result in death or serious injury.
DANGER Indicates a potentially hazardous situation vMdch. If not avoided. could result in death or serious injury.![]() WARNING Indicates a potentially hanttkuS situation Mach. if not avoided. could result in serious injury and &Moment damage.
WARNING Indicates a potentially hanttkuS situation Mach. if not avoided. could result in serious injury and &Moment damage.![]() CAUTION Inc states a potentially hazardous situation %tech. if not avoided. could result in minor or moderate injury to the user or patient or damage to the device or other ProPerty.
CAUTION Inc states a potentially hazardous situation %tech. if not avoided. could result in minor or moderate injury to the user or patient or damage to the device or other ProPerty.
IMPORTANT SAFETY PRECAUTIONS. AND WARNINGS
 It is important that you read all warnings in the user’s manual before use. Use the product only for its intended use as described in the manual. Improper use can result in serious or fatal illness/injury, improper treatment, or property damage.
![]() WARNING (the USA only)Indicates a potentially hazardous situation. if not avoided, could result in death or serious injury.
WARNING (the USA only)Indicates a potentially hazardous situation. if not avoided, could result in death or serious injury.![]() CAUTION Indicates a potentially hazardous situation that, if not avoided, could result in serious injury and equipment damage.These devices have been thoroughly tested and inspected to assure proper performance and operation.Specifications put forth in this manual were in effect at the time of publication. However, to ensure continual improvement measures, changes to these specifications may be made at any time without obligation on the part of the manufacturer.
CAUTION Indicates a potentially hazardous situation that, if not avoided, could result in serious injury and equipment damage.These devices have been thoroughly tested and inspected to assure proper performance and operation.Specifications put forth in this manual were in effect at the time of publication. However, to ensure continual improvement measures, changes to these specifications may be made at any time without obligation on the part of the manufacturer.![]() WARNINGWARNING: IF ANY OF THE MOTOR HOUSING PARTS SHOULD BECOME DETACHED OR BROKEN, EXPOSING THE MOTOR OR ANY OTHER ELECTRICAL COMPONENTS, OPERATION SHOULD BE DISCONTINUED IMMEDIATELY TO AVOID PERSONAL INJURY OR FURTHER PRODUCT DAMAGE.To reduce the risk of serious or fatal injury from electrocution, fire, burns and to reduce the risk of damage or malfunction of the unit:
WARNINGWARNING: IF ANY OF THE MOTOR HOUSING PARTS SHOULD BECOME DETACHED OR BROKEN, EXPOSING THE MOTOR OR ANY OTHER ELECTRICAL COMPONENTS, OPERATION SHOULD BE DISCONTINUED IMMEDIATELY TO AVOID PERSONAL INJURY OR FURTHER PRODUCT DAMAGE.To reduce the risk of serious or fatal injury from electrocution, fire, burns and to reduce the risk of damage or malfunction of the unit:
- Before use, check the serial number label on the bottom of the compressor to ensure that the voltage and current indicated on the unit correspond with the voltage and current available.
- Never operate this product If It:a. has a damaged cord or plugb. is not working properlyc. has been dropped or damagedd. has been exposed to any liquids inside the case
- Return non-operating product to an authorized 3B Medical, Inc. dealer for repair or replacement.
- Keep all electrical cords away from heated surfaces. Do not overload wall outlets or use extension cords.
- Do not operate where oxygen is being administered in a closed environment such as an oxygen tent.
- Never drop or insert any object into any openings.
- Do not open or disassemble the compressor. Refer all servicing to a 3B Medical, Inc. Brands authorized dealer.
- Never spray liquids onto the compressor housing. Fluid could cause damage to the electrical and compressor parts and could lead to an In the event that fluids enter the unit, return the product to an authorized medical equipment service center for examination and repair.
- Do not use the nebulizer while operating a vehicle.
- EMI/RF1 recommendations:a. Do not turn on or use hand-held personal electronic communication devices such as cellular phones, walkie-talkies and CB radios while the compressor is turned on.b. Be aware of any nearby transmitters (radio, television, microwave, ) and avoid operating the compressor close to any of these transmitters.c. Turn off the power of the compressor is not going to be used for any length of time.d. Be aware that adding accessories or components or modifying the compressor may make it more susceptible to EMI/RFI.
NEBULIZER AND ACCESSORIES:
- Tubing and accessories are for single patient use only. Do not share your tubing and accessories with other patients.
- To reduce the risk of increased bacterial growth, infection, Illness, or injury from contamination, thoroughly dean and dry all parts of tubing and accessories and thoroughly dry any moisture or condensation in the tubing at the end of every treatment, following the instructions on page 12.
- Cleaning the nebulizer unit after each treatment Is not enough. The tubing and accessories must also be regularly sterilized and disinfected between treatments to prevent serious or fatal illnesses caused by contamination.
- Never use tubing with a clogged nozzle. If the nozzle is clogged, the aerosol mist will be reduced, altered, or stopped, which will diminish or eliminate the effectiveness of the treatment. If clogging occurs, replace it with the same model.
- Close supervision is necessary when this product is used by or near children and physically or mentally impaired persons. Never use when sleeping or drowsy.
- This product contains small parts that may present a choking hazard to small children. The tubing also presents a strangulation hazard.
WARNING:ALWAYS USE CLOSE ADULT SUPERVISION WHEN ADMINISTERING TREATMENT TO A CHILD. DO NOT LEAVE THE CHILD UNATTENDED DURING TREATMENT.
- Children under the age of 3 or any patient who is unable to use a mouthpiece property under supervision should use a mask (optional).
- Before use, check tubing and accessories for proper assembly. All parts should be seated firmly in place. The use of improperly assembled tubing and accessories could diminish or prevent adequate delivery of medication and the effectiveness of the treatment.
![]() CAUTIONOPERATING CAUTIONS:
CAUTIONOPERATING CAUTIONS:
- Connect this product to an appropriate voltage outlet for your model. Do not use with power strips or extension cords.
- Do not use this product with a DC to AC converter, or with any AC voltage and/or frequency other than specified.
- Do not run this product unattended.
- Never operate if this unit has a damaged cord or plug if it has been dropped in any way or into the water if it does not work properly. Return it to a service center for repair.
- If any abnormality occurs, discontinue use immediately until the unit has been examined and repaired.
- Always unplug the product immediately after use.
- Never allow the power supply cord to be pulled, jerked, strained, twisted, or severely bent, especially at the plug connections. Damage will occur at the high flex point of entry into the appliance, causing it to rupture and short. Handle the cord carefully for longer life.
- Never block the air openings of the main unit or place it where the air openings may be obstructed.
STORAGE CAUTIONS:
- Do not store the unit under direct sunlight, high temperature, or humidity.
- Keep the unit out of reach of small children.
- Keep the cord away from heated surfaces. Do not wrap the cord around the appliance.
- Always keep the unit unplugged while not in use.
CLEANING CAUTIONS:
- Do not immerse the unit in water. It may damage the unit.
- Disconnect the unit from the electrical outlet before cleaning.
- Clean all necessary parts after each use as instructed in this guidebook.
CLEANING THE COMPRESSOR HOUSING:
- Use a clean, damp cloth to wipe the exterior of the compressor housing.
GETTING STARTED
- Check to ensure the following components of the nebulizer are enclosed:a•Compressor unit•Tubing and accessories (see page 3 for illustration of parts)
- It is recommended to keep extra tubing, accessories, and air filters on hand at all times in case original parts become lost, damaged, or soiled.
CAUTIONIf you did not receive the components listed above, please contact the dealer where you purchased your nebulizer.SETTING UP THE NEBULIZER COMPRESSOR AND NEBULIZER ACCESSORIESCAUTIONTubing and accessories are NOT sterile from the package.Prior to the initial operation, the nebulizer should be thoroughly cleaned.
- Wash hands with soap and warm water and dry completely with a clean towel.
- Place the compressor on a clean, dust-free, stable, and flat surface. Check the filter monthly or every 10 – 12 treatments and replace if dirty, clogged, or wet to ensure proper operation.
- Make sure tubing and accessories have been cleaned and/or disinfected before first use and after the last daily treatment. Refer to the Cleaning and Disinfecting Tubing and Accessories section on page 12.
- Remove the nebulizer cap by twisting counter-clockwise until it stops and lifts up (Figure 3-1). Be sure that the cone is put inside the bottom section
- Fill nebulizer cup using eyedropper or syringe with prescribed medication. Do not fill more than 8 ml per treatment (Figure 3-2).
- Close the nebulizer cap and turn clockwise until it is tightened (Figure 3-3).

- If using the mask (optional), press it directly into the nebulizer cup. (Figure 4)
-
If using the mouthpiece, firmly attach it to one end of the tee. The corrugated tube should be attached to the opposite end of the tee. Then attach the remaining end of the tee to the nebulizer cup. The cap is designed to fit tightly (Figure 5).
-
Attach one end of the tubing firmly onto the air outlet on the side of the compressor unit. It is important that the tubing be pushed all the way onto the air outlet. The tubing is designed to fit tightly (Figure 6-1).
-
Firmly press the other end of the tubing onto the bottom of the nebulizer cup (Figure 6-2).
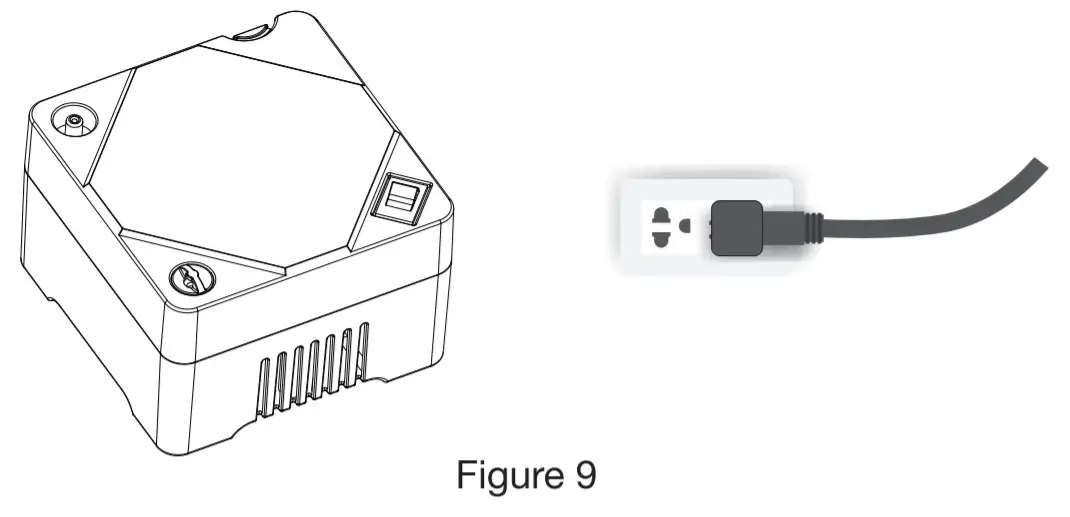
- Plug the power cord into an appropriate electrical outlet. (DO NOT use with
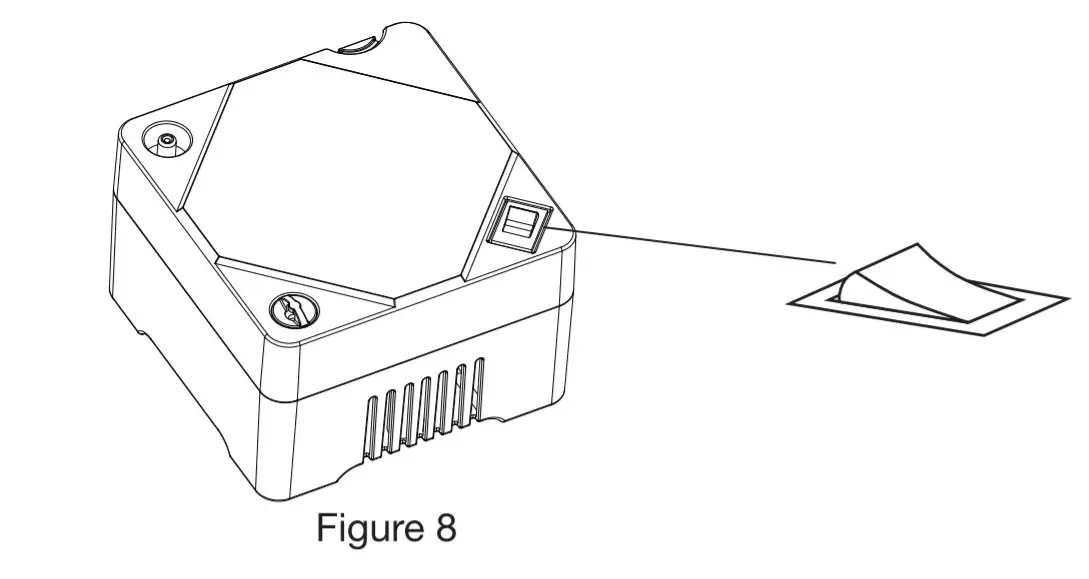
- Make sure at this stage, the power switch is at “OFF” status.
- Press the power switch to “ON” status to begin your prescribed treatment. (DO NOT run unattended).
- When treatment is finished, shut off the unit and unplug it from the electrical outlet.


![]() WARNING!
WARNING!
- The compressor motor has a thermal protector, which will shut off the unit before it becomes overheated. When the thermal protector shuts the unit off, please:a. Switch off the unit.b. Unplug the unit from the electrical outlet.c. Wait 40 minutes for the motor to cool down before starting another treatment.d. Make sure the air openings are not obstructed and the air filter is clean.
- Never operate if this unit has a damaged cord or plug, has been dropped in any way, immersed into water or if it does not work properly. Return it to a service center for repair.
- If any abnormality occurs, discontinue use immediately until the unit has been examined and repaired.
- Always unplug the product immediately after use.
- Never allow the power supply cord to be pulled, Jerked, strained, twisted or severely bent, especially at the plug connections. Damage will occur at the high flex point of entry into the appliance, causing it to rupture and short. Handle the cord carefully for longer life.
- Never block the air openings of the main unit or place It where the air openings may be obstructed.
OPERATING THE COMPRESSOR NEBULIZER
- Take the power cord and plug it Into an electrical outlet. (Figure 9)
- Check for moisture leakage near the nebulizer connections
- There are (3) ways to administer medication with this nebulizer.A, Hold the air intake near the nose (Figure 8-1).B If using a mask (optional), put the mask on the face (Figure 8-2).C If using a mouthpiece, hold it in or near the mouth (Figure 8-3).
- Taking deep breaths in, inhale the liquid medication vapor.
- When liquid medication is depleted, turn the power switch to “OFF” (Fig. 11).CAUTIONFor optimal performance, operate the unit for 20 minutes, then leave it off for 40 minutes.
- Unplug the power cord from the electrical outlet.
- Detach the tubing and accessories from the compressor unit.
- Clean and sterilize tubing and accessories.


CLEANING
CLEANING THE NEBULIZER COMPONENTS AND ACCESSORIES:
- Disconnect the tubing from the compressor and from the bottom of the nebulizer cup.
- If there is any moisture (condensation) in the tubing, let the compressor run with the tubing only for 2 – 3 minutes. The warm air from the compressor will dry out the tubing. Alternatively, you can dry the tubing by removing it from the compressor and hanging it up with the “ends down” to allow the moisture or condensation to drain out and evaporate. Use a clean damp cloth to wipe the exterior of the tubing.
- Disassemble tubing end of the accessories.
- Wash all parts with warm water and liquid dish soap.CAUTION: DO NOT WASH THE TUBING.
- Rinse thoroughly with warm water and shake out the water.
- Air dry or hand dry nebulizer parts with a clean, lint-free cloth. Reassemble nebulizer when parts are dry and store.
- You can also wash the reusable nebulizer (optional accessory) on the top shelf of a dishwasher. Masks cannot be washed safely in a dishwasher. DO NOT WASH THE TUBING. Place the parts in a dishwasher basket and place the basket on the top rack of the dishwasher. Remove and dry parts when the cycle is complete.
- With proper care, disposable nebulizer kits should be replaced every 2-4 weeks, and optional reusable nebulizer kits should be replaced every 6
![]() CAUTIONDisposable nebulizers are NOT dishwasher safe!DISINFECTING AND STERILIZING NEBULIZER COMPONENT:
CAUTIONDisposable nebulizers are NOT dishwasher safe!DISINFECTING AND STERILIZING NEBULIZER COMPONENT:
- Clean the nebulizer components and accessories as described in the cleaning section. Every other treatment day, soak the parts in a solution of one (1) part distilled white vinegar and three (3) parts hot tap water for one (1) hour. DO NOT SOAK THE TUBING. You can substitute commercially available respiratory equipment disinfectant for distilled white vinegar by following the manufacturer’s instructions for mixing.
- Rinse all parts thoroughly with warm tap water and dry with a clean, lint-free Discard vinegar solution when disinfecting is complete.
![]() WARNINGOnly one patient may use one set of tubing and accessories. Do not share components with other patients.CLEANING THE COMPRESSOR
WARNINGOnly one patient may use one set of tubing and accessories. Do not share components with other patients.CLEANING THE COMPRESSOR
- Wipe daily with a damp cloth.
- Do not use any powdered cleaners or soap pads, which may damage the finish.
FILTER CHANGE
- Do not use cotton or any other materials. Do not wash or clean the filter. Only use filters supplied by your distributor, and do not operate without a filter.
- Change the filter every 15 – 30 days or when the filter turns gray.
- Changing procedure:a. Remove the filter cover.b. Replace the used filter with a new one.c. Replace the filter cover.
MAINTENANCE
AIR FILTER:
- The air filter on the side panel of the compressor unit is bright white when With use, it will turn gray, which means it is time to replace it. It must be replaced immediately if it gets wet or becomes clogged.
- To replace the air filter, ensure the compressor is turned off. Open the air filter cover, take out the air filter and replace it with a new one. Place the cap back into the socket of the compressor and snap the filter cover back in place (Fig. 12).
CAUTIONDo not attempt to wash and reuse the air filter. Do not use substitute filter material. Compressor damage may result.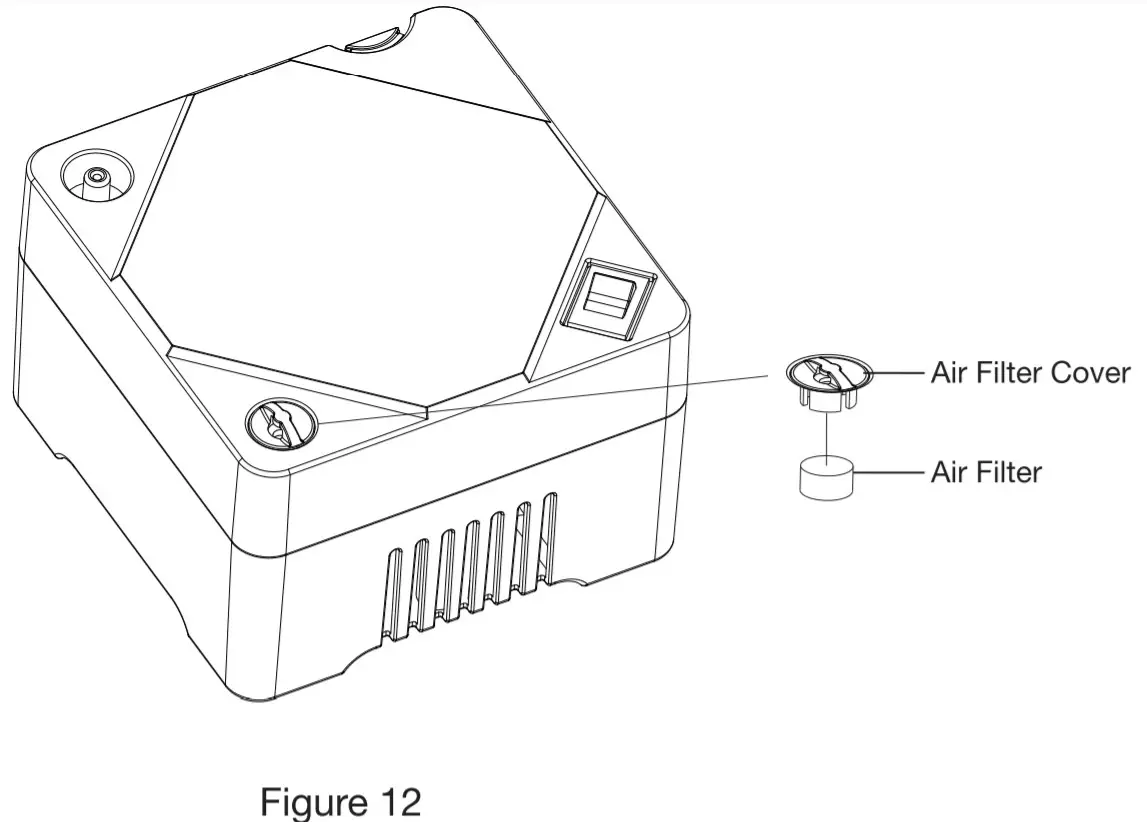
NEBULIZER SPECIFICATIONS
| Power | AC 120V, 60Hz, ETL Classified Listed |
| Power Consumption | 1.3A |
| Medication Capacity | 6m1 |
| Particle Size (micron) | >75% 0.5-5pm |
| MMAD | 2.97pm |
| Sound Level | Less than 60 dB at 1 meter |
| Average Nebulization Rate | z0.2m1/min |
| Compressor Pressure Range | 30 to 50 PSI |
| Liter Flow Range | 6.0 – 10.0 LPM |
| Operating/Storage Temperature Range | 10°C to 40°C (50°F to 1044F) |
| Operating/Storage Humidity Range | 10 to 90% RH |
| Operating Cycles | 20 minutes on, 40 minutes off |
| Dimension (L x W x H) | 6.1″ x 5.5″ x 3.5″ |
| Weight | 2.73 lbs. (1.24kg) |
| Standard Accessories | Nebulizer, Air Tube, Mouthpiece, Tee, Corrugated Reservoir Tube, Air Filters (5pcs) |
| Optional Accessories | Adult Mask, Reusable Nebulizer, Carry Bag |
| Warranty | 5-year limited warranty |
LIMITED WARRANTY
3B Medical, Inc. offers a limited five (5) year warranty on the compressor unit and six (6) months on accessories. We warrant that the compressor unit and its parts will be free from defects in workmanship and materials for a period of five (5) years from the date of original purchase and six (6) months on tubing and accessories. This warranty does not extend to failures resulting from accident, misuse, abuse, alteration, use of unauthorized service, parts or cleaning solutions, or failure to comply with the User’s Manual.If the warranted equipment should fail during the warranty period, 3B Medical, Inc., at our option, will repair or replace parts at issue, provided the claim is bona fide. It shall be the responsibility of the purchaser to pack and return the equipment in a manner to avoid shipping damage. The shipment must be prepaid to us. This warranty covers the cost of labor incurred in the removal or replacement of the warranted component parts at us only.
SERVICE AND REPAIR
If you should have any questions about this nebulizer, please contact an authorized 3B Medical, Inc. dealer. Do not open or disassemble the compressor unit at any time. This will void the warranty. If the unit is malfunctioning discontinue use immediately and return to the original provider for repair or replacement.
[xyz-ips snippet=”download-snippet”]