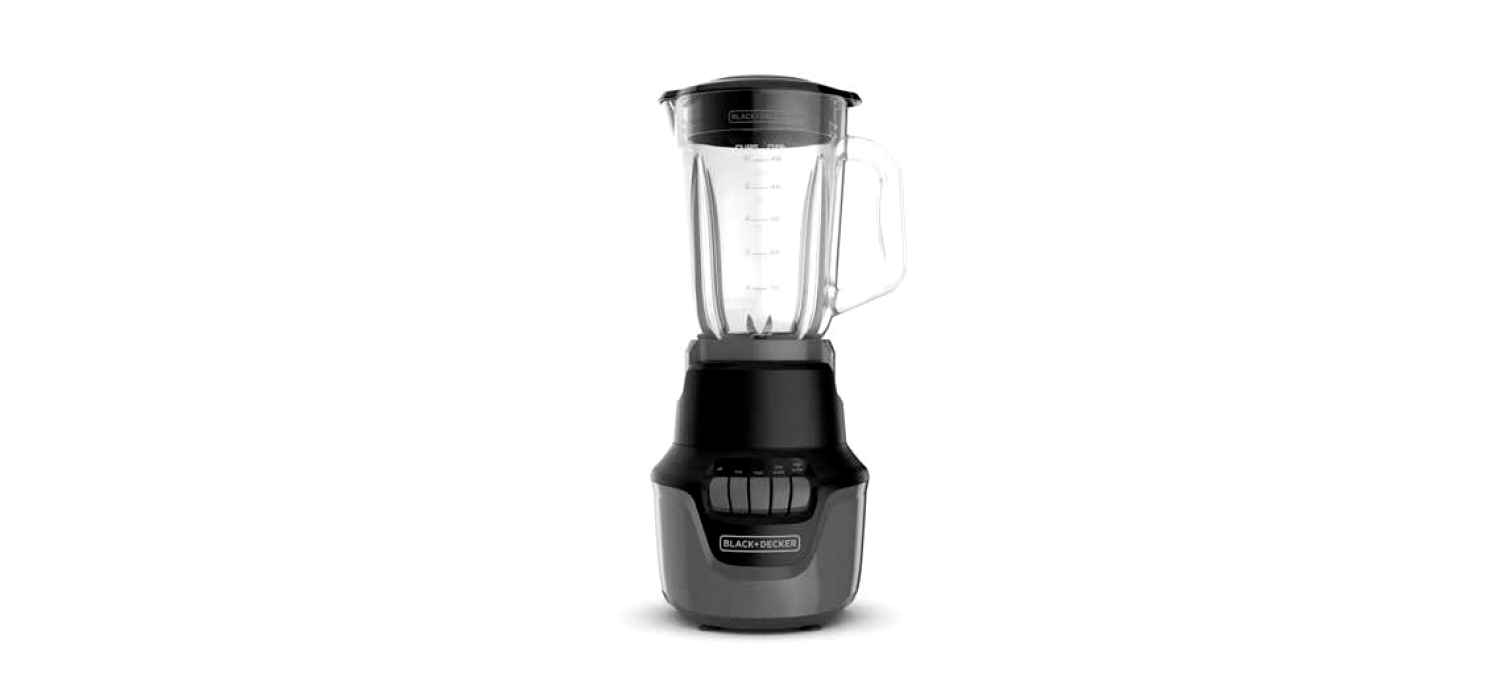
BLACK + DECKERPerformance Helix BlenderUser Manual
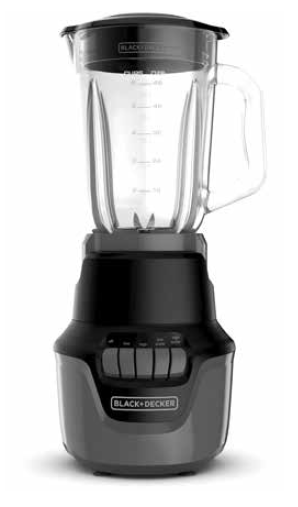

BL1600BG
Use and Care Manual

PLEASE READ AND SAVE THIS USE AND CARE BOOK.
Important Safeguards
When using electrical appliances, always follow basic safety precautions to reduce the risk of fire, electric shock, and/or injury, including the following:
- Read all instructions.
- To protect against risk of electrical shock, do not put blender base, cord or plug in water or other liquid.
- Close supervision is necessary when any appliance is used by or near children.
- Turn the appliance OFF, then unplug from the outlet when not in use, before assembling or disassembling parts and before cleaning. To unplug, grasp the plug and pull from the outlet. Never pull from the power cord.
- Avoid contacting moving parts.
- Do not operate any appliance with a damaged cord or plug or after the appliance malfunctions or is dropped or damaged in any manner. Contact the consumer service number listed in this manual. This appliance has important markings on the plug blade. The attachment plug or entire cordset (if plug is molded onto cord) is not suitable for replacement. If damaged, the appliance must be replaced.
- The use of attachments, including canning jars, not recommended or sold by the appliance manufacturer may cause fire, electric shock or injury.
- Do not use outdoors.
- Do not let the plug or cord hang over the edge of table or counter.
- Do not place on or near a hot gas or electric burner or in a heated oven.
- Keep hands and utensils out of container while blending to reduce the risk of severe injury to persons or damage to the blender. A scraper may be used but must be used only when the blender is not running.
- Blades are sharp. Handle carefully.
- To reduce the risk of injury, never place blade assembly on base without the jar properly attached.Always operate blender with cover in place.
- Do not blend hot liquids.
- Do not use appliance for other than intended use.
- This appliance is not intended for use by persons (including children) with reduced physical, sensory or mental capabilities, or lack of experience and knowledge, unless they have been given supervision or instruction concerning use of the appliance by a person responsible for their safety.
- Children should be supervised to ensure that they do not play with the appliance.
Save these instructions.
This product is for household use only.
Safety Features
Polarized plug (120v models only)
This appliance has a polarized plug (one blade is wider than the other). To reduce the risk of electric shock, this plug is intended to fit into a polarized outlet only one way. If the plug does not fit fully into the outlet, reverse the plug. If it still does not fit, contact a qualified electrician. Do not attempt to modify the plug in any way.
Tamper-resistant screw
Warning: This appliance is equipped with a tamper-resistant screw to prevent removal of the outer cover. To reduce the risk of fire or electric shock, do not attempt to remove the outer cover. There are no user-serviceable parts inside. Repair should be done only by authorized service personnel.
Electrical cord
- A short power-supply cord is provided to reduce the risk resulting from becoming entangled in or tripping over a longer cord.
- Extension cords are available and may be used if care is exercised in their use.
- If an extension cord is used,
- The marked electrical rating of the extension cord should be at least as great as the electrical rating of the appliance,
- If the appliance is of the grounded type, the extension cord should be a grounding-type 3-wire cord, and
- The cord should be arranged so that it will not drape over the countertop or tabletop where it can be pulled on by children or tripped over unintentionally.
Note: If the power cord is damaged, please contact the warranty department listed in these instructions.
Getting To Know YourHELIX™Performance Blender
Press lid to boost blade height, using Blade Boost Technology. The blades reach up through an air pocket into the ingredients above. This allows the blending vortex to reestablish. If air pocket is persistent, add liquid.
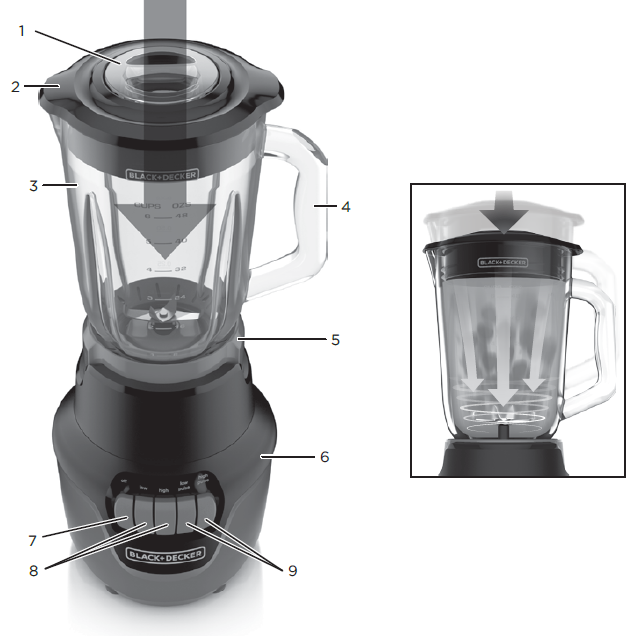
- Measuring cup lid insert(Part# BL1600-02)
- Lid (Part# BL1600-01)
- Blending jar (Part# BL1600-03)
- Handle
- Jar base/Blade assembly(Part# BL1600-04)
- Base
- Off button
- Speed buttons
- Pulse buttons
Product may vary slightly from what is illustrated.
HOW TO USE
This product is for household use only.
GETTING STARTED
- Remove all packing material, any stickers from the product, and the plastic band around the plug.
- Remove and save literature.
- Please visit www.prodprotect.com/blackanddecker to register your warranty.
- Wash all removable parts as instructed in CARE AND CLEANING section of this manual.
BLENDER JAR ASSEMBLY
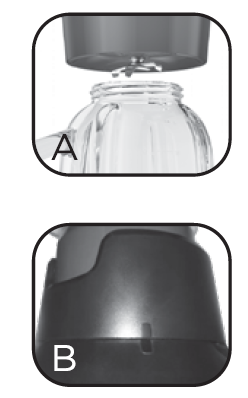
- Turn blending jar upside down and place flat on counter top or work surface.Caution: Blades are sharp. Handle carefully.
- Place jar base/blade assembly onto jar and rotate clockwise until it is tight. (A)
- Turn assembled jar right side up.
- Place lid on blending jar.Note: Make sure the ingredient slot is closed.
- Unwrap power cord from storage area under the base.
- Place jar assembly on base and turn clockwise to lock into place. The marks on the jar assembly will align with the marks on the top edge of the base. (B)
- Blender is now ready for use.
USING YOUR BLENDER
Important: Appliance should always have lid in place when in use.Caution: Do not place blender jar onto base when motor is running.
- Make sure appliance is OFF.
- Place foods to be blended into jar. For best results place ingredients in jar in the following order: liquids, powders, soft foods, hard foods, ice.Note: You must always add a liquid before blending.
- Place lid on jar; make sure measuring cup lid insert is in place.
- Plug power cord into outlet.Note: When in use, do not leave blender unattended. When using hard foods, such as ice or cheese, keep one hand on the lid to keep blender in place.
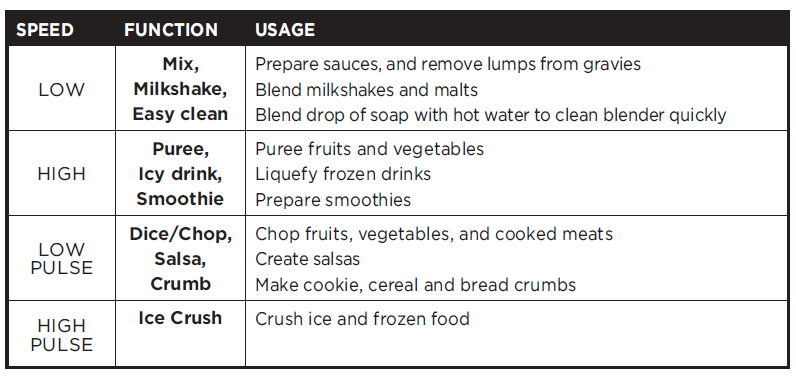
- Select the speed that best suits your desired task.(See SPEED CHART)
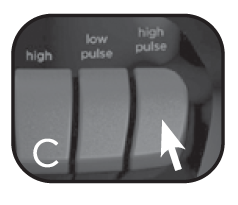
- When blending thick mixtures, such as smoothies and milkshakes, press the High Pulse button for several seconds, then release. Repeat until food has desired consistency. (C)
Note: Use PULSE for no more than five seconds at a time, allowing the blender to rest briefly between each pulse, no more than two minutes total. This helps break up the ice and distribute the ingredients.
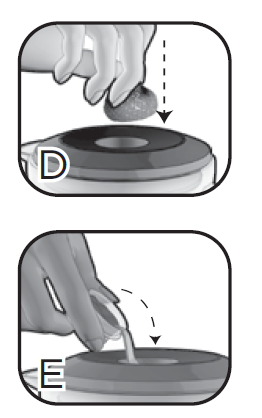
7. Open the lid cap to add ingredients while the blender is running and drop ingredients through the opening (D).
- The lid cap holds up to 1 oz. liquid and can be used as a measure when adding ingredients such as juices, milk, cream and liquor (E).
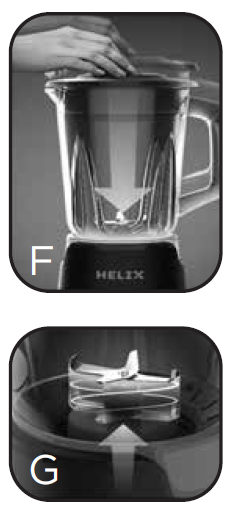
- If air pockets or clogs form in the mixture, press down on the lid to break them up. (F) This lowers the jar and raises the blades within the mixture. (G)
Important: Do not remove the lid while the blender is running.
8. When finished, press the OFF button. Make sure blades have completely stopped before attempting to remove the blending jar from the base.
9. To remove the jar, grasp the handle, turn jar counterclockwise and lift up.
Note: Always unplug the appliance when not in use.
Blending tips and tricks
- Cut food into pieces no larger than ¾” for use in the blender.
- When preparing foods that have several different kinds of ingredients, always add liquid ingredients first.
- When making bread crumbs make sure blender jar is completely dry.
- When using PULSE function; use short bursts. Allow the blades to stop rotating between pulses. Do not use PULSE for more than 2 minutes.
- Use the High Pulse button when crushing ice cubes or anything frozen.For efficient ice crushing, repeatedly press down and release the High Pulse button and the lid in unison.
- It is helpful to begin the blending process on the lowest speed and then increase to a higher speed, if necessary.
- To stop blending at any time, press the OFF button.
- Do not store foods in the blending jar.
- Do not overfill the blender (the blender is more efficient with less rather than more).
- Do not run blender for longer than 1 ½ minutes at a time. Scrape down sides of blending jar, if necessary, and continue blending.
- Do not use if blending jar is chipped or cracked.
- It is not recommended to use your blender to beat egg whites, mix dough, mash potatoes, or grind meats.
- Refrain from tapping or banging the Jar base/Blade assembly on the counter.
Do not place any of the following in the blender:
- Large pieces of frozen foods
- Tough foods such as raw turnips, sweet potatoes and potatoes
- Bones
- Hard salami, pepperoni
- Boiling liquids (cool for 5 minutes before placing in blending jar)
Speed Chart
CARE AND CLEANING
This product contains no user serviceable parts. Refer service to qualified service personnel.
CLEANING:
- Before cleaning, turn off and unplug the appliance.
- Lift the blending jar by the handle off the base.
- Remove jar base/blade assembly by turning it counterclockwise until loose.Caution: Blades are sharp. Handle carefully.
- Combine 1 cup hot water and a drop of liquid dish soap in the blending jar. Cover and blend for about 30 seconds while pressing down on the lid a few times to clean the seal and mechanism.
- Disassemble and wash the removable parts by hand or in the dishwasher. Place the jar on the bottom rack and the rest of the parts on the top rack only.
Important:
- Do not place the jar parts in boiling liquids.
- Do not immerse the base in liquid. Wipe the base with a damp cloth and dry thoroughly.
- Remove stubborn spots by rubbing with a damp cloth and nonabrasive cleaner.
Note: Do not use rough scouring pads or cleansers on parts or finish
RECIPES
CLASSIC SMOOTHIE
This easy-to-blend classic smoothie is a great way to refresh at any time of day!
Ingredients:
- 2 cups apple juice
- 2 medium bananas, halved
- 2 cups whole strawberries, frozen
Directions:Place all ingredients in blender jar in order shown. Cover and blend on High for 30 seconds, or until smooth.Makes about 3 cups.
Tip: Substitute orange juice for apple juice.
QUICK AND EASY SALSA
This fast and easy restaurant-style salsa is a great substitute for fresh Pico de Gallo when tomatoes are no longer in season. Serve it with your favorite chips or as a topping for tacos.
Ingredients:
- 2 (10 oz.) cans diced tomatoes with green chilies
- ½ small onion, quartered
- 1 small jalapeno pepper, seeded, deveined
- 1 clove garlic, peeled and smashed
- ½ cup cilantro, loosely packed
- 1 Tbsp. lime juice
- 1 tsp. sugar
- ½ tsp. cumin
- ½ tsp. salt
Directions:Place ingredients in blender jar, in order shown. Cover and pulse on LOW PULSE for 30 seconds or to desired consistency. For a small batch, cut recipe in half.
NEED HELP?
For service, repair or any questions regarding your appliance, please call our Customer Service Line at 1-800-465-6070. Please DO NOT return the product to the place of purchase. Also, please DO NOT mail product back to manufacturer, nor bring it to a service center. You may also want to consult the website listed on the cover of this pamphlet.
Warranty Information
(Applies only in the United States and Canada)
What does it cover?• Any defect in material or workmanship provided; however, Spectrum Brands’ liability will not exceed the purchase price of product.
For how long?• Two years from the date of original purchase with proof of such purchase.
What will we do to help you?• Provide you with a reasonably similar replacement product that is either new or factory refurbished.
How do you get service?• Save your receipt as proof of date of sale.• Visit the online service website at www.prodprotect.com/blackanddecker, or call toll-free 1-800-465-6070, for general warranty service.• If you need parts or accessories, please call 1-800-738-0245.
How does state law relate to this warranty?• This warranty gives you specific legal rights. You may also have other rights that vary from state to state or province to province.
What does your warranty not cover?• Damage from commercial use• Damage from misuse, abuse or neglect• Products that have been modified in any way• Products used or serviced outside the country of purchase• Glass parts and other accessory items that are packed with the unit• Shipping and handling costs associated with the replacement of the unit• Consequential or incidental damages (Please note, however, that some states do not allow the exclusion or limitation of consequential or incidental damages, so this limitation may not apply to you.)
Are there additional warranty exclusions?• This warranty shall not be valid where it is contrary to U.S. and other applicable laws, or where the warranty would be prohibited under any economic sanctions, export control laws, embargos, or other restrictive trade measures enforced by the United States or other applicable jurisdictions. This includes, without limitation, any warranty claims implicating parties from, or otherwise located in, Cuba, Iran, North Korea, Syria and the disputed Crimea region.

References
[xyz-ips snippet=”download-snippet”]