Nilfisk OM 107412672 Select Instructions
![]()

Instructions for use
Dear Nilfisk customer
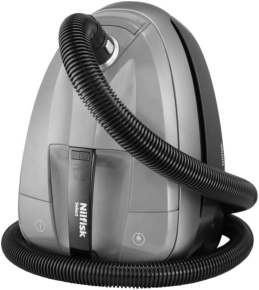
Congratulations on the purchase of your new Nilfisk vacuum cleaner.
Prior to using the appliance for the fi rst time, be sure to read this document through and keep it ready to hand.
Symbols used to mark instructions
 WARNING
Danger that can lead to serious injuries and damage.
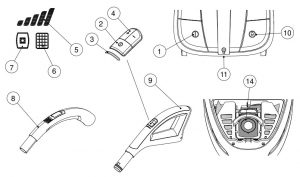
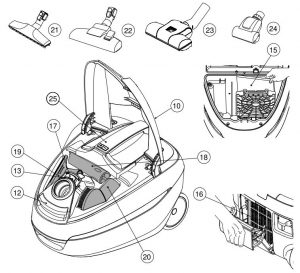
Overview
(illustrations inside front cover)
- On/off button
- On/off button, remote control
- On/off indicator, electronic
- Power level adjustment, remote control
- Power level indicator, electronic
- HEPA filter indicator, electronic
- Dust bag indicator, electronic
- Manual handle
- Remote handle
- Cable rewind button
- Parking bracket
- Open/close button, dust container
- Dust bag indicator (Classic models)
- Dust bag
- Pre-filter
- HEPA filter
- Open/close button, accessory lid
- Crevice nozzle
- Upholstery nozzle
- Brush nozzle
- Hard floor nozzle (not standard on all models)
- Combination nozzle
- Turbo nozzle (not standard on all models)
- Mini Turbo nozzle (not standard on all models)
- Carrying handle
Display symbols on carrying handle
(not standard on all models)
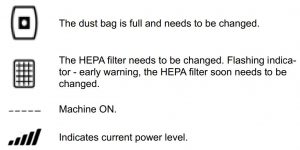
Specifications and details are subject to change without prior notice.
Safety Instructions
WARNING
- Do not use the machine without dust bag and fi lters properly fitted.
- This machine is not intended for the suction of hazardous materials or gas, doing so may expose people to serious health risks.
- The machine must not be used for the suction of water or other liquids.
- Do not pick up sharp objects such as needles or pieces of glass.
- Do not pick up anything that is burning or smoking such as cigarettes, matches or hot ashes.
- Use and store this machine indoors and in a dry environment, 0 °C to 60 °C.
- Do not use the machine outdoors.
- Do not handle the machine with wet hands.
- Turn off the machine before unplugging.
- To unplug, grasp the plug, not by pulling on the electric cable. Do not carry or pull the machine by the electric cable.
- The machine must not be used if the electric cable shows any sign of damage. Regularly inspect the electric cable for damage, in particular if it has been crushed, shut in a door or run over.
- Do not use the machine if it appears faulty. Have the machine inspected by an authorized service centre if the machine has been dropped, damaged, left outdoors or has been exposed to water.
- No changes or modifications to the mechanical or electrical safety devices should be made.
- All repair must be carried out by an authorized service centre.
- Use only original dust bags, original filters and original accessories from your local dealer.
- Use of unauthorized dust bags and filters will void the warranty.
- Turn off the machine and unplug before starting dust bag or filter change, grasp the plug, not by pulling on the electric cable.
- This appliance can be used by children aged from 8 years and above and persons with reduced physical, sensory or mental capabilities or lack of experience and knowledge if they have been given supervision or instruction concerning use of the appliance in a safe way and understand the hazards involved.
- Children shall be supervised to make sure that they do not play with the appliance.
- Cleaning and user maintenance shall not be made by children without supervision.
- If the supply electric cable is damaged, it must be replaced by the manufacturer, its service agent or similarly qualified persons in order to avoid hazard.
- Different types of batteries or new and used batteries are not to be mixed.
- Exhausted batteries are to be removed from the appliance and safely disposed of.
- If the appliance is to be stored unused for a long period, the batteries should be removed.
- The supply terminals are not to be short-circuited.
Instructions for use
Before using the machine make sure that the voltage shown on the rating plate underneath the machine corresponds with the mains voltage.
The machine is supplied with dust bag and pre-filter.Numbers x refer to illustrations on pages 165-167.
Start and stopStartPull out the electric cable and plug the machine to a wall socket.
On/off:Option 1: Use on/off on machineOption 2: Use on/off on the remote control (bend end) – only superior model.
Power can be adjusted between 5 power levels. Current setting is shown on the carrying handle of the machine (only for Comfort/Superior). On the Superior model the power setting can also be adjusted on the remote control (hose handle).
StopTurn off the machine and unplug. Unplug by grasping the plug, not by pulling on the electric cable.
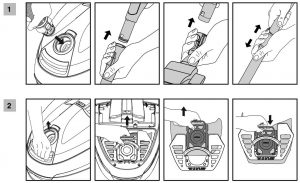
Connecting hose, tube and nozzles
- Insert the hose connector into the suction inlet until it engages by a “click” sound.
- Connect the hose handle to the tube and twist until they engage with a click.
- Connect the tube and nozzle and twist until they engage with a click.
- The tube is telescopic and can be adjusted to your height.Pull out the adjusting handle to extend the tube, and pull back to shorten to desired length.
Disengage
- Disengage the nozzle from the tube by pressing the button.
- Disengage the hose handle from the tube by pressing the button.
- To remove the hose connection from the suction inlet, press button and disengage the hose.
Change of dust bag and filtersThe size and quality of the dust bag and filters affect the machine efficiency. Use of non original dust bags or non original filters can cause restricted air flow which may lead to machine overload. Using non-original dust bag or filters will void the warranty.
The machine is a completely air tight construction. This ensures that air and dirt going into the machine, can only get out through the HEPA filter in the end.
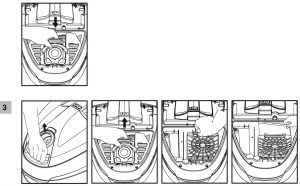
Changing the dust bag
The dust bag indicator shows when to change the dust bag. Always use original dust bags.
- Open the lid by pushing at the latch release in the direction of the arrows.
- Remove dust bag holder from dust compartment.
- Remove dust bag from holder. The dust bag can be closed by pulling the collar handle.
- Insert the new dust bag by guiding the collar into the tracks of the bag holder.
- Place the bag holder in the dust compartment. Check that the dust bag is correctly fi tted into dust compartment.
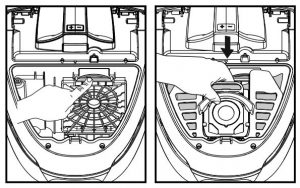
Changing the pre-filter
The pre-filter protects the motor by absorbing micro-particles that the dust bag can not keep. Change the pre-filter with every fourth dust bag. The pre-filter is located behind the dust bag. Always use original filters.
- Open the lid by pulling up at the latch release.
- Remove bag holder with bag from dust compartment.
- Open pre-filter hatch by pulling handle.
- Take out the pre-filter.
- Fit the new pre-filter (ensure that the text is readable) and close the pre-filter hatch.
- Place the bag holder in the dust compartment. Check that the dust bag is correctly fitted into dust compartment.
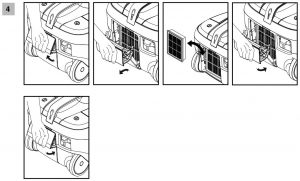
Changing the HEPA filter
The HEPA filter cleans the exhaust air from micro particles the dust bag can not keep. The HEPA filter can not be brushed or washed clean. Comfort and Superior models have a HEPA filter indicator that shows when to change the HEPA filter. For Classic models, change HEPA filter for every 4th dust bag change. Always use original dust bags and filters.
- Open the lid on the back of the machine by pulling the tap.
- Take out the HEPA filter.
- Insert the new HEPA filter. Check that the HEPA filter is correctly fitted. NB: Only touch the filter plastic frame
- Put the lid back and close by pushing the tap in. NB: Assure lid is fully closed.
Adjust the suction powerAll models have a five step adjustment on the carrying handle.The suction power can also be adjusted on the remote handle of the Superior models.
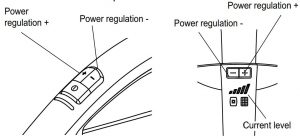
Current level is shown on the carrying handle on Superior/ Comfort models.
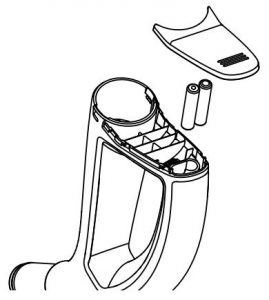
Battery replacement in hose handle:
- Open the lid of the battery holder by sliding the lid towards the front of the hose handle.
- Replace the used batteries with two new ones, type 1.5V AAA. Make sure the polarity of the batteries is placed correct at the bracket.
- Slide the battery lid back until you hear a click.
Parking the tube and nozzle
There are two grooves for parking. One located on the underside of the machine to use when machine stands on the back. The other on the back of the machine, to be used when the machine is standing on its wheels.
Thermal fuseThe machine is fitted with a thermal fuse, which preventsthe machine from overheating. If the thermal fuse blow, themachine automatically switches off the motor and must coolbefore it can be started again.
Restart
- Turn off the machine and unplug from the wall socket.
- Ensure that nothing blocks the air fl ow through hose handle, hose, tube, nozzle, dust bag or filters.
- Let the machine cool.
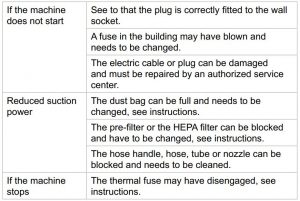
- Plug in the machine again and push start button. The machine will not start until cool enough. If the machine does not start turn it off and unplug. Try again in a while.
WARNING
When activating the automatic cable rewind, care must be taken as the plug at the end of the electric cable can swing during the last part of the rewinding. It is recommended that you hold on to the plug while rewinding.
Cleaning tips
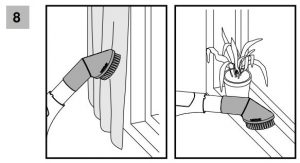
- Crevice nozzleUse the crevice nozzle for narrow spaces
- Upholstery nozzleUse the upholstery nozzle for upholstered furniture
- Brush nozzleUse the brush nozzle for curtains and window sills
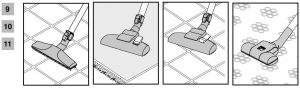
- Hard floor nozzleUse the nozzle for hard fl oors
- Combination nozzleAdjust the combination nozzle depending on type of fl oor
- Turbo nozzleUse the turbo nozzle for effi cent carpet cleaning
- Mini Turbo nozzleUse the mini turbo nozzle for effi cient furniture cleaning
The crevice, upholstery and brush nozzle are located under the accessory lid. The accessory lid is opened by pressing the release button downwards. The lid is closed manually.
The different models of these vacuum cleaners can include different nozzles.
Trouble-shooting
Repair or service of electrical components as electric cable or motor, must only be carried out by an authorized service center.
Service and maintenance
- Store the machine indoors and in a dry environment.
- Change the pre-filter with every fourth dust bag. The dust bag package includes four dust bags and one pre-filter.
- Clean the machine surface with a dry cloth or a damp cloth with a little cleaning agent.
- Order original accessories from a local dealer.
- Service – contact your local dealer.
Recycling and scrappingRecycle the wrapping and scrap the machine acelectric cableing to recommendations from the local authorities. Cut the electric cable as short as possible to avoid that someone gets injured on the scrapped machine.
Environmental commitmentThis machine is designed with the environment in mind. All plastic parts can be used for recycling.
ResponsibilityNilfisk disclaim all responsibility for all damage caused by incorrect use or modification of the machine.
InformationFor more information see www.nilfisk.com
GuaranteeThe guarantee can vary between different countries. Contact your local dealer for information.
Guarantee and Service
This Nilfisk Select Series vacuum cleaner is covered by a five (5) year guarantee on the machine, which covers the motor, cable rewinder, switch and casing. The nozzles, filters, hoses, tubes and other accessories are covered twelve months due to manufacturing fault only and excludes wear and tear.
The guarantee includes spare parts and labour costs, and covers manufacturing and material defects that may occur during normal domestic use.
Service under the guarantee will only be performed if it can be proven that the defect occurred within the product’s guarantee period (a correctly completed guarantee certificate or printed/stamped cash register receipt with date and product type) and on the condition that the vacuum cleaner was bought as a new product and distributed by Nilfisk.
In the event of the repair of defects, the customer must contact Nilfisk to be directed to a service agent at the customers own expense. Upon completion of any repairs necessary, the vacuum cleaner will be returned to the customer at the risk and expense of Nilfisk.
The guarantee does not cover:
- Normal wear and tear of accessories and filters.
- Defects or damage occurring as a direct or indirect result of incorrect use – such as the vacuuming of rubble, hot ashes or carpet deodorant powder.
- Abuse, loss or lack of maintenance as described in the Instructions for use.
- Plaster dust.
- Saw dust.
- Water.
- Should not be used for home renovations.
Nor will it cover incorrect or poor configuration, i.e. setting up or connection, nor fi re-damage, fire, lightning strike or unusual voltage fluctuations or any other electrical disturbances such as defective fuses or defective electrical installations on the supply grid, and defects or damage in general that Nilfisk consider to be the result of causes other than manufacturing and material defects.
The guarantee becomes void:
- If a defect is caused by the use of non-original Nilfisk dust bags and filters.
- If the identity number is removed from the vacuum cleaner.
- If the vacuum cleaner has been repaired by a non-Nilfisk authorized dealer.
- If the machine is used in a commercial environment, i.e. building contractors, cleaning contractors, professional trades or any other non-domestic usage.
The guarantee is valid in:Great Britain, Ireland, Germany, Belgium, Austria, Switzerland, France, Spain, Portugal, Italy, Holland, Sweden, Norway, Denmark, Finland, China, Estonia, Latvia, Lithuania, Poland, Slovenia, Hungary, Czech Republic, Slovakia, Greece, Russia, Turkey, Australia and New Zealand.
Addendum Australia:Our goods come with guarantees that cannot be excluded under the Australian Consumer Law. You are entitled to a replacement or refund for a major failure and for compensation for any other reasonably foreseeable loss or damage. You are also entitled to have the goods repaired or replaced if the goods fail to be of acceptable quality and the failure does not amount to a major failure.
Nilfisk vacuum cleaners for domestic use are warranted for 2 years from the date of purchase by:
Nilfisk Pty LtdUnit 1/13 Bessemer StreetBlacktown NSW 2148Phone: 1300 556 710E-mail:
Find your local service agent here: http://www.nilfi sk.com.au.The benefits under this warranty are in addition to your national law of sale.
WEEE
The symbol ![]() on the product or on its packing indicates that this product may not be treated as household waste. Instead it shall be handed over to the applicable collection point for the recycling of electrical and electronic equipment. By ensuring this product is disposed of correctly, you will help prevent potential negative consequences for the environment and human health, which could otherwise be caused by inappropriate waste handling of this product. For more detailed information about recycling of this product, please contact your local city office, your household waste disposal service or the shop where you purchased the product.
on the product or on its packing indicates that this product may not be treated as household waste. Instead it shall be handed over to the applicable collection point for the recycling of electrical and electronic equipment. By ensuring this product is disposed of correctly, you will help prevent potential negative consequences for the environment and human health, which could otherwise be caused by inappropriate waste handling of this product. For more detailed information about recycling of this product, please contact your local city office, your household waste disposal service or the shop where you purchased the product.
Technical Specifications


Indicative annual energy consumption (kWh per year), based on 50 cleaning tasks. Actual annual energy consumption will depend on how the appliance is used. Measurements done in acelectric cableance with EN 60335-1, EN 60335-2-2 (safety), EN 60312-1 (performance), and EN 60704-1, EN 60704-2 (Noise).
Declaration of Conformity
We,
Nilfisk A/SBanemarksvej 58DK-2605 BroendbyDENMARKhereby solely declare that the product:


Following the provisions of:
Low Voltage Directive 2006/95/ECEMC Directive 2004/108/ECRoHS Directive 2011/65/ECEnergy labelling of vacuum cleaners 665/2013/ECEcodesign requirements for standby and off mode 1275/2008/ECEcodesign requirements for vacuum cleaners 666/2013/EC* R&TTE Directive 1999/5/EC
Hadsund 01-02-2015 Anton Sørensen Senior Vice President – Global OperationsR&D – Vacuum Cleaners and High Pressure Washers


References
SK Sales & Services : บริการงานสอบเทียบ เครื่องมือวัดอุตสาหกรรม รวมถึงจำหน่าย ติดตั้งและซ่อมเครื่องมือวัดอุตสาหกรรมทุกชนิด
The domain name sk.com.ar is for sale
Soner Karaman | Çok Yakında!
SK
SK
Home – Densin-Nilfisk
Simpson Kotzman – Engineering consultants to the Australian building and construction sector.
Sk.co.uk is for sale – PerfectDomain.com
Schütz & Kanomata | Instituto de Idiomas
Congregation Streaming
[xyz-ips snippet=”download-snippet”]