POWERMATIC Stand for PM2014 Lathe User Manual
Assembly instructions
WARNING
 WARNING
- Read and understand all instructions and warnings in your lathe manual before operating lathe on this stand.
- Replace warning labels if they become obscured or removed.
- Always wear eye protection when operating a lathe.
- Make sure all fasteners on stand, and fasteners holding lathe to stand, are securely tightened.
- Failure to comply with the above warnings may result in personal injury, or damage to machine.
 WARNING: This product can expose you to chemicals including lead and cadmium which are known to the State of California to cause cancer and birth defects or other reproductive harm, and phthalates which are known to the State of California to cause birth defects or other reproductive harm. For more information go to http://www.p65warnings.ca.gov
WARNING: Drilling, sawing, sanding or machining wood products generates wood dust and other substances known to the State of California to cause cancer. Avoid inhaling dust generated from wood products or use a dust mask or other safeguards for personal protection. Wood products emit chemicals known to the State of California to cause birth defects or other reproductive harm. For more information go to http://www.p65warnings.ca.gov/wood
Contents of container
2 Upper brackets1 Cross bar4 Levelers with hex nuts1 Hardware package1 Instruction sheet1 Product registration card
Tools required for assembly
9/16in. (14mm) wrench – for levelers and stand assembly 1/2in. (12mm) wrench – for mounting lathe
Assembly
Refer to parts breakdown for any assembly clarification. Numbers in parentheses refer to index numbers in parts list.
- Install two levelers (#11) into each leg. Tighten hex nut against stand.
- Set legs upright and install upper brackets (#1) to desired height. Insert 1-in. long screws through bracket holes into threaded inserts in legs.
- Install cross bar (#3) to holes just below the upper bracket edge.
- Make sure all screws are tight. Turn levelers as needed to achieve level of the stand, then tighten hex nuts against stand.
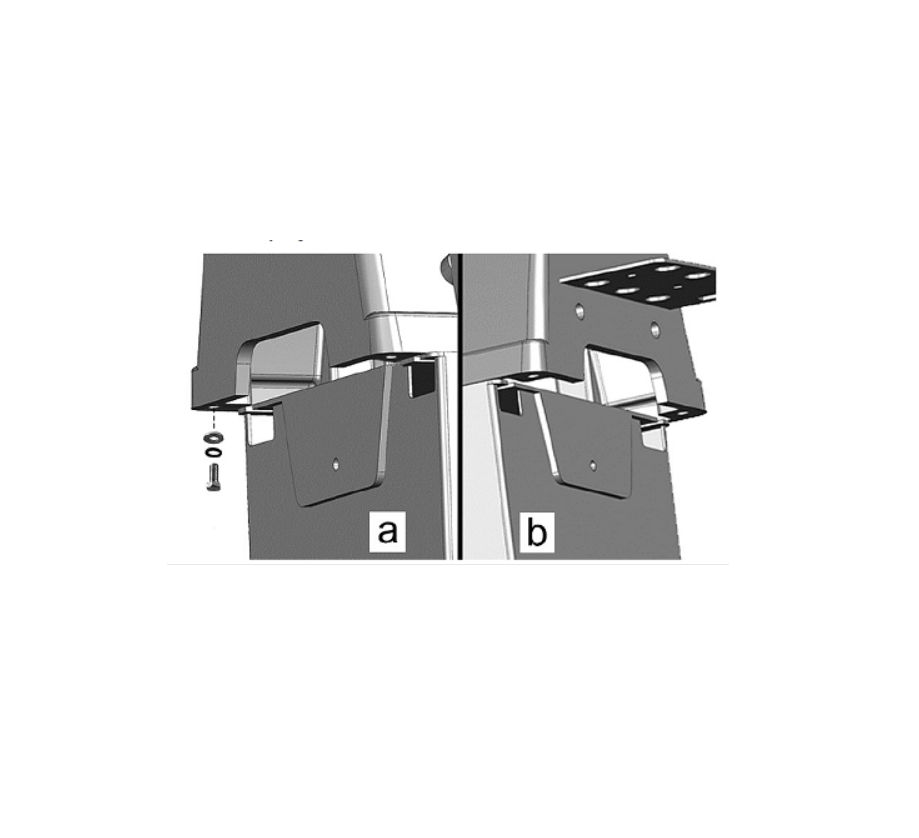
- Unplug lathe from power, and rest lathe upon stand. Orient it so that cross bar (#3) will be at rear of stand
- Slide lathe until one end projects over edge of stand. See Figure 1a. Insert 5/8-inch long screws, two lock washers and two flat washers into the two outer holes and screw them part-way in with your fingers.
- Slide lathe opposite direction until it projects over opposite edge of stand (Figure 1b). Insert two screws with lock washers and flat washers in the samemanner.
- Slide lathe to center it over stand and align the four remaining holes. Insert 5/8-inch long screws, two lock washers and two flat washers.
- Firmly tighten all 8 screws with a wrench.
Parts Breakdown for 1792014S Stand

| #. | Part No. | Description | Size | Qy |
| 1792014S | Stand Assembly | 1 | ||
| 1 | PM2014-401 | Upper Bracket | 2 | |
| 2 | PM2014-402 | Leg | 2 | |
| 3 | PM2014-403 | Cross Bar | 1 | |
| 4 | JWL1221VSS-103 | Cover | 4 | |
| 5 | TS-0051021 | Hex Cap Screw * | 5/16″-18×5/8″ | 8 |
| 6 |
Threaded Insert |
3/8″-16 | 14 | |
| 7 | TS-0060051 | Hex Cap Screw * | 3/8″-16×1″ | 12 |
| 9 | TS-0720091 | Lock Washer * | 3/8″ | 12 |
| 10 | TS-0680042 . | Flat Washer * | 3/8″ | 12 |
| 11 | JWL1642-206 | Leveler | 4 | |
| 12 | TS-0570031 | Hex Nut | 3/8″-16 | 4 |
| 13 | TS-0720081 | Lock Washer * | 5/16″ | 8 |
| 14 | TS-0680031 | Flat Washer * | 5/16” | 14 |
| 1792014S-HP | Hardware package (items with *) |
Some parts are shown for reference only, and may not be available individually.
Specifications
Stock number 1792014SMain material steel plate and tubingNet weight 25 kg (55 lbs.)Shipping weight 29 kg (63.8 lbs.)
Specifications were current at time of publication, but because of our policy of continuous improvement, Powermatic reservesthe right to change specifications at any time and without prior notice, without incurring obligation.
Read More About This Manual & Download PDF:
References
[xyz-ips snippet=”download-snippet”]