
![]()
LEDR4FP/830
USE AND CARE GUIDE
DIMMABLE 4 IN. ROUND FLAT PANELRECESSED DOWNLIGHT
Safety Information
For your safety, always remember to:
- Turn off the power supply at the fuse or circuit breaker box before you install the fixture.
- Ground the fixture to avoid potential electric shock and to ensure reliable starting.
- Double-check all connections to be sure they are tight and correct.
- Wear rubber-soled shoes and work on a sturdy wooden ladder.
- Account for small parts and destroy packing material, as these may be hazardous to children.
This fixture is designed for use in a circuit protected by a fuse or circuit breaker.
FCC STATEMENT: This device complies with part 15 of the FCC Rules. Operation is subject to the following two conditions: (1) This device may not cause harmful interference, and (2) this device must accept any interference received, including interference that may cause undesired operation. Note: This equipment has been tested and found to comply with the limits for a Class B digital device, pursuant to part 15 of the FCC Rules. These limits are designed to provide reasonable protection against harmful interference in a residential installation. This equipment generates, uses, and can radiate radio frequency energy and, if not installed and used in accordance with the instructions, may cause harmful interference to radio communications. However, there is no guarantee that interference will not occur in a particular installation. If this equipment does cause harmful interference to radio or television reception, which can be determined by turning the equipment off and on, the user is encouraged to try to correct the interference by one or more of the following measures: Reorient or relocate the receiving antenna. Increase the separation between the equipment and receiver. Connect the equipment into an outlet on a circuit different from that to which the receiver is connected. Consult the dealer or an experienced radio/TV technician for help. Remove the fixture and the mounting package from the box and make sure that no parts are missing by referencing the illustrations on the installation instructions.Consult a qualified electrician to ensure the correct branch circuit conductor.
WARNING: Risk of fire or electric shock. Installation of this product assembly requires a person familiar with the construction and operation of the luminaire’s electrical system and the hazard involved. If not qualified, do not attempt installation. Contact a qualified person.WARNING: Risk of fire or electric shock. Install this product only in the luminaires that has the construction features and dimensions shown in the photographs and/or drawings and where the input rating of the product does not exceed the input rating of the luminaire. Do not make or alter any open holes in an enclosure of wiring or electrical components during installation.WARNING: To prevent wiring damage or abrasion, do not expose wiring to edges of sheet metal or other sharp objects. This device is not intended for use with emergency exits or not for emergency lighting.WARNING: RISK OF SHOCK. House electric current can cause painful shock or serious injury unless handled properly.CAUTION: Turn off the main power at the circuit breaker before installing the fixture, in order to prevent possible shock.NOTICE: All electrical connections must be in accordance with local and National Electrical Code (N.E.C.) standards. If you are unfamiliar with proper electrical wiring connections obtain the services of a qualified electrician.WARNING: Risk of fire. Use only on 120-volt 60Hz circuits. Suitable for damp locations. Reliable operating temperature is 0˚F –120˚F. This device is for use with most 4 in. recessed fixtures. Turn the power off before installing. Do not look directly into the light. Compatible with most dimmers including Leviton 6681-IW, Lutron S-600P, and Lutron DVCL-153. Dimmable to 10% with most dimmers. If flickering occurs in low-level dimming, increase light level. Before installing your lighting fixture, thoroughly review the enclosed installation manual. If you do not have sufficient electrical wiring experience, please refer to a do-it-yourself wiring handbook or have your fixture installed by a qualified licensed electrician. All electrical connections must be in accordance with Local and National Electrical Code (NEC) Standards. For more information including dimmer compatibility, visit www.feit.com or call our toll-free number 1-866-326-BULB.
Warranty
This product is warranted to be free from defects in workmanship and materials for up to 5 years from date of purchase. If it fails to do so, please contact Feit Electric at [email protected] or call 1-866 326-BULB (2852) for instructions on replacement. Do not return the product to the store.
Pre-Installation
TOOLS REQUIRED

HARDWARE INCLUDED
NOTE: Hardware not shown to actual size.
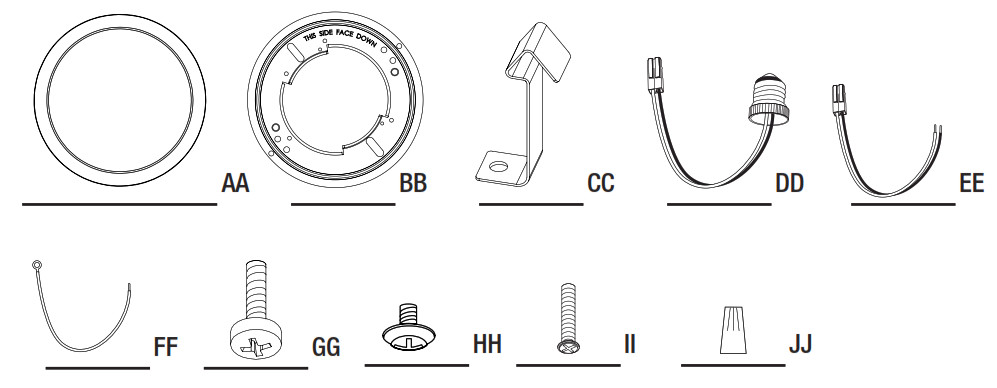
| Part | Description | Quantity |
| AA | 5 in. fixture | 1 |
| BB | Mounting bracket | 1 |
| CC | 4 in. mounting clip spring | 3 |
| DD | E26 adapter with male connector | 1 |
| EE | Stripped wires with male connector | 1 |
| FF | Ground wire | 1 |
| GG | 4 in. mounting clip spring screws | 3 |
| HH | Ground wire screw | 1 |
| II | J-Box mounting screws | 2 |
| JJ | Wire nuts | 3 |
4 in. Recessed Can Installation
1 Turning Off the Power
- Turn the power OFF at the switch and fusebox or the circuit breaker.
- Remove the existing trim installed in the recessed housing.
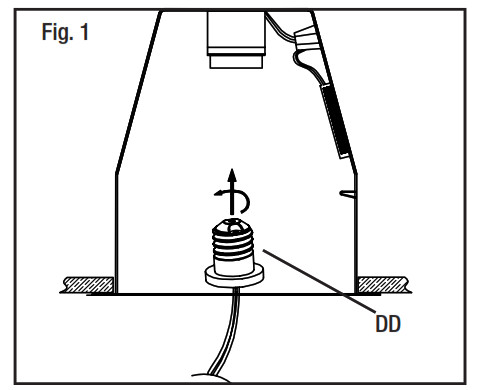
2 Installing the adapter
- Install the E26 adapter (DD) into the socket. (Fig. 1)
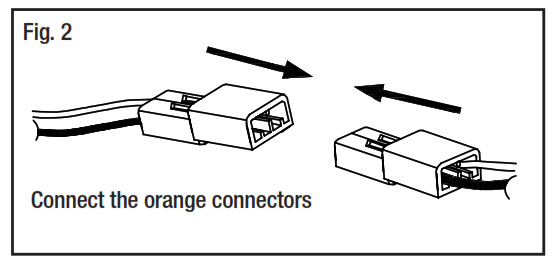
Connecting the terminals
- Connect the two terminals together. (Fig. 2)
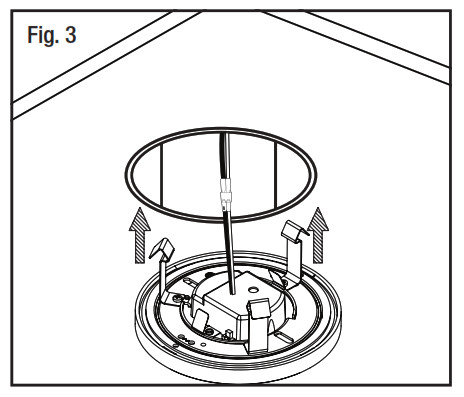
4 Installing the fixture
- Gently push the fixture into the recessed housing. (Fig. 3)
J-Box Installation
1 Turning Off the Power
- Turn the power OFF at the switch and fusebox or the circuit breaker.
- Remove the existing trim installed in the recessed housing.
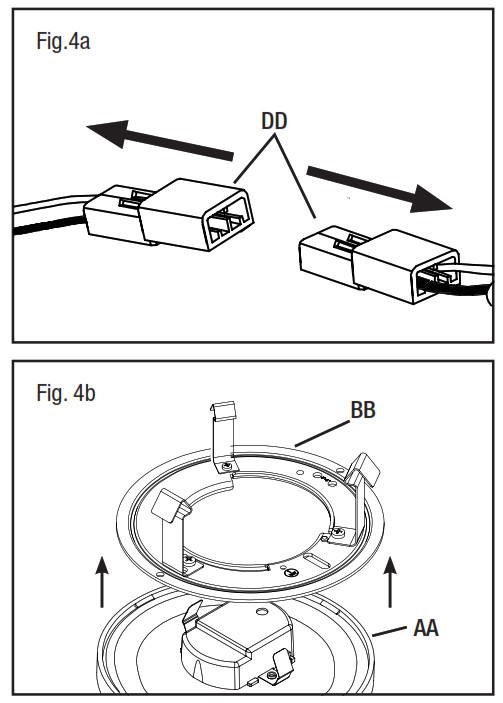
2 Disconnecting and removing components
- Disconnect the E26 adapter (DD). (Fig. 4a)
- Remove the mounting bracket (BB) from the fixture (AA). (Fig. 4b)
- Remove the 4 in. mounting clip springs (CC) from the mounting bracket (BB). (Fig. 4c)

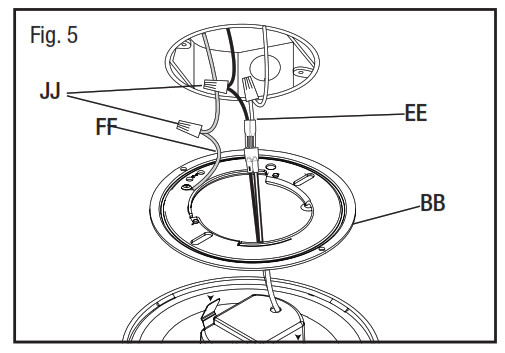
3 Identifying the wires
- Identify the wiring: (black-line voltage, white-neutral and green – ground)
- Use the wire nuts (JJ) to connect the stripped wires with male connector (EE) to the two wires coming from the J-box (black-line voltage, white-neutral).
- Determine if the ground wire is inside the J-box. If not, then secure the ground wire (FF) provided to the mounting bracket (BB). (Fig. 5).
4 Installing the mounting bracket to the junction box
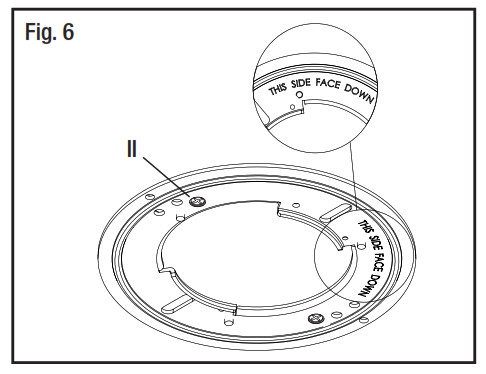
- Install the mounting bracket (BB) to the J-box by inserting the two mounting screws (II) through the slots in the mounting bracket (BB).
- Make sure the mounting bracket (BB) is installed with the label facing downwards. (Fig. 6)
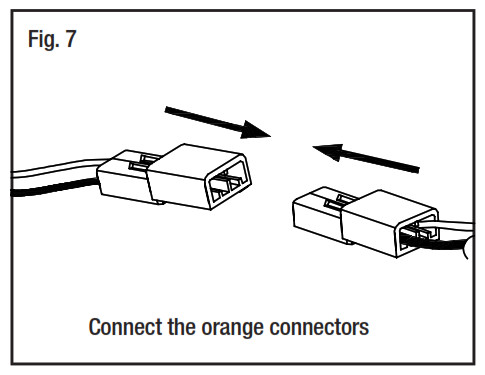
5 Connecting the terminals
- Connect the two terminals together. (Fig. 7)
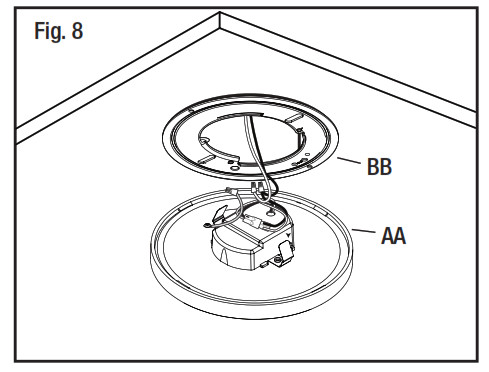
6 Installing the fixture
- Secure the fixture (AA) to the mounting bracket (BB) by pressing the fixture into the mounting bracket until the clips on the fixture engage together. Make sure the fixture is firmly locked into place. (Fig. 8)
WWW.FEIT.COMRetain this manual for future use.
FEIT ELECTRIC COMPANY | PICO RIVERA, CA | (800) 543-3348 | FAX (562) 908-6360 | www.feit.com
References
[xyz-ips snippet=”download-snippet”]