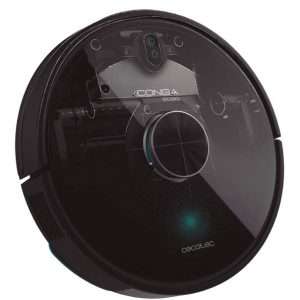
CONGA 6090 Ultra Robot Aspirator User Manual
The expert for robots in your home
With one click to the online shop


 Do not use in water-logged in water-logged environment
SAFETY INSTRUCTIONS
Read these instructions thoroughly before using the appliance. Keep this instruction manual for future reference or new users.
This product must be used in accordance with the directions in this instruction manual. Cecotec cannot be held liable or responsible for any damages or injuries caused by improper use.
Make sure that the mains voltage matches the voltage stated on the rating label of the appliance and that the wall outlet is grounded.
This product can only be disassembled by qualified personnel.
Do not touch wires, power supplies or power adapters with wet hands.
Keep the robot away from clothing, curtains and any other similar materials.
Do not sit or place heavy or sharp objects on top of the appliance.
Do not operate the appliance close to heat sources, flammable substances, wet surfaces where it can fall or be pushed into water or allow it to come into contact with water or other liquids. Do not use outdoors.
Do not use the charging base if it has a damaged cord or plug or if it is not operating properly. In case of fault or malfunction, contact the official Technical Support Service of Cecotec.
Do not operate the device on tables, chairs or other high surfaces where it could fall.
Do not use the laser protection as handle when moving or holding the robot.
Do not operate the product in places where temperature is below 0 ºC or above 40 ºC.
The appliance can only be operated with the supplied battery and power adapter. The use of other components or accessories could cause risk of fire, electric shock or product damage.
Do not use the device to vacuum flammable or burning objects such as cigarettes, matches or ash.
Before operating the robot, please remove any object on the floor such as clothing, papers, power cords or other items that may obstruct the device.
The appliance is not intended to be used by children under the age of 8. It can be used by children over the age of 8, as long as they are given continuous supervision.
This appliance can be used by children aged 8 and above, and persons with reduced physical, sensory or mental capabilities or lack of experience and knowledge, as long as they have been given supervision or instruction concerning the use of the appliance in a safe way and understand the hazards involved.
Do not allow children to play with the appliance. Supervise children, they shall not play with the appliance. Close supervision is necessary when the appliance is being used by or near children.
1. PARTS AND COMPONENTS
Robot:Fig.1.
- Back home mode
- Power/Automatic cleaning button
- Network configuration
Robot and sensorsFig.2.
- Laser sensor
- Top cover
- Back home/Power/Autocleaning mode
- Infrared receiver sensor
- Anti-collision sensor
- Omnidirectional wheel
- Charging terminals
- Battery
- Side brush
- Bumper
- Motor cover
- Main brush: For cleaning all types of surfaces
- Left side wheel
- Right side wheel
- Silicone brush: Special for pet hair
- Jalisco brush: Specific for hard floors
- Optical sensor: Specific for preventing the robot from bumping
Wet & Dry tankFig.3.Water compartment
- Tank lock
- Water inlet
- Water tank
Dust compartmentFig.4.
- High-efficiency filter
- Dust compartment
Dust tankFig.5.
- Dust tank
- Primary filter
- High-efficiency filter
- Dust tank cover
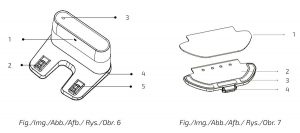
Charging baseFig.6.
- Signal transmission area
- Charging terminal
- Charge indicator
- Cable slot
- Charging terminal
Mop bracket and clothFig.7.
- Mop
- Mop bracket
- Velcro
- Tab
2. BEFORE USE
Take the product out of the box and remove all packaging materials.Make sure all parts and components are included and in good conditions. If any sign of visible damage is observed, contact immediately with the official Technical Support Service of Cecotec.
3. INSTALLATION
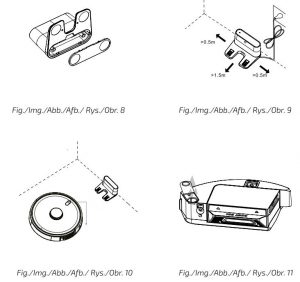
Robot and charging base installation Fig.8.
Connect the charging base to a power supply and store the remaining cable. It is important tostore the remaining cable at the bottom of the charging base to avoid it from being draggedand disconnected.
Place the charging base against the wall, leaving the safety distance indicated in the below picture
Note: Ensure a space of at least 1 m on both the left and right side of the charging base, and a space of at least 2 m in front of it. Fig.9.
Warning: Do not expose the charging base to direct sun light.
Long press the power button for 3 seconds; when the light indicator turns on, place the roboton the charging base.Fig.10.
Steady blue light: ON/operatingOscillating orange light: ChargingRed light blinks: Error
Note:Take the robot to the charging base if the battery is low. The robot might not turn on if thebattery is very low.The robot will automatically turn on when placed on the charging base.The robot cannot be turned off during charging.
Wet & dry and dust tank installationNote: It is not suggested to use the scrubbing function for the first-time use.
Open the tank’s blue silicone lid, fill the tank with water carefully so water does not come outand close it again. Make sure the silicone clip is properly closed to avoid water from pilling.Fig.11.
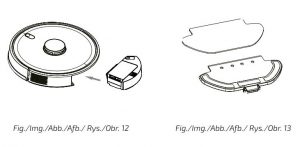
Install the tank in the robot following the indicated direction. Make sure the clip is properlyfastened.Fig.12.
Only for Wet & dry tank installation:Attach the mop to the bottom part of the mop bracket with the Velcro.Fig.13.
Manually press the clips on both sides of the Wet & dry tank and push it into its correct position. You will hear a click when it is properly fixed.Fig.14.
Recommendations:Do not use the scrubbing function while the robot is unattended.Remove the mop bracket when the robot is charging or not in use.If there are carpets in the house, set Restricted Areas to avoid the robot from passing over them.Add some drops of cleaning agent (not corrosive) if considered necessary.To remove the mop bracket, press the release button and pull from it outwards.
Warnings:Using cleaning agents in excess might block water outlets.In order to achieve perfect scrubbing, it is suggested to moisten the mop before using it.
First cleaningOnce the robot and the charging base are completely installed, follow these steps before scheduling the first cleaning cycle.
First of all, the robot must be fully charged. It is suggested to allow the robot to charge overnight. When it is fully charged, it may carry out the first cleaning cycle and save the first map. To do so, activate Auto cleaning mode and Eco power level. It is very important to followthese indications for the robot to recognize each and every corner in the house and to create a complete map.
If the house where the robot is going to be used is too big and the robot runs out of battery, do not worry. The robot returns to the charging base, saves the full map and those that have not been completed, and once it is charged again, it resumes the cleaning cycle from the point it has stopped until it maps the whole surface. The robot keeps on mapping constantly, therefore it adapts independently to each house’s features and continuously improves
4. OPERATION
Once the robot’s light indicator changes from oscillating orange to steady blue, the battery is fully charged, and the robot is ready to operate.
The robot cannot operate with low battery.Recommendations: Remove all cables and obstacles from the floor before operating the robot in order to avoid accidents and damage.
Robot buttonsFig.15.
Auto modePress the power button on the robot for it to start cleaning automatically, first a cleaning cycle in Edge mode and then another cycle in and organized zigzag motion, recognizing which areas it has cleaned and which ones it has not. The robot will automatically plan the cleaning route as it is cleaning. If during this mode the robot is controlled manually, the robot will calculate the route again and could go through previously cleaned areas. In order to ensure efficient cleaning, do not operate it manually during auto mode cleaning.
Thanks to its Total Surface 3.0 technology, if the battery is low during the cleaning cycle, the robot will smartly return to the charging base automatically and, once it is fully charged, it will resume the cleaning process from the same point, offering a high-efficiency cleaning.
In order to optimise the whole process, the robot will automatically calculate the necessary charging time according to the surface to be cleaned. During cleaning, the robot will stop briefly to evaluate the area and calculate the cleaning route (this stop will vary depending on the house conditions).
Note: The robot cleans in an organized way and per 4×4 m squared areas, therefore it might leave the room where it is cleaning to finish off the delimited area. Do not worry, the robot will clean all the accessible surface.
Back home modePress the Back home buttonThis mode can be activated during any other cleaning cycle and the robot will stop cleaning and return to the charging automatically.
The robot will take the shortest route back to the charging base thanks to its map memorizing and the smart back home function.
When a cleaning cycle has been completed or the robot’s battery is low, thanks to its Total Surface 3.0 technology, the robot will also return to the charging base to avoid running out of battery. Once the robot has recharged, it will resume cleaning from the point it has stopped.
Recommendation: Remove the Wet & dry tank during charging.
Remote controlFig.16.SchedulePower levels (Turbo/Normal/Eco)Back homeClockManual controlOn/PauseEdge mode
Remote control bindingIf the robot does not respond to the remote control, follow the below steps:Press the Edge mode button on the remote control for 5 seconds for the remote control to enter pairing mode. The screen will display 8888.The remote receiver will be activated in 5 seconds and will enter pairing mode. The remote control’s signal is received and the remote control returns to normal status. The display will show pairing is completed.
If the pairing process is unsuccessful, the remote control will display 8888 and will exit thepairing mode after 30 seconds.
The following modes and operations can be activated from the remote control.Modes
The first time the robot is operated, it will map and save the whole house’s map by means of its laser before starting the cleaning cycle. Use the robot in Auto mode and Eco power level, this way you will ensure the robot memorizes the full map.
Note: Make sure the light indicator is lighted in blue before starting cleaning, indicating it isactivated. If not, press any button on the remote control to wake it up.
Auto modeFig.17.Press the power button on the remote control for it to start cleaning automatically, first a cleaning cycle in Edge mode and then another cycle in and organized zigzag motion, recognizing which areas it has cleaned and which ones it has not. The robot will automatically plan the cleaning route as it is cleaning. If during this mode the robot is controlled manually, the robot will calculate the route again and could go through previously cleaned areas. In order to ensure efficient cleaning, do not operate it manually during auto mode cleaning.
Thanks to its Total Surface 3.0 technology, if the battery is low during the cleaning cycle, the robot will smartly return to the charging base automatically and, once it is fully charged, it will resume the cleaning process from the same point, offering a high-efficiency cleaning. During cleaning, the robot will stop briefly to evaluate the area and calculate the cleaning route (this stop will vary depending on the house conditions).
Note: The robot cleans in an organized way and per 4×4 m squared areas, therefore it might leave the room where it is cleaning to finish off the delimited area. Do not worry, the robot will clean all the accessible surface.
Note: Press the power levels button to switch between the 3 modes: Turbo/Normal/Eco.
Back home modeFig.19.Press the Back-home button on the remote control in order to send the robot to the charging base. This function can be activated during any other cleaning cycle and the robot will automatically return to the charging base and stop the cleaning process. The robot will take the shortest route back to the charging base thanks to its map memorizing and the smart back home function.
When a cleaning cycle has been completed or the robot’s battery is low, thanks to its Total Surface 3.0 technology, the robot will also return to the charging base to avoid running out of battery. Once the robot has recharged, it will resume cleaning from the point it has stopped.
Warnings:Remove the Wet & dry tank from the robot before charging it.Make sure there are no obstacles in the room being cleaned to ensure the robot can get to thecharging base without problems.
FunctionsPauseWhile the robot is operating, press the power button on the App, the remote control or on therobot to pause it and press the same button again to resume cleaning.
StandbyThe robot will automatically enter standby mode after 5 minutes of no operation.Press the power button on the App, the remote control or on the robot to start it up again.
Warnings:After 12 hours of no operation, the robot will turn automatically off.The robot will not enter standby mode during charging.
Suction power levelPress the power levels button on the remote control to select the desired power level.Choose between Eco (low power), Medium (medium power) and Turbo (high power).
ScheduleWarning: The robot cannot be scheduled from more than one device at a time. Make sure toschedule it either from the mobile phone App or from the remote control.
The robot is provided with a schedule function in order to provide a maximum-efficiency cleaning. The time settings and the cleaning scheduling must be carried out from the remote control. Once the robot has been scheduled, it will automatically carry out the cleaning cycles every scheduled day.
Note: Make sure the robot is activated and that the light indicator is lighted before schedulingany cleaning or setting time.
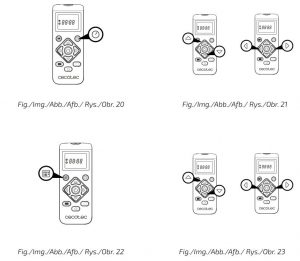
Current timeFig.20.Hold down the time button for 3 seconds. The first 2 digits, indicating the hour, will start blinking.
Use the up and down direction buttons to set the current time. Then, use the left and rightbuttons to switch from hours to minutes and repeat the before step.Fig.21.
Press the time button to save the settings.Scheduling cleaning tasksLong press the schedule button for 3 seconds. The first 2 digits, indicating the hour, will startblinking.
Fig.22.Use the up and down direction buttons to set the schedule time. Then, use the left and rightbuttons to switch from hours to minutes and repeat the before step.
Fig.23.Press the schedule button again to save the settings.To cancel the scheduled cleaning, follow the below steps:Set the clock on the remote control at 00:00 a.m. and save it.Switch the robot off for 1 minute and switch it on again.
Note: The robot will beep to indicate all settings have been saved.Warning: When the remote control’s batteries are replaced, the clock and schedule timesmust be set again.
Light indicator:Operating: Steady blue light.Low power: Orange light blinks slowly.Charging: Orange light oscillates.Network configuration: Blue light.Start-up/firmware update: Blue light oscillates.Error: Red light flashes quickly.
5. MOBILE APP AND WI-FI CONNECTION
In order to access all the robot’s functions from wherever you are, it is suggested todownload the Conga 6090 App. You will be able to control the robot in the most efficient way,enjoying the excellence of cleaning.
App advantages:Control your robot in an easy and intuitive way.Activate the cleaning process from any point.Carry out settings and daily scheduling.Choose between its different cleaning modes: Auto, Spiral, Edge, Manual, Twice, Restricted area, Spot, Smart area, back home or Scrubbing.View how the robot creates an interactive map as it is cleaning.Manage rooms smartly through its Room Plan function, which allows you to join, separate orname rooms. Plus, create and schedule your own cleaning plans by selecting the rooms youwant to clean, the mode and power level.Check the cleaned surface and the time taken.Check the cleaning history.The App supports 5 GHz networks.*This model is compatible with voice virtual assistants Google Assistant and Alexa
Warnings:The Wi-Fi name and password cannot exceed 32 bits.If the network configuration fails to connect, follow the steps below:Press the power button for 5 seconds, the robot will enter sleeping mode and the Wi-Filight indicator will blink fast indicating connection error. Retry connecting the robot againfollowing the steps in the before section.If the connection fails again, check if:a. The robot is too far away from the router.b. The Wi-Fi password is incorrect.
The following modes can be activated from the App:Auto mode: Select this mode for the robot to clean 4×4 m quadrants. Within this space, itwill carry out a first cleaning cycle in Edge mode and then in zigzag motion to complete thesurface. Once it has finished, it will directly return to the charging base.It can be activated from the App or the remote control.
Note: The robot could leave the room to complete the cleaning cycle in some of thequadrants. This will not affect the robot’s operating, do not worry.
Edge mode: Select this mode for the robot to clean along walls and furniture.It can be activated from the App or the remote control.
Spiral mode: When this mode is selected, the robot will start cleaning in a specific point, by moving in an outward spiral motion and then returning to the starting point in an inward spiral motion at maximum power. Then, it will return directly to the charging base.It can only be activated from the App.
Scrubbing mode: When this mode is activated, the robot moves in a swaying motion, simulating real scrubbing moves. It starts off cleaning in Edge mode, then in zigzag motion and finally returns to the charging base taking the straightest way back home.
It can only be activated from the App.
Manual mode: To carry out manual cleaning, use the direction buttons on the remote controlor on the App to take the robot to the specific points where you want it to clean.It can be activated from the App or the remote control.
Back home mode: Select this mode at any point of any cleaning cycle and during any of themodes, the robot will automatically return to the charging base.It can be activated from the robot, the remote control or the App.
Smart Area mode: Once the home’s map has been saved, select this mode for the robot to clean a specific area in zigzag motion. The robot will clean the selected area and then will return directly to the charging base. You can set more than 1 area at the same time. The robot will only clean the area selected in the map; therefore it will go to the point and return to the base without vacuuming.It can only be activated from the App.
Spot mode: Select this mode if you want to clean thoroughly a specific point in the map, making the most of the robot’s maximum power. The robot will clean a 2×2 m zone in zigzag motion and then will return directly to the charging base when cleaning is completed. The robot will only clean the area selected on the map; therefore it will go to the point and return to the base without vacuuming.It can only be activated from the App.
Restricted Area mode: Select this mode and delimit in the map specific areas where you donot want the robot to clean. You can set more than 1 restricted area at the same time on themap. It can only be activated from the App.
Twice mode: Use this mode to carry out a deep, thorough cleaning of your home.It can be combined with Edge, Spiral, Spot or Smart Area modes. The robot will carry out 2 fullcleaning cycles and then will return directly to the charging base.
Final cleaningBefore returning to the charging base, the robot moves forward and backward several timesin order to eliminate any rests of dust from the brush.
6. CLEANING AND MAINTENANCE
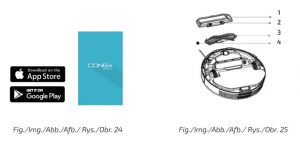
Main brushTurn the robot around and press the main brush’s release button to take the cover out.Take the main brush out and clean the compartment.Clean the main brush with the provided tools and use water and soap if necessary.
Place the main brush in its position and fasten the cover’s clip.Recommendation: Replace the main brush every 6-12 months to ensure efficient operating(depending on the frequency and type of use).
Fig.25.Main brush coverTabMain brushCompartment
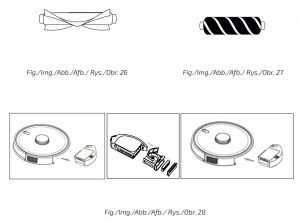
Silicone brushFig.26.To clean the silicone brush, follow the instructions on the previous section to remove it fromthe robot and wash it with water and soap. Dry it thoroughly before assembling it back inorder to ensure efficient operation.
Jalisco brushFig.27.To clean the Jalisco brush, follow the previous section’s steps to take it out and clean it withwater. Dry it thoroughly before assembling it back in order to ensure efficient operation.
Dust tankFig.28.Take the dust tank out.Open the dust tank cover and empty it.Use the cleaning brush to clean the inside of the dust tank.Install the dust tank back in the robot.
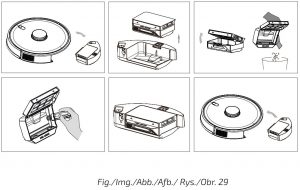
Wet & dry tankFig.29.Take the Wet & dry tank out.Detach the dust compartment from the rest of the tank.Open dust compartment and empty it.Use the cleaning brush to clean the dust compartment.
Assemble the dust compartment in the Wet & dry tank.Install the Wet & dry tank back in the robot.If the Scrubbing mode has been used, empty the water tank and then fill it with clean water torinse it. Empty it again before installing it back in the robot.
High-efficiency filterFig.30.Remove the high-efficiency filter and shake it to remove all the dust.Note:Replace the high efficiency filter every 3 months depending on the frequency and type of use.Clean the filter periodically with a brush to avoid blockage. Do not use water or detergents.
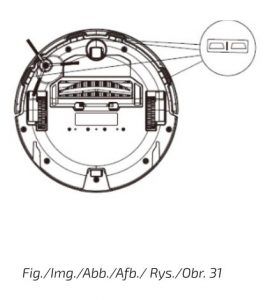
Side brushFig.31.Remove and clean the side brushes regularly.Recommendation: In order to ensure a perfect cleaning, it is suggested to replace the sidebrushes every 3 months, depending on the frequency and type of use.
Free-fall sensorsFig.32.Clean the free-fall sensors with a soft cloth regularly.Warning: Always transport the product turned off and in its original package.
7. BATTERY REPLACEMENT AND CHARGING
Do not use any other battery, power adapter or charging base than the one officially providedby Cecotec.Do not use non-rechargeable batteries.Do not remove, dismantle or attempt to repair the battery or the charging base.Do not place the charging base near heat sources.Do not use a wet cloth to wipe any of the parts of this product.If the robot is not going to be used for a long time, remove the battery from the product andstore it in a dry and safe place. It is suggested to charge the battery every month in order toavoid damage to the battery.Do not dispose of waste batteries at will. It is suggested to hand them over to professionalorganizations for correct treatment.
8. TROUBLESHOOTING
Problem
- The robot does not start up or does not clean.
- The robot cannot charge or return to the charging base.
- The robot does not work properly.
- The robot emits a strange noise during cleaning.
- The robot does not clean efficiently or dust leaks from the robot.
- The robot could not connect to Wi-Fi.
- The robot did not carry out the scheduled cleaning task.
- The robot does not return to the charging base after spot cleaning or after changingstarting position.
- The robot does not resume cleaning.
- The robot is always offline.
- Connection between the mobile phone and the robot failed.
Solution1.1. The robot cannot operate with low battery. Allow it to charge before operating it.1.2. The room temperature is below 0 ºC or above 50 ºC. Operate the robot in a room where the temperature is between the stated temperature range.2.1. There are too many obstacles near the charging base, relocate the charging base to an area free of obstacles.2.2. Clean the charging terminals.2.3. Make sure the power switch is turned on.2.4. The robot is too far away from the charging base, place it closer and try again.2.5. There is very little free space around the charging base. Make sure the charging terminals are clean.
3.1. Turn the robot off, switch it off and turn it on again.3.2. Once the robot is turned on and has left the charging base, hold down the Back home button on the robot until it beeps. Immediately after, let go the button and press it again until the robot starts speaking. This way the robot will be restarted.
4. The main brush, side brush or omnidirectional wheel may have foreign matters tangled, stop the robot and clear it up.
5.1. The dust tank is full. Empty it and clear the high-efficiency filter if it is blocked.5.2. The high-efficiency filter is blocked, clear it.5.3. The main brush is tangled with foreign matter, please clear it up.
6.1. The Wi-Fi signal is poor. Make sure the Wi-Fi signal is correct.6.2. The Wi-Fi connection is unstable. Reset the router, check if there are any App updates and try again.
6.3. Make sure your device’s mobile data are deactivated to improve the binding process.
7.1. Check if the robot is in Night mode and switch mode. The robot does not carry out scheduled cleaning cycles under this mode.7.2. Make sure the robot is connected to the network, it will not be able to carry out scheduledcleaning tasks without being connected.
8.1. The robot will map and calculate a new route after operating under spot cleaning or afterhaving changed its starting position.8.2. If the charging base is very far away from the robot, it will not be able to charge backautomatically. Put the robot back on the charging base manually.
9. Make sure the robot is not in Sleep mode, it will not resume cleaning under this mode. It won’t resume cleaning when it is placed manually on the charging base.10. Make sure the robot is successfully connected to the network and always in the range covered by the Wi-Fi signal.11. Make sure the robot and the charging base are in an area with good Wi-Fi signal, reset therouter and try connecting them again.
9. TECHNICAL SPECIFICATIONS
- Model: Conga 6090 Ultra
- Product reference: 05554100-240 V~ 50/60 Hz
- Battery: 14,8 V, 6400 mAh
- Frequency bands: 2.412-2.472 GHz 5.150-5.250 5.250-5.350 GHz 5.470-5.725 GHz
- Maximum Transmission Power: 16 dBm
Made in China | Designed in Spain
10. DISPOSAL OF OLD ELECTRICAL APPLIANCES
![]() The European directive 2012/19/EU on Waste Electrical and Electronic Equipment (WEEE), specifies that old household electrical appliances must not be disposed of with the normal unsorted municipal waste. Old appliances must be collected separately, in order to optimize the recovery and recycling of the materials they contain and reduce the impact on human health and the environment.
The European directive 2012/19/EU on Waste Electrical and Electronic Equipment (WEEE), specifies that old household electrical appliances must not be disposed of with the normal unsorted municipal waste. Old appliances must be collected separately, in order to optimize the recovery and recycling of the materials they contain and reduce the impact on human health and the environment.
The crossed out “wheeled bin” symbol on the product reminds you of your obligation to dispose of the appliance correctly.
Consumers must contact their local authorities or retailer for information concerning the correct disposal of old appliances and/or their batteries.
11. TECHNICAL SUPPORT AND WARRANTY
This product is under warranty for 2 years from the date of purchase, as long as the proof of purchase is submitted, the product is in perfect physical condition, and it has been given proper use, as explained in this instruction manual.
The warranty will not cover the following situations:
The product has been used for purposes other than those intended for it, misused, beaten, exposed to moisture, immersed in liquid or corrosive substances, as well as any other fault attributable to the customer.
The product has been disassembled, modified, or repaired by persons, not authorised by the official Technical Support Service of Cecotec.
Faults deriving from the normal wear and tear of its parts, due to use.
The warranty service covers every manufacturing defects of your appliance for 2 years, based on current legislation, except consumable parts. In the event of misuse, the warranty will not apply.
If at any moment you detect any problem with your product or have any doubt, do not hesitate to contact Cecotec Technical Support Service at +34 963 210 728.
Pictures
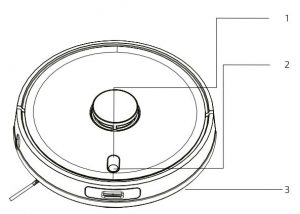
FIG 1
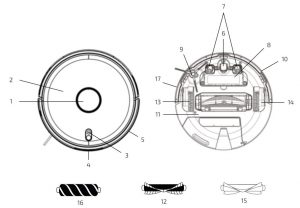
FIG 2




Grupo Cecotec Innovaciones S.L.C/ de la Pinadeta s/n, 46930Quart de Poblet, Valencia (Spain)IC02200728
References
[xyz-ips snippet=”download-snippet”]

