 H-5116 OHAUS AVIATOR™ 7000 PRICE COMPUTING SCALE
 H-5116 OHAUS AVIATOR™ 7000 PRICE COMPUTING SCALE
1-800-295-5510uline.com
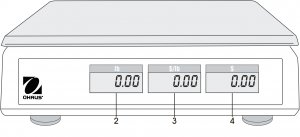
OVERVIEW OF CONTROLS
CONTROL PANEL
Vendor Display Vendor Keyboard
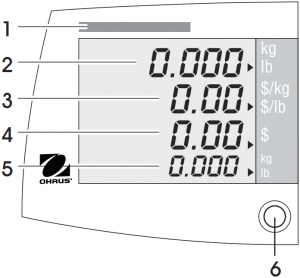
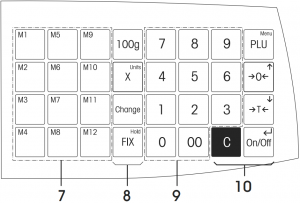
CONTROL PANEL PARTS
# DESCRIPTION1 Capacity Information2 Weight Display3 Unit Price4 Price5 Preset Tare6 Level Indicator7 PLU Preset Keys8 Advanced Function Keys9 Numeric Keypad10 Basic Function Keys
Customer Display
DISPLAY STATUS MESSAGES AND INDICATORS
| STATUS MESSAGE | MEANING |
|
ZERO |
Scale is at center of zero. |
|
PT |
Keyboard tare or tare recalled from CPU. |
|
NET |
Net value (gross minus tare); push button tare exists. |
|
FIX |
Unit price and/or tare is fixed. |
|
X |
Scale is in by-count mode. |
|
100 g |
100 g pricing is activated. |
|
½ |
1/2 lb. pricing is activated. |
|
¼ |
1/4 lb. pricing is activated. |
| STATUS MESSAGE | MEANING |
|
Add |
Scale is in accumulation mode; data exists in the accumulation memory. |
|
Total |
The displayed total price is added into the accumulation memory. |
| Battery is full. | |
| 2/3 battery power left. | |
| 1/3 battery power left. | |
| Battery power at critical level. |
SETUP
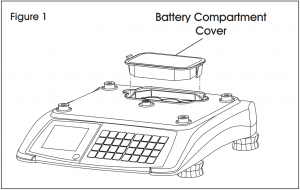
INSERTING THE BATTERIES
1. Make sure that the external power supply is disconnected.2. Remove the weighing pan.3. Remove the battery compartment cover. (See Figure 1)
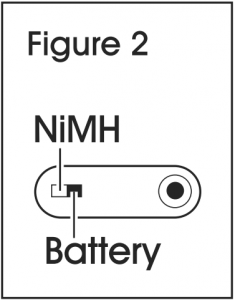
4. Turn over the scale and ensure that the battery switch is set to the correct position.
a. For rechargeable D-cell batteries: “NiMH” (See Figure 2)b. For non-rechargeable D-cell batteries: “Battery” (See Figure 2)
![]() NOTE: Batteries are not included.
NOTE: Batteries are not included.
 WARNING! There is a risk of explosion when the battery switch is not set correctly. Make sure that the battery switch is in the right position for the desired type of battery.
5. Turn the scale right side up.6. Place the batteries in the compartment so that the positive poles face the springs. See pole markings on cover and housing.7. Close the battery compartment and put the weighing pan back on.
CONNECTING TO MAIN POWER
The power supply is stored in a compartment under the scale to support safe transport.
- Connect the supplied power supply unit to the power connection socket on the underside of the scale.
- Plug the power supply unit into a properly grounded outlet.
OPERATION
TURNING SCALE ON/OFF
- To turn the scale on, press the ON/OFF key.• After the scale is turned on, it runs through a short display test. All segments and status messages briefly light up and the software version is displayed.• The scale is ready when the weight display appears.
- To turn the scale off, press and hold the ON/OFF key until a long beep can be heard.
FREE INPUT
You can immediately use your scale for weighing and selling without prior configuration.
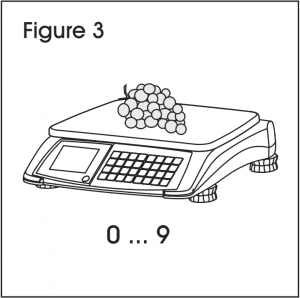
- Place the item on the scale. (See Figure 3)
- Enter the unit price. The price to pay is displayed.
- Remove the item from the scale. All displays return to zero.
Enter the unit price as usual without the decimal point, but with all the decimal places.
WORKING WITH PLUs
You can save the price and/or tare for frequently sold goods in the scale’s PLU memory and recall it later. In the factory setting, unit price and tare are saved in a PLU.
CREATING A PLU
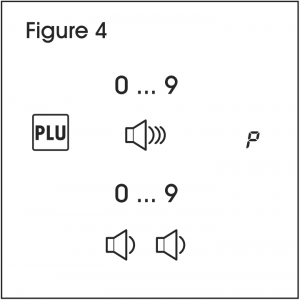
- Enter the unit price.
- Press and hold the PLU key until a long beep can be heard. P appears in the weight display. (See Figure 4)
- Enter the PLU number between 1 and 9999.
- Wait until the scale beeps twice. The PLU is stored and all displays return to zero.• To save the tare weight in the PLU, tare the corresponding container before entering the unit price.• The scale can store 100 PLUs. If the memory is full and you want to store a new PLU, the messages Full and Delete are displayed. You can either overwrite a specific PLU or delete the whole PLU memory.- To overwrite an existing PLU, press the C key and create a new PLU with the number you want to overwrite.- To delete the whole PLU memory, press the ENTER (ON/OFF) key.
CALLING UP PLUs
Depending on the setting of operator setup step 7, there are two ways to call up PLUs.
CALLING UP VIA PLU KEY
(Factory setting, operator setup step 7 = off)

- Place item on the scale. (See Figure 5)
- Enter the corresponding PLU number and press the PLU key. Unit price and price to pay are displayed.
- Remove item from scale. All displays return to 0.
CALLING UP PLU AUTOMATICALLY
(Operator setup step 7 = on)
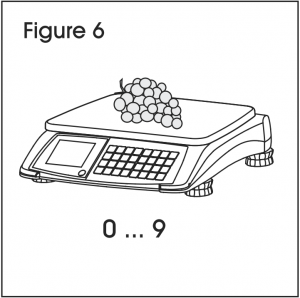
- Place the item on the scale. (See Figure 6)
- Enter the corresponding PLU number. The PLU is called up automatically. Unit price and price to pay are displayed.
- Remove the item from the scale. All displays return to 0.
USING PLU PRESET KEYS
You can save the most important PLUs to the keys in the left-hand key field.
Depending on the setting of operator setup step 14, one or two PLUs can be assigned to a PLU preset key.
PLU PRESET KEYS WITH ONE PLU
(Operator setup step 14 = off)
STORING ONE PLU TO A PRESET KEY
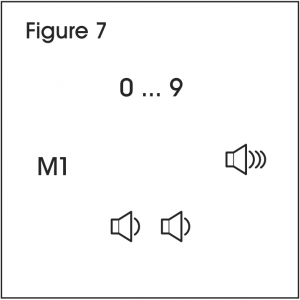
- Enter the unit price or recall PLU. (See Figure 7)
- Press and hold the desired preset key, e.g., M1, until a long beep can be heard. Two short beeps indicate that the data has been stored.
CALLING UP PLUs WITH PRESET KEYS
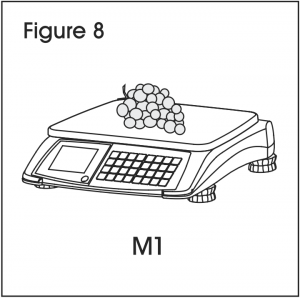
- Place the item on the scale. (See Figure 8)
- Press the corresponding preset key, e.g., M1. Unit price and price to pay are displayed.
- Remove the item from the scale. All displays return to zero.
PLU PRESET KEYS WITH TWO PLUs
(Factory setting, operator setup step 14 = on)
STORING TWO PLUs TO A PRESET KEY
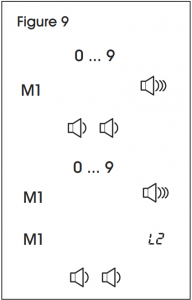
- Enter the unit price or recall PLU of the first PLU to be assigned to the preset key. (See Figure 9)
- Press and hold the desired preset key, e.g., M1, until a long beep can be heard. Two short beeps indicate that the data has been stored.
- Enter the unit price or recall PLU of the second PLU to be assigned to the preset key.
- Press and hold the desired preset key, e.g., M1, until a long beep can be heard.
- Immediately press the desired preset key again, e.g., M1. L2 is displayed and two short beeps indicate that the data has been stored.
CALLING UP TWO PLUs WITH PRESET KEYS
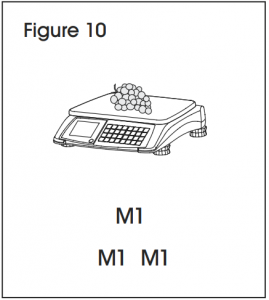
- Place the item on the scale. (See Figure 10)
- To call up the first PLU, press the corresponding preset key once, e.g., M1. Unit price and price to pay of the first PLU are displayed.To call up the second PLU, press the corresponding preset key twice. Unit price and price to pay of the second PLU are displayed.
- Remove the item from the scale. All displays return to zero.
USING TARE
If you know the weight of your containers, you can enter the tare weight via the keyboard (so you do not have to tare the empty container).
TARING AN EMPTY CONTAINER
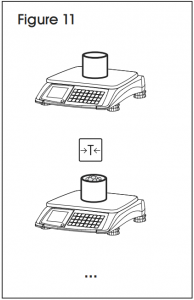
- Place the empty container on the scale. (See Figure 11)
- Press the TARE key. The weight display is reset to 0.000 and the NET symbol appears. The tare weight is displayed in the bottom line of the display.
- Fill the container with the goods to be weighed.
- Carry out pricing as described above.
- Remove the container from the scale. All displays return to zero.
KEYBOARD TARE
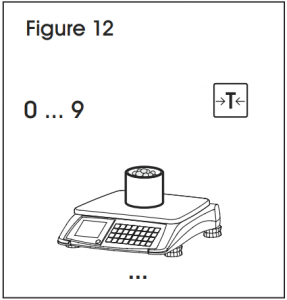
- Input the known tare value and press the TARE key. The input tare value is displayed in the bottom line of the display and the PT cursor is lit. The weight display shows the negative tare value. (See Figure 12)
- Place the item with container or wrapping material onto the scale.
- Carry out pricing as described above.
- Remove the item with container or wrapping material from the scale. All displays return to zero.
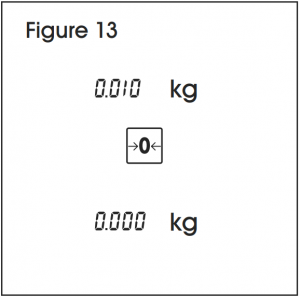
ZEROING
Due to soiling on the weighing pan or unfavorable external influences, it is possible that the weight display of an unloaded weighing pan may no longer be 0.000. In such cases, the scale must be reset to zero. The maximum allowed deviation to be compensated by zeroing is +/- 2 % of the weighing range.
1. Press the ZERO key. (See Figure 13) The weight display is set to zero.
BY-COUNT OPERATION
With the by-count function, you can price non-weighing items, e.g., in the bakery department. Pricing can base on a deal quantity of, e.g., three pieces.

- Enter the deal quantity (1-99). (See Figure 14)
- Press the X key to call up the by-count function. The by-count icon is displayed.
- Enter the price per deal quantity.
- Confirm with the ENTER (ON/OFF) key.
- Enter the number of items (1-99). The price to pay is displayed.• The unit price is stored until by-count operation is ended.• Use the C key to leave by-count operation.
ACCUMULATING
This functionality is only legal in certain regions or, if acceptable, if the weighing system is connected to an external printer.
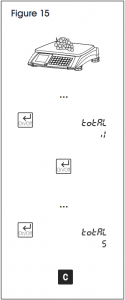
1. Place the first item on the scale. (See Figure 15)2. Enter the unit price.3. Press the ENTER (ON/OFF) key. The total price to pay and the number of items are displayed.4. Remove the item and press the ENTER (ON/OFF) key again. The weight display is shown.5. Repeat steps 1 to 4 for more items.6. To finish the transaction, press the ENTER (ON/OFF) key. The total price to pay and the number of items is displayed.7. To clear the total, press and hold the C key. The total is cleared.
If a printer is connected, a printout can be generated by pressing the ENTER (ON/OFF) key twice. After printing, the total is cleared automatically.
CHANGE FUNCTION
The scale is able to calculate the amount of change.
SINGLE ITEM
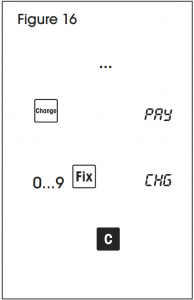
- Carry out pricing as described in the Free Input section on page two. (See Figure 16)
- Press the CHANGE key. The total price to pay is displayed.
- Enter the customer’s payment and press the FIX key. The amount of change is displayed.
- Press the C key to return to normal weighing mode.
MULTIPLE ITEMS
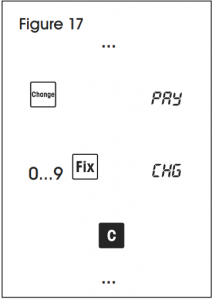
- Carry out accumulating as described on page five. (See Figure 17)
- When the total is displayed, press the CHANGE key. The total price to pay is displayed.
- Enter the customer`s payment and press the FIX key. The amount of change is displayed.
- Press the C key to finish the change function.
- Clear total as described on page five.
FIX UNIT PRICE AND/OR TARE
In normal operation, unit price and tare weight - if applicable - are cleared when the item is removed from the scale. For weighing and pricing, several samples of the same PLU, e.g., for prepacking, you can fix unit price and/or tare.
FIXING PRICE AND TARE WEIGHT
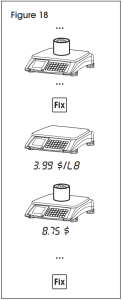
- Tare the container.
- Place first sample on scale. (See Figure 18)
- Carry out pricing as described on page two.
- Press the FIX key.
- Remove the item from the scale. The unit price and tare are still displayed.
- Place the next sample on the scale. The price to pay is displayed.
- Remove item from scale.
- Repeat steps 5 and 6 for more samples of the same unit price and tare.
- Press the FIX key again to clear the unit price and tare.• To fix the price only, just begin with step 2.• To fix tare weight only, disregard steps 2 and 3.
HOLD FUNCTION
When using the hold function, the price to pay is kept in the display when the item is removed from the scale.
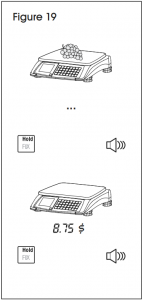
- Place the item on the scale. (See Figure 19)
- Carry out pricing as described on page two.
- Press and hold the HOLD (FIX) key until a long beep can be heard. Weight and unit price are cleared, the price to pay and “hold” are displayed.
- When removing the item from the scale, the price to pay is still displayed.
- To return to normal weighing mode, press and hold the HOLD key again until a long beep can be heard.
WEIGHING WITH 100 G (1/2 LB. / 1/4 LB.) PRICE UNIT
For many products, customers are used to a price per 100 g (1/2 lb. / 1/4 lb.). This function is only available if permitted by the national weights and measures regulations.
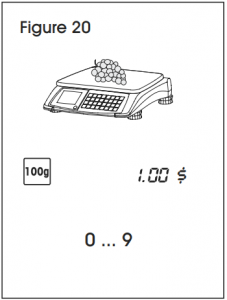
- Place the item on the scale. (See Figure 20)
- Press the 100 g (1/2 lb. / 1/4 lb.) key. The 100 g (1/2 lb. / 1/4 lb.) icon is displayed.
- Enter the unit price per 100 g (1/2 lb. / 1/4 lb.). The unit price per 100 g (1/2 lb. / 1/4 lb.) and the price to pay are displayed.
- Remove the item from the scale. All displays return to zero.
100 g (1/2 lb. / 1/4 lb.) mode stays active until the 100 g (1/2 lb. / 1/4 lb.) key is pressed again.
SWITCHING WEIGHING UNIT BETWEEN KG. AND LB.
This function is only available if permitted by the national weights and measures regulations.
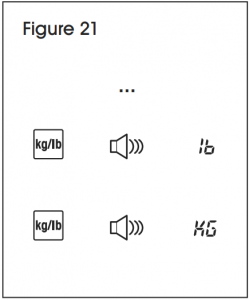
- Carry out pricing as described on page two. (See Figure 21)
- Press the UNITS key until a long beep can be heard. The weight is displayed in the second weight unit.
- Press the UNITS key again until a long beep can be heard to return to the first weight unit.
BACKLIGHT FUNCTION
If the light of the environment is not bright enough to get a clear reading from the display, the backlight can be switched on.
SWITCHING BACKLIGHT ON/OFF
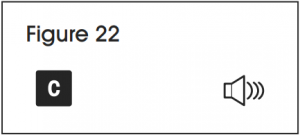
- Press and hold the C key until a long beep can be heard. The backlight is switched on/off. (See Figure 22)
When the scale is not used for 15 seconds, the backlight automatically switches off. When a weight is placed on the scale or when a key is pressed, the backlight switches on again.
TICKET PRINTING
- Ticket printing is not available in all countries.
- For ticket printing, operator setup step 16 must be set to “1.”
TICKET WITHOUT TAX
For ticket printing without tax, operator setup Step 21 must be set to “OFF.”
- Carry out accumulating as described on page five.
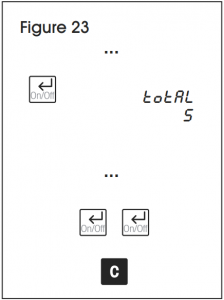
- To finish the transaction, press the ENTER (ON/OFF) key. The total price to pay and the number of items are displayed. (See Figure 23)
- If desired, enter the amount of change as described in the Change Function section on page five.
- To initiate printing, press the ENTER (ON/OFF) key twice.
- Press the C key to cancel the transaction.
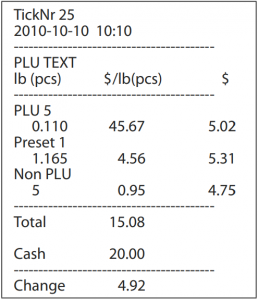
Printout example
TICKET WITH TAX
For ticket printing with tax, operator setup step 21 must be set to “ON.”
STORING TAX ON A KEY

To store a tax on the keys M9 to M12, operator setup step 22 must be set to “1.”
- Press and hold one of the keys M9 to M12 until a long beep can be heard. (See Figure 24)
- Enter tax rate and confirm with the ENTER (ON/OFF) key, e.g., enter 7.00 for tax rate 7%.
PRINTING A TICKET WITH TAX
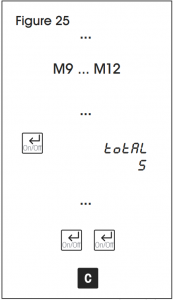
1. Carry out pricing as described on page two.2. Press the corresponding tax key (M9 to M12). (See Figure 25)3. Repeat steps 1 and 2 for further items.4. To finish the transaction, press the ENTER (ON/OFF) key. The total price to pay and the number of items are displayed.5. If desired, enter the amount of change as described in the Change Function section on page five.6. To initiate printing, press the ENTER (ON/OFF) key twice.7. Press the C key to cancel the transaction.
Printout example

PRINTING REPORTS
PRINTING SALES REPORT
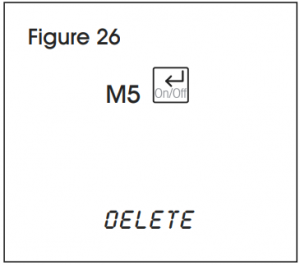
Press the report button M5 and confirm with the ENTER (ON/OFF) key. (See Figure 26)
The sales report is printed.
When printing is finished, you are asked if you want to delete the sales report.
Sales report example

PRINTING LOG REPORT
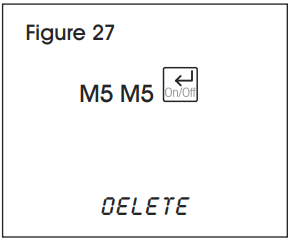
- Press the report button M5 twice and confirm with the ENTER (ON/OFF) key. (See Figure 27)
- Select the range of transactions to be printed
The log report is printed.
When printing is finished, you are asked if you want to delete the transactions.
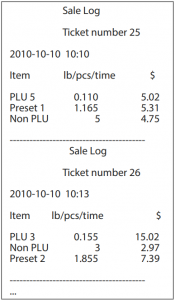
Log report example
LEGAL FOR TRADE
When the scale is used in trade or a legally controlled application, it must be set up, verified and sealed in accordance with local weights and measures regulations. It is the responsibility of the purchaser to ensure that all pertinent legal requirements are met. As verification requirements vary by jurisdiction, the purchaser should contact their local weights and measures office if they are not familiar with the requirements.
Verification process must be performed at the place of use.
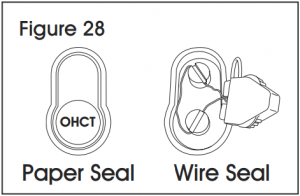
To prevent access to calibration and metrological settings, the scale must be sealed using a paper seal or wire seal. (See Figure 28)
OPERATOR SETUP
SETUP OPERATION
ENTERING OPERATOR SETUP
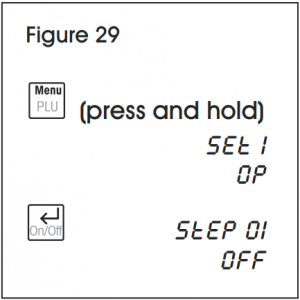
- Press and hold the MENU (PLU) key until a long beep can be heard. SET 1 OP is displayed for “Operator Setup.” (See Figure 29)
- Press the ENTER (ON/OFF) key to enter operator configuration. The first operator setup step and its current setting are displayed.
SELECTING SETUP STEP
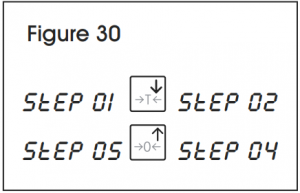
To move to another setup step, use the ARROW DOWN (TARE ) key or ARROW UP (ZERO) key. (See Figure 30)
In the line below, the current setting of the step is displayed.
CHANGING SETTINGS
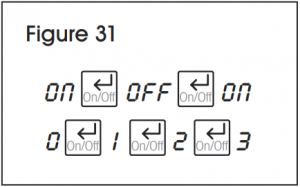
To toggle between the settings of a setup step, use the ENTER (ON/OFF) Key.(See Figure 31)
When moving to another setup step, the selected setting is confirmed.
ENDING SETUP
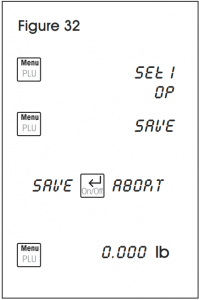
- Press the MENU (PLU) key to leave operator setup steps. (See Figure 32)
- Press the MENU (PLU) key again to leave the setup mode. SAVE is displayed.
- If you do not want to save, use the ENTER (ON/OFF) key to toggle between SAVE and ABORT.
- Press the MENU (PLU) key a third time to return to the weighing mode.
EXAMPLE: SETTING DIGITAL FILTER TO LOW(Operator Setup Step 8)
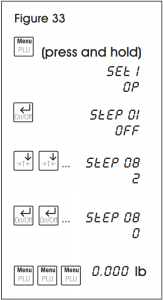
- Press and hold the MENU (PLU ) key until a long beep can be heard. SET 1 OP is displayed for “Operator Setup.” (See Figure 33)
- Press the ENTER (ON/OFF ) key to enter operator configuration. The first operator setup step and its current setting are displayed.
- To move to setup step 8, press the ARROW DOWN (TARE) key repeatedly until Step 08 with its current setting is displayed.
- To change the setting of setup step 8, press the ENTER (ON/OFF) key repeatedly until the setting is 0.
- End setup by pressing the MENU (PLU ) key three times.
OPERATOR SETUP OVERVIEW
Factory settings are indicated in bold print.
| # | SETTING | DESCRIPTION |
| 1 | ResetON Reset operator setup functions to factory settings.OFF Do not reset operator setup functions. | |
| 2 | BeeperON Beep when a key is pressed.OFF No sound when a key is pressed. | |
| 3 | BacklightingON Backlighting on.OFF Backlighting off. | |
| 4 | Power Off / Sleep0 Both disabled, power off and sleep function.1 No sleep function, automatic power off after 30 minutes of non-use.2 Sleep function after 5 minutes of non-use, no automatic power off.3 Sleep function after 5 minutes of non-use, automatic power off after 30 minutes of non-use.4 Sleep function after 15 minutes of non-use, no automatic power off.5 Sleep function after 15 minutes of non-use, automatic power off after 30 minutes of non-use. | |
| 5 | Auto Clear TareON Automatic clearing of the tare weight when the load is removed from the platform.OFF No automatic clearing of the tare weight. | |
| 6 | Prepack / Fix ModeON Prepack / fix mode enabled.OFF Prepack / fix mode disabled. | |
| 7 | Auto PLUON Find PLU as soon as a number is entered.OFF Find PLU after pressing the PLU key. | |
| 8 | Digital Filter0 Low digital filtering.1 Medium digital filtering.2 High digital filtering. | |
| 9 | Charging FunctionON Battery charging function enabled.OFF Battery charging function disabled.To change charging function, you are asked to enter a password: 55555. | |
| 10 | Function Keys0 Function keys disabled.1 Function keys enabled. | |
| 11 | PLUON Storing PLUs enabled.OFF Storing PLUs disabled. | |
| 12 | By-Count OperationON By-count operation enabled.OFF By-count operation disabled. | |
| 13 | Two PLUs in One Preset KeyON Two PLUs can be preset in one preset key.OFF Only one PLU can be preset in a preset key. | |
| 14 | Communication Port0 RS2321 USB | |
| 15 | Communication Type0 Protocol transfer to a connected computer.1 Printout on a connected printer (not available in all countries). | |
| 16 | Ticket Language (not available in all countries)0 English1 French2 German3 Spanish4 Italian | |
| 17 | RS232 Communication Speed0 1200 bps1 2400 bps2 4800 bps3 9600 bps4 19200 bps5 38400 bps6 57600 bps | |
| 18 | Communication Format0 7 data bits, parity even, 1 stop bit1 7 data bits, parity odd, 1 stop bit2 7 data bits, no parity, 1 stop bit3 8 data bits, no parity, 1 stop bit4 7 data bits, parity even, 2 stop bits5 7 data bits, parity odd, 2 stop bits6 7 data bits, no parity, 2 stop bits7 8 data bits, no parity, 2 stop bits | |
| 19 | Price Computing Protocol Type0 CAS1 Avery Berkel2 Dialog 063 L2 Mettler Toledo4 Anker5 Dialog 02/046 NCI Protocol | |
| 20 | PLU TareON Storing unit price and tare weight in the PLU.OFF Storing unit price only in the PLU. |
SETTING DATE AND TIME
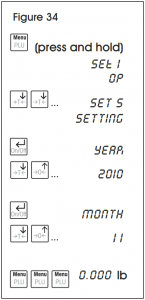
- Press and hold the MENU (PLU) key until a long beep can be heard. (See Figure 34)
- Press the ARROW DOWN (TARE) key repeatedly until SET 05 SETTING is displayed.
- Press the ENTER (ON/OFF) key to set the year.
- Use the ARROW DOWN (TARE) key or ARROW UP (ZERO) key to change the year.
- Repeat steps 3 and 4 to set month, day, hour, minute and second.
- End setup by pressing the MENU (PLU) key three times.
MAINTENANCE
WARNING! Disconnect the AC adapter from the AC power supply and the balance before cleaning.
WARNING! Do not allow liquids to enter the AC adapter or the balance.
CLEANING
Use a soft cloth dampened with water and a mild detergent.
![]() NOTE: Do not use harsh chemicals to clean the balance, as the finish may be damaged.
NOTE: Do not use harsh chemicals to clean the balance, as the finish may be damaged.
TROUBLESHOOTING
If the scale shows an error message, proceed as follows:
- Turn the scale off and wait for approximately 5 seconds.
- Turn the scale on.
- If the error message is still displayed, refer to the error message list.
| OPERATING ISSUE | CAUSES | RECOMMENDATIONS |
| E11 | RAM error. | Contact Uline service team. |
| E16 | ROM error. | Contact Uline service team. |
| E18 | EEPROM error. | Contact Uline service team. |
| E34 | PLU number too high. | Enter PLU Number from 1-99. |
| No PLU | PLU not found. | Store PLU. |
| nnnnnn | Overload | Reduce load. |
| uuuuuu | RAM error. | Re-zero the scale. |
If the troubleshooting section does not resolve your problem, contact Uline Customer Service at 1-800-295-5510.
1-800-295-5510uline.com
0721 IH-5116
[xyz-ips snippet=”download-snippet”]