audio-technica ATR2500x-USB Streaming/Podcasting/Recording Microphone User Guide
FCC NoticeWarning This device complies with Part 15 of the FCC Rules. Operation is subject to the following two conditions: (1) This device may not cause harmful interference, and (2) this device must accept any interference received, including interference that may cause undesired operation.
Caution You are cautioned that any changes or modifications not expressly approved in this manual could void your authority to operate this equipment.
Note: This equipment has been tested and found to comply with the limits for a Class B digital device, pursuant to part 15 of the FCC Rules. These limits are designed to provide reasonable protection against harmful interference in a residential installation. This equipment generates, uses and can radiate radio frequency energy and, if not installed and used in accordance with the instructions, may cause harmful interference to radio communications. However, there is no guarantee that interference will not occur in a particular installation. If this equipment does cause harmful interference to radio or television reception, which can be determined by turning the equipment off and on, the user is encouraged to try to correct the interference by one or more of the following measures:
- Reorient or relocate the receiving antenna.
- Increase the separation between the equipment and receiver. – Connect the equipment into an outlet on a circuit different from that to which the receiver is connected.
- Consult the dealer or an experienced radio/TV technician for help.
Contact:Responsible Company: Audio-Technica U.S., Inc. Address: 1221 Commerce Drive, Stow, Ohio 44224, USATel: 330-686-2600
ICES statementCAN ICES-3(B)/NMB-3(B)
Overview

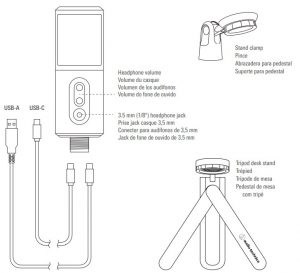
- For desktop useScrew the microphone into the threaded portion of the tripod desk stand. The front of the microphone should face the A-T logo. Extend the tripod legs to provide a wide, secure base, and place the tripod desk stand on a flat surface.For mic stand use Screw the microphone stand clamp to your mic stand. Screw microphone into the stand clamp.
- Use a screwdriver or coin to loosen/tighten the stand’s pivot screws for angle adjustment.
- Plug one of the provided USB cables into the USB output at the base of the microphone then connect the other end of the cable to your digital recording device.When connecting the microphone to a USB-C port, you must use a USB On-The-Go (USB OTG) cable like the one included.When using with equipment that includes a built-in mic, consult that device’s user guide for instructions on disabling its mic.
- Optional headphone monitoring: Connect headphones with 3.5 mm (1/8″) plug into front of microphone. Use up/down buttons for volume control.
- For a more detailed user manual, visit the ATR2500x-USB product page at audio-technica.com
 Audio-Technica Corporation (Headquarters)2-46-1 Nishi-naruse, Machida, Tokyo, 194-8666, Japan
Audio-Technica U.S., Inc.1221 Commerce Drive, Stow, Ohio, 44224, USAwww.audio-technica.com© 2021 Audio-Technica Corporation P52821-01
References
[xyz-ips snippet=”download-snippet”]


