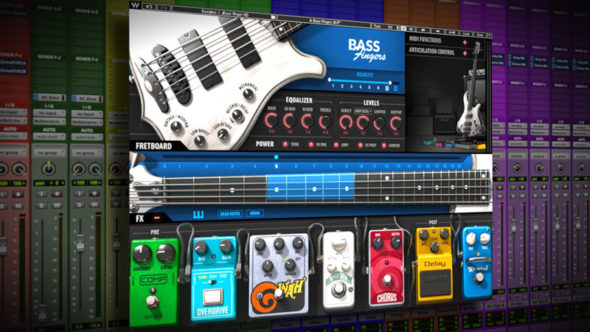
WAVES Bass Fingers
WelcomeThank you for choosing Waves! In order to get the most out of your new Waves plugin, please take a moment to read this user guide. To install software and manage your licenses, you need to have a free Waves account. Sign up at www.waves.com. With a Waves account you can keep track of your products, renew your Waves Update Plan, participate in bonus programs, and keep up to date with other important information.We suggest that you become familiar with the Waves Support pages: www.waves.com/support. There are technical articles about installation, troubleshooting, specifications, and more. Plus, you’ll find company contact information and Waves Support news.
Introduction
Bass Fingers is a sample-based virtual instrument aimed at capturing the experience, sound, and attitude that professional bass players bring to the studio—all from a MIDI keyboard. It provides a realistic bass sound by playing notes the way a seasoned bass player would play them: not just the notes, but also the correct positions on the fretboard, with the corresponding articulation preferences. Even fretboard and finger noises are taken into account. This produces natural-sounding samples without the need for manual layer selections.Bass Fingers is powered by the Waves Sampler Engine (WSE), a state-of-the-art multi-sample engine that delivers solid, high-quality sampler performance. It provides a multitude of sound processing options, such as shaping the core sample tone and selecting the modulation and spatial effects that have been carefully designed for Bass Fingers. A detailed sample base, played through a sampler designed just for this, enables you to create realistic and stylized bass lines with minimal effort.Bass Fingers has an extensive dynamic range as well as powerful sound design capabilities, resulting in a versatile instrument that’s both functional and highly creative.AcknowledgmentThe Bass Fingers sample base was designed, recorded, and edited by Or Lubianiker, a highly-regarded live and session bass player. The samples were made with Or’s signature sound in mind, using his choice of instruments, strings, and preamps. He also developed the unique Bass Fingers legato and articulation systems and shaped the sound of the Bass Fingers sample library.
What is Finger-style Bass Playing?
The most prominent technique used by electric bass players today is finger style. This flexible technique has developed its own dynamic ranges and an assortment of signature sounds—it’s been incorporated into most musical genres. Finger-style playing involves using the index and middle fingers to strike the strings in the area between the bridge and the neck. Since each bass player has preferred hand positions, dynamics, and finger attacks, a wide variety of tones can be achieved using finger style. Bass Fingers delivers this technique with variety and accuracy.
The Sample LibraryThe sample library contains over 14000 samples, all of which are hand crafted to give you the most extensive and realistic finger-style vocabulary possible. Most sample categories feature eight velocity layers and six round robins, plus a fully natural sustain for each note.The library contains these sample categories:
- Finger-style samples
- Hammer on and Pull off (legato) samples
- Percussive samples
- Release and Decay samples
- Mechanical Noise samples
- Slides and special effects samples
There are two identical Bass Fingers sample libraries: Standard and High Definition. The only difference is the quality, and therefore the size, of the files. Let’s say you’re creating your sound at home on a laptop—where storage may be limited—but you will mix on a large rig in a studio. You may choose to use the SD library at home and then load the HD samples when you mix. All programming is maintained when changing between libraries. We recommend that, if you have sufficient disk space, you use the HD library. It’s not all that big and loads faster.
Components
Bass Fingers is a stereo-only virtual instrument plugin. It appears under the related selection menus for virtual instruments in all supported DAW host applications. Bass Fingers receives MIDI data to trigger notes and control changes.In addition to the plugin, there is a free-standing Bass Fingers application. It uses ASIO (Windows) or Core Audio (Mac) drivers to play through your audio device.
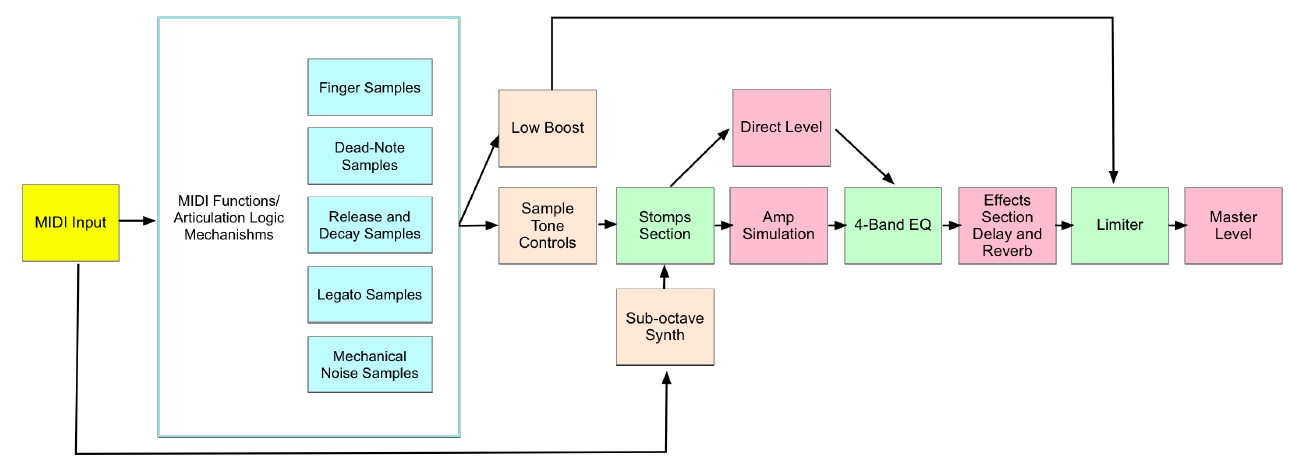
Functional Block/Flow Diagram
Getting Started
Bass Fingers is easy to use—you can undoubtedly learn it without our help. There are many different ways to play it and you will quickly come up with a way that’s perfect for you. Still, while you’re getting started, we suggest that you follow the work sequence described in the next few pages. Once you’re comfortable using Bass Fingers, arrange your workflow any way you like.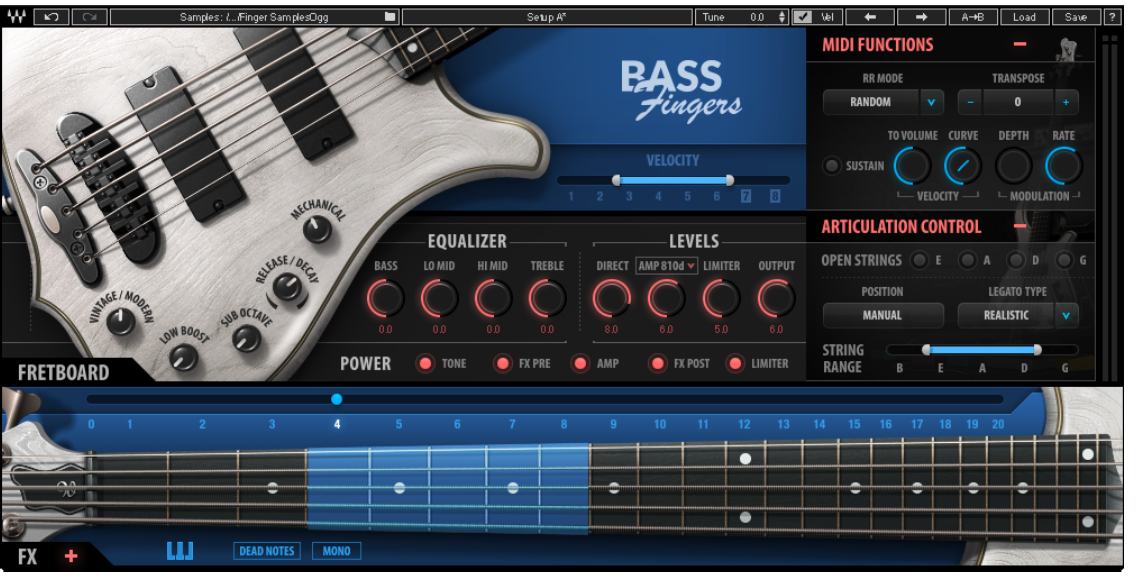
Suggested Steps
- Insert the Bass Fingers plugin on a stereo instrument track in your DAW or launch the standalone application. The plugin will load its default preset and will be ready for you to use.
- Play a few notes and explore the basic tone controls, which are located on the body of the bass.
- Refine the tone and timbre of the sound with the Fretboard Position control. This moves the playing position up and down the fretboard.
- Use the pedalboard effects processors at the bottom of the interface to sculpt your bass sound. If the effects section is not visible, click the + (plus) sign to reveal it.
- Set the Velocity Curve control to adjust your keyboard in order to get the feel you like. This control is in the MIDI Functions section. Once you’re happy with the keyboard touch, you can uncheck the velocity (VEL) box in the top bar. This prevents the velocity setting from changing when a preset is loaded.
Navigating the PresetsBass Fingers presets are managed with the WaveSystem Toolbar at the top of the window. Use the Next/Previous Preset arrows on the Toolbar to scroll through presets. Click the Load button to see all presets. To learn more, click the icon at the upper-right corner of the window and open the WaveSystem Guide.
Selecting the Samples FolderWhen you first launch the Bass Fingers standalone application or instantiate the plugin, you will likely see the prompt, “Please locate your Waves Instrument’s Samples Library folder.” Navigate to the folder that holds your sample library and click OK. This path will be saved with the plugin preferences. Information about the samples folder is shown in the WaveSystem toolbar. To select a different sample folder, click on the Samples Library bar and navigate to the desired folder. The folder must contain valid Waves sampled instrument files with the WSF resource, otherwise the OK button will be grayed out. This new selection replaces the existing folder location preference.
Interface and Controls 
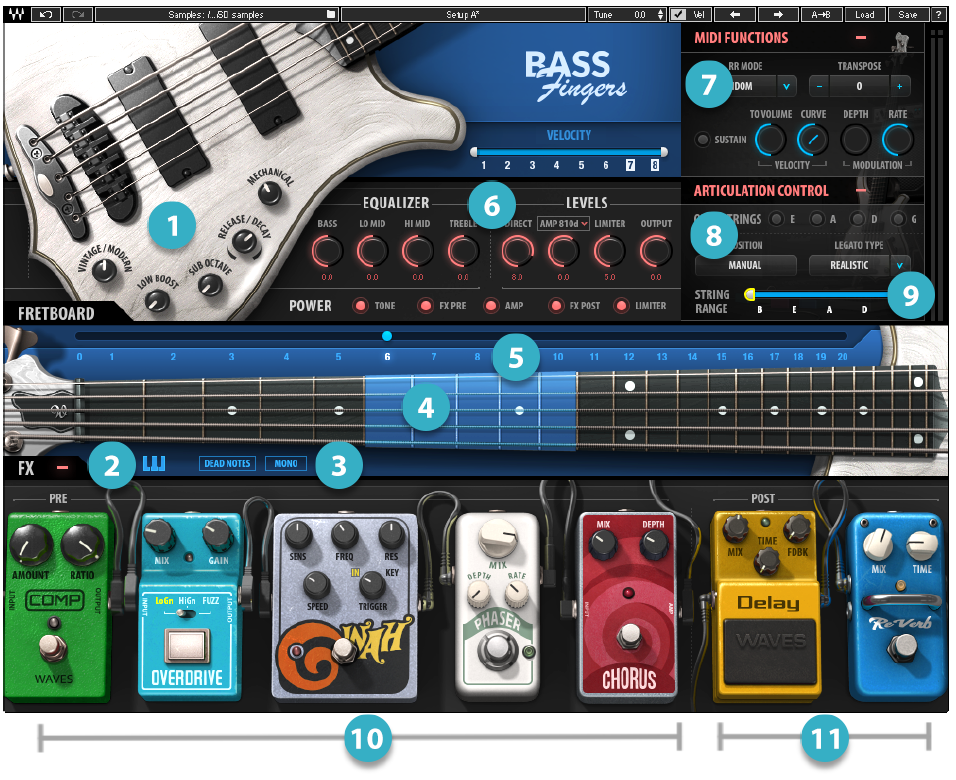
- Tone Function Controls
- Keyswitch Access Button
- Dead Notes and Mono Selectors
- Active Position Range
- Fretboard Position Selector
- EQ and Levels Controls
- MIDI Controls Section
- Articulation Controls
- String Range Selector
- FX Pre
- FX Post
Tone Section
The tone section contains the controls that affect basic sample sound and articulation. All controls are on the body of the bass.
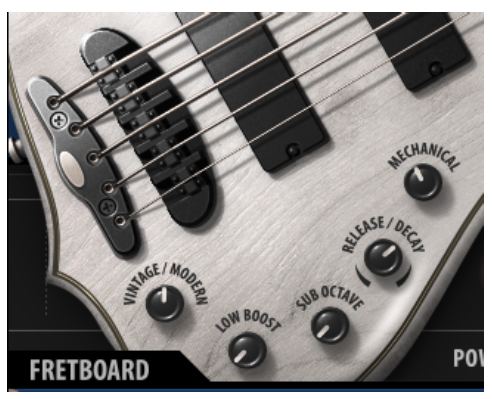
Vintage/ModernThe effect of this control ranges from a warm vintage tone with a rich low end (knob turned all the way to the left) to a detailed, punchy sound fit for a modern production (knob turned all the way to the right). This is an easy way to dial in a suitable basic tone for the samples that are going into the processing chain.
Low BoostThe Low Boost knob enhances the bass and sub frequencies of the sample without sending them into the processing chain. This results in a consistent and coherent low-end response, even with presets that drastically change the sound of the sample, such as when using multiple stomps and effects.
Sub OctaveA sub-octave synth layer that tracks and changes in tone according to the range. This layer is sent to the processing chain and is affected by all of the modulation and effects of the instrument. It can enrich any bass line and it offers many creative sound design possibilities.
Release/DecayThis sets the type, sustain, and playback volume of the samples that are played at the end of notes.
- When the knob is centered at 0 (zero), no release samples will be played.
- When the knob is set to 10 (full release), the level and sustain of the release samples are at their maximum. These are samples of the mechanical sounds that are created when stopping a note with the fretting hand.
- When the knob is set to -10 (full decay), the level and sustain of the decay samples increase. These are samples of the harmonic note endings created by the plucking hand stopping the strings.
In addition to contributing to the realistic feel and sound of the sampler, release/decay samples can be used to further stylize your bass lines and smooth out note transitions.MechanicalThis sets the level of “mechanical noise” samples that are automatically triggered between the played notes. These are the noises caused by the fretting hand brushing against the strings when moving on the fretboard.
EQ Controls 
The EQ section features a four-band EQ with Bass, Low Mid, High Mid, and Treble boost/cut controls. In the processing chain, the EQ section is positioned between the FX Pre and FX Post sections of the pedalboard.The equalizer is an integral part of the amp; it is bypassed when the amp is switched off.
Levels Controls 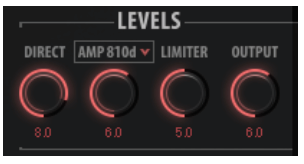 The Levels section contains four knobs, each of which controls a different aspect of the instrument’s output sound.
DirectThis controls the level of the direct sound—the sample played through the processing chain without amp simulation.
AmpThis is the level of amp simulation. This signal path goes through the same process as the Direct signal, but ends in an amp simulation module that shapes the tone as would an 8×10 cabinet. The Amp simulation path is parallel to and independent of the DI level. It has different frequency response and compression than does the Direct signal
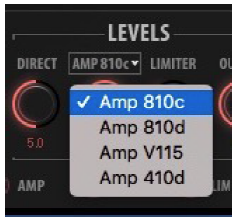
Use the Amp Type drop-down menu to choose between four different bass amp IRs to modify the size and warmth of your bass tone. We recommended that you begin by choosing either the amp or the direct as the main tone, and then slowly mixing between the two to find the right balance.Turning off the amp power bypasses the Direct and Amp controls and disables the Amp Type drop-down menu.
LimiterThe Limiter knob controls the threshold of the output limiter. Higher settings yield more gain reduction.OutputThis controls the output level of the instrument.
Power Controls

The power section contains five toggle buttons that allow you to deactivate the Tone, FX Pre, Amp, FX Post, and Limiter sections separately.Deactivating modules decreases CPU load and may improve performance. This is particularly useful in CPU-heavy projects with many plugins—projects where every bit of power matters.
Fretboard and Position Controls
The Fretboard section features a 24-fret, 5-string bass guitar neck with a position indicator (covering a 5-fret range highlighted in blue) and note displays. Playing a note triggers a visual indication on the fretboard that marks the exact position of the sampled note. Clicking a string on any fret will show the selected note.

Position SelectorThere are twenty numbers above the fretboard; together these make up the Position Selector. Each selection represents a five-fret range in which selected notes will be played in compliance with how a bass player actually performs. Different strings share some of the same notes. This selector gives the user a way to explore the tonal variations that come from playing the same line using different note positions and articulations.The Position control also determines the polyphonic behavior of the instrument across strings. Say, for example, you want to play two notes at the same time. This may not be possible. Depending on the current position, both notes may be on the same string. Move the position on the fretboard so that these notes are played from different strings.
To ensure that the sampler triggers proper legato and articulation selections that sound natural within a range, adjust the Position setting to a value that is associated with the pitch range of the notes being played. Experiment with this control and listen to the multitude of tonal options it introduces to any bass line. Different settings can result in drastically different-sounding lines.
Dead-notes TriggerThis button changes every note on the keyboard to a corresponding dead-note sample, according to its location on the fretboard, and in compliance with the articulation settings. This is like a bass player muting the strings with his left hand.This control cannot be automated, but it is MIDI assignable.
Mono ModeThis forces the instrument to be completely monophonic. No legato samples will be played in this mode.
Keyswitch Editor
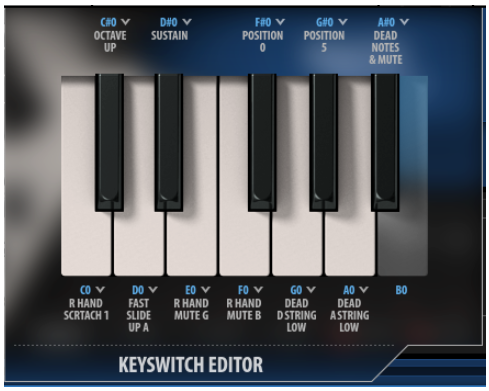
Use the Keyswitch Editor to assign specific samples and articulation controls to the keys of the lowest octave (C0–B0). These keys are not otherwise used, so assignments do no not affect playing samples. To access the editor, click on the Keyboard icon located below the fretboard on the left side of the interface. The editor opens with the factory setup.
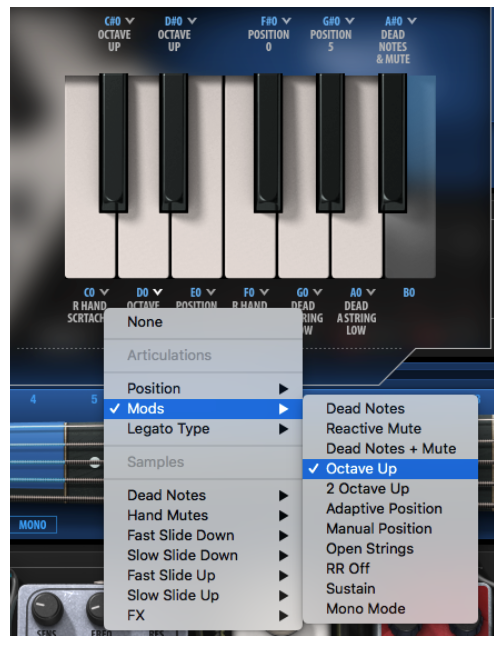
To modify these settings, click the down arrow next to a Note label, and then choose an assignment from the dropdown menu. When using a keyswitch that’s assigned to articulation controls, you should first hold the keyswitch, and then play a note.Keyswitches that are assigned to samples function like all other keys; they are sensitive to note velocity. For example, assigning the “Octave Up” to the key A0 means that every note will play one octave higher as long as A0 is held.
MIDI Functions
The MIDI Functions/Articulation Section contains controls that manage basic functions: velocity behavior, round robin order, transposition, and sustain pedal activation. Click on the + (plus) symbol to expose a section.
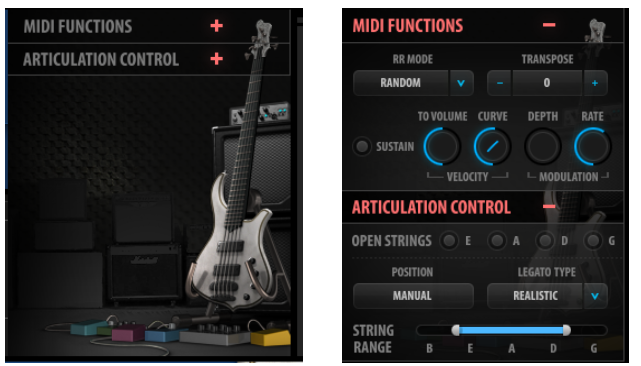
Round Robin ModeSets round robin playback order: forward, reverse, and random playback of round robin samples. When the Round Robin Mode is switched off, the longest available sample will always play.
TransposeAdds pitch offset to the incoming MIDI notes in semitones from -24 to +24.
Velocity to VolumeDetermines the extent to which velocity layers will differ in playback volume. When this knob set to 0, all velocity layers will play at their original levels. When set to 10, the velocity layers will vary drastically in volume.
Velocity Range
Velocity Range sets the dynamic range of the instrument and expands or limits the number of velocity layers that can be triggered by playing dynamics. Louder layers will have a sharper attack, more sustain, and a significantly different character than softer layers.
Velocity CurveThe Velocity Curve control changes the curve of the velocity response from logarithmic to exponential. Use it to adjust the feel of your MIDI keyboard.
ModulationModulation controls the depth and rate of pitch modulation. Higher Depth settings result in a wider range of movement between pitch values below and above the sample. The modulation rate determines how fast or slow it will move between the values. Modulation depth is, by default, mapped to the modulation wheel on the keyboard.
Sustain Pedal ButtonThe Sustain Pedal button activates/deactivates the sustain pedal. The Sustain LED lights when the sustain pedal is in use.
Articulation Section
Open StringsThe Open Strings section contains four buttons that force the sampler trigger to an open string sample as the default when played at the corresponding open string pitch (E1 A1 D2 G2), regardless of the Position setting. This control was added to accommodate for playing a line against an open string, the same way many bass players would do if asked to play in one of the open string keys (B E A D G). Prioritizing the open string sample ensures that the open string pitches are always heard at their best possible tone.Legato TypeThe Legato Type control enables control over triggering the legato samples.
Realistic: The instrument uses the Position settings to generate legato or non-legato samples, according to the context. For example, when playing a new note on the same string as the previous one, Bass Fingers will mute the played note. This is because, on a real bass, it is not possible to play two notes simultaneously on the same string.
Extended : This mode allows you to trigger legato samples on the same string, beyond the fret range as determined by the position selector. This mode can enhance the legato system when playing phrases with extended legato ranges.
Force Legato : While Force Legato is on, the sample engine disregards realistic limitations of particular strings. This allows the user to play continuous hammer on/pull off samples across strings in a way that’s not possible on a real bass guitar. This type of legato resembles the sound of a player constantly “tapping” the bass.
Always : This mode will always trigger the legato samples, even when the notes played do not overlap.
Off (Polyphonic) : Turning Legato Type off allows you to play every note with no legato rules whatsoever. This mode will essentially make the instrument polyphonic, with the ability to play all notes at the same time (even on the same string).
Position: The Position switch sets the playing position on the fretboard. Changing position affects the tone and timbre of a played note.
Manual : The Position setting remains the same, even if notes outside of the position range are played. This allows you to play inside a fret range to maintain realistic sample playback behavior. In the Manual mode, it’s useful to assign the Position Slider to a MIDI control or to Keyswitches.
Adaptive : The Position changes based on the notes played. Use this mode to explore the variations in tone across the fretboard without manually changing the active position. When a note is played outside the current range, the position will shift accordingly. The next notes to play will be in this new position range. The Position Slider is inactive in the Adaptive mode.
Note: The Position control cannot be automated by the host. You can, however, assign the slider to a MIDI Control (that you can edit) or use the Keyswitch Editor to achieve sample-accurate position changes.
String RangeString Range prioritizes note selection on certain strings while maintaining overall fretboard position behavior. Notes in the selected String Range will always play within the fretboard range; notes outside the string range can be played on other strings if they are not available in the fretboard position.Playing the same note on a different string results in a different tone.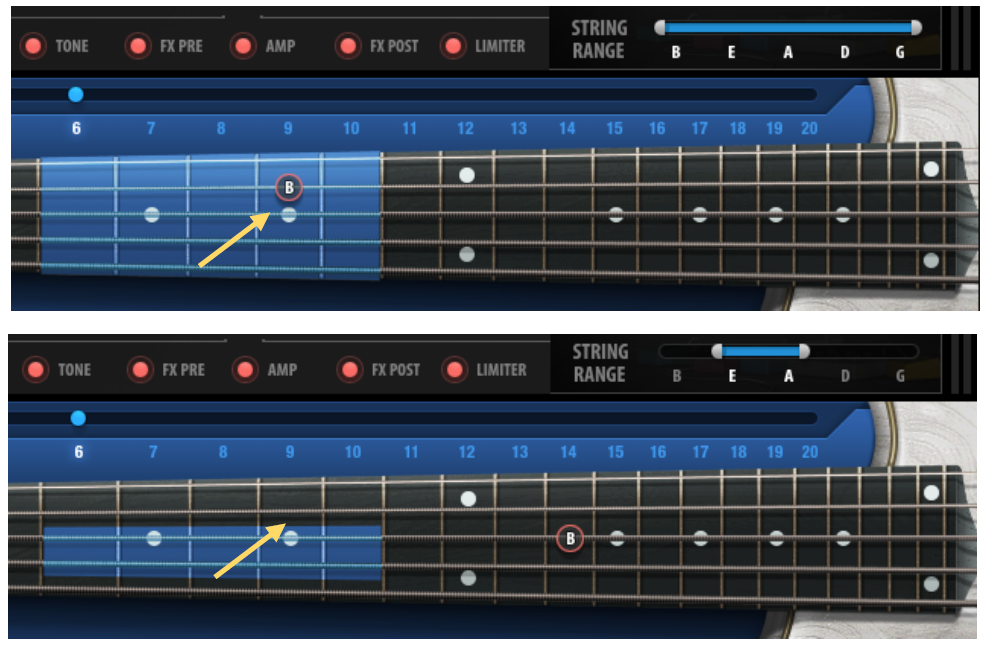
In this example, the D string is in the String Range. When B is played on the D string, it will play within the current Fretboard position.
Now the D string is not within the String Range, so the same note will now play outside the Fretboard Position.
Pedalboard
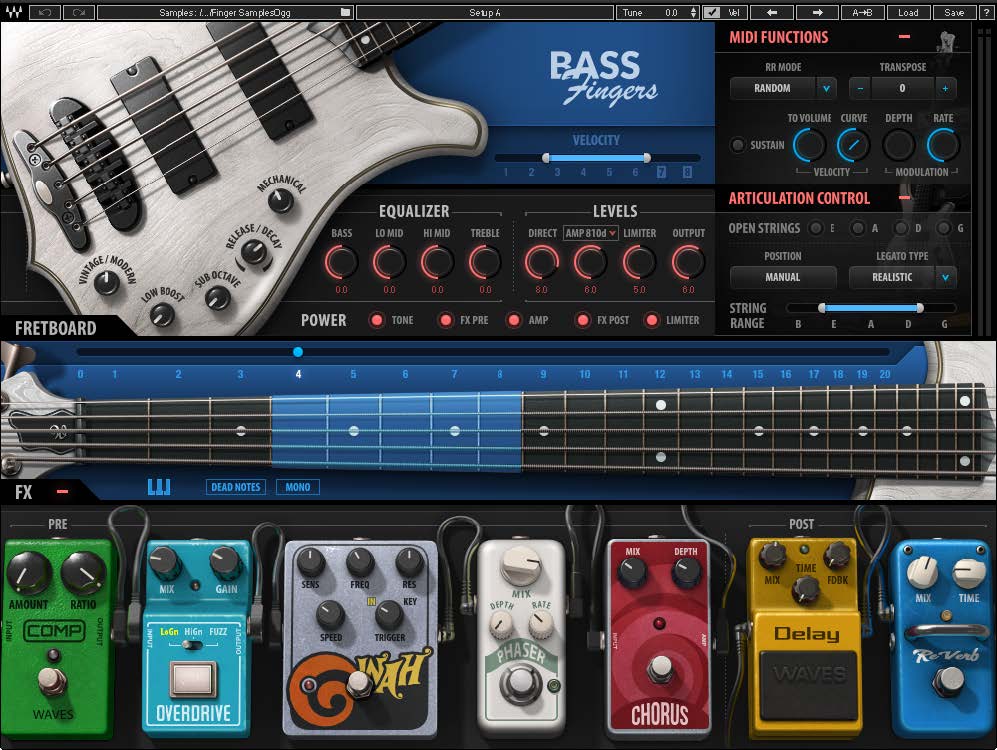
The pedalboard contains seven pedals that can be activated either separately or in combination, offering many sound design options. The first five pedals are pre-amplifier in the signal flow; the last two occur post-amplifier.
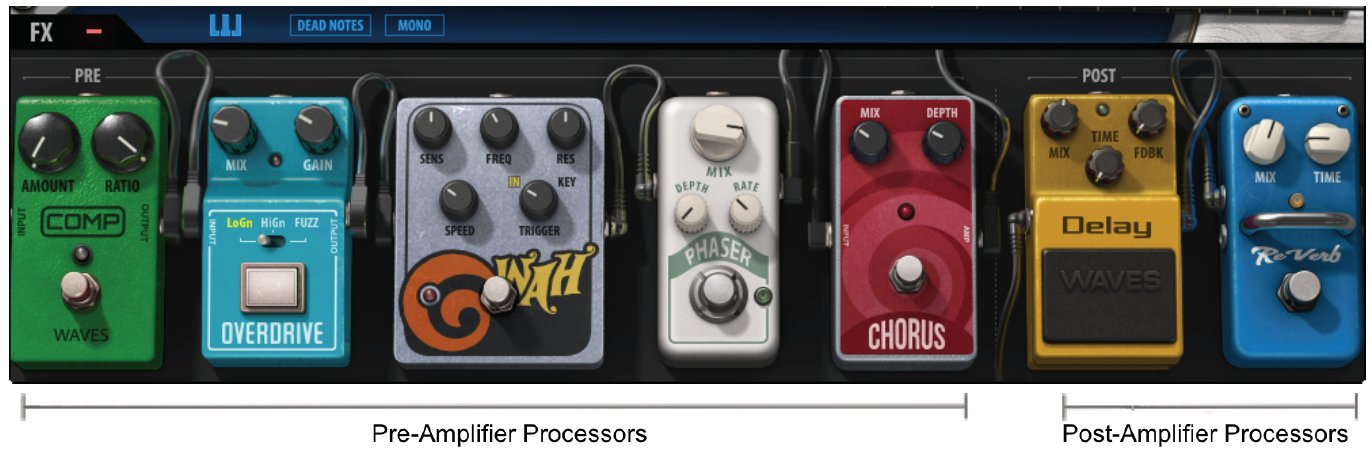
FX PreThe FX Pre section consists of five pedals, wired in the following order: Compressor, Overdrive, Wah, Phaser, and Chorus. Each pedal has parameter controls and a bypass button and is suitable for live use or automation.CompressorThis is a standard compressor with Amount and Ratio knobs.
- Amount is used to set how much of the signal will be compressed
- Ratio determines the amount of compression.
Overdrive
- This is a parallel overdrive that features Mix and Gain knobs, plus a selectable drive type switch.
- The Mix knob sets the balance between the clean and driven signal.
- Gain controls the amount of distortion.
- Use the center switch to select between the three overdrive types: Hi Gain, Lo Gain, and Fuzz.
WahThis is a two-in-one “Wah” pedal that can follow the playing dynamics as well as the set values of Speed and Sens.
- Trigger selects between the two filter modes:o In: Filter envelope will respond to the incoming audio signal (velocity sensitive).o Key: Filter envelope will be triggered based on incoming MIDI notes.
- Mix sets the balance between clean and filtered signals.
- Freq sets the cutoff frequency for the filter.
- Sens determines how sensitive the filter is to dynamics (Input mode) or the depth of the envelope (Key mode).
- Res is used to sharpen or flatten the cutoff response.
- Attack controls how long it takes for the filter to open.
PhaserThis is a parallel phaser pedal with Mix, Depth, and Rate controls.
- Mix controls the balance between the dry and wet signals.
- Depth controls the amount of modulation.
- Rate determines the speed of the modulation.
ChorusThis is a parallel chorus pedal with Mix and Depth knobs.
- Mix blends in the processed signal.
- Depth determines the amount of modulation.
FX PostThe FX Post section contains delay and reverb pedals, each with parameter controls and a bypass button.DelayA delay pedal with Mix, Feedback, and Time knobs.
- The Mix knob controls the balance between the Dry and the Wet signals.
- The Feedback (FDBK) knob determines the time it takes for the repeats to decay.
- The Time knob provides control over delay time in Sync rates (such as ¼ note) or Free rates (in milliseconds), using the same knob. The middle position, 12 o’clock, is the slowest Free value. Turning the knob clockwise from this position increases the rate. When the knob setting is less than 12 o’clock, values are defined with respect to the host. Turning the knob counterclockwise increases the rate through musical note values related to the host’s BPM.
Output Clip IndicatorOn the right side of the display is an output level indicator. The meter is not scaled, but it indicates if your output level is particularly high or low so that you can adjust your controls accordingly. On the top of the meter is an output clipping indicator that glows red if a clip has occurred. Click on the light to reset.
Waves System ToolbarUse the bar at the top of the plugin to save and load presets, load sample libraries, compare settings, undo and redo steps, and resize the plugin. To learn more, click the icon at the upper-right corner of the window and open the WaveSystem Guide.
Sample LibrariesThe first time the Bass Fingers plugin is instantiated or the application is launched, it opens a browser so that you can locate and select a samples library folder. This will become the default folder. To change to another samples library (e.g., SD to HD), click on the Samples button and navigate to another sample library folder. A selected library remains the default until you load another library.The folder must contain valid Waves sampled instrument files, otherwise the OK button will be grayed out. You can download Waves sample libraries from the Waves download page. http://www.waves.com/downloads/sample-libraries
The Preferences Dialog
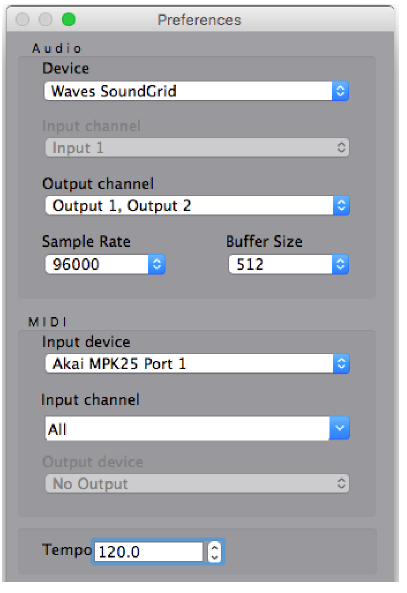
The preferences dialog allows configuration of Audio, MIDI, and User Choices.
Audio provides control over the following parameters:
Device displays the audio devices available on the system.Output Channels allows selection of audio outputs from the selected device.Sample Rate displays and sets the sample rate.*Buffer Size displays and sets the buffer size, which influences latency.**In Windows, sample rate and buffer size cannot be changed from this panel. To modify these settings: close the application, adjust sample rate and buffer size with your driver’s control panel, and re-launch.
MIDI provides control over the following parameters:
MIDI Input device displays a list of available MIDI input devices on the current system. Select the MIDI device for receiving MIDI data.Input Channel: The Bass Fingers standalone application is ready to receive MIDI in OMNI mode from all channels. The MIDI Channel Control allows the selected MIDI device to receive MIDI input only from certain channels, as selected in the checkboxes.
Output Device: Not usedTempo: Sets the tempo for all relevant plugins. By default, tempo-based Waves plugins are in a “tempo listen” state. Their tempo rates will fix to this value.

References
[xyz-ips snippet=”download-snippet”]

