
Shure IntelliMix Room Audio Processing
Software User Manual
![]()

User guide for Shure IntelliMix Room DSP software. Learn how to install, activate, and manage IntelliMix Room to bring crystal-clear audio to all of your rooms.
Version: 7.0 (2020-H)
What is IntelliMix Room?
IntelliMix Room is digital signal processing (DSP) software designed to optimize the performance of Shure networked micro phones with videoconferencing software, resulting in better conference room audio all around. It’s designed to run on the same computer as any videoconferencing software, which reduces the amount of equipment in the room.

What Do I Need to Use IntelliMix Room?
IntelliMix Room requires other software and hardware to work in your room. You’ll need the following:
Software:
 Shure Designer software installed on a computer connected to the same network as IntelliMix Room.
- Designer lets you control all installations of IntelliMix Room in one place.
- It doesn’t need to be on the same computer as IntelliMix Room.
- Videoconferencing software (such as Zoom, Microsoft Teams, or BlueJeans) installed on the same computer/device as IntelliMix Room
Hardware:
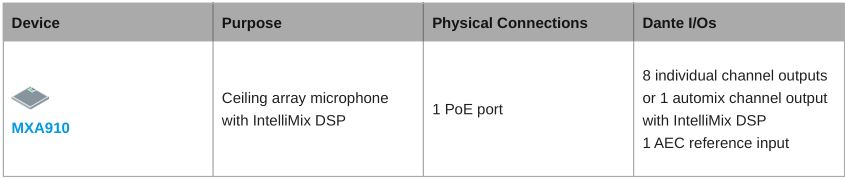
- Dante-enabled microphone, such as a Shure MXA910 or MXA310
- PC or other physical device optimized for running IntelliMix Room (no virtual machines)
- Windows 10 Pro, Enterprise, or IoT Enterprise (64 bit)
- Processor: i5 quad core 1.9 GHz minimum
- 8 GB RAM minimum
- Solid state drive
- Internet connection for licensing
- Other room components, such as displays, cameras, loudspeakers, switches, Cat5e cables, and meeting control interfaces
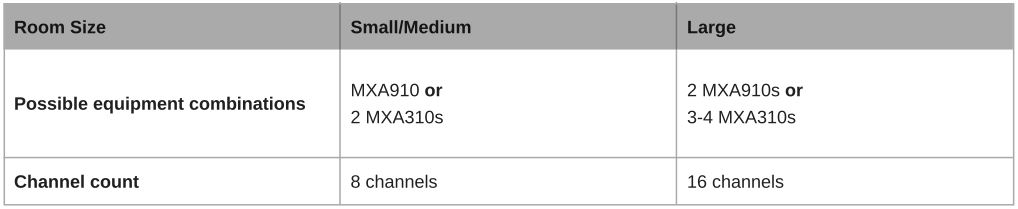
Choosing a Channel Count
IntelliMix Room software is sold based on the number of IntelliMix DSP channels you need. For example, an 8-channel license has 8 channels with all of the IntelliMix DSP blocks (AEC, NR, and AGC).
The software always includes 8 auxiliary Dante input channels without IntelliMix processing. You shouldn’t count these when deciding on your channel needs.
To choose a channel count:
- Check your Dante-enabled microphone’s channel count
- Plan the microphone’s coverage for the room, and see how many channels you will need. For example, if you use 2
- MXA910s, a 16-channel license is the best option. For 2 MXA310s, an 8-channel license covers your needs.
- For best results, each microphone channel should have an IntelliMix DSP input channel.
- Larger rooms may require multiple microphones.
- Don’t count the microphone’s automix out channel when calculating channel needs.
- Plan for future device needs
- If you plan to add more microphone channels with processing in future, include them in your channel count.
How to Purchase IntelliMix Room
To purchase, contact your local Shure sales representative (find yours at shure.com). For each installation, you can choose from 8 or 16 channels of IntelliMix DSP. Licenses are available for 3- and 5-year durations.
After purchasing, you’ll receive an email with instructions for creating a software.shure.com account, where you can download the software and find your license ID. The license ID activates all purchased installations.
Next steps:
- Install IntelliMix Room on all devices.
- Discover and activate all IntelliMix Room installations using Shure Designer software.
- Apply DSP and route audio for each installation using Designer.
IntelliMix Room Free Trial
Before purchasing, you can try out a 16-channel version of IntelliMix Room. The software runs exactly like a purchased version during the trial.
To download a trial version, contact your local Shure sales representative (find yours at shure.com).
Once you set up a trial license, you’ll get a license ID for the software. Enter that ID in Designer to activate the trial.
System Requirements
You can install IntelliMix Room on any physical device that meets these requirements:
- Windows 10 Pro, Enterprise, or IoT Enterprise (64 bit)
- Processor: i5 quad core 1.9 GHz minimum
- 8 GB RAM minimum
- Solid state drive
- Internet connection (wired or wireless required for licensing)
If you install IntelliMix Room on a hubtype device running Windows, consult the manufacturer’s documentation for how to access the operating system and install software.
Devices that don’t meet these requirements are not supported. Virtual machines are not supported.
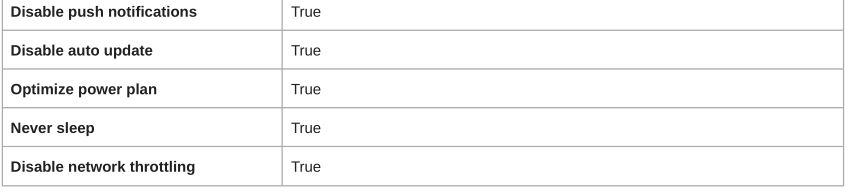
Optimizing Windows for Conference Room Audio Processing
These are the recommended Windows settings for conference room audio processing:
- Disable Cortana.
- Disable notifications from Windows and installed programs.
- Turn off automatic Windows updates.
- Use the high performance power plan in Power Options.
- Make sure this plan uses active cooling in the advanced power options.
- Disable all Sleep and Hibernate settings.
- Disable network throttling.
Additionally, follow these system best practices:
- Reboot the computer regularly.
- Disconnect unused USB devices.
- Remove software with high CPU loads, such as games or streaming apps.
- Make sure the computer’s BIOS is updated.
- Check that Ethernet, Wi-Fi, and display drivers are updated.
Installation Guide
Installing IntelliMix Room
Before installing, make sure you have admin rights for all devices.
- Purchase IntelliMix Room from your Shure sales representative (find yours at shure.com).
- Download the .exe from software.shure.com.
- Launch the installation file and follow the steps.
- Choose network interface cards (NICs) to use for Shure control, Dante audio, and licensing.
- The Shure control NIC must match the one used by Designer software.
- Important: For licensing, only use a permanent NIC on the computer. This setting can’t be changed after installation.
- Choose which PC optimizations to make. For the best audio performance, choose all options.
- Click the IntelliMix Room icon in the system tray to access basic settings and a troubleshooting event log.
Next steps:
- Activate IntelliMix Room installations using Designer software (free at shure.com). IntelliMix Room installations will not pass audio until you activate your license.
- Control DSP, routing, and all other settings with Designer.
Installing with Mass Deployment Tools
You can deploy IntelliMix Room using standard software deployment tools. See below for available command line and silent install arguments.
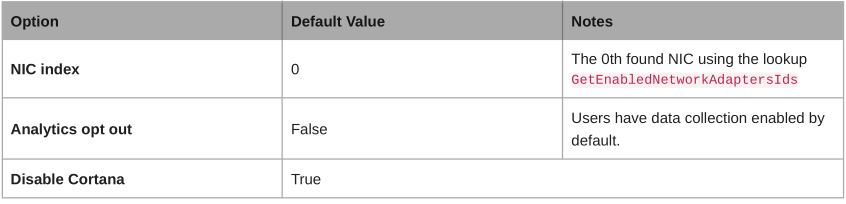
Optional CLI Arguments
- /S : Silent mode. Installer runs without GUI and implements default options. If there is an existing version installed, the installer uses the existing settings unless parameters listed below are provided.
- /S /express : Installer runs with only a progress bar UI and keeps all previous settings.
- /nicindex=[integer] : NIC index to use for both Shure control and Dante audio network capabilities.
- /nicindex_control=[integer] : NIC index to use for Shure control network capabilities.
- /nicindex_audio=[integer] : NIC index to use for Dante audio network capabilities.
- /nicipaddress=[integer] : NIC IP address to use for all IntelliMix Room network capabilities.
- /nicipaddress_control=[integer] : NIC IP address to use for Shure control network capabilities.
- /nicipaddress_audio=[integer] : NIC IP address to use for Dante audio network capabilities.
- /nicid=[UUID] : NIC UUID to use for all IntelliMix Room network capabilities.
- /nicid_control=[integer] : NIC UUID to use for Shure control network capabilities.
- /nicid_audio=[integer] : NIC UUID to use for Dante audio network capabilities.
- /licindex=[integer] : NIC index to use for licensing identification. Also used to get MAC address.
- /licipaddress=[IP ADDRESS] : NIC IP address to use for licensing identification. Also used to get MAC address.
- /licid=[UUID] : NIC UUID to use for licensing identification. Also used to get MAC address.
- /licmac=[mac address] : NIC MAC address (without -) to use for licensing identification.
Installation and IntelliMix Room Settings
- /norestart : Do not reboot the system after installation. Default behavior of the software is to reboot, and rebooting is required to implement certain Windows optimizations.
- /analyticsoptout=[true|false] : Opt out of analytics data collection.
Windows Optimizations
- /skipoptimizations : Skip all optimizations.
- /disablecortana=[true|false]
- /disablepushnotifications=[true|false]
- /disableautoupdate=[true|false]
- /optimizepowerplan=[true|false]
- /neversleep=[true|false]
- /disablenetworkthrottling=[true|false]
Installer Default Settings
IntelliMix Room Firewall Changes
During installation, the software modifies your firewall to allow access for all Shure .exes. These changes are required to run the software.
- Shure_IntelliMix_Room.exe
- Shure PTP.exe
- Shure mDNSResponder.exe
- Shure Common_Server.exe
- Shure APEC3.exe
Basics of Shure Designer Software
To use IntelliMix Room, you need Shure Designer software installed on a computer with a network connection to all IntelliMix Room installations.
Designer has some basic concepts that are important to understand as you start using IntelliMix Room:
Projects
- Use to manage groups of locations.
- Each project uses 1 license ID. All IntelliMix Room installations in a project use the same license ID.If you’re managing multiple customers with multiple license IDs, create separate projects to manage them.
Locations
- Use to organize groups of devices installed in the same physical location, such as a room, an area, or a building floor.
- If devices are in the same Designer location, you can route audio between them using the Routing tab.
Virtual Devices
- Use to design coverage without being on the same network as the physical devices.
- Push settings from virtual devices to physical devices once connected at the job site.
Online Devices
- Shows every available device on your network.
Live Mode
- Location-level setting that lets you control devices in real time.
- Use to push settings to online devices or pull settings from online devices.
Sync
- Use in Live mode to match the settings between virtual devices and online devices.Push settings from virtual devices to online devices.Pull settings from online devices to virtual devices.
Discovering IntelliMix Room in Designer
Each installation of IntelliMix Room appears as a separate device in Designer. Each installation’s name matches the computer’s network name.
To find any online installations:
- Go to Online devices.
- Use the checkboxes to select IntelliMix Room installations and add them to locations.
If you can’t find some installations:
- Go to the computer that won’t appear in Designer.
- Click the IntelliMix Room icon in the system tray.
- Make sure IntelliMix Room is using the same Shure control NIC (network interface card) as Designer.
Note: IntelliMix Room doesn’t show up in Shure Update Utility or Shure Web Device Discovery.
Uninstalling IntelliMix Room
Before uninstalling, make sure you have admin rights and an internet connection for all devices.
- In Designer, find the devices that you plan to remove IntelliMix Room software from.
- Select the devices, and click Deactivate. After deactivation, the licenses are available to be used again. Devices with an internet connection release their licenses quickly. If the devices don’t have an internet connection, it will take up to 7 days for the license to be available for reuse. To avoid this delay, connect devices to the internet before uninstalling.
- On each device, uninstall IntelliMix Room like any other software.
Updating IntelliMix Room
Version 2.x and newer: When a new version of IntelliMix Room is available, you’ll receive an email about the release. To up date, open the IntelliMix Room installation that is being updated from the Windows system tray and go to Version > Check for updates.
Updating from Version 1.x to 2.x: Download the 2.x version from your account at software.shure.com and run the installer over the 1.x version. The 2.x version replaces the 1.x version.
How IntelliMix Room Licenses Work
After installing IntelliMix Room on all devices, use Shure Designer software to activate your licenses. Designer is usually in stalled on a separate computer since it manages all installations of IntelliMix Room.
There are a couple terms to know as you manage licenses for IntelliMix Room:
- Installation: A single instance of IntelliMix Room software installed on a device.
- License: Each installation of IntelliMix Room needs one to run. Choose between an 8- or a 16-channel license.
- Project: A grouping in Designer that has a collection of locations with devices. Each project uses 1 license ID. If you have multiple license IDs to manage, create separate projects for each one.
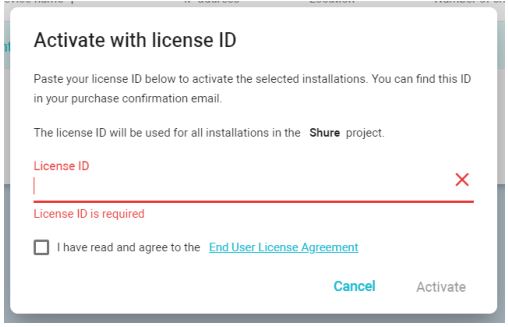
- License ID: A 12-digit code used to activate all of your purchased installations in Designer. When you purchase a group of licenses from Shure, you’ll receive this code in the purchase email (it’s also available in your account at software.shure.com). Each customer has 1 license ID.
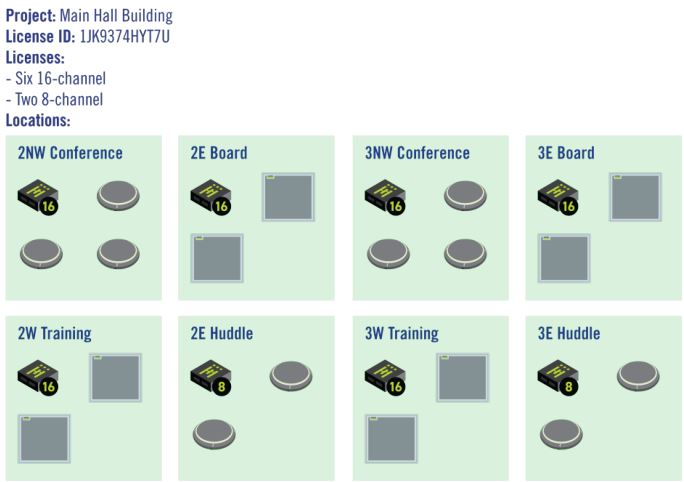
Here’s an example workflow for the whole process:
- Decide how many 8-channel and how many 16-channel licenses you need. Purchase them from Shure.
- Install IntelliMix Room on all devices.
- Install Designer on a computer connected to the same network and discover all of your installations.
- Create a project in Designer. Move all 8-channel installations into that project at the same time, and then repeat for 16 channel installations. You choose which type of license to use for the installations during this step.
- Click Activate and add your license ID. All installations with an internet connection should activate quickly.
Activating IntelliMix Room
To activate the software, you need:
- A license for each installation
- Licenses are based on the channel count (8 or 16 channels) for each installation of the software.
- Your license ID
- A license ID activates all licenses in your account.
- Find in your purchase confirmation email, or in your account at software.shure.com.
- Internet connection for all devices running IntelliMix Room
IntelliMix Room must be installed on a device before you can activate that license.
- In Designer, go to Online devices. Check that you can discover all installations.
- Each installation appears as a separate device. The device name matches the PC’s name.
- If you don’t see all installations, check the Shure control NIC settings on the computer running IntelliMix Room. Use the same network as Designer.
- Create a new project in Designer.If you have many license IDs to manage, create a separate project for each license ID.
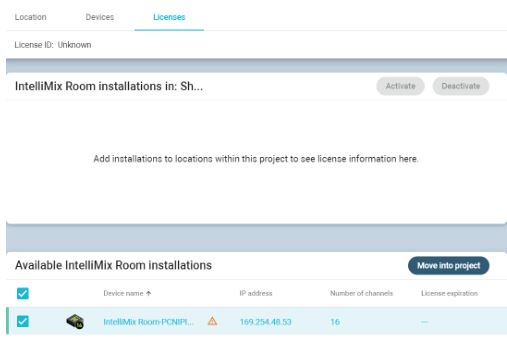
- Go to the project’s Licenses page. From the list of available installations, select one to move into the project. Click Move into project.
- If you add multiple installations to a project at the same time, choose installations that all use the same license type.For example, move all 8channel licenses into the project first, and then repeat the process for your 16channel licenses.
- If you add multiple installations to a project at the same time, choose installations that all use the same license type.For example, move all 8channel licenses into the project first, and then repeat the process for your 16channel licenses.
- Click Activate. Choose the license type for the installation and click Next.
- Add your license ID and click Activate. This license ID is used for all installations in the project. If the device running In telliMix Room has an internet connection, the installation activates and is ready to use.
Next steps:
- Create locations and add IntelliMix Room installations to them.
- Route audio to IntelliMix Room to apply DSP.
Renewing a License
To renew your IntelliMix Room licenses, contact your Shure sales representative.
After you renew your licenses, your license ID stays the same. You won’t need to make any changes to any existing room setups. All installations will continue running normally.
What Happens When My License Expires?
IntelliMix Room stops passing audio when your license expires.You will receive email reminders to renew your license 90 days before it expires.
Deactivating Licenses
Deactivating the license for an IntelliMix Room installation causes that installation to stop passing audio.After deactivation, the license is available to be used again on another installation of IntelliMix Room.
To deactivate licenses:
- In your project, go to Licenses. This page shows all IntelliMix Room installations in the project.
- Select the installations you want to deactivate.
- Click Deactivate. If the devices being deactivated have internet connections, you can reuse those licenses. If the devices being deactivated do not have internet connections, the licenses won’t be available for reuse until they have an internet connection, or for up to 7 days.
- Deactivated licenses are now available to be assigned to other installations.
Moving or Reassigning Licenses
After purchasing, you might need to install IntelliMix Room on a different device than it was originally installed on.
To reassign a license to a new device:
- In your project, go to Licenses. This page shows all IntelliMix Room installations in the project.
- Select the license that you want to move to a different device.
- Click Deactivate. This causes the device to become unlicensed and stop passing audio. The license can be reused as soon as an internet connection is available for the device being deactivated.
- Install IntelliMix Room on the new device.
- In Designer, find the new installation of IntelliMix Room. Add it to the same project as the old installation.
- When prompted, choose the channel count that matches the old installation. Your license is now reassigned to the new device.
License Server Details
IntelliMix Room uses a cloud license server managed by Flexera. To see information about available licenses and your account, sign in at software.shure.com. Use the username and password you set up during purchase.
IntelliMix Room requires a continuous internet connection to verify each installation’s license status. Every 12 hours, the installation checks in with the license server to validate its license. If a device running IntelliMix Room can’t contact the cloud license server for 7 days, the installation becomes unlicensed and audio stops passing.
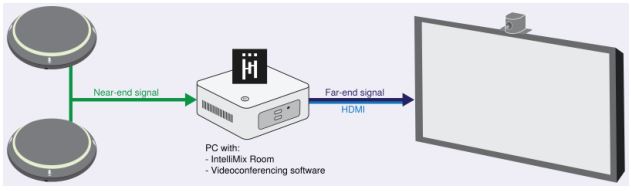
Using Videoconferencing Software with IntelliMix Room
To connect IntelliMix Room to videoconferencing software, select IntelliMix Room Echo Cancelling Speakerphone as the speaker and the microphone in your videoconferencing software. Do the same thing in the computer’s sound settings.
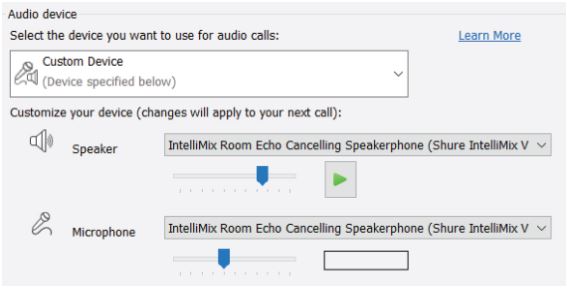
The microphone setting sends signals to the videoconferencing software from any microphone connected to IntelliMix Room.
The speaker setting sends a far-end signal from the videoconferencing software to IntelliMix Room. This is how IntelliMix Room gets an AEC reference and a signal for local sound reinforcement.
If you choose a different source as the speaker, you won’t be able to get farend audio from the videoconferencing software in to IntelliMix Room to use as an AEC reference.
Routing Microphone Signals to the DSP
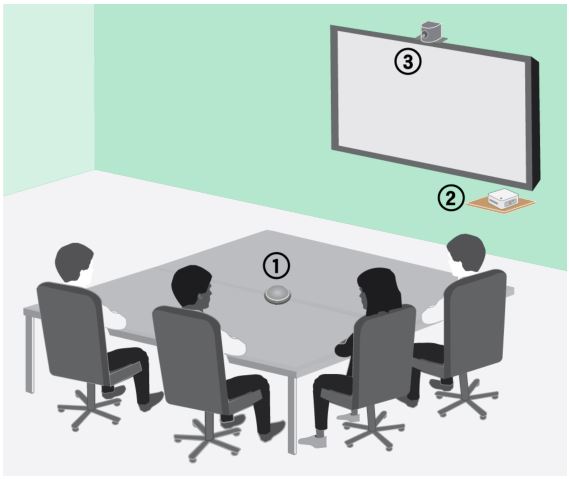
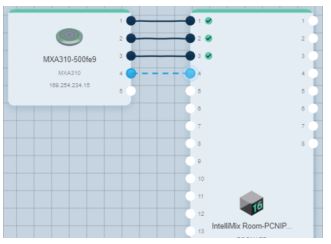
To route your microphone’s signal to IntelliMix Room for processing, use Designer.This example reflects a small conference room with:
- MXA310 using 4 channels
- Computer with 8-channel IntelliMix Room and videoconferencing software installed
- Display and camera
To route signals to the DSP:
- Create a location in Designer. Add the MXA310 and IntelliMix Room installation to the location from the Online devices list.
- Both devices must be in the same location to route audio between them.
- Open the location and go to Routing. This page lets you create Dante audio routes and link Shure networked mute buttons to devices.
- Click Optimize. The Optimize workflow automatically routes audio signals, applies DSP settings, turns on mute synchronization, and enables LED logic control for connected devices.You can also manually route audio and apply DSP settings outside of the Optimize workflow if you prefer.
- Check the audio routes and settings to make sure they fit your needs. You might need to:
- Delete unnecessary routes.
- Check levels and adjust gain.
- Verify that AEC reference signals are correctly routed.
- Fine-tune DSP blocks as needed.
- Open IntelliMix Room’s device configuration window. From here, you can adjust DSP settings and route the signal toother sources. Check that your mic inputs are using the AEC reference you want to use.
- To send your signal to other sources, go to Matrix mixer.
- To send the automix signal to videoconferencing software, route to the virtual audio output.
- To send the automix signal to other Dante sources, route to the appropriate Dante output. Use Dante Controller to route IntelliMix Room Dante outputs to non-Shure devices.
Note: If you’re using a non-Shure Dante microphone, use Dante Controller to route the near-end signal to IntelliMix Room.
Routing Far-End Audio to IntelliMix Room
To use acoustic echo cancellation (AEC), you need to route a far-end signal to the software. The AEC uses that far-end signal as a reference and blocks it from being sent back to the far end as echo.
Each input channel can use a different AEC reference source. If all channels use the same source, select the AEC reference source on each input channel.
- In your conferencing software’s settings, select IntelliMix Room Echo Cancelling Speakerphone as the playback device. This sends the far-end signal to IntelliMix Room’s virtual audio input.
- Open IntelliMix Room’s configuration window in Designer.
- On each microphone input channel, select AEC. Choose the far-end reference source from the menu.
- For best results, use the signal that feeds your local reinforcement system as the reference source.
Sending Far-End Audio to Loudspeakers and Other Sources
- Go to Matrix mixer.
- Find the far-end signal, which comes to the software through the Virtual Audio Input.
- Check the box where the Virtual Audio Input and the destination intersect. You can also adjust crosspoint gain here.Common destinations include:
- PC audio output (3.5 mm or HDMI connector): Go to Schematic view and click PC Output. Choose an output from the menu. Display speakers connected by HDMI cable or the 3.5 mm connector are common options.
- Dante output destinations (loudspeakers or Shure ANI, for example)
Use Cases
Overview of Shure Conferencing Devices
Shure offers a range of connectivity options for conferencing. MXA microphones, audio processors, and network interfaces all use Dante to send audio over standard IT networks. You can use Shure’s free Designer software to control most Shure devices and route audio between them.
Use Case: IntelliMix Room, 2 MXA310s, and Display with Built-In Speakers
- IntelliMix Room provides DSP and sends signals from the MXA310s to the videoconferencing software.
- Far-end signal comes in to IntelliMix Room’s Virtual Audio Input.
- Connect the computer to the display to use the display’s built-in speakers for sound reinforcement.
Setup Process
- Connect all devices, discover them in Designer, and place them in the same Designer location.
- In Designer, go to [Your location] > Routing.
- Click Optimize. This button automatically routes audio signals, applies DSP settings, turns on mute synchronization, and enables LED logic control for connected devices. You can customize the settings later if necessary, but Optimize gives you a good starting point.
- Check that the Virtual Audio Input is set as the AEC reference signal. Delete any unnecessary audio routes.
- Using the matrix mixer, route the far-end signal (the Virtual Audio Input) to the PC output. Click PC Output in the Schematic tab to choose the connected display.
If far-end participants hear echo artifacts, the display may be introducing latency. See Troubleshooting for help.
Equipment List:
- 2 MXA310s
- Computer in room with videoconferencing software and IntelliMix Room
- Display with built-in speakers
- Network switch supplying Power over Ethernet (PoE)
- Computer on network with Shure Designer software
- Cat5e (or better) Ethernet cables
- HDMI cable to connect computer to display
- Any other cameras or cables
Use Case: IntelliMix Room, 2 MXA910s, and Loudspeakers
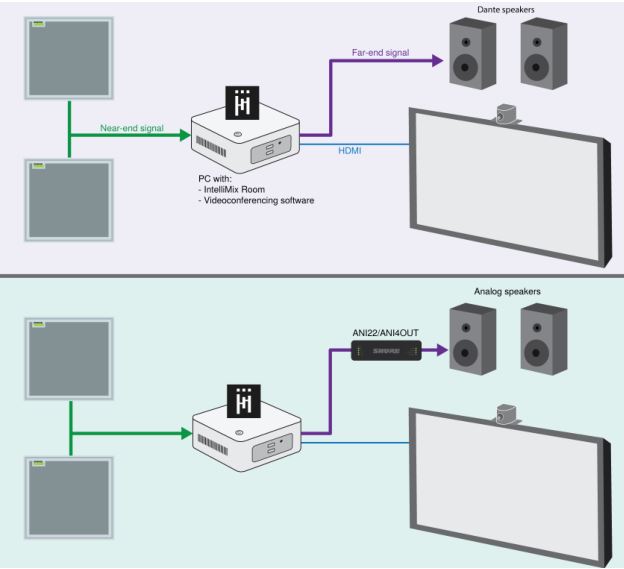
- IntelliMix Room provides DSP and sends signals from the MXA910s to the videoconferencing software.
- Far-end signal comes in to IntelliMix Room’s Virtual Audio Input
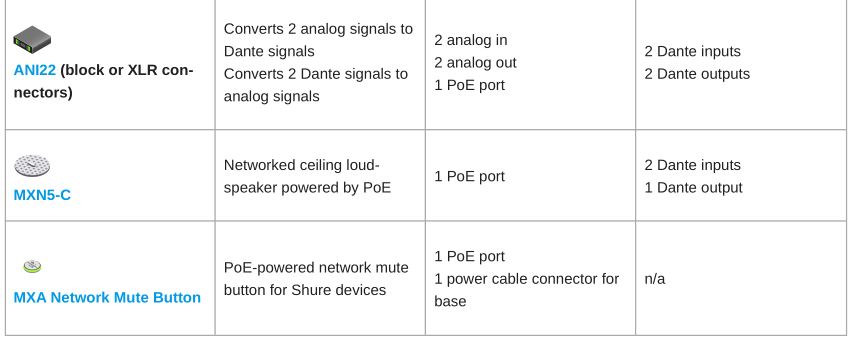
- Use Dante or analog loudspeakers for sound reinforcement. If you’re using analog speakers, use an ANI22 or ANI4OUT to bring the far-end signal off the network to the loudspeakers.
Setup Process
- Connect all devices, discover them in Designer, and place them in the same Designer location.
- In Designer, go to [Your location] > Routing.
- Click Optimize. This button automatically routes audio signals, applies DSP settings, turns on mute synchronization, and enables LED logic control for connected devices. You can customize the settings later if necessary, but Optimize gives you a good starting point.
- Check that the Virtual Audio Input is set as the AEC reference signal. Delete any unnecessary audio routes.
- Using the matrix mixer, route the far-end signal (the Virtual Audio Input) to a Dante output.
- Open Dante Controller software to route the signal from IntelliMix Room’s Dante output to the loudspeaker.
Dante Loudspeakers: Route the signal to the loudspeaker(s) in Dante Controller.
Analog Loudspeakers: Connect the loudspeakers to an ANI22 or ANI4OUT, and route the signal to the ANI in Dante Controller.
Equipment List:
- 2 MXA910s
- Computer in room with IntelliMix Room and videoconferencing software
- Dante or analog loudspeakers
- ANI22 or ANI4OUT for analog loudspeaker systems
- Network switch supplying Power over Ethernet (PoE)
- Computer on network with Shure Designer software
- Cat5e (or better) Ethernet cables
- Any other cameras, cables, or displays
Applying DSP Blocks
To apply DSP blocks:
- Open a location that contains an IntelliMix Room installation.
- Select the installation and click Configure.
- In Schematic view, click a DSP block to open the settings window. You can also access DSP blocks from the Inputs and Outputs tabs.
DSP blocks also get applied during Designer’s Optimize workflow.
Using Designer’s Optimize Workflow
Designer’s Optimize workflow speeds up the process of connecting systems with at least 1 microphone and 1 audio processor. Optimize also creates mute control routes in locations with MXA network mute buttons. When you select Optimize in a location, Designer does the following:
- Creates audio routes and mute control routes
- Adjusts audio settings
- Turns on mute synchronization
- Enables LED logic control for applicable devices
The settings are optimized for your particular combination of devices. You can customize settings further, but the Optimize workflow gives you a good starting point.
After optimizing a location, you should check and adjust settings to fit your needs. These steps may include:
- Deleting unnecessary routes.
- Checking levels and adjusting gain.
- Verifying that AEC reference signals are correctly routed.
- Fine-tuning DSP blocks as needed.
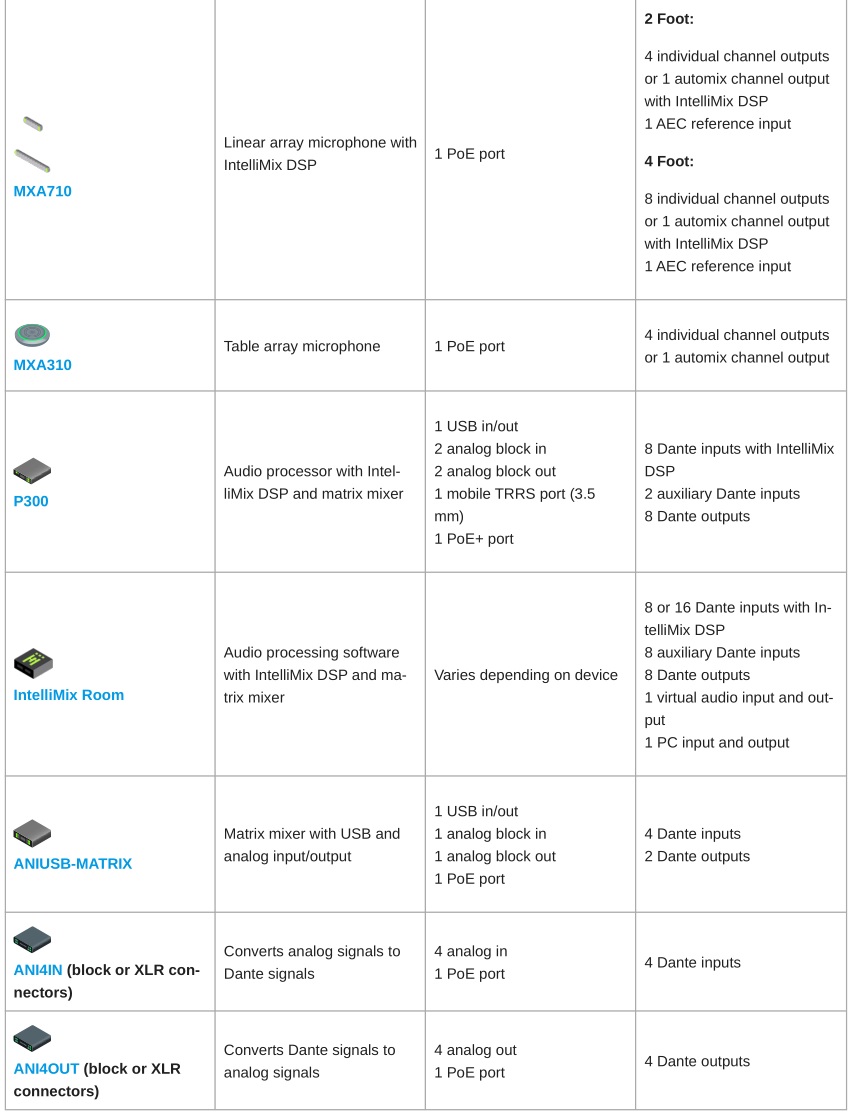
Compatible devices:
- MXA910
- MXA710
- MXA310
- P300
- IntelliMix Room
- ANIUSB-MATRIX
- MXN5-C
- MXA Network Mute Button
To use the Optimize workflow:
- Place all relevant devices in a location.
- Select Optimize. Designer optimizes microphone and DSP settings for your equipment combination.
If you remove or add devices, select Optimize again.
Schematic View
The schematic view in Designer provides an overview of the entire audio signal chain, with the ability to adjust settings and monitor signals.
Adjusting SettingsRight-click an input, output, or processing block to access the following options:
Per Channel
Copy / pasteCopy and paste settings between items. For example, set the equalizer curve on the USB output, and then use the same setting for the analog output. Or, copy the gain and mute status from one input channel to several others.
Mute / unmuteMutes or activates the channel
Enable / disableTurns processing on or off (does not apply to matrix mixer or automixer)
EditOpens the dialog to adjust parametersGlobal (right-click in blank area)
Mute all inputsMutes all input channels
Mute all outputsMutes all output channels
Unmute all inputsUnmutes all input channels
Unmute all outputsUnmutes all output channels
Close all dialogsClears all open dialogs from the workspace
Customizing the Workspace
Create a custom environment to monitor and control a set of inputs, outputs, and processing blocks from a single screen. There are two ways to break out dialogs:
- Right click > edit
- Double-click the input, output, or processing block.
Open as many dialogs as you need to keep important controls available.
Metering and Audio Routing
A meter appears underneath each input and output to indicate signal levels (dBFS).
The lines connecting inputs and outputs to the matrix mixer appear colored when connections are established. When a signal is not routed, the line appears gray. Use these tools to troubleshoot audio signals and verify connections and levels.
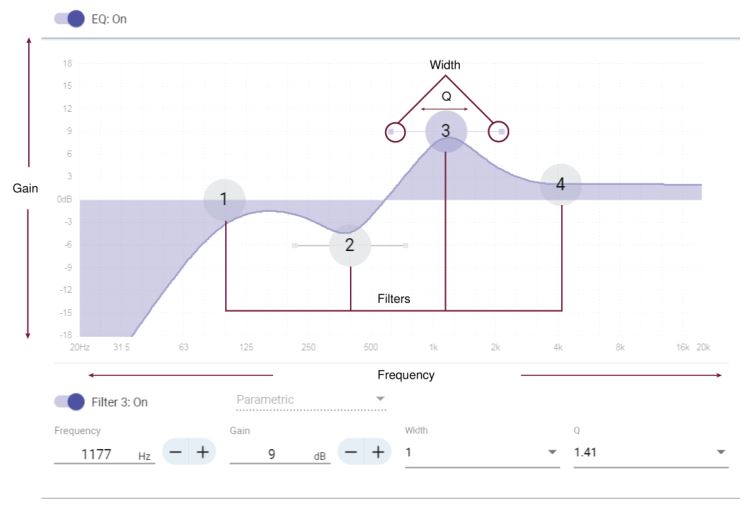
Parametric Equalizer
Maximize audio quality by adjusting the frequency response with the parametric equalizer.Common equalizer applications:
- Improve speech intelligibility
- Reduce noise from HVAC systems or video projectors
- Reduce room irregularities
- Adjust frequency response for reinforcement systems
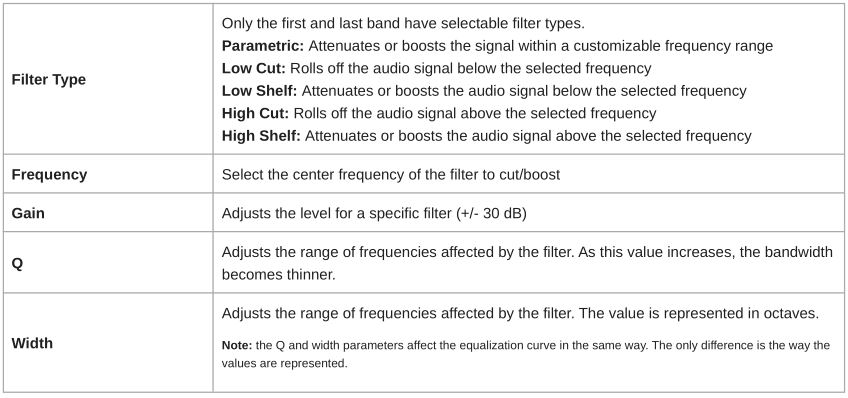
Setting Filter Parameters
Adjust filter settings by manipulating the icons in the frequency response graph, or by entering numeric values. Disable a filter using the check-box next to the filter.
Copy, Paste, Import, and Export Equalizer Channel Settings
These features make it simple to use effective equalizer settings from a previous installation, or simply accelerate configuration time.
Copy and Paste
Use to quickly apply the same PEQ setting across multiple channels.
- Select the channel from the pull-down menu in the PEQ screen.
- Select Copy
- In the pull-down menu, select the channel to apply the PEQ setting and select Paste.
Import and Export
Use to save and load PEQ settings from a file on a computer. This is useful for creating a library of reusable configuration files on computers used for system installation.

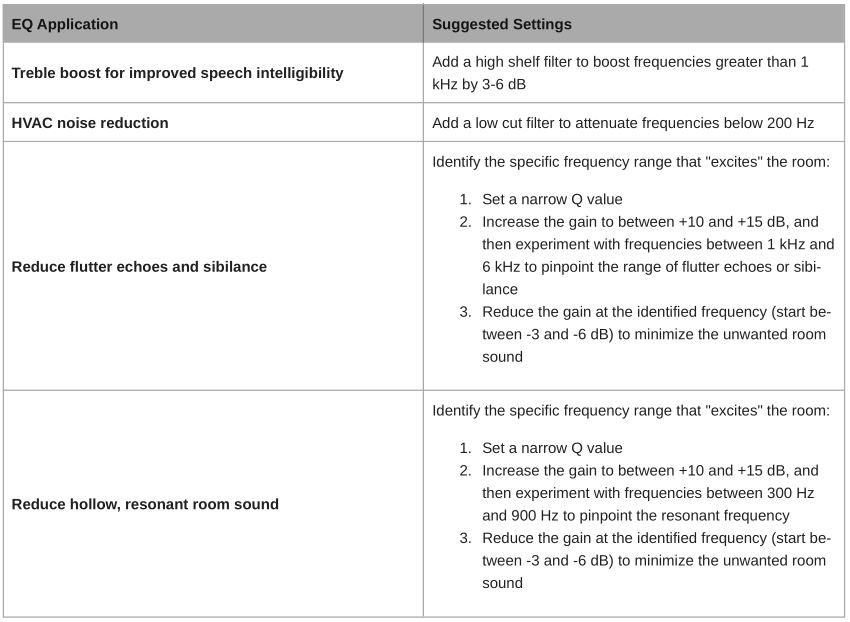
Equalizer Applications
Conferencing room acoustics vary based on room size, shape, and construction materials. Use the guidelines in following table.
EQ Contours for IntelliMix Room
Use the built-in equalizer contours to quickly apply EQ changes to any of the Dante input channels. Applying both EQ contours and other channel EQ filters has a cumulative effect, meaning that the EQ changes stack on top of each other.
Listen to and test your system as you make EQ changes.
Off: Turns off any active EQ contoursMXA910 High Pass: 300 Hz low-cut filterMXA910 Low Shelf: 960 Hz, -10 dB low-shelf filterMXA910 Multi-Band: 200 Hz low-cut filter, parametric 450 Hz, -10 dB, 2.87 Q, ½ octave parametric, 900 Hz, -10 dB, 2.87 Q, ½ octave parametricMXA310 Low Cut: 180 Hz low-cut filterMXA710 Low Shelf: 300 Hz, -6 dB low-shelf filter
Acoustic Echo Cancellation
In audio conferencing, a far-end talker may hear their voice echo as a result of a near-end microphone capturing audio from loudspeakers. Acoustic echo cancellation (AEC) is a DSP algorithm which identifies the far-end signal and stops it from being captured by the microphone to deliver clear, uninterrupted speech. During a conference call, the AEC works constantly to optimize processing as long as far-end audio is present.
When possible, optimize the acoustic environment using the following tips:
- Reduce speaker volume
- Position speakers farther from microphones
- Avoid pointing speakers directly at microphone coverage areas
Selecting a Reference Signal for AEC
To apply AEC, provide a far end reference signal. For best results, use the signal that also feeds your local reinforcement system.
P300: Go to Schematic and click any AEC block. Choose the reference source, and the reference source changes for all AEC blocks.MXA910: Route a far-end signal to the AEC Reference In channel.IntelliMix Room: Go to Schematic and click an AEC block. Choose the reference source. Each block can use a different reference source, so set the reference for each AEC block.
Designer’s Optimize workflow automatically routes an AEC reference source, but it’s a good idea to check that Designer chooses the reference source you want to use.
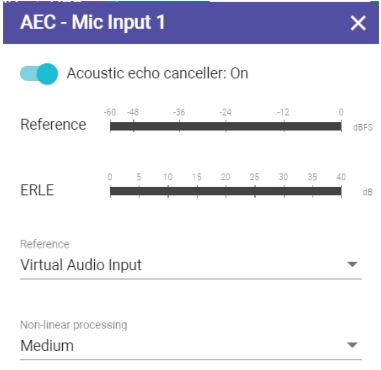
AEC Settings
Reference MeterUse the reference meter to visually verify the reference signal is present. The reference signal should not be clipping.
ERLEEcho return loss enhancement (ERLE) displays the dB level of signal reduction (the amount of echo being removed). If the reference source is connected properly, the ERLE meter activity generally corresponds to the reference meter.
ReferenceIndicates which channel is serving as the far end reference signal.
Non-Linear ProcessingThe primary component of the acoustic echo canceller is an adaptive filter. Non-linear processing supplements the adaptive filter to remove any residual echo caused by acoustic irregularities or changes in the environment. Use the lowest possible setting that is effective in your room.
Low: Use in rooms with controlled acoustics and minimal echoes. This setting provides the most natural sound for full duplex.
Medium: Use in typical rooms as a starting point. If you hear echo artifacts, try using the high setting.
High: Use to provide the strongest echo reduction in rooms with bad acoustics, or in situations where the echo path frequently changes.
Noise Reduction
Noise reduction significantly reduces the amount of noise in the signal caused by projectors, HVAC systems, or other environmental noise. It is a dynamic processor, which calculates the noise floor in the room and removes noise throughout the entire spectrum with maximum transparency.
SettingsThe noise reduction setting (low, medium, or high) represents the amount of reduction in dB. Use the lowest possible setting that effectively lowers noise in the room.
Compressor
Use the compressor to control the dynamic range of the selected signal.
ThresholdWhen the audio signal exceeds the threshold value, the level is attenuated to prevent unwanted spikes in the output signal. The amount of attenuation is determined by the ratio value. Perform a soundcheck and set the threshold 3-6 dB above average talker levels, so the compressor only attenuates unexpected loud sounds.
RatioThe ratio controls how much the signal is attenuated when it exceeds the threshold value. Higher ratios provide stronger attenuation. A lower ratio of 2:1 means that for every 2 dB the signal exceeds the threshold, the output signal will only exceed the threshold by 1 dB. A higher ratio of 10:1 means a loud sound that exceeds the threshold by 10 dB will only exceed the threshold by 1 dB, effectively reducing the signal by 9 dB.
Delay
Use delay to synchronize audio and video. When a video system introduces latency (where you hear someone speak, and their mouth moves later), add delay to align audio and video.
Delay is measured in milliseconds. If there is a significant difference between audio and video, start by using larger intervals of delay time (500-1000 ms). When the audio and video are slightly out of sync, use smaller intervals to fine-tune.
Automatic Gain Control (AGC)
Automatic gain control adjusts channel levels to ensure consistent volume for all talkers, in all scenarios. For quieter voices, it increases gain; for louder voices, it attenuates the signal.
Automatic gain control is postfader, and adjusts the channel level after the input level has been adjusted. Enable it on channels where the distance between the talker and the microphone may vary, or in rooms where many different people will use the conferencing system.
Target Level (dBFS)Represents the level that you want the gain to reach. This level is different from adjusting the input fader according to peak levels to avoid clipping. Suggested starting points:
- P300: -32 dBFS
- MXA910: -37 dBFS
- IntelliMix Room: -32 dBFS
Maximum Boost ( dB)Sets the maximum amount of gain that can be applied
Maximum Cut ( dB)Sets the maximum attenuation that can be applied
Tip: Use the boost/cut meter to monitor the amount of gain added or subtracted from the signal. If this meter is always reaching the maximum boost or cut level, adjust the input fader so the signal is closer to the target level.
Mute and Fader Groups
You can link channels to each other to create groups for muting and fader controls. You link channels by clicking for the channels and the controls that you want linked. For example, if channels 1, 2, and 3 are linked for Mute, muting any of those individual channels mutes all of the linked channels.
Adjusting Input levels
The Inputs tab controls a channel’s gain before it reaches the matrix mixer. However, you should also adjust the source’s gain before it reaches IntelliMix Room.
To monitor a source’s input level before IntelliMix Room processing: Set metering to Pre-gain in the Settings menu.
- Check the source level before it reaches IntelliMix Room. Verify that the networked microphones or other Dante sources are operating at nominal output levels.
- Adjust gain in the Inputs tab.
- This gain stage adjusts the signal level before it reaches the matrix mixer.
- Mix the levels as high as possible so that the loudest channel does not reach the peak level (0 dB) on the meter.
Pre- and Post-Gain Metering
The 2 metering modes allow you to monitor signal levels before and after the gain stages.
Input Metering
- Pre-gain: Displays the pre-fader signal level. If signals are too low or clipping, adjust them at the source.
- Post-gain: Displays the post-fader signal level, so the meters reflect gain adjustments on input faders. This meter does not include automatic gain control or any other processing.
Output Metering
- Pre-gain: Displays signal levels after input gain has been applied, but before the output faders. This meter includes input faders, digital signal processing blocks, automixing, and crosspoint gain.
- Post-gain: Displays the post-fader signal level sent to each output. This meter includes gain adjustments made on the output faders.
When to Use the Input and Automixer Gain Faders
There are 2 different gain faders that serve different purposes:
Input Gain (Pre-Gate)To adjust, go to Inputs. These faders affect a channel’s gain before it reaches the automixer and therefore affect the automixer’s gating decision. Boosting the gain here will make the channel more sensitive to sound sources and more likely to gate on. Lowering gain here makes the channel less sensitive and less likely to gate on.
Automixer Gain (Post-Gate)To adjust, go to Automixer. These faders adjust a channel’s gain after automixer’s gating decision. Adjusting the gain here will not affect the automixer’s gating decision. Only use these faders to adjust the gain of a channel after you are satisfied with the automixer’s gating behavior.
Matrix Mixer
The matrix mixer routes audio signals between inputs and outputs for simple and flexible routing:
- Send a single input channel to multiple outputs
- Send multiple input channels to a single output
Crosspoint Gain
Crosspoint gain adjusts the gain between a specific input and output, to create separate submixes without changing input or output fader settings. Select the dB value at any crosspoint to open the gain adjustment panel.
Gain staging: Input fader > crosspoint gain > output fader
Routing Channels
Connect inputs and outputs by selecting the box where they intersect.
Automix Modes
GatingGating mode delivers fast-acting, seamless channel gating and consistent perceived ambient sound levels. Off-attenuation in this mode is fixed at -20 dB per channel, regardless of the number of open channels.
Gain SharingGain sharing mode dynamically balances system gain between open and closed channels. The system gain remains consistent by distributing gain across channels to equal one open channel. The scaled gain structure helps to reduce noise when there is a high channel count. When fewer channels are used, the lower off-attenuation provides transparent gating.
ManualManual mode sums all active tracks and sends the summed signal over a single Dante output. This provides the option to route an individual signal for reinforcement or recording, without enabling automixing. The settings from the faders in the standard monitoring view apply to the summed output.
Automix SettingsNote: Not all settings are available on all automixers.
Leave Last Mic OnKeeps the most recently used microphone channel active. The purpose of this feature is to keep natural room sound in the signal so that meeting participants on the far end know the audio signal has not been interrupted.
Gating SensitivityChanges the threshold of the level at which the gate is opened
Off AttenuationSets the level of signal reduction when a channel is not active
Hold TimeSets the duration for which the channel remains open after the level drops below the gate threshold
Maximum Open ChannelsSets the maximum number of simultaneously active channels
PriorityWhen selected, this channel gate activates regardless of the number of maximum open channels.
Always OnWhen selected, this channel will always be active.
Send to MixWhen selected, sends the channel to the automix channel.
SoloMutes all of the other channels
Automix Gain MeterWhen enabled, changes gain meters to display automix gating in real time. Channels that gate open will display more gain than channels that are closed (attenuated) in the mix.
Mic Optimization Mode (P300 only)Select the microphone that is used with the automixer for best performance. For best results, route microphone channels to the processing device and click Auto configure (this automatically selects the correct mic optimization mode).
Use the Off setting when using a Shure Microflex Wireless system, or traditional wired microphones.
Gate Inhibit (P300 only)Enable gate inhibit to prevent far-end audio from gating on near-end microphone channels.
- Make sure all input gain levels are properly adjusted and all other automixer settings are configured.
- Disable Leave last mic on.
- Perform a test call with the far end to adjust the gate inhibit fader. Increase the fader level so that the far end indicator turns on, and far-end audio does not gate on the near-end automixer channels.
- Verify that near-end talkers still activate the automixer channels. If the channels do not turn on, lower the gate inhibit fader.
- Re-enable Leave last mic on if necessary.
Automixer Direct Out Tap Points
In the Automixer tab, use the menus below each channel to choose where the signal to the matrix mixer should come from. All options include input channel gain, mute, solo, and PEQ.
Pre-Processing/Pre-GateSends a signal without AEC, noise reduction, or AGC to the matrix mixer.
Post-Processing/Pre-GateSends a signal with AEC and noise reduction but without automixer gating or AGC to the matrix mixer.
Post-Processing/Post-GateSends a signal with automixer gating, AEC, and noise reduction but without AGC to the matrix mixer.
Pre-Processing/Post-GateSends a signal with automixer gating but without AEC, noise reduction, or AGC to the matrix mixer.Note: Direct out tap points are not available on all Shure automixers.
Network Setup Examples
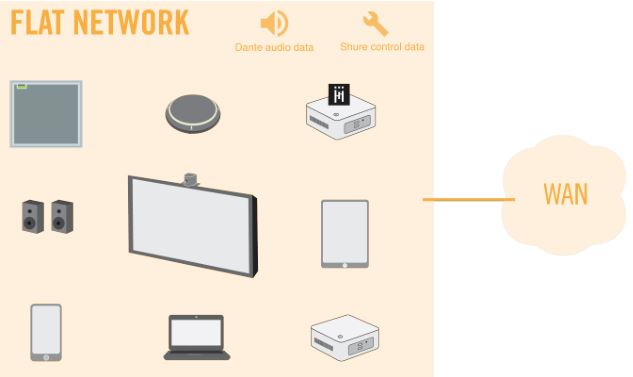
IntelliMix Room works with many different types of networks. Here are some of the most common network setups:
- Flat Network
- All A/V and corporate devices are on the same network.
- Use one network for Shure control and Dante audio data.
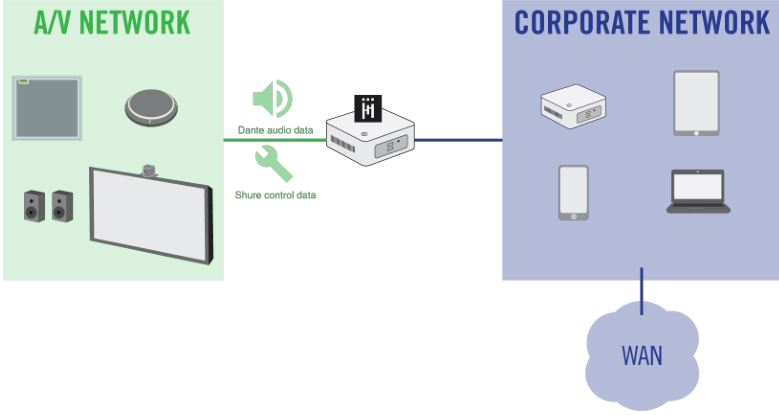
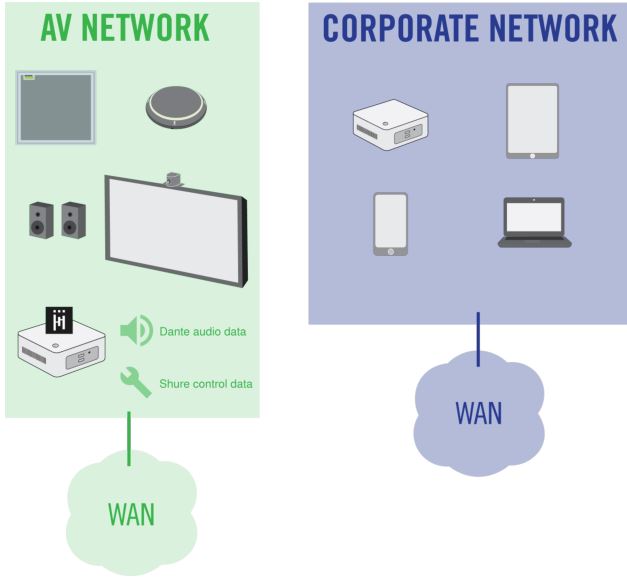
- Corporate and AV Network
- All A/V devices are on a separate network from the corporate network.
- The computer running IntelliMix Room uses the A/V network for Dante audio and Shure control data.
- The computer uses a wired connection to the corporate network for internet. USB 3.0 to gigabit Ethernet adapters are a common way to connect to 2 NICs.
- Corporate and AV Network with Separate Internet Connections
- IntelliMix Room and all other A/V devices are on a separate network that has its own internet connection, which is completely separate from the corporate network.
- Use the A/V network for both Dante audio and Shure control data.
Choosing Networks for Shure Control and Dante Audio
This software sends 2 types of data over the network: Shure control data and Dante audio data. You can use the same NIC (network interface card) for both, or use 2 different NICs to separate the traffic.
During installation, you will be asked to choose a network for each one.
Shure control NIC:
- Choose the network that Designer uses.
- Used for device discovery and control
Dante audio NIC:
- Choose the same network as other Dante devices to send audio between devices.
- Cannot use Wi-Fi
- Used to carry Dante digital audio
To change the NICs after installation, click the IntelliMix Room icon in the system tray of the computer running IntelliMix Room.To change Designer’s NIC, go to Settings.
Choosing a Licensing NIC
During installation, the software prompts you to choose a NIC (network interface card) to use for licensing identification. The NIC must be permanent and not removable. Do not use NICs that could be removed, such as a USB-to-Ethernet adapter or a docking station.
This setting cannot be changed after installation.
Security Testing
Shure IntelliMix Room underwent penetration testing by a reputable third-party security assessment company. The test results placed IntelliMix Room above the average of all applications tested. Going forward, Shure will continue to internally and externally test the security of IntelliMix Room. For more information on the test results, please contact productsec[email protected].
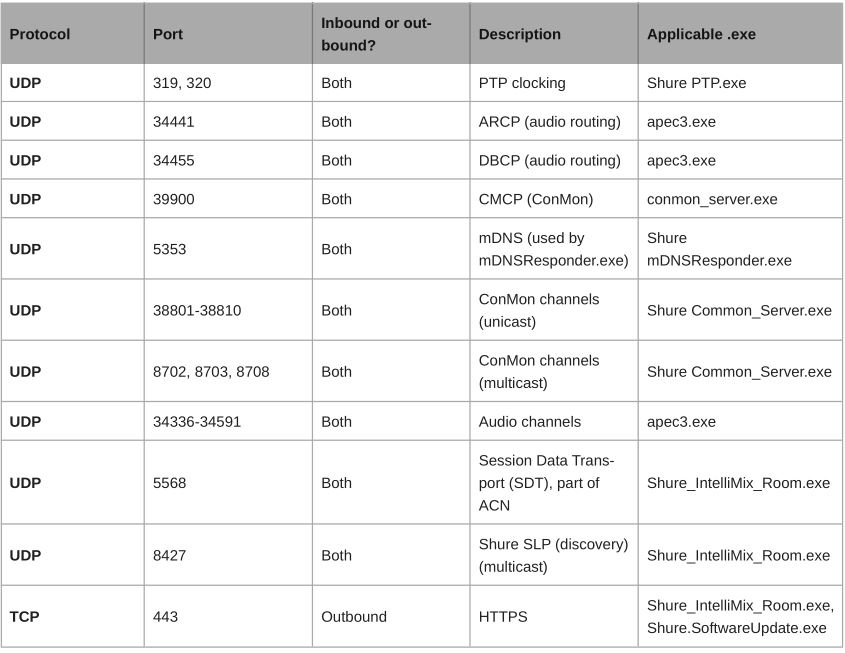
IntelliMix Room IP Ports and Protocols
Compatibility with Dante Domain Manager
This device is compatible with Dante Domain Manager software (DDM). DDM is network management software with user authentication, role-based security, and auditing features for Dante networks and Dante-enabled products.
Considerations for Shure devices controlled by DDM:
- When you add Shure devices to a Dante domain, set the local controller access to Read Write. Otherwise, you won’t be able to access to Dante settings, perform a factory reset, or update device firmware.
- If the device and DDM can’t communicate over the network for any reason, you won’t be able to control Dante settings, perform a factory reset, or update device firmware. When the connection is reestablished, the device follows the policy set for it in the Dante domain.
- If Dante device lock is on, DDM is offline, or the configuration of the device is set to Prevent, some device settings are disabled. These include: Dante encryption, MXW association, AD4 Dante browse and Dante cue, and SCM820 linking.
See Dante Domain Manager’s documentation for more information.
Note: IntelliMix Room is not compatible with Dante’s device lock feature.
How to Recover IntelliMix Room from Inaccessible Dante Domains
If Dante Domain Manager isn’t accessible, you can manually remove the IntelliMix Room installation from the domain. DDM can become inaccessible if an installation of IntelliMix Room gets moved from one network to another and it doesn’t get removed from the Dante domain first.
To remove the installation from the domain:
- Stop the IntelliMix Room service (Task manager > Services > Right-click IntelliMix Room > Stop).
- Clear the contents inC:\ProgramData\Shure\IntelliMixRoom\dalconfig.
- Restart the IntelliMix Room service. This clears the domain credentials and also resets other Dante settings.
Dante Flows for Shure Devices
Dante flows get created any time you route audio from one Dante device to another. One Dante flow can contain up to 4 audio channels. For example: sending all 5 available channels from an MXA310 to another device uses 2 Dante flows, because 1 flow can contain up to 4 channels.
Every Dante device has a specific number of transmit flows and receive flows. The number of flows is determined by Dante platform capabilities.
Unicast and multicast transmission settings also affect the number of Dante flows a device can send or receive. Using multicast transmission can help overcome unicast flow limitations.
Shure devices use different Dante platforms:
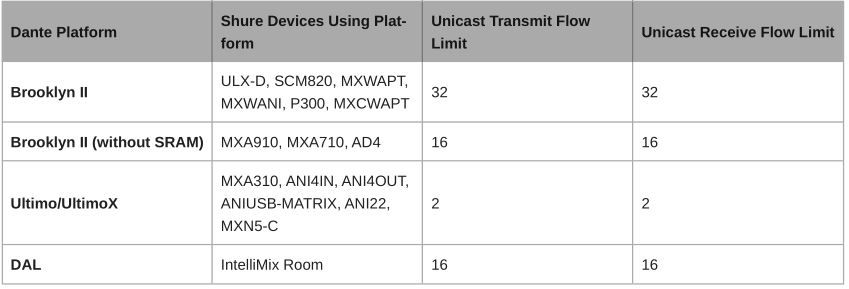
Learn more about Dante flows in our FAQs or from Audinate.
Using Command Strings with IntelliMix Room
To control IntelliMix Room with third-party control systems, turn on command strings in Designer. You must choose an open port on the computer running IntelliMix Room to send and receive command strings.Default port: 2202Port range: 1025-65534
- In Designer, open the installation of IntelliMix Room you want to control and go to Settings > Command strings.
- Turn on command strings.
- Enter an available port to send and receive the command strings. Make sure that the port isn’t being used by any other programs installed on the computer.
To test if the port is available:
- Send a command to IntelliMix Room. Make sure you are targeting IntelliMix Room’s control IP address.
- If you don’t receive a response, the port is being used by another program.
- Try a different port number and send the command until you receive a response.
- For best results, install all software on the computer before choosing a port for command strings. Adding new software after setting up command strings can change how the computer’s ports are used, which can affect command strings.
A complete list of command strings is available at pubs.shure.com/command-strings/IntelliMixRoom.
Event Logs
There are 2 different event logs to help with troubleshooting: the IntelliMix Room-level event log, and the Designer-level event log. Each one logs different types of events.
IntelliMix Room Event LogTo access, open IntelliMix Room from the system tray and select Event log.IntelliMix Room’s event log collects detailed information about the license status, CPU performance, audio performance, and other possible issues. If you need to contact Shure’s support team, this event log provides the most detail about each installation.
Designer Event LogTo access, open Designer and select Event log.Designer’s event log collects high-level information about all devices and software controlled by Designer. This event log isn’t as detailed as the device-specific event logs.
Event logs collect up to 1,000 entries. Select Export log to create a CSV (comma separated values) document to save and sort the log data.
Severity Level
InformationAn action or event has been successfully completed.
WarningAn action cannot be completed, but overall functionality is stable.
ErrorA problem has occurred that could inhibit functionality.
Log Details
DescriptionProvides details on events and errors, including IP address and subnet mask
Time StampTime since most recent boot-up
Event IDIndicates event type for internal reference
Troubleshooting


ResetRestore factory defaults: Resets all application and license settings to the factory defaults. Network settings remain the same.
Specifications
Control SoftwareShure Designer
Digital Signal ProcessingAutomatic mixing, Matrix mixer, Acoustic Echo Cancellation (AEC), Noise Reduction, Automatic Gain Control, Compressor, Delay, Equalizer (4-band Parametric), Mute, Gain (140 dB range)
Frequency ResponseDante Digital Audio or Virtual Audio Device — 20 to 20,000 Hz
Sampling RateDante Digital Audio or Virtual Audio Device — 48 kHz
Bit DepthDante Digital Audio — 24 bitVirtual Audio Device — 24 or 16 bit
LatencyNot including Dante latencyAuxiliary Dante Inputs to Dante out — 28 msDante Mic Inputs to Dante out (AEC enabled) — 34.7 msDante Mic Inputs to Dante out (AEC and NR disabled) — 28 ms
Acoustic Echo Cancellation Tail LengthUp to 300 ms
Shure IntelliMix Room Audio Processing Software User Manual – Shure IntelliMix Room Audio Processing Software User Manual –
[xyz-ips snippet=”download-snippet”]