 Building Networks for PeopleQuick Installation GuideDWC-1000 Wireless ControllerThis document will guide you through the basic installation process for your new D-Link Wireless Controller.DWC-1000

Documentation also available onCD and via the D-Link Website
About This Guide
This guide gives step-by-step instructions for setting up your D-Link DWC-1000 Wireless Controller. Please note that the model you have purchased may appear slightly different from those shown in the illustrations.The DWC-1000 Wireless Controllers are full-featured wireless LAN controllers designed for small network environments.The controllers possess a range of network and access point management and security functions. The controllers can control up to 6 access points by default, and up to 24 after being upgraded with license packs.The DWC-1000 can be upgraded with three optional license packs:
- The DWC-1000-AP6/DWC-1000-AP6-LIC License Packs enable the Wireless Controller to manage 6 extra access points. The DWC-1000 can be upgraded up to 3 times with this license pack, enabling it to support up to 24 access points in total.
- The DWC-1000-VPN/DWC-1000-VPN-LIC License Packs enable the Wireless Controller to support VPN, firewall, Website Filter (static WCF), and routing functions.
- The DWC-1000-WCF-12/DWC-1000-WCF12-LIC License Packs enable the dynamic WCF (Category filtering) feature for one year. It allows you to filter up to 32 categories of websites to restrict users from accessing them from your networks, such as pornography, gambling, online shopping, and many others. Dynamic WCF also has a logging feature. Whenever a user tries to access a website that is blocked, the corresponding event will be logged.
Note:
- Ensure that firmware v4.2.0.6 or above for DWC-1000 is being used.
- Ensure that the DWC-1000-VPN License is already activated before activating the DWC-1000-WCF-12 License.
Unpacking the ProductOpen the shipping carton and carefully unpack its contents. Please consult the following packing list to make sure that all the items are present and undamaged. If any item is missing or damaged, please contact your local D-Link reseller for a replacement.
- One (1) DWC-1000 Wireless Controller
- One (1) Power adapter
- One (1) Console Cable (RJ-45 to DB-9 Cable)
- One (1) Ethernet (CAT5 UTP/Straight-Through) Cable
- One (1) Reference CD (CD-ROM containing product documentation in PDF format)
- Two (2) Rack Mounting Brackets
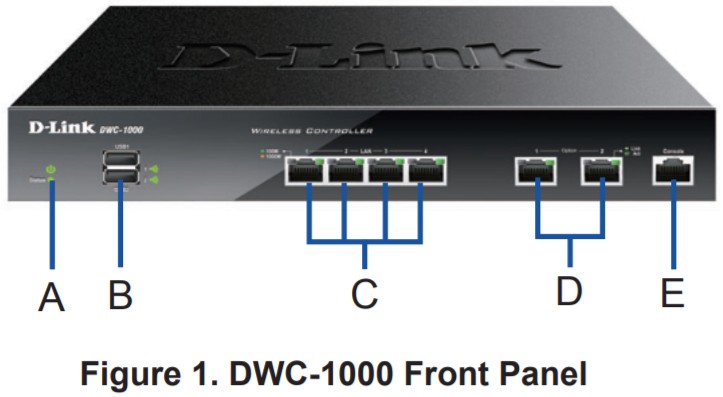
Product OverviewFront Panel – DWC-1000
| Item | Feature | Description |
| A | Power LED | Indicates the Wireless Controller is powered on. |
| B | USB Ports (1-2) | These can support various USB 1.1 or 2.0 devices including:
1. Flash Disk or Hard Disk for network sharing.2. Printer. |
| C | Gigabit LAN ports (1-4) | Connect Ethernet devices such as computers, switches, and hubs. |
| D | Gigabit Option ports (1-2) | The Option1 port is for connection to a backbone. After activating the VPN/Firewall/Router function through a license pack upgrade, the Option1 port will act as a WAN port for connecting to a cable or DSL modem; and the Option2 port can serve as a WAN or DMZ port for dual WAN connections or internal Server Farm purposes. |
| E | Console Port | Used to access the CommandLine Interface (CLI) via an RJ-45 to DB-9 console cable. |
Table 1. Front Panel Descriptions
Device Status LEDs and Ethernet Port LEDs

Figure 2. Ethernet RJ-45 Port LED
The device LEDs show information about the current device status. When the device powers up, the POWER/STATUS LED will be lit solid orange during the power-on process.The startup takes approximately one minute to complete after which the LED will change to solid green.If you want to turn the device off and on again, we recommend you wait a few seconds between shutting it down and powering it back on.The Ethernet LEDs show the status of each Ethernet port. Table 2 lists the name, color, status, and description of each device LED.
| LED Indicators | Color | Status | Description |
| Power/ Status | Orange/ Green | Solid Orange | Power-on process in progress. |
| Solid Green | Power-on process complete. | ||
| BlinkingOrange | The device has crashed and is in recovery mode. | ||
| Blinking Green | The system is defective and firmware upgrades have bled. | ||
| Light Off | The device is powered off. | ||
| USB | Green | Solid Green | The Ink is good. |
| Blinking Green | There is activity on this port. | ||
| Light Off | No link. | ||
| TX/RX Status | Green | Solid Green | Link is present. |
| Blinking Green | Port is sending or receiving data. | ||
| Light Off | No Link. | ||
| LINK Speed | Green/ Orange | Solid Green | Port is operating at 100 Mbps. |
| Solid Orange | Port is operating at 1000 Mbps. | ||
| Light Off | Port is operating at 10 Mbps. |
Table 2. Device Status LED Descriptions
DWC-1000 Default Interface Settings
| Ethernet Interface | Interface Type | IP Address | Web-Based Management |
| LAN(1-4) | Static IP | 192.168.10.1/24 | Enabled |
| Options | DI1CP Client | 0.0.0.0/0 | Disabled |
| Option2 (Configurable Port) | DI1CP Client (default) | 0.0.0.0/0 | Disabled |
| Static IP (When itsconfigured as DMZ) | 172.17.100.254/24 | Disabled |
Table 3. Default Interface Settings
Note:
- The Option2 port will be usable after activating a VPN/Firewall/Router License Pack. The Option2 port is a configurable port that supports various advanced scenario applications. When the Option2 port is configured as a DMZ port, the IP address will be changed to 172.17.100.254.
- The D-Link Wireless Controller only allows Web GUI access from LAN interfaces by default for security reasons.
Installation and Connection
This chapter describes how to install a DWC-1000 device in a standard 19-inch equipment rack and how to connect cables and power to the device.Before You BeginObserve the following precautions to help prevent shutdowns, equipment failures, and injuries:
- Before installation, always check that the power supply is disconnected.
- Ensure that the room in which you are operating the device has adequate air circulation and that the room temperature does not exceed 40 o C o (104 F).
- Ensure there is one meter (three feet) of clear space in the front and back of the device.
- Do not place the device in an equipment rack frame that blocks the air vents on the sides of the chassis. Ensure that enclosed racks have fans and louvered sides.
- Ensure that none of these hazardous conditions exist before installation: moist or wet floors, leaks, ungrounded or frayed power cables, or missing safety grounds.
Installing Equipment
You can mount the DWC-1000 into a standard 19-inch equipment rack. To install the DWC-1000 into a rack:
- Attach the mounting brackets to each side of the chassis as shown in Figure 3 and secure them with the screws provided.
 Figure 3. Attach the Rack Mount Brackets
 - Then, use the screws provided with the equipment rack to mount the device in the rack as shown in Figure 4.
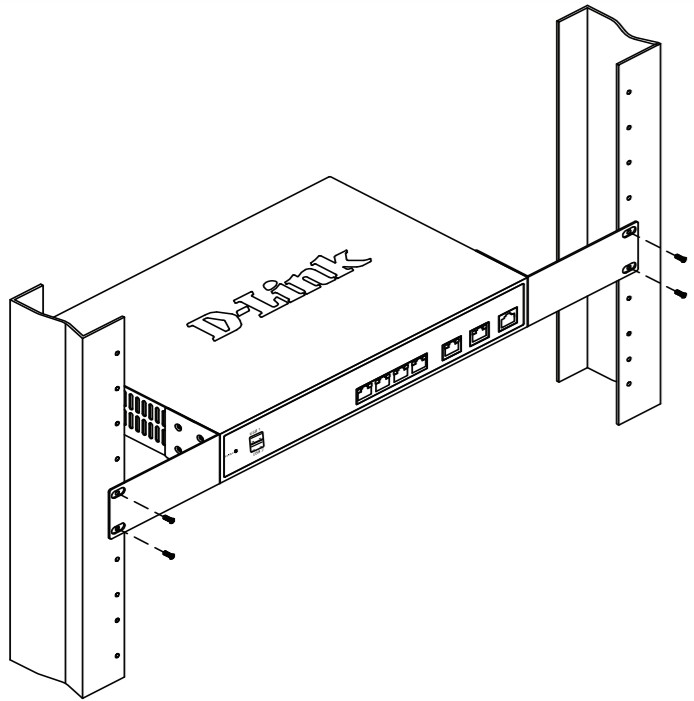 Figure 4. Install the Wireless Controller in a standard-sized equipment rack
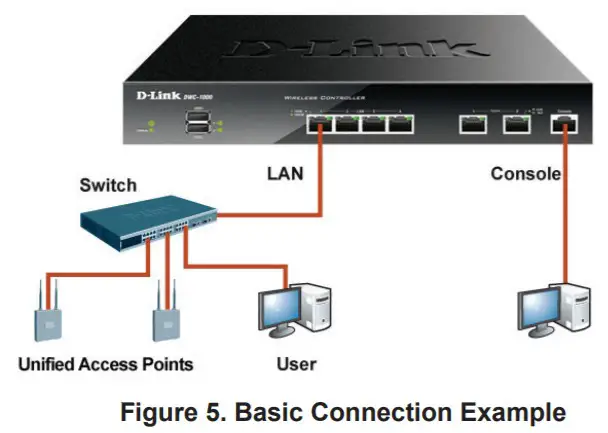
Connecting Power and Turning On/OffThe AC power cord shipped with the device connects the device to the earth ground when plugged into a grounded AC power outlet. The device must be grounded during normal operation.To connect the device to a power source, plug one end of the AC power cord into the AC power connector on the back panel of the device. Plug the other end into an AC power source.Note: We recommend using a surge protector for the power connection.To power on the DWC-1000, press the AC power switch on the rear panel to the on position. To power off the device, press the power switch to the off position.Connecting the Device to a NetworkThis section provides basic information about physically connecting the DWC-1000 to a network. Please note that the Option2 port can only be used after activating the VPN/Firewall/Router functions through license upgrading.To connect the necessary cables as shown in Figure 5:
- Connect an RJ-45 cable from one of the ports labeled LAN (1-4) to a switch in the LAN network segment.
- Connect an RJ-45 to DB-9 cable from the console port for CLI (Command Line Interface) management access.
Initial Configuration
The Wireless Controller software is preinstalled on the DWC-1000. When the device is powered on, it is ready to be configured. While the device has a default factory configuration that allows you to connect to the device, you must perform further configuration for your specific network requirements.Discovering the Wireless ControllerUsing the WebUITo use the WebUI, the workstation from which you are managing the device must initially be on the same subnetwork as the device. The workstation also requires a compatible browser:
| Browser | Version | |
 |
Microsoft Internet
Explorer |
9.0 or higher |
 |
Mozilla Firefox | 20 or higher |
 |
Opera | 12.0 or higher |
 |
Apple Safari | 5.0 or higher |
 |
Google Chrome | 25 or higher |
Table 4. Browser Compatibility
To access the device’s WebUI:
- Connect your workstation to one of the ports labeled LAN (1-4).
- Ensure your workstation is configured with a static IP address in the 192.168.10.0/24 subnet.Note: Disable pop-up blocking software or add the management IP address http://192.168.10.1 to your pop-up blockers allow list.
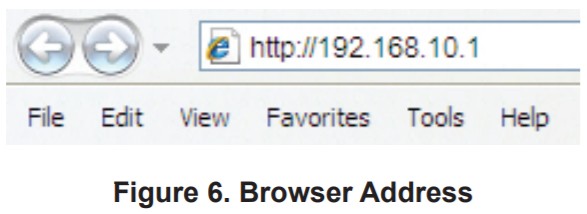
- Launch your browser and enter the IP address for the LAN interface (The default IP address is http://192.168.10.1), then press Enter.

- Log in to the Wireless Controller Web Interface. The default login information is:
Username: adminPassword: admin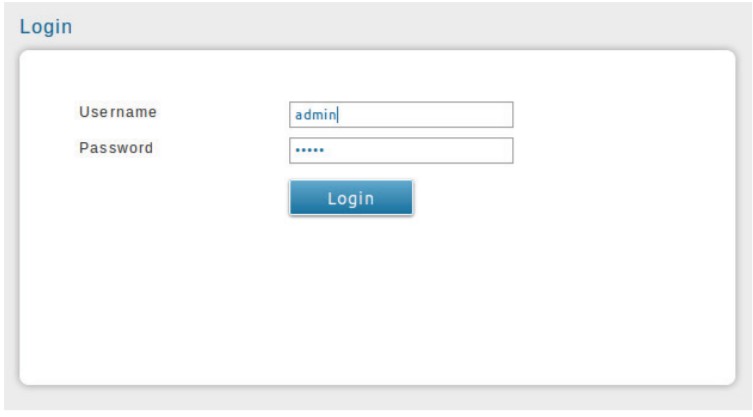 Figure 7. Authentication Dialog
Using a Console Connection (RJ-45 to DB-9 DCE)
The DWC-1000 Wireless Controller provides a serial port that allows you to connect to a computer or terminal for monitoring and configuring the device. This port is an RJ-45 connector, implemented as a data communication terminal equipment (DCE) connection.To use the console port connection, you need the following equipment:
- A terminal or a computer with both a serial port and the ability to emulate a terminal.
- The included RJ-45 to DB-9 cable.
- If your Laptop or PC does not have an RS-232 connector, a converter (not included) is required.
To establish a console connection:
- Plug the RJ-45 connector of the suppliedRJ-45 to DB-9 cable directly into the console port on the Wireless Controller.
- Connect the other end of the cable to a terminal or to the serial connector of a computer running terminal emulation software.Set the terminal emulation software values as follows:Baud rate: 115200Data bits: 8Parity: NoneStop bits: 1Flow control: None
- Connect the Wireless Controller following the instructions in the “Connecting Power and Turning On/Off” section in this guide, then switch on your device. The boot sequence will be displayed on the terminal.
- Once the boot sequence is completed, the command prompt will be displayed and the device is ready to be configured.
Discovering and Managing The Unified AP
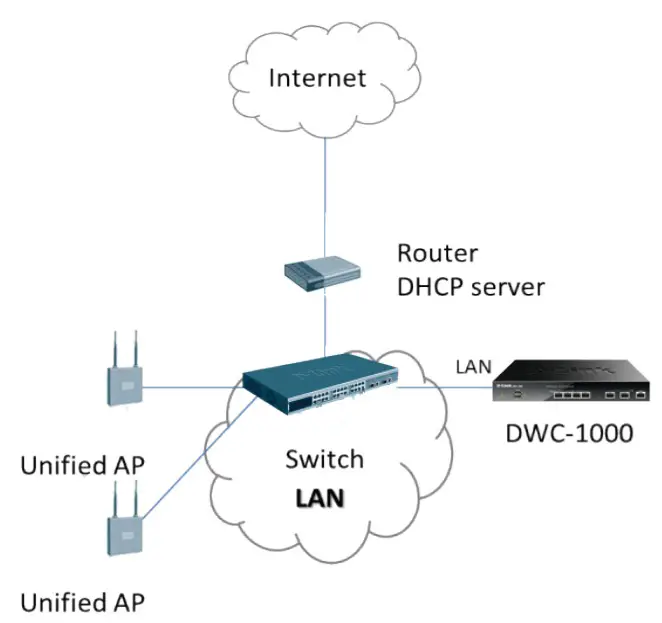
Figure 8. Example of WLAN network deployment
To discover and manage the Unified AP:
- Record the MAC address of each Unified AP on the network.
- Connect the Unified AP you want to configure to the local area Ethernet network.
- Log into the DWC-1000 and set the LAN IP address to be in the subnet of the local area Ethernet network.
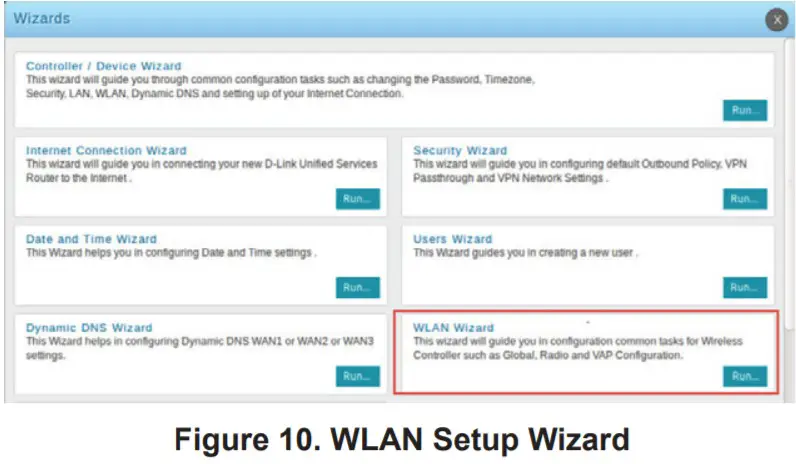
- Go through the WLAN Setup Wizard to manage your access points. Navigate to Wizard > WLAN Setup Wizard.
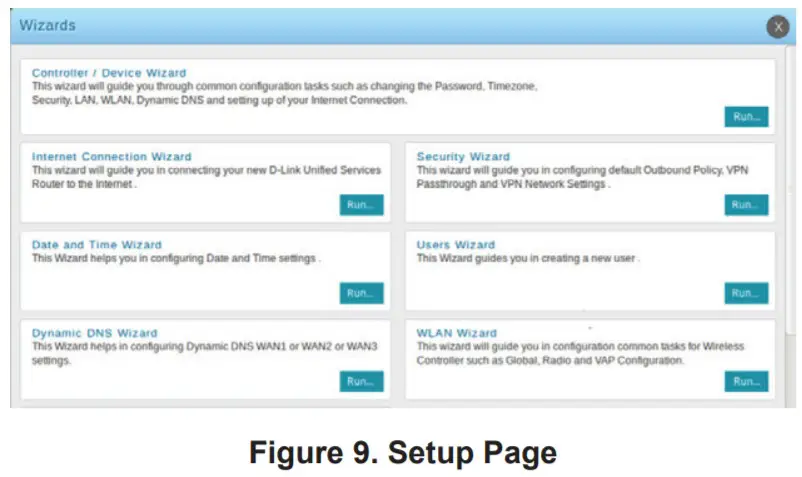
Obtain and enter the following information to complete the WLAN Setup Wizard:
4.1 Wireless Global Configuration – Choose the country code.
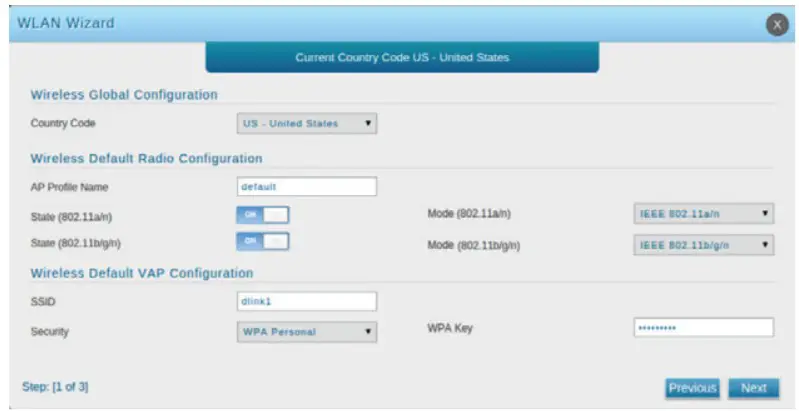
Figure 11. Choose the Country Code
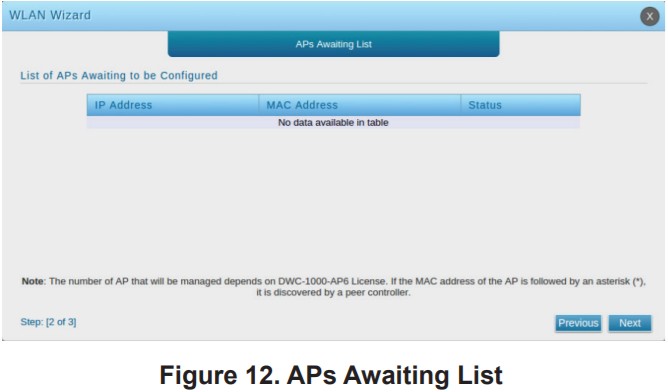
4.2 Wireless Default Radio Configuration – Create an AP Profile for the radio setting of the wireless network, and set the radiomode.4.3 Wireless Default VAP Configuration – Enter the SSID network name, then select a security method. If you select Static WEP or WPA Personal, enter a secure passphrase for your WLAN.4.4 List of APs Awaiting to be Configured – This page displays the list of APs awaiting to be managed.
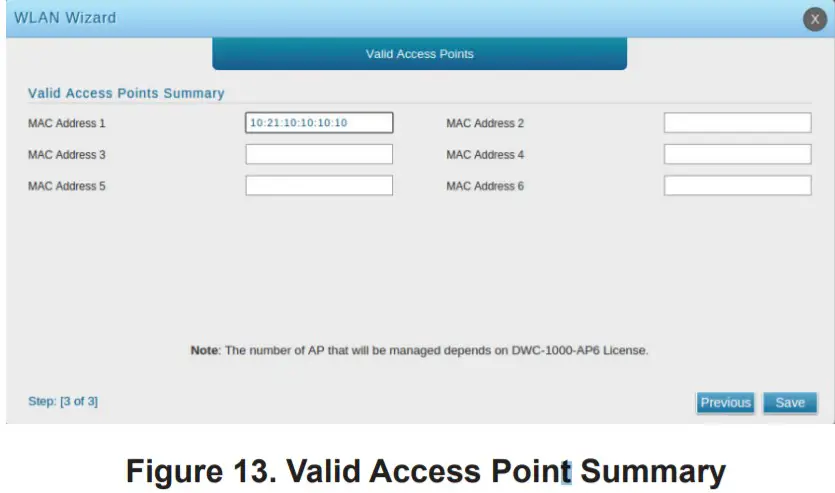
 4.5 Valid Access Point Summary –Enter at least one MAC address of the AP that you want to manage.Note: If a password was set for the AP while in standalone mode, this requires APs to be authenticated before they can associate with the controller. Type the same password that was set in standalone mode in the Authentication Password box. If no password was set in standalone mode, you do not need to enter a password here.The valid password range is between 8 and 63 alphanumeric characters.The password in this field must match the password configured on the AP.
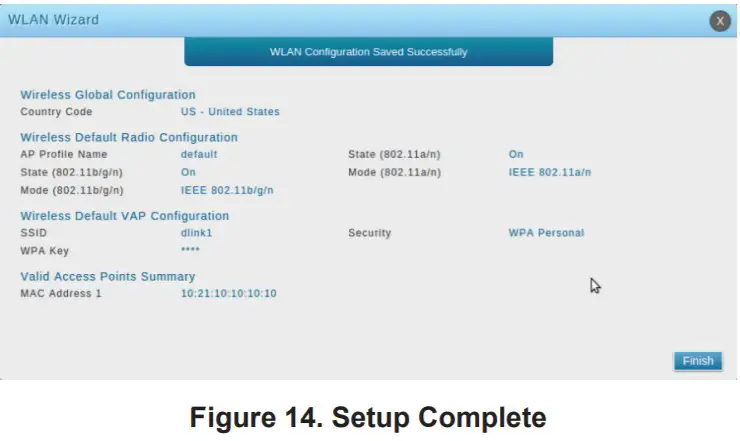
 4.6 Save Settings and Connect – When the WLAN Connection Setup Wizard has been completed, click the Finish buttonto save your settings and connect.
Additional InforYou can refer to the additional documentation found in the PDF format on the accompanying master CD or visit the D-Link website online for more information on how to configure the DWC-1000 device.D-Link Wireless Controller User ManualThis manual describes the general operation and control of the Wireless Controller firmware which drives and controls the Wireless Controller series hardware. It includes examples of how to carry out typical administrative tasks such as setting up Rogue AP detection and how to use the Wireless Controller in various scenarios.D-Link Wireless Controller CLI Reference GuideThis document describes all available text-based commands that can be used on an RJ-45 to DB-9 Console or SSH interface to configure the Wireless Controller.Online SupportIf there are any issues that are not in the user manual, please visit http://support.dlink.com, which will direct you to your appropriate local D-Link website.Warranty InformationThe D-Link Limited Lifetime Warranty information is available at http://warranty.dlink.com/

 Ver. 4.00(WW)_130x1832021/04/1429072600DW10006
References
[xyz-ips snippet=”download-snippet”]


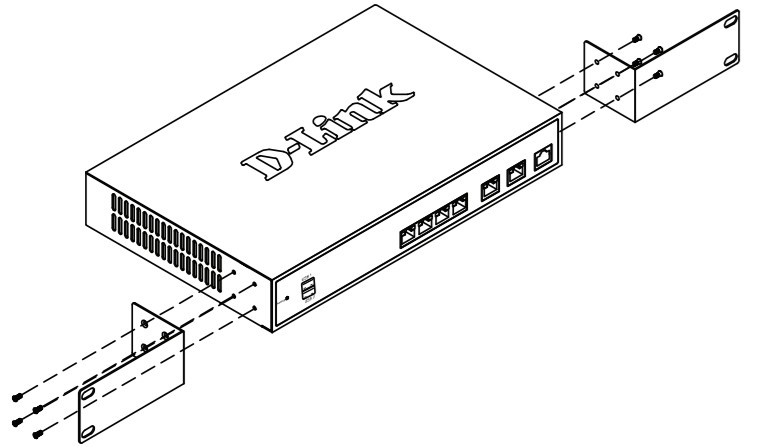 Figure 3. Attach the Rack Mount Brackets