Spa & Hot Tub User Manual

![]()
SAVE THESE IMPORTANTSAFETY INSTRUCTIONS
This manual contains important safety, operating, and installation instructions – read before installing or operating spa.
OWNER’S INFORMATION
DEALER IMPRINT AREA
______________________________________|
______________________________________|
Dear Spa Owner:
Congratulations on your purchase of a new spa. You now possess the ultimate passport to tranquility – a daily vacation at home, ready and waiting for you in your own backyard!
We want you to enjoy your spa. Many hours of research have gone into the design of your spa to ensure the ultimate in hydrotherapy and relaxation. Only the highest quality components have been used to ensure years of trouble free operation. Your comfort and enjoyment have been designed into your spa from the start.
Please take the time to read through this Operator’s Guide. In it you will find guidelines on caring for your spa, a complete explanation of the controls, safety instructions, a trouble-shooting section, and lots more.
Thank you for your business and your confidence in our company. We look forward to serving you!
______________________
This Operator’s Guide utilizes the following symbols to emphasize particular information.
![]()
![]()
![]()
The Safety Alert Symbol indicates a potential hazard
![]()
![]()
![]()
![]()
![]()
![]()
![]()
![]()
![]()
![]()
![]()
![]()
![]()
![]()
![]()
![]()
![]()
![]()
![]()
![]()
![]()
![]()
![]()
![]()
![]()
![]()
DURING PREGNANCY, SOAKING IN HOT WATER MAY CAUSE DAMAGE TO THE FETUS. LIMIT USE TO 10 MINUTES AT A TIME.
PREVENT DROWNINGSPA HEAT SPEEDS UP EFFECTS OF ALCOHOL, DRUGS, OR MEDICINE, AND CAN CAUSE UNCONSCIOUSNESS. IMMEDIATELY LEAVE SPA IF UNCOMFORTABLE OR SLEEPY.
PREVENT CHILD DROWNINGWATER ATTRACTS CHILDREN. ALWAYS ATTACH A SPA COVER AFTER EACH USE.


KEEP FROM HEATFAILURE TO DO SO WILL RESULT IN VOID OF WARRANTY.
![]()
![]()
![]()
![]()
![]()
![]()
Please avoid using any spa chemicals that contain Hydrogen Peroxide. Hydrogen Peroxide based spa chemicals have been found to react adversely with the materials used to produce these components. We recommend the use of Chlorine and Bromine based products only. Any structural and/or cosmetic jet failure linked to the use of Hydrogen Peroxide based products will not be covered under your warranty. Please consult your Dealer for approved chemical options.
![]()
![]()
![]()
ATTENTION
INSTALL FILTERS BEFORE FILLING SPA!
- Remove filters from plastic bag.
- Carefully thread filters into fittings
- DO NOT OVERTIGHTEN. A snug fit is all that is required.
![]()
![]()
![]()
![]()
![]()
![]()
![]()
![]()
REDUCE THE RISK OF ELECTROCUTION
- Never place an electric appliance within 5 feet of spa.
REDUCE THE RISK OF CHILD DROWNING
- Supervise children at all times.
- Attach spa cover after each use.
REDUCE THE RISK OF OVERHEATING
- Check with a doctor before use if pregnant, diabetic, in poor health, or under medical care.
- Exit immediately if uncomfortable, dizzy, or sleepy, Spa heat can cause hyperthermia and unconsciousness.
- Spa heat in conjunction with alcohol, drugs or medication can cause unconsciousness.
WHEN PREGNANT Soaking in hot water for long periods can harm your fetus. Measure water temperature before entering.
- Do not enter spa if water is hotter than 100˚ F (38˚ C).
- Do not stay in spa for longer than 10 minutes.
This marking is to be removed only by the owner after Safety Sign is installed.


![]()
![]()
![]()
![]()
![]()
![]()
RISK OF ELECTRICAL SHOCKReplace components only with identical components
![]()
![]()
![]()
![]()
![]()
![]()
![]()
![]()
PREVENT ELECTROCUTIONDo not connect any auxiliary components (for example, cable, additional speakers, headphones, additional audio/video components, etc.) to the system.
![]()
![]()
![]()
![]()
![]()
![]()
RISK OF ELECTRICAL SHOCKDo not leave the compartment door open
SAFETY INSTRUCTIONS
SAVE THESE INSTRUCTIONS
Included with your new spa is a safety sign. The sign is for you and your guest’s protection and is suitable for outdoor use in wet locations. The sign should be placed in a location visible to all users of the spa.
Please take time to point out the physical location of the safety sign and the importance of the safety precautions displayed on the safety sign to all of your guests. Remember, your safety and the safety of anyone who enjoys the use of your spa is our utmost concern.
The sign should be mounted with screws or another type of permanent fastener. Additional or replacement signs can be obtained from your dealer or direct from our factory.
![]()
![]()
![]()
![]()
![]()
![]()
![]()
![]()
DURING PREGNANCY, SOAKING IN HOT WATER MAY CAUSE DAMAGE TO THE FETUS. LIMIT USE TO 10 MINUTES AT A TIME.
PREVENT DROWNINGSPA HEAT SPEEDS UP EFFECTS OF ALCOHOL, DRUGS, OR MEDICINE, AND CAN CAUSE UNCONSCIOUSNESS. IMMEDIATELY LEAVE SPA IF UNCOMFORTABLE OR SLEEPY.
PREVENT CHILD DROWNINGWATER ATTRACTS CHILDREN. ALWAYS ATTACH A SPA COVER AFTER EACH USE.
IMPORTANT SAFETY INSTRUCTIONS
![]()
![]()
![]()
![]()
![]()
![]()
![]()
![]()
When installing and using this electrical equipment, basic safety precautions should be followed, including the following:
READ AND FOLLOW ALL INSTRUCTIONS
- WARNING – To reduce the risk of injury, do not permit children to use this product unless they are closely supervised at all times.
- DANGER-RISK OF CHILD DROWNING.Extreme caution must be exercised to prevent unauthorized access by children. To avoid accidents, ensure that children cannot use the spa unless they are supervised at all times.NOTE : A wire connector is provided on this unit to connect a wire of a minimum No. 4 AWG minimum 75˚C copper conductor between this unit and any metal equipment, metal enclosures of electrical equipment, metal water pipe, or conduct within 5 feet (1.52 m) of the unit.
- DANGER – RISK OF ELECTRIC SHOCK.Install spa at least five (5) feet (1.52 m) from all metal surfaces. A spa may be installed within five (5) feet (1.52 m) of metal surfaces if, in accordance with the National Electrical Code / IEC, each metal surface is permanentlyconnected by a minimum No. 4 AWG (6. mm) minimum 75˚C copper conductor attached to the wire connector on the terminal box. A grounding lug is provided for this purpose.
- DANGER – RISK OF INJURY. The suction fittings in this spa are sized to match the specific water flow created by the pump. Should the need arise to replace the suction fittings or the pump, be sure that the flow rates are compatible.NOTE: Never operate the spa if the suction fittings are broken or missing. Never replace a suction fitting with one rated less than the flow rate marked on the original suction fitting.
- DANGER To reduce the risk of injury to persons, do not remove the suction grate. Suction through drains and skimmers is powerful when the jets in the spa are in use. Damaged covers can be hazardous to small children and adults with long hair. Should any part of the body be drawn into these fittings, turn off the spa immediately. As a precaution, long hair should not be allowed to float in the spa.
- WARNING Install the spa so that water can be easily drained out of the compartment containing electrical components so as not to damage equipment. Also, when installing spa, allow at least 2 feet of clearance around the perimeter of the spa to provide enough room to access for servicing. Contact your local dealer for their specific requirements.
- WARNING-TO REDUCE THE RISK OF INJURY:
- REMINDER – Never allow anyone to dive into a spa. Always enter feet first.
- Always enter and exit a spa slowly.
- Do not use the spa alone.
- Before entering the spa, always measure the water temperature with an accurate thermometer. Tolerance of water temperature regulating devices can vary as much as plus/minus 5˚ F (3˚ C).
- Persons suffering from obesity or with a medical history of heart disease, diabetes, high or low blood pressure or circulatory system problems should consult a physician before using a spa.
- Since excessive water temperatures have a high potential for causing fetal damage during early months of pregnancy, pregnant or possibly pregnant women should limit spa water temperatures to 100˚ F (38˚ C).
- Excessive water temperature can be dangerous. The water in the spa should never exceed 104˚ F (40˚ C). Water temperatures between 100˚ F (38˚ C) and 104˚ F (40˚ C) are considered safe for a healthy adult. Lower water temperatures are recommended for extended use (exceeding 10 minutes) and for young children. Long exposures at higher temperatures can result in hyperthermia.
- The use of alcohol, drugs or medication before or during spa use may lead to unconsciousness with the possibility of drowning.
- Persons using medication should consult a physician before using a spa since some medication may induce drowsiness while other medication may affect heart rate, blood pressure and circulation.
- Children’s body temperature can increase more rapidly than adults in the same water with elevated temperatures (above 99˚ F). Children should spend less time in water above body temperature than adults.


- HYPERTHERMIAHyperthermia occurs when the internal temperature of the body reaches a level several degrees above the normal body temperature of 98.6˚ F.
- THE SYMPTONS OF HYPERTHERMIA INCLUDE:
- Dizziness
- Fainting
- Drowsiness
- Lethargy
- Increase in internal body temperature
- THE EFFECTS OF HYPERTHERMIA INCLUDE:
- Unawareness of impending hazard
- Failure to perceive heat
- Failure to recognize the need to exit spa
- Physical inability to exit spa
- Fetal damage in pregnant women
- Unconsciousness resulting in potential of drowning
- WARNING – The use of alcohol, drugs or medication can greatly increase the risk of hyperthermia in hot tubs and spas.
- The use of alcohol, drugs, or medication before or during spa use may lead to unconsciousness with the possibility of drowning.
- Persons using medication should consult a physician before using a spa since some medication may induce drowsiness while other medication may affect heart rate, blood pressure, and circulation.
- REMINDER – A safe temperature for swimming or aquatic exercise is around 80˚ (27º C).NOTE – People with infections or sores should not use the spa. Warm and hot water temperatures may allow the growth of infectious bacteria if not properly disinfected.
- DANGER – RISK OF ELECTRIC SHOCK.Do not permit any electric appliance, such as a light, telephone, radio or television within five (5) feet (1.52 m) of the spa. Never operate any electrical appliances from inside the spa or while wet.
- WARNING – RISK OF SUFFOCATION.If this spa is equipped with a heater, it is intended for outdoor use only, unless proper ventilation can be provided for an indoor installation.
- CAUTION – RISK OF ELECTRIC SHOCK.Do not leave the Audio compartment open.
- CAUTION – RISK OF ELECTRIC SHOCK.Replace components only with identical components.
- WARNING – PREVENT ELECTROCUTION.Do not connect any auxiliary components (for example, additional speaker, headphones, additional audio/video components etc.) to the system. These units are not provided with an outdoor antenna.Do not service this product yourself as opening or removing covers may expose you to dangerous voltage or other hazards. Refer all servicing to your qualified spa tech.If the power supply/supply cord(s) are damaged, if water is entering the speaker, Audio compartment, or any other component in the electrical equipment compartment area, the protective shield is showing signs of deterioration, or there are signs of other potentially hazardous damage to the unit, turn off the circuit breaker from the wall and contact or refer to your service technician.The unit should be subject to periodic routine maintenance once every quarter to make sure that the unit is operating properly.
- DANGER – RISK OF ELECTRIC SHOCK.Do not permit any electric appliance, such as a light, telephone, radio or television within five (5) (1.52 m) feet of the spa.
- A green colored terminal or a terminal marked G, GR. Ground, Grounding or the symbol shown in Figure 14.1 of UL1563 is located inside the supply terminal box or compartment. To reduce the risk of electric shock, this terminal must be connected to the grounding means provided in the electric supply service panel with a continuous copper wire equivalent in size to the circuit conductors supplying this equipment.
- Two lugs marked “Bonding Lugs” are provided on the external surface or on the inside of the supply terminal box or compartment. To reduce the risk of electric shock, connect the local common bonding grid in the area of the spa to these terminals with an insulated or bare copper conductor not smaller than No. 4 AWG.
- All field-installed metal components such as rails, ladders, drains or other similar hardware with 3m of the spa shall be bonded to the equipment grounding bus with copper conductors not smaller then No. 4 AWG.CAUTION – Test the ground fault circuit interrupter before each use of the spa.CAUTION – Read the instruction manual.CAUTION – Adequate drainage must be provided if the equipment is to be installed in a pit, or equivalent.WARNING – Water temperature in excess of 100.4°f (38°c) may be injurious to your health.WARNING – Disconnect the electric power before servicing.WARNING: Children should not use spas or hot tubs without adult supervision.WARNING: Do not use spas or hot tubs unless all suction guards are installed to prevent body and hair entrapment.WARNING: People using medications and/or having an adverse medical history should consult a physician before using a spa or hot tub.WARNING: People with infectious diseases should not use a spa or hot tub.WARNING: To avoid injury, exercise care when entering or exiting the spa or hot tub.WARNING: Do not use drugs or alcohol before or during the use of a spa or hot tub to avoid unconsciousness and possible drowning.WARNING: Pregnant or possibly pregnant women should consult a physician before using a spa or hot tub.WARNING: Water temperature in excess of 100 o F (38 o C) may be injurious to your health.WARNING: Before entering the spa or hot tub measure the water temperature with an accurate thermometer.WARNING: Do not use a spa or hot tub immediately following strenuous exercise.WARNING: Prolonged immersion in a spa or hot tub may be injurious to your health.WARNING: Do not permit electric appliances (such as a light, telephone, radio, or television) within 1.5 M of this spa or hot tub.CAUTION: Maintain water chemistry in accordance with manufacturer’s instruction.
Hyperthermia occurs when the internal temperature of the body reaches a level several degrees above the normal body temperature of 98.6°F (37°C). The symptoms of hyperthermia include drowsiness, lethargy, and an increase in the internal temperature of the body. The effects of hyperthermia include
- unawareness of impending hazard
- failure to perceive heat
- failure to recognize the need to exit spa
- physical inability to exit spa
- fetal damage in pregnant women
- unconsciousness and danger of drowning
WARNING: THE USE OF ALCOHOL OR DRUGS CAN GREATLY INCREASE THE RISK OF FATAL HYPERTHERMIA IN HOT TUBS AND SPAS.
BASIC INFORMATION
Congratulations on the purchase of your new spa. Our goal is to provide you with a warm and relaxing spa which incorporates a soothing water massage. In order to maximize the pleasure of your spa, you will need to understand how it works.
The following operating and maintenance instructions are very important and must be followed carefully. With proper care and maintenance your spa will provide you with years of satisfaction with minimum effort.
- The pump and heater should be operated a minimum of two hours per day for cleaning and heating.
- The length of time required to heat your spa to the desired water temperature will vary, depending on the air temperature, season, and wind velocity. We highly recommend using a vinyl hard cover to minimize heat loss and to protect your spa when not in use. Covers are available from your local spa dealer.
- The replaceable filter cartridge is trouble free and easy to clean. A routine cleaning is the best practice. Make sure the pump is off, then remove the cartridge. Wash it off using a water hose with a pressure nozzle and then reassemble. This should be done on a monthly basis.
- Keep the spa water level 2” (5 cm) above the skimmer. Never allow the water level to drop below the bottom of the skimmer opening. If the water level is too low, the skimmer will allow air into the water lines of the pump, causing it to lose its prime (waterflow). Running the pump without water flow will damage the pump seal assembly and could possibly result in further equipment damage, which will not be covered under warranty.
- If your spa has a natural wood skirt or if you purchased a gazebo, we recommend applying a wood sealer of your choice (always follow application instructions) to protect the finish. Repeat as directions suggest.
- You should clean your spa at least every 3-4 months. Drain the spa water and use a gentle liquid cleanser. DO NOT use hard brushes or abrasive cleaners. Fill with regular tap water and chemically treat the water for a clean and healthy spa.
![]()
![]()
![]()
![]()
![]()
![]()
CAUTION: Cover must be kept on spa at all times when spa is drained or winterized. Direct exposure to sunlight can damage plastic parts and interior surface, jets, or any interior components. Damage caused by exposure to the sun will not be covered under warranty.
![]()
![]()
Do not use soft water. It may harm your acrylic.
NORTH AMERICAN ELECTRICAL INSTALLATION REQUIREMENT’S
HAVE YOUR ELECTRICIAN READ THE FOLLOWING INFORMATION BEFORE INSTALLATION BEGINS
Electrical connections made improperly, or the use of wire incorrectly sized, may continually blow fuses in the electrical equipment box, may damage the internal electrical controls and components. Any of these conditions may be unsafe and will void the warranty.
It is the responsibility of the spa owner to ensure that electrical connections are made by a qualified electrician in accordance with the National Electrical code and any local and state electrical codes in force at the time of installation.
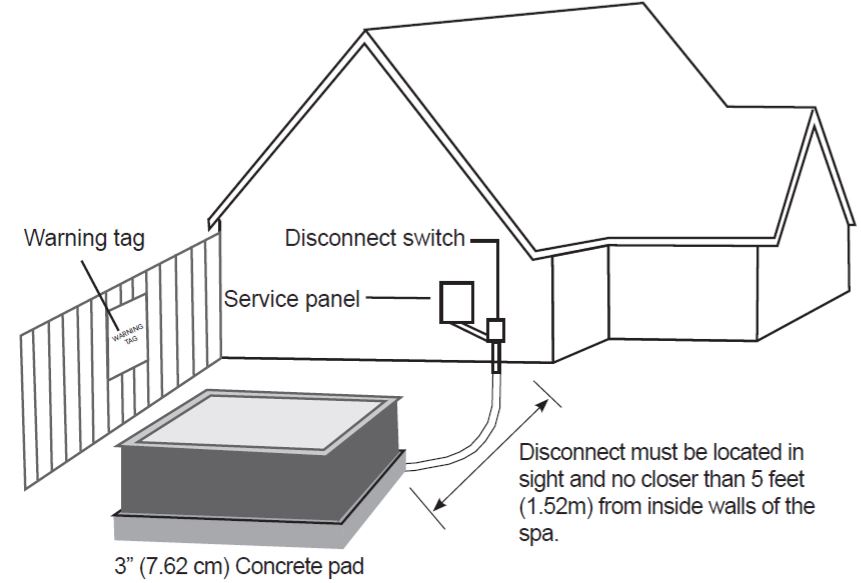
These connections must be made in accordance with the wiring diagrams found inside the control box. This equipment has been designed to operate on 60Hz, alternating current only, 240 volts are required. Make sure that power is not applied while performing electrical installation. A copper bonding lug has been provided on the electrical equipment pack to allow connection to local ground points. The ground wire must be at least 6 or 8 AWG copper wire and must be connected securely to a grounded metal surface such as a cold water pipe. The electrical supply for your spa must include a 60 AMP switch or circuit breaker to open all non-grounded supply conductors to comply with section 422-20 of the National Electrical Code. This disconnect must be readily accessible to the spas occupants, but installed at least five feet from the spa but within sight. A ground fault circuit interrupter (GFCI) must be used to comply with section 680-42 of the National Electrical Code. A GFCI is designed to automatically shut off power to a piece of equipment when a ground fault is detected.
Power hook-up to the spa must be a 240 volt 3 wire plus ground (6 AWG copper). Route the cable into the equipment area for final hookup to terminals inside the control panel. To install the wiring for the in.ye spa control, you’ll need a Phillips screwdriver and a flat screwdriver. Loosen the 2 screws of the Spa Pack door and open it. Remove 5 1/2” of cable insulation, Strip away 1” of each wire insulation, Pull the cable through the cutout of the box and secure it with a strain relief (1” NPT strain relief; hole diameter: 1.335”). Make sure that only the uncut sheathing is clamped at this opening. Push the color-coded wires into the terminals as indicated on the sticker and use the flat screwdriver to tighten the screws on the terminals.After making sure wire connections are secure, push them back into the box and close the door. Tighten the 2 screws of the Spa Pack door.Connect the bonding conductor to the bonding lug on the front of the in.xe Spa Pack (a grounded electrode conductor shall be used to connect the equipment grounding conductors). The spa must be hooked up to a “dedicated” 240 volt, 60 amp breaker and GFCI. The term “dedicated” means the electrical circuit for the spa is not being used for any other electrical items (patio lights, appliances, garage circuits, etc.) If the spa is connected to a non-dedicated circuit, overloading will result in “nuisance tripping”, which requires resetting of the breaker switch located in the house main electrical panel.
(Excludes any 110/120 volt models.)
EUROPEAN ELECTRICAL INSTALLATION REQUIREMENT’S
HAVE YOUR ELECTRICIAN READ THE FOLLOWING INFORMATION BEFORE INSTALLATION BEGINS
Electrical connections made improperly, or the use of wire incorrectly sized, maycontinually blow fuses in the electrical equipment box, may damage the internalelectrical controls and components. Any of these conditions may be unsafe and willvoid the warranty.
It is the responsibility of the spa owner to ensure that electrical connections are madeby a qualified electrician in accordance with the National Electrical code / IEC and anylocal and state electrical codes in force at the time of installation.
These connections must be made in accordance with the wiring diagrams found inside the control box. This equipment has been designed to operate on 50Hz, alternating current only, 230 volts are required. Make sure that power is not applied while performing electrical installation. A copper bonding lug has been provided on the electrical equipment pack to allow connection to local ground points. The ground wire must be at least 10 AWG copper wire and must be connected securely to a grounded metal surface such as a cold water pipe. The electrical supply for your spa must include a 32 AMP switch or circuit breaker to open all non-grounded supply conductors to comply with section 422-20 of the National Electrical code / IEC. This disconnect must be readily accessible to the spas occupants, but installed at least five feet from the spa but within sight. A ground fault circuit interrupter (GFCI) must be used to comply with section 680-42 of the National Electrical code / IEC. A GFCI is designed to automatically shut off power to a piece of equipment when a current fault is detected.
Power hook-up to the spa must be a 230 volt 4 wire plus ground (10 AWG copper) (Where 3 phase power is used)
Route the cable into the equipment area for final hookup to terminals inside the control panel. To install the wiring for the in.ye spa control, you’ll need a Phillips screwdriver and a flat screwdriver. Loosen the 2 screws of the Spa Pack door and open it. Remove 5 1/2” of cable insulation. Strip away 1” of each wire insulation. Pull the cable through the cutout of the box and secure it with a strain relief (1” NPT strain relief; hole diameter: 1.335”). Make sure that only the uncut sheathing is clamped at this opening. Push the color-coded wires into the terminals as indicated on the sticker and use the flat screwdriver to tighten the screws on the terminals. After making sure wire connections are secure, push them back into the box and close the door. Tighten the 2 screws of the Spa Pack door. Connect the bonding conductor to the bonding lug on the front of the in.xe Spa Pack (a grounded electrode conductor shall be used to connect the equipment grounding conductors). The spa must be hooked up to a “dedicated” 230 volt, 32 amp breaker and GFCI. The term “dedicated” means the electrical circuit for the spa is not being used for any other electrical items (patio lights, appliances, garage circuits, etc.) If the spa is connected to a non-dedicated circuit, overloading will result in “nuisance tripping” which requires resetting of the breaker switch located in the house main electrical panel.
WIRING CONNECTIONS – GFCI
(For units with a GFCI)
WARNING – This product is provided with a ground-fault circuit-interrupter (give location). The GFCI must be tested before each use. With the product operating, open the service door. When the product stops operating, this merely indicates that the door is equipped with an electrical interlock. Next, push the test button on the GFCI and close the service door. The product should not operate. Now open the service door, push the reset button on the GFCI and close the service door. The product should now operate normally. When the product fails to operate in this manner, there is a ground current flowing indicating the possibility of an electric shock. Disconnect the power until the fault has been identified and corrected.
![]()
![]()
![]()
![]()
![]()
![]()
![]()
![]()
![]()
![]()
![]()
![]()
![]()
![]()
![]()
![]()
![]()
![]()
![]()
![]()
DANGER!
- Replace damaged cord immediately.
- Do not bury cord.
- Connect to a grounded, grounding type receptacle only.
(YE/YT NA) WIRING CONNECTIONS
Electrical wiring: North American model in.ye and in.ytRefer to wiring diagram in the enclosure box lid for more information.


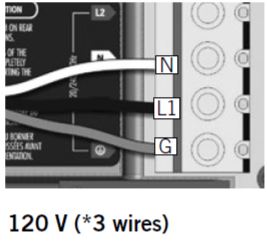

* If connected to a 3 wires system, the heat.wave and accessories will not operate at 240 V.
Note: To convert accessory wire m
Refer to the section <<Connections for 120 V heaters>>.
Insert each wire into the appropriate socket of the main entry terminal block according to the color code indicated on the sticker. Use a flat-head screwdriver to tighten the screws on the terminal.
After making sure wires are securely connected, push them back into the box and replace the cover. Do not over tighten cover screws (torque to 8 in. lb max {0.9 N.m}).
Connect the bonding conductor to the bonding lug on the front of the spa pack (a grounded electrode conductor should be used to connect the equipment grounding conductors).
![]()
![]()
![]()
![]()
Note: To convert model to a 120 V system, the white (common) accessory wire must be moved. See wiring diagram for details.
(YE EU) WIRING CONNECTIONS
Electrical wiring: European model in.ye
Refer to wiring diagram in the enclosure box lid for more information.
![]()
![]()
![]()
![]()
![]()
![]()
![]()
![]()
![]()
![]()
![]()
![]()
![]()
![]()
![]()
![]()
![]()
![]()
![]()
![]()


Insert each wire into the appropriate socket of the main entry terminal block according to the color code indicated on the sticker. Use a flat-head screwdriver to tighten the screws on the terminal.
After making sure wires are securely connected, push them back into the box and replace the cover. Do not over tighten cover screws (torque to 8 in. lb max {0.9 N.m}).
Connect the bonding conductor to the bonding lug on the front of the spa pack (a grounded electrode conductor should be used to connect the equipment grounding conductors).
Electrical wiring: European model in.yt
Refer to wiring diagram in the enclosure box lid for more information.
![]()
![]()
![]()
![]()
![]()
![]()
![]()
![]()
![]()
![]()
![]()
![]()
![]()
![]()
![]()
![]()
![]()
![]()
![]()
![]()
Warningin.yt.ce models must always be connected to a circuit protected by a Residual-Current Device (RCD) having a rated operating residual-current not exceeding 30 mA. Correct wiring of the electrical service box, RCD, and pack terminal block is essential! Check your electrical code for local regulations. Only copper wire should be used, never aluminum.
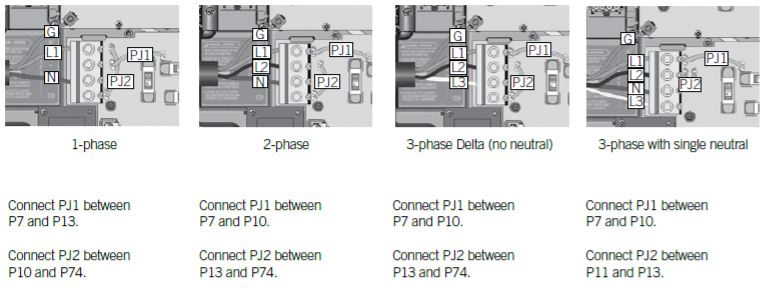

Insert each wire into the appropriate socket of the main entry terminal block according to the color code indicated on the sticker. Use a flat-head screwdriver to tighten the screws on the terminal.
After making sure wires are securley connected, push them back into the box and replace the cover. Do not over tighten cover screws (torque to 8 in. lb max {0.9 N.m}).
Connect the bonding conductor to the bonding lug on the front of the spa pack (a grounded electrode conductor should be used to connect the equipment grounding conductors).
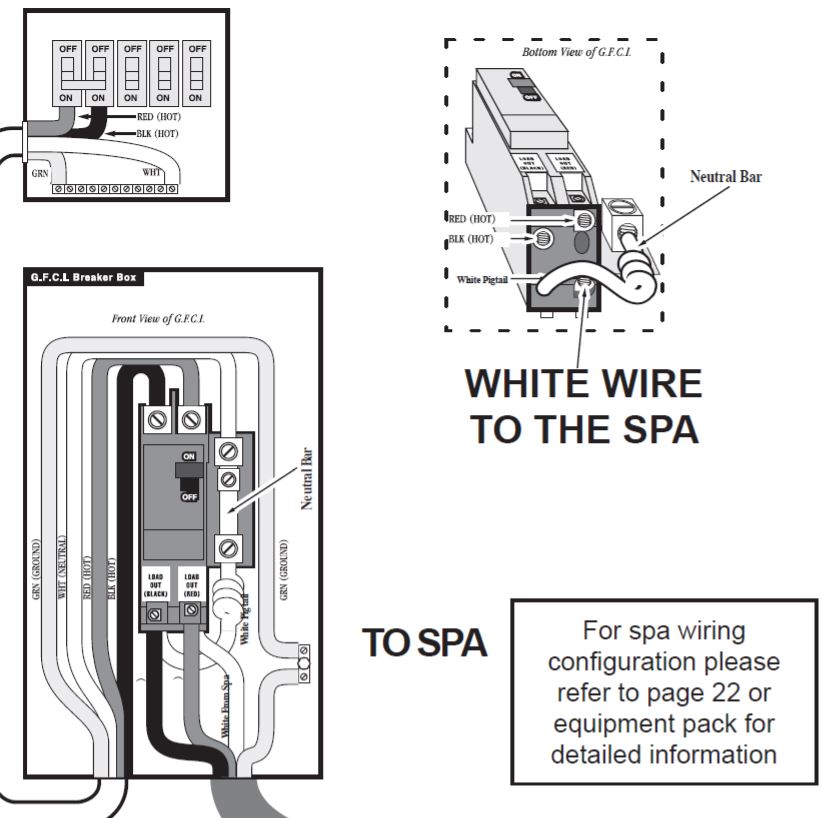
SPA (YE/YT-CLASS) WIRING DIAGRAM
The Diagram intended for the YE / YT-Class Pack System
Wiring Requirements
- 2-Hots, 1-Neutral, 1-Isolated Ground
- 4 Wire #6 AWG minimum 75˚C copper conductor
Factory Recommended G.F.C.I. Load Center WiringNote: The white neutral wire from the back of the GFCI MUST be connected to an incoming line neutral. The internal mechanism of the GFCI requires this neutral connection. The GFCI will not work without it.

![]()
![]()
![]()
![]()
![]()
![]()
![]()
![]()
![]()
![]()
![]()
![]()
![]()
![]()
![]()
![]()
![]()
![]()
![]()
![]()
NOTE!
Connection order may vary by pack model, please refer to equipment pack panel for proper connection order.
SET-UP & DELIVERY GUIDELINES
Getting ready for delivery & Set-up of your new spa
Surface and Pad RequirementsYour new portable spa must be placed on a uniformly firm, flat, and level surface. A concrete pad 3” (7.5cm) thick is best. If your spa is located near sprinklers, adjust or cap them so they do not hit the siding of the spa.
Balconies and deck requirements
- Decking must be constructed to support 85 pounds per square foot.
- Balconies must be constructed to meet current state and local codes.
- Gates must be self-closing and self-latching.
Access & Clearance
- Your spa requires 48” (1.22m) of clearance through gates between house and side fences, and up to 8.5’ (2.6m) overhead clearance depending on the size of the unit.
- The clearance required to turn a corner can be equal to the length of the spa.
- All debris blocking access to the job site must be removed prior to delivery. Any trimming of trees or bushes, removal of debris, leveling of ground or other general maintenance must be done prior to delivery and is the responsibility of the customer.
General Considerations for outdoor installation
Proper planning will increase your total enjoyment factor with your new spa. Listed below are some additional items to consider when planning your installation.
- How spa will complement landscaping and vice versa.
- View from inside of spa and view of spa from inside the home.
- Exposure to sunlight and shading from trees.
- Privacy
- Getting to spa from house and return.
- Proximity to dressing room and bathrooms
- Storage for spa chemicals
- Local building codes (if applicable)
- Power cable
![]()
![]()
![]()
![]()
![]()
![]()
![]()
![]()
![]()
![]()
![]()
![]()
![]()
![]()
![]()
![]()
![]()
![]()
![]()
![]()
CAUTION!
Decking must be constructed to support 85lbs. per sqft. (38 kgs.)
General consideration for indoor installation
Installing your spa indoors creates an extremely different set of considerations. Here again, with proper planning, no matter what room your spa goes in, it will be your favorite room.
- Work with your spa dealer and contractor to insure all local building, electrical and plumbing codes are met.
- Plan for a floor drain to drain off excess water or for draining and cleaning your spa.
- A ventilation fan may be necessary due to high humidity created by your spa.
- Finished material in your spa room should also be capable of withstanding increased humidity.
- Excess Water: Normal use of the spa causes large amounts of water to splash out of the unit. Depending on the specific installation, additional provisions may have to be made for proper removal of water.
- Clearance Access: In order to better service your spa, clearance for access to spa must be 38 inches (92cm) at equipment compartment and 24 inches (61cm) around the remaining area.
Electrical requirements
- (NA) Your 220 Volt spa pack will require a double pole 60 amp dedicated GFCI, ground fault circuit breaker. (refer to page 25)
- (EU) Your 230 Volt spa pack will require a dedicated breaker. (refer to page 20-21)Caution: Connect only to a circuit protected by a class A ground fault circuit interrupter.
- Extension cords are not to be used in conjunction with operation of the spa. Low voltage damage could result, which is not covered by warranty.
- If you have any doubts, have your electrical system checked by a licensed electrician.
- Use copper conductors only.

![]()
![]()
![]()
![]()
![]()
![]()
![]()
![]()
![]()
![]()
![]()
![]()
![]()
![]()
![]()
![]()
![]()
![]()
![]()
![]()
NOTE!
It is the customer’s responsibility to acquire necessary permits and to arrange for installation and hook up of the electrical power by a licensed electrician.
GENERAL PRE-OPERATION INSTRUCTIONS
Priming pump for electrical packs
The power pack system is located under the skirting. The equipment can be serviced by simply removing the door. The door is located on the side of the spa where three panels are located, usually on the side of the spa with the lounger, or the side where the topside control panel is located.
It is important to make sure that all of the air is out of the pump(s) before operating. To do this follow procedures below:
- Turn off power at the breaker
- Make sure the gate valves are open
- Fill the spa with water going thru the filter
- Turn the power on at the breaker
- Start the pump on low speed and water should start circulating within one to two minutes. If water does not start circulating, turn pump from low to high until water is flowing.
- If pump still does not prime, please see “Trouble Shooting Guide” located in the back of this manual
![]()
![]()
![]()
![]()
![]()
![]()
![]()
![]()
![]()
![]()
![]()
![]()
![]()
![]()
![]()
![]()
![]()
![]()
![]()
![]()
NOTE!
Equipment style and location will vary by model
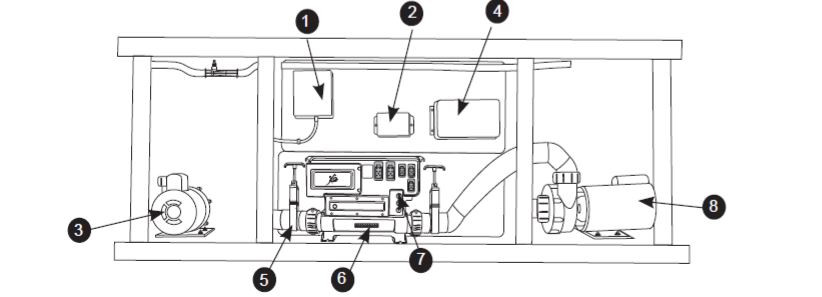

- Ozonator
- LED Controller
- 2nd High Performance Pump
- Power Supply
- Gate Valve
- Flow Thru Heater
- Equipment Pack
- Dual Speed High Performance Pump
Set thermostat, located on top side control panel, to desired temperature and continue heating until desired temperature has been reached.
![]()
![]()
![]()
![]()
![]()
![]()
![]()
![]()
![]()
![]()
![]()
![]()
![]()
![]()
![]()
![]()
![]()
![]()
![]()
![]()
WARNING!
Do not run spa with gate valves closed or run pump with no water circulating in spa for long periods. This could damage the spa equipment.
FILTER LOCATION
Single or Dual Filter Location (Canister Style)


Single or Dual Filter Location (Enclosed)


![]()
![]()
![]()
![]()
![]()
![]()
![]()
![]()
![]()
![]()
![]()
![]()
![]()
![]()
![]()
![]()
![]()
![]()
![]()
![]()
NOTE!
Location will vary by model
FILTER MAINTENANCE
Filtration starts as soon as water flow is steady through the filter. The filter cartridge removes body oil and debris from the spa water, as they can cause flow resistance. A dirty cartridge will decrease flow and may prevent the spa from heating properly. Therefore, regular filter cleaning is essential.
Cleaning and replacing filter cartridge
Your spa filter(s) have been designed for quick and easy maintenance.
Enclosed Style
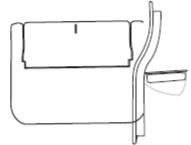

- Turn off power at the breaker.
- Open filter door and expose filter cartridge(s) by pulling door toward center of spa until door opens completely.
- Unscrew filter cartridge(s) and remove.
- Clean with a garden hose equipped with a high pressure nozzle, or soak in filter cartridge cleaner if necessary, or at every other regularly scheduled cleaning. Rinse filter thoroughly before installing.
- Screw clean cartridge back into filter enclosure and return filter door to original position.
Open Style
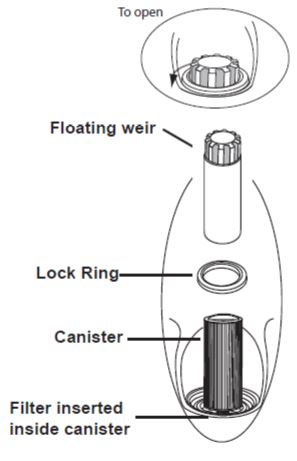

- Turn off power at the breaker.
- Remove basket from filter canister. Remove filter cartridge and clean with a garden hose equipped with a high pressure nozzle or soak in filter cartridge cleaner if necessary or at every other regularly scheduled cleaning. Rinse filter thoroughly before installing.
- Place clean cartridge in filter canister
- Replace basket weir in filter canister.
![]()
![]()
![]()
![]()
![]()
![]()
![]()
![]()
![]()
![]()
![]()
![]()
![]()
![]()
![]()
![]()
![]()
![]()
![]()
![]()
NOTE!
The filter should be inspected and cleaned on a regular basis.
SPA TERMINOLOGY
Jets
Your new spa features a variety of jet styles. All jets regardless of style return the water to the spa. Air is mixed with the water by using the air controls (if equipped) creating a gentle to most vigorous massage.
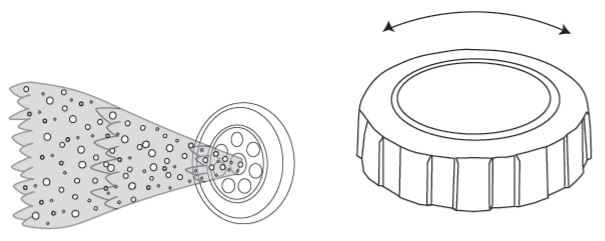

Water Diverter Valve
The water diverter valve controls the output of the pump(s) water flow to either side of the spa. It will provide even water flow to all jets if left in the half way position. The purpose of this valve is to increase or decrease the output of one side or another for maximum or minimum water flow in case of one or two person usage. This valve is also used to turn the master massage jet on and off, if so equipped. Colors/style may vary from drawing. A water diverter valve is the largest of the valve controls.
Although all three controls look similar in appearance, they are easily discernible by size. The air control is the smallest, the mini diverter valve is medium in size, and the water diverter valve is the largest .
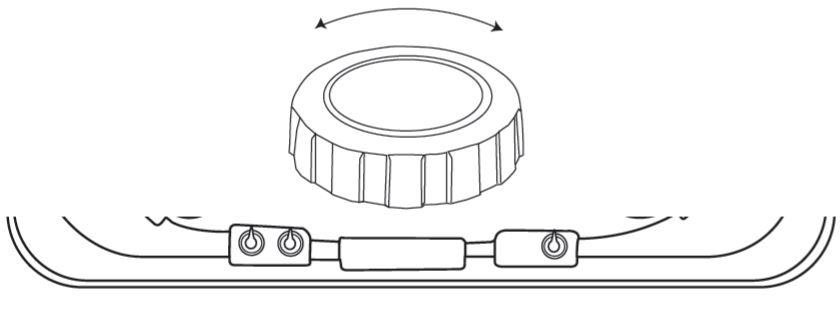

A Mini Diverter Valve, an Air Control, and a Water Diverter Valve.Locations and design will vary on each spa model.
Fountain Jet Controls
If your spa is equipped with optional fountain jets, they are controlled with a fountain jet control. Turning the fountain jet control full counterclockwise will turn the fountain jet on full power, while turning full clockwise will turn the fountain jet off.
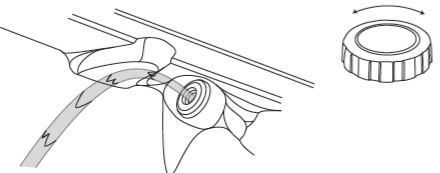

Waterfall Controls
If your spa is equipped with waterfalls, they are controlled with a mini diverter valve. Turning the mini diverter valve full clockwise will turn the waterfall on full power, while turning full counterclockwise will turn the waterfall off.
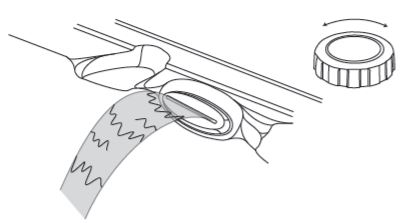

Air Control
Each spa is equipped with air controls (venturies). The purpose of these controls is to regulate the mixture of air and water that flows through the jets. If an optional blower is installed, air is also pushed through the air controls (venturies) for maximum output. If your spa has a master massage jet located in the foot well, the spa will be equipped with an air control specifically for the master massage jet. This third control operates the same as the others. Colors/style may vary from drawing. An air control is the smallest of the valve controls.
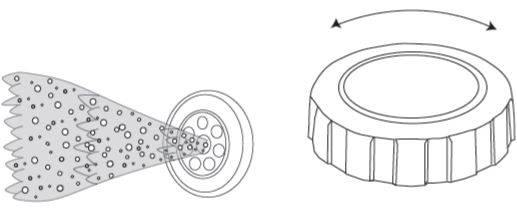

Equipment access panel
This are located behind the side panel below the topside control panel, this area houses the major components responsible for the spas operation. The components include the pumps, heater, control panel box, ozonator, and led light system (if applicable). Pump and equipment placement may vary by model.


Access panel
These are located on all four sides of the spa. All of the panels are removable should service be required.


Draining your spa
Because your spa holds a relatively small amount of water, contaminants such as body oil, perspiration, dirt, hair, etc., may become quite concentrated. For this reason, the water should be drained and replaced every three months depending on use.
- Turn off power at the breaker.
- When water begins to drain out of the hose, be sure to drain the water to a convenient place.


After draining is completed, Wipe down the inside of your spa making sure your surface is dry and free from standing water. We recommend that after draining or cleaning your spa that you put the cover back on. Avoid exposing the acrylic surface to direct sunlight for an extended period of time. Extended exposure can cause surface fading or cracking, which could void the acrylic warranty.
![]()
![]()
![]()
![]()
![]()
![]()
![]()
![]()
![]()
![]()
![]()
![]()
![]()
![]()
![]()
![]()
![]()
![]()
![]()
![]()
NOTE!
Be sure that hose is on a downward grade to properly drain spa.
Spa Light
Your spa light is designed for safety and is located in the interior wall of your spa. The on/off switch is located on the topside control panel.


Spa heater
This element is an electric heater housed in a stainless steel tube. It is thermostatically controlled and equipped with a high-limit temperature safety shut-off sensor. The high-limit sensor cannot be reset until the temperature within the heater assembly drops several degrees below the shut-off temperature of 100˚ (º38 C) (varies by model). Should the high-limit switch trip repeatedly, contact your dealer or qualified service representative to diagnose the problem.


Gate Valves
Are installed for shut off/on water supply from heater or pump for service. For normal spa operation valves should be in the open position (handle extended is open).
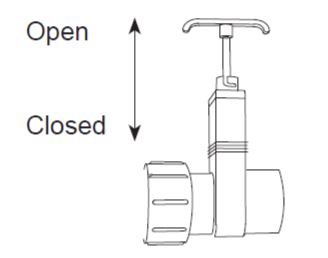

Main Pump
This produces water flow through heater and main jets. Also used for filtration. Can be controlled as desired by pressing the pump or pump 1 button on your topside control panel. Refer to quick reference card for filtration frequency and duration.
Secondary Pump (on select models)
This produces water flow through secondary group of jets. Can be controlled by pressing the pump 2 button on your topside control panel.
Third Pump (on select models)
This produces water flow through third group of jets. This pump will be a high speed only. Can be controlled by pressing the pump 3 button on your topside control panel.
Circulation Pump (on select models)
If equipped, this pump is controlled during filtration and heating only, by the topside control configuration. Refer to quick reference card for filtration frequency and duration.
Ozonator (on select models)
Your ozonator will operate in conjunction with your filtration system and circulation pump (if applicable). It will deactivate when any other control function is manually activated and will reactivate after one hour in activity. The ozonator is standard on all spas.
Cleaning Your Spa Water
You need to keep your spa clean and ready to use. When you enter your spa, you bring in as much contamination as 50 people would in a normal size swimming pool. Because your spa is such a small, enclosed environment, it needs to be a sanitary place. We accomplish this with a simple three step process:
- Balance
- Filtration
- Sanitation
The water that comes from your tap at home is fine for showers or bathing, because it is drained immediately after use. In a spa, your water is used for up to three months. Hot water is a breeding ground for bacteria, so sanitizing becomes necessary, as well as maintaining a specific mineral balance. Having that mineral balance in place ensures that the water, which is naturally corrosive to metal, will not cause damage to the spa equipment. We recommend weekly water testing.
When adding chemicals, broadcast the granules across the water while the pumps are running to prevent undissolved solids from settling on the acrylic surface.
Wait 15 to 20 minutes before covering the spa after chemicals have been added.
![]()
![]()
![]()
![]()
![]()
![]()
![]()
![]()
![]()
![]()
![]()
![]()
![]()
![]()
![]()
![]()
![]()
![]()
![]()
![]()
CAUTION!
The use of Tri-Chlor is not recommended for use in spas. Tri-Chlor will cause damage to the acrylic surface and other surfaces in the spa. Damage caused by the use of this chemical is not covered under warranty.
![]()
![]()
![]()
![]()
![]()
![]()
![]()
![]()
![]()
![]()
![]()
![]()
![]()
![]()
![]()
![]()
![]()
![]()
![]()
![]()
WARNING!
Please be careful with chemicals – damage to the surface of the spa can occur due to the improper use of chemicals such as trichlor or chlorine, chemical tablets, acids or spa cleaners. Do not let undissolved chemicals lie on the surface of the spa. Damage from chemical misuse is not covered under warranty. Improper water chemistry balance can damage the spa surfaces and/or equipment, and is not covered under your warranty.
![]()
![]()
![]()
![]()
![]()
![]()
![]()
![]()
![]()
![]()
![]()
![]()
![]()
![]()
![]()
![]()
![]()
![]()
![]()
![]()
WARNING!
Maintain water chemistry in accordance with manufacturer’s instructions.
Water testing
Your spa dealer is equipped to perform a thorough analysis of your spa water. Take a one liter sample to the store and they will advise you on the products necessary to properly balance and care for your spa. Unbalanced spa water can quickly damage your equipment. Your spa dealer will advise you on how to protect your investment.
![]()
![]()
![]()
![]()
![]()
![]()
![]()
![]()
![]()
![]()
![]()
![]()
![]()
![]()
![]()
![]()
![]()
![]()
![]()
![]()
WARNING!
BalanceSpa water must have the correct chemical balance. Unbalanced water can irritate eyes, corrode the equipment, leave mineral deposits, and decrease the effectiveness of the sanitizer.Balanced water means establishing proper balance among total alkalinity, ph, calcium hardness and total dissolved solids.
SPA WATER MAINTENANCE
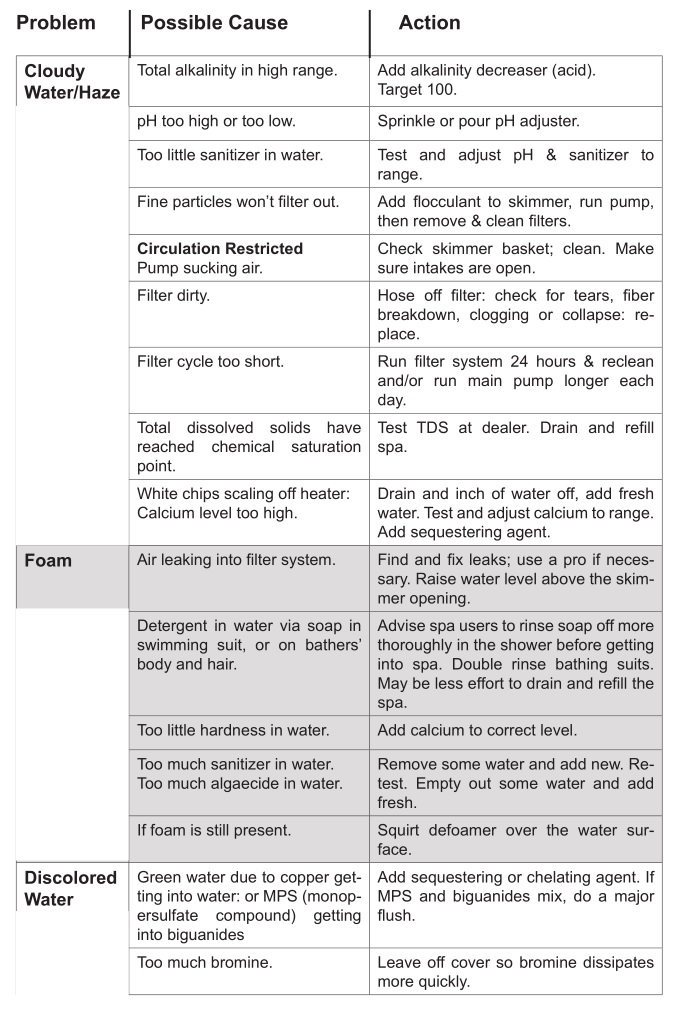


![]()
![]()
![]()
![]()
![]()
![]()
![]()
![]()
![]()
![]()
![]()
![]()
![]()
![]()
![]()
![]()
![]()
![]()
![]()
![]()
WARNING!
Do not leave your water treatment products outside. If subjected to extreme heat or cold, their effectiveness can be impaired. KEEP ALL CHEMICALS OUT OF THE REACH OF CHILDREN!
WINTERIZING YOUR SPA
![]()
![]()
![]()
![]()
![]()
![]()
![]()
![]()
![]()
![]()
![]()
![]()
![]()
![]()
![]()
![]()
![]()
![]()
![]()
![]()
WARNING!
In areas of the country where the temperatures drop below 32° F (ºO C), it is important to follow these directions:
When winterizing the spa, we recommend putting RV antifreeze in the spa and running it before draining the spa.
- If the spa is not going to be used, drain completely. Be sure all water is removed. Break or loosen unions at each end of pump to ensure water from pump area is removed. Remove pump freeze plugs if so equipped. Using a shop vacuum, vacuum all jets thoroughly to remove any water left over in the plumbing lines.
- Do not turn unit off with water in the spa. Frozen water may rupture plumbing. Freeze damage repairs are not covered under warranty.
- Remove and clean filter cartridge. Store cartridge in a secure place to prevent freezing. If the spa is going to be used, maintain normal operating procedures and ensure cover is in place when possible.
![]()
![]()
![]()
![]()
![]()
![]()
![]()
![]()
![]()
![]()
![]()
![]()
![]()
![]()
![]()
![]()
![]()
![]()
![]()
![]()
NOTE!
Freeze ups or damage caused by freezing are not covered under warranty !
SPRINGTIME START-UP
If your spa has been winterized, the Manufacturer highly recommends that you contact an authorized dealer to restart your spa. The following is an outline of the procedures involved.
- Make sure all o-rings for pumps are in place and undamaged.
- Make sure all the fittings that loosened are re-tighten.
- Replace all jet fittings, pump drain plugs, hose bib drains, and bleeder valves.
- Fill the spa with water in a normal way,
- Run the jets on high for about 15 minutes.
- Drain the water.
- Put the filters back in.
- Refill the system and treat chemically as one would after a normal water change.
- Ensure Pump unions and heater unions are tightend. Loose connections are not covered under warranty
For more information about winterizing your system, or restarting a winterized system, please contact your local Authorized dealer.
GENERAL SPA MAINTENANCE
Proper maintenance for your spa cover
- Use a soft broom to remove accumulation after every snowfall or ice storm.
- Splash cool tap water on the hardware to free them if they become frozen shut. Household lubricating oil will keep the lock free, but apply carefully because it can damage the cabinet finish.
- We recommend a good treatment with vinyl conditioner before the first snow or ice. If possible, treat during the winter too.
- Monitor your water chemistry. Even if the spa is not used regularly, improper water chemistry can cause a mildew build-up on the cover. Clean, PH controlled water will prolong the life of the cover.
- If mildew is found, remove foam cores from the vinyl encasement. Mix 1 gallon of water, a teaspoon of mild dish washing soap and a cup of bleach. With a soft bristle brush, scrub the inside and outside of the vinyl encasement thoroughly. Take a washcloth and wipe down each foam core; rinse thoroughly. Place the encasement in the sun and foam cores in the shade to dry. Once everything is thoroughly dry, spray the cores and encasement with a mildew inhibitor. Allow to dry completely, then reassemble. The key here, of course, is to maintain proper water chemistry to avoid mildew.
- We suggest rotating the cover every six months to maintain even wear. Unzip the cover, remove the foam cores, turn over and reassemble.
Ask Your Dealer About Using A Cover Lifter PROTECT YOUR COVER!
Proper maintenance for your spa pillows
- Your spa pillows need to be rinsed periodically to remove any chemical residue. This should help to eliminate pillows becoming stiff and discolored.
- If spa is not to be used for a period of time, pillows should be removed. Pillow life will be extended.
Proper maintenance for your spa fountain jets
- In order to keep your fountain jets operating properly, follow these instructions in sequence:
- Turn off fountain jets
- Remove outer ring by turning face counter clockwise
- Remove internal jet insert with a pair of needle nose pliers.
- Clean plastic filter at the back of the jet insert so all holes are free of debris.
- Reinstall jet insert and outer ring.
Please note: We do not recommend the fountain jets be left on when spa cover is closed, this may damage your spa cover.
Proper Care For Stainless Steel Surfaces.
It is possible for stainless steel to corrode under the correct adverse circumstances. It is important to maintain proper water chemistry at all times to prevent damage to the stainless steel surfaces, as well as other surfaces, and components. Stainless steel obtains its resistance to corrosion by a thin coating over the outer surface. In the event this thin coating is damaged or removed, the surface then becomes susceptible to corrosion and rust. This coating can be damaged by the buildup of chemicals most commonly from off gassing chemicals becoming trapped between the cover and the spa water. This coating can also be damaged by using abrasive materials such as steel wool or abrasive cleaners such as household bleach. The following steps will ensure the stainless steel maintains its resistance to corrosion and long lasting beauty.
- Ensure proper water chemistry is maintained at all times.
- Wait 15 to 20 minutes before covering the spa after chemicals have been added.
- Clean surfaces often with fresh water.
- Do not use abrasive materials or abrasive cleaners.
- If using a floater to dispense chemicals, regularly check the sanitizer levels in the spa water to ensure the floating dispenser is not allowing too much sanitizer into the water.
Failure to properly care for and maintain the stainless steel surfaces in the spa may result in rusting or showing signs of corrosion. Rusting or corrosion is not covered by the warranty.
Pump and Heater Unions
- Pump unions and heater unions may need to be tightend perioidically. Loose connections are not covered under warranty
GENERAL TOPSIDE CONTROLS


GENERAL TOPSIDE SPA FUNCTIONS
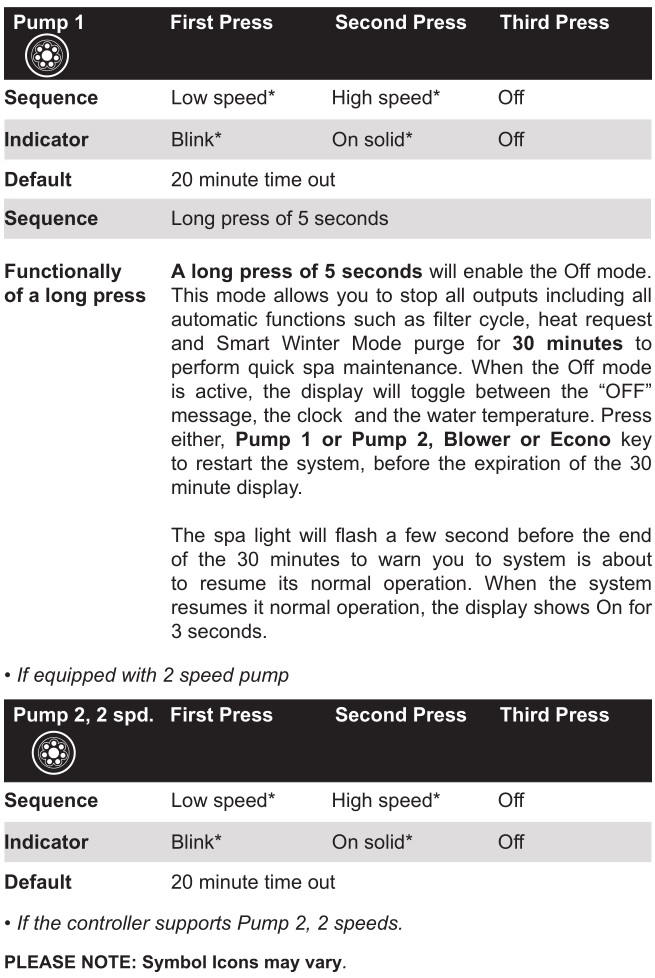

GENERAL SPA FUNCTIONS
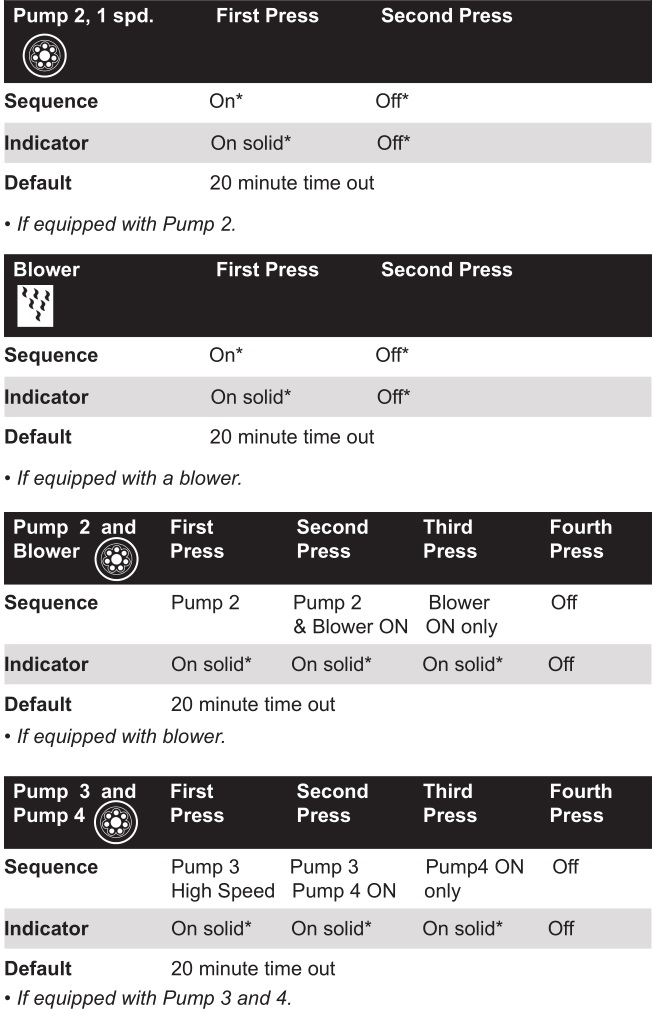

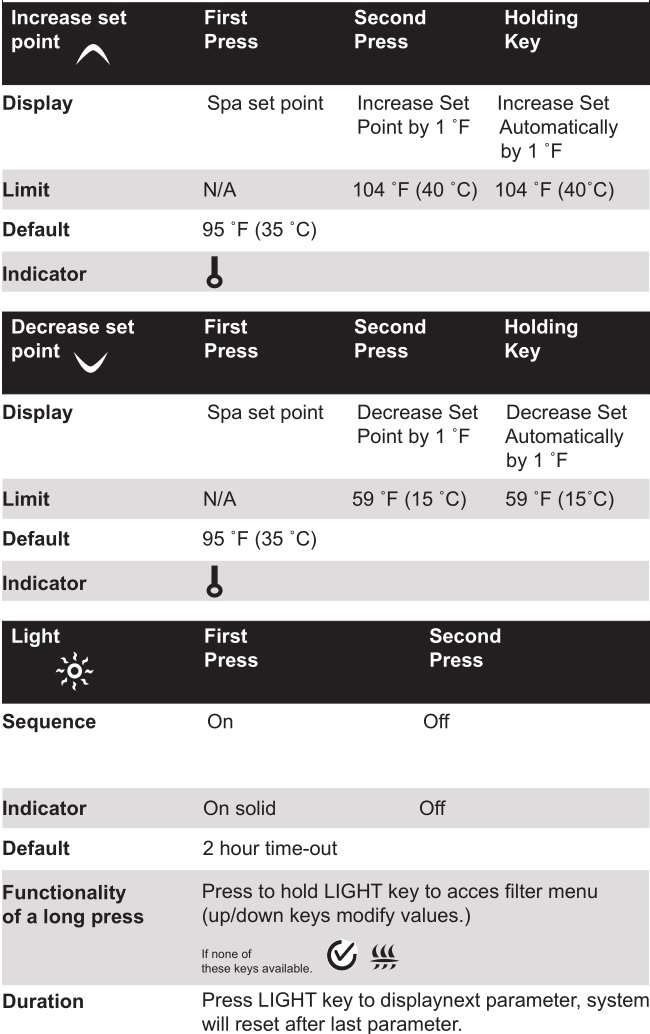


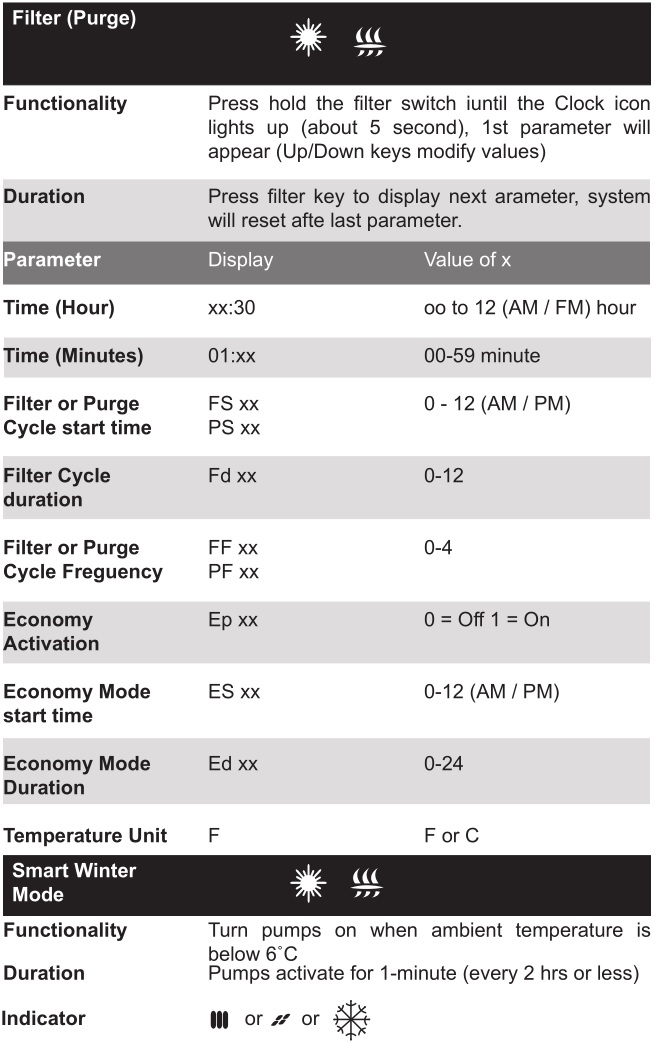


GENERAL TOPSIDE DIAGNOSTIC MESSAGES
The list below shows the different error messages that can appear on the home screen.Refer to the troubleshooting and error codes section of the TechBook for your spa pack system.Please note that if you are in a swim spa configuration, the message may be followed by “Master” or “Slave” to designate from which pack the error is coming.


GENERAL TOPSIDE DIAGNOSTIC MESSAGES & INSTRUCTIONS
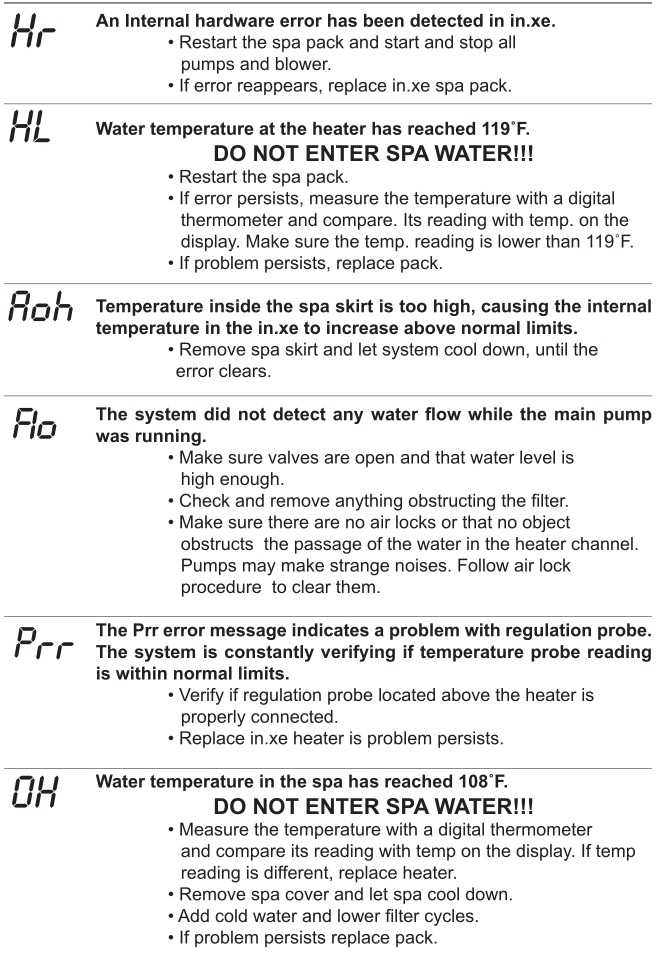

TROUBLE SHOOTING GUIDE


![]()
![]()
![]()
![]()
![]()
![]()
![]()
![]()
![]()
![]()
![]()
![]()
![]()
![]()
![]()
![]()
![]()
![]()
![]()
![]()
NOTE!
These motors will feel hot to the touch. This is normal. The Overheat Sensor will turn the motor off if there is an overload or high temperature problem.
Limited Warranty Summary
Please refer to the warranty card included with your product for complete warranty information. In order to receive prompt warranty service, you must register your spa – ask your dealer about registering. Spa provides a limited warranty to our customers. It applies to the spa structure, surface, plumbing, pumps, heater, blower, and controls. The limited warranty does not cover damage resulting from improper maintenance, improper installation, misuse, abuse, accident, fire, normal acts of God, wear and tear, or improper water maintenance. Unauthorized modifications of the spa may void the warranty. Replacement costs associated with transportation, removal, and reinstallation are the sole responsibility of the spa owner.
We reserve the right to make changes in design or material of its products at any time without incurring liability. This limited warranty applies to the first retail purchaser and terminates upon any transfer of ownership.
Disclaimer:The information in this manual is accurate to the best of Dynasty Spas. However, Dynasty Spas, Inc. assumes no responsibility for errors or omissions. Nor is any liability assumed for damages resulting from use of the information contained herein.
At the time of print, this manual is accurate in its information. Dynasty Spas reserves the right to change to improve its product without prior notice. To check on updated or for other information, please visit www.dynastyspas.com and follow the links to the owners club section.
Safety SignThe safety sign enclosed with your owner’s manual packet should be permanently installed where visible to all users of the spa. It is very important that you, as a spa owner, review the important safety instructions and warnings before you operate your spa. It is equally important that you instruct all users, even occasional ones, as to the warnings associated with spa use. You may obtain additional signs by contacting:
Dynasty Spas101 Dynasty WayAthens, TN 37303866-396-7727
©Dynasty Spas, Inc. Dynasty Spas reserves the right to change product selections and/or make product modifications without notice.Your Dynasty Spas Dealer/Contractor is an independent business person and not an agent or employee of Dynasty Spas or any of its subsidiaries. Neither Dynasty Spas nor its subsidiaries accept any responsibility for any representations, statements or contracts made by any Spa Dealer/Contractor.
All rights reserved. Spas reserves the right to make product modifications and enhancements.Rev date: 051120
Installer
Company:________________________Address: _________________________Phone: __________________________Warranty Submission Date:___________
PLEASE ASK YOUR DEALER ABOUT REGISTERING YOUR WARRANTY
Model: __________________________Serial Number:____________________Equipment Pack: __________________Color:___________________________Date of Delivery: __________________
Spa Manufacturer1815 Milton Rd.Athens, TN 37303


Spa & Hot Tub User Manual – Spa & Hot Tub User Manual –
[xyz-ips snippet=”download-snippet”]

