Braukmann AMX300 DirectConnectTM Mixing Valve Kits
INSTALLATION INSTRUCTIONS
 Tools needed (not supplied)
1.Wrench2. Pliers
Safety Definitions
These safety terms identify information you must read.
CAUTIONIndicates a hazardous situation which, if not avoided, could cause bodily injury or property damage.
WARNINGIndicates a hazardous situation which, if not avoided, could result in death or serious injury.
GETTING STARTED
CAUTIONFor the homeowner’s comfort, safety and convenience, it is recommended this mixing valve kit be installed and serviced by a plumbing professional. These instructions provide detailed instructions for installation and maintenance of the mixing valve kit. You must read these instructions carefully and completely to ensure proper installation.
Safety Precautions
WARNINGWater inside the water heater is very hot and presents a scalding hazard. Water temperatures in excess of 120 ºF (49 ºC) can cause severe burns. Explain this to homeowner and emphasize the risks associated with adjusting the mixing valve settings.
Included in this box (see Fig. 1)
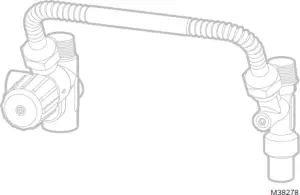
- AMX300 thermostatic mixing valve (“A”)
- Cold water tee (“B”)
- Flexible metal connector (“C”)
- Thermostrip (“D”)
- AMX300 Mixing Valve Installation Instructions (literature # 62-3112)
- AMX300 Mixing Valve Kit Installation Instructions (literature # 62-3113)

WARNINGWater inside the water heater is very hot and presents a scalding hazard. If the AMX300 mixing valve kit is being installed on a water heater that is already operational, be careful when draining the hot water supply lines in preparation for connecting the mixing valve kit.
Setting Homeowner Expectations
Make sure the homeowners know what to expect from their AMX300 mixing valve kit. Show the homeowner the procedure for adjusting the AMX300 mixing valve if, in the future, they are not satisfied with the temperature of the hot water delivered to the fixtures in the house. Outline the potential scalding hazard if the mixed water temperature is set too high and answer any questions the homeowner may have.Recommend to the homeowner that the mixing valve kit be checked annually to ensure it continues to operate correctly. These installation instructions must be left with the homeowner for future reference.
WARNINGCompliance to ASSE 1017 code requires installation of a check valve. An expansion tank must be installed with the check valve to accommodate thermal expansion.
Important Installation RequirementsFollow professional safety standards and all local regulations. Consult local plumbing codes prior to installing the AMX300 mixing valve kit.
PREPARATION FOR INSTALLATION
The following steps should be taken to ensure proper conditions for operation:
- Check the operating conditions (temperature, pressure and flow rate) of the system where the mixing valve kit will be installed and ensure they do not exceed the specifications of the mixing valve (refer to literature # 62-3112, AMX300 Series DirectConnectTM Mixing Valve Installation Instructions). All specifications must be met before installing the mixing valve kit.
- If the water supply is of poor quality, the internal components may jam requiring an additional filter or strainer to be fitted to the system. Contact a plumbing professional for appropriate materials and installation.
- This mixing valve kit MUST NOT be subjected to heat during installation as this may damage the internal components.CAUTIONApplying heat to these valves can damage the mixing valve’s internal components, causing it to not regulate the mixed water temperature properly. If using sweat fittings to connect the mixing valve kit to the plumbing system, DO NOT apply heat to the mixing valve after it is connected to the water heater. Sweat the copper tubing of the plumbing system to the threaded adapter before connecting the adapter to the mixing valve.
- The valve MUST NOT be allowed to freeze. If the mixing valve kit is installed in a location where freezing could occur, suitable insulation must be used to prevent damage.
- DO NOT use excess thread sealant (in liquid, tape or other form) on the NPT threads, as this may cause the mixing valve kit to fail; ensure that thread sealant does not get into the internal parts of the mixing valve kit. Do not use ANY thread sealant on flare connections of the flexible metal connector.
- When installing the AMX300 mixing valve kit on a water heater with a blower mounted on top, the blower unit must be removed prior to installation of the mixing valve kit and replaced after the kit is installed. If the water heater is gas-fired, the mixing valve kit must be connected to the water heater before the draft hood is installed. When installing an AMX300 mixing valve kit on an existing water heater, it may be necessary to remove the draft diverter and some of the vent sections before installing the AMX300 mixing valve kit.
- The AMX300 mixing valve kit is intended for use ONLY on water heaters in potable water systems. It must never be installed on a water heater that has previously been used with a non-potable water heating system, due to the potential for contamination from toxic materials used in theses types of systems (e.g. boiler treatment chemicals).
- Remove all components from the AMX300 mixing valve kit box and check that all required components are included. The required components are: AMX300 mixing valve, cold water tee, flexible metal connector, thermostrip and installation instructions (see Fig. 1).
- The AMX300T kit includes a flexible metal connector suitable for water heaters with an 8-in. spacing between the hot and cold water nipples on top of the tank. The AMX302T includes a flexible metal connector suitable for water heaters with an 11-in. spacing.
WATER CONNECTIONS
The AMX300 mixing valve has an integral 1/2-in. FNPT Alternate Hot Water outlet port (marked with an embossed “AH” on the body of the valve) that draws unmixed, very hot water from the tank. Use of this port is optional and should be used if very hot water is needed at specific fixtures (laundry, dishwasher, etc.). It also has an integral 1/2-in. FNPT recirculation inlet port (marked with an embossed “R” on the body of the valve) which can be connected to a domestic hot water recirculation loop. The return line from the recirculation loop must have a check valve installed to prevent reverse flow from the water heater to the fixtures (refer to literature # 62-3112, AMX300 Series DirectConnectTM Mixing Valve Installation Instructions). Refer to Fig. 2 and 3 for descriptions and locations of the inlet and outlet ports on the mixing valve and cold water tee.
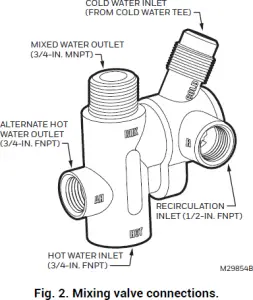
 Fig. 3. Cold water tee connections.
WARNINGDo not return recirculation loop to any other location other than “R” inlet of the mixing device. If recirculation loop water is returned to the water heater at any location other than the optional recirculation inlet, the recirculation loop is exposed to unmixed VERY hot water.
AMX300 DIRECTCONNECTTM MIXING VALVE KITS
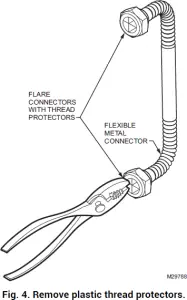
INSTALLATION1. Plastic thread protectors are installed in both ends of the flexible metal connector. Remove these protectors with pliers using a pulling and twisting motion, as shown in Fig. 4.CAUTIONDo not damage the flared connectors or threads of the flexible metal connector when removing thread protectors.
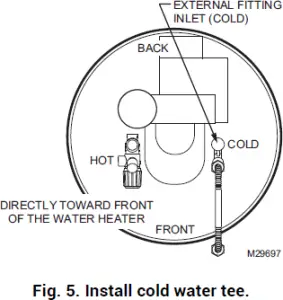
2. Install the cold water tee onto the water heater’s cold water inlet. If installing on a water heater with 1-in. inlet fitting, use 1-in. FNPT to 3/4-in. MNPT brass reducer bushing and brass nipples. Tighten until leak tight and facing the front of the water heater as shown in Fig. 5.
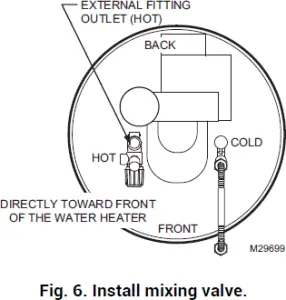
 3. If compliance to ASSE 1017 code is required, install a field supplied check valve in the cold water supply. In this case an expansion tank is required prevent excessive pressure in the system. If desired, the expansion tank may be plumbed to the 1/4″ NPT outlet on cold water tee to expansion tank.4. Install the AMX300 mixing valve onto the water heater’s hot water outlet. If installing on a water heater with 1-in. outlet fitting, use 1-in. FNPT to 3/4-in. MNPT brass reducer bushing and brass nipples. Tighten until leak tight and facing the front of the water heater as shown in Fig. 6.
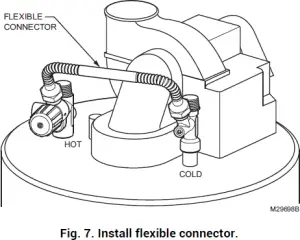
 5. Install the flexible metal connector to the AMX300 mixing valve and cold water tee as shown in Fig. 7. Tighten flare connectors until leak tight. At this time the mixing valve kit should be leak tight.
 Continue installation of potable water system as indicated in the installation and operation instruction manual supplied with the water heater. Once potable water system has been completely installed, and all connections are lead tight, attach the thermostrip to the mixed water outlet pipe no more than 10 in. from the outlet of the AMX300 mixing valve.
TEMPERATURE ADJUSTMENT
Prior to adjusting the hand wheel setting on the mixing valve, the water heater must be operational and deliver hot water within the water heater outlet temperature range, typically 100°F180°F (38°C82°C). To achieve the desired mixed water supply temperature, the temperature setting on the water heater may need to be adjusted. Prior to measuring the mixed water supply temperature, using the supplied thermostrip, ensure the hot water tank recovers from any aquastat adjustment and the temperature of the hot water in the heater has stabilized.
Measure the mixed water supply temperature by opening the hot water tap at the nearest faucet supplied by the AMX300 mixing valve. A minimum flow rate of 1 to 1.5 gpm (4 to 6 L/min) is recommended for accurate temperature readings on the thermostrip (see Fig. 8). Allow the hot water to run until a steady temperature reading is displayed on the thermostrip.

WARNINGIncreasing water temperature increases the risk of scald injury. Scalding may occur within 5 seconds at a setting of 140°F (60°C). Water temperature over 120°F (49°C) can cause serious injury. Children, the disabled, and the elderly are at highest risks of being scalded. Please feel the water before bathing or showering.
Table 1. Scald Risk Chart
|
Water Temperature |
Time to scald (approximate) |
|
155 °F (68 °C) |
About 1 second |
|
150 °F (66 °C) |
About 1-1/2 seconds |
|
145 °F (63 °C) |
Less than 3 seconds |
|
140 °F (60 °C) |
Less than 5 seconds |
|
135 °F (57 °C) |
About 10 seconds |
|
130 °F (54 °C) |
About 30 seconds |
|
125 °F (52 °C) |
1-1/2 – 2 minutes |
|
120 °F (49 °C) |
More than 5 minutes |
The mixed water supply temperature may require adjustment. The mixing valve kit is set at approximately 120 ºF (49 ºC) when the arrow on the hand wheel and the arrow on the valve body are aligned.
1. To Increase mixed water supply temperature: Push in and rotate the hand wheel counter-clockwise until the desired set point is reached as indicated on the thermostrip reading (see Fig. 9). Ensure the hand wheel snaps back to a locked position once desired set point is reached.2. To Decrease mixed water supply temperature: Push in and rotate the hand wheel clockwise until the desired set point is reached as indicated on the thermostrip reading (see Fig. 9). Ensure the hand wheel snaps back to a locked position once desired set point is reached.
ºF ºc 14060 13858 13657 13456 13255 13054 12853 12652 12451 12250 12049 11848 11647 11446 11244 11043
ThermostripAccuracy expiresafter MMMYYYY12451 12250 12049 11848 11647Fig. 9. Thermostrip.
MAINTENANCE
Resideo recommends that the AMX300 mixing valve kit be checked annually to ensure proper operation. In areas with adverse water conditions, such as extremely hard water, more frequent intervals are recommended.
Hard water conditions may result in scale deposits causing binding of internal parts in extreme cases. Scale build-up occurs more quickly with high water hardness and higher temperature of the water stored in the tank.
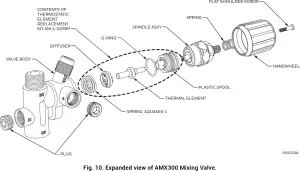
Cleaning the internal parts will usually restore the valve operating conditions. In some cases, it may be necessary to replace the thermostatic element assembly (See Fig. 10). A Thermostatic Element Replacement Kit, AM-1-025RP, is available through Resideo distributors.
To remove scale from the internal surfaces of the AMX300 mixing valve, or to replace the thermostatic element, it is not necessary to remove the valve from the piping. Simply perform the following steps:1. Shut off cold water supply to the water heater2. Open a hot water faucet to drain hot water from the system piping3. Follow directions in the MAINTENANCE section of “AMX300 Series DirectConnectTM Mixing Valve Installation Instructions”, Resideo literature # 62-3112 (supplied with the AMX300 mixing valve kit)4. Open the cold water supply shut-off valve until hot water flows from the hot water faucet that was opened in step 2 above.5. When a steady stream of water flows from the faucet, close the faucet6. Check for leaks on the AMX300 mixing valve and tighten components as required7. Restart the water heater, following the water heater manufacturer’s directions, and wait until it reaches setpoint and the temperature in the tank has stabilized8. Test the temperature at the mixed water outlet (as described in the TEMPERATURE ADJUSTMENT section above) and adjust hand wheel position as necessary to achieve desired temperature.
There may be some variation in the water temperature from the mixing valve kit due to seasonal temperature variations in the cold water supply.
REPLACEMENT PARTS
Rebuild kit for AMX300 mixing valve. AM-1-025RP Thermostrips (in packs of 10). TS205-064
www.resideo.com
Resideo Technologies, Inc. 1985 Douglas Drive North, Golden Valley, MN 55422 1-800-468-1502 62-3113–05 M.S. Rev. 03-20 | Printed in United States
© 2020 Resideo Technologies, Inc. All rights reserved. This product is manufactured by Resideo Technologies, Inc. and its affiliates.
[xyz-ips snippet=”download-snippet”]


