GLassOuse 9346376064002 Wireless Head Assistive Device
GlassOuse Vl.3


Dimensions L:160mm x W:145mm x T:S0mmWeight 42g
Bluetooth Connection
GlassOuse Vl.3 supports connection to Bluetooth 4.0 and below.
- Activate Bluetooth on your device (for iOS and iPadOS, also activate Accessibility> Touch> Assistive Touch)
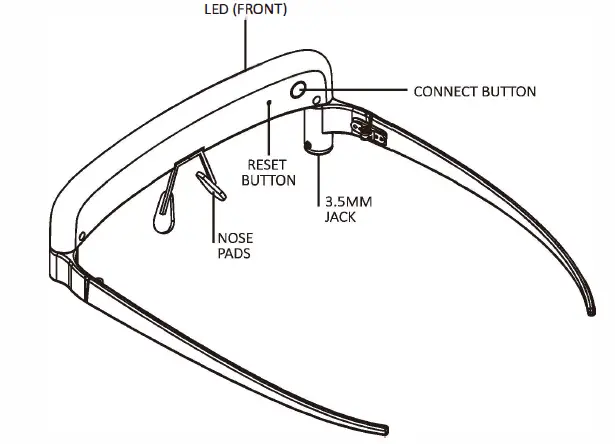
- Press and hold the “Connect” button on the GlassOuse. T he LED light will blink.
- Find and link to GlassOuse Vl.3 using your device’s Bluetooth scan screen.
- To use GlassOuse with other devices, press the “Connect” button again, or dismiss GlassOuse connection from your device or turn off previously connected device’s Bluetooth function.
Mouse use
After you wear GlassOuse like regular glasses, the cursor will move according to your head movements. To move the cursor around the screen, move your head accordingly. Use your switch for clicking actions or the “Dwell” feature of your device. When your head is in a centred and comfortable position towards the screen, the cursor should be in the middle.
NOTE: You can bring back the mouse cursor to the centre by pushing it to the edge of your device’s screen with your head and retrieving it back.
Calibration
We suggest doing the calibration before the first use or when connected with the new device. If the cursor moves abnormally (i.e. vibration, sliding etc.) calibration is recommended.To Calibrate GlassOuse Vl.3:
- Connect GlassOuse with your device via Bluetooth.Wait until the LED is continuously blue.
- Keep the Glassouse in an inverted position on a flat solid surface to start automatic calibration.
- During calibration, you will notice LED blinking red and blue alternatively. Once the LED is continuously blue again, calibration is finished.
NOTE: Calibration should be performed within 3 minutes of successful connection with the device.
Setting Mouse Sensitivity
You can adjust your GlassOuse Vl.3 mouse sensitivity via two ways:To set your cursor speed on your device (PC, tablet, phone, TV):
- Go to “Cursor Speed” option of the device.
- Select the desired speed.
To set the cursor speed via GlassOuse:
- Connect GlassOuse to a G-switch through mono 3.5mm jack plug. Press your G-switch and “Reset” button simultaneously (use the pin to press the reset button). If you are using a Puff Switch, press “Reset” button of your GlassOuse while you are puffing towards the switch.
- While pressing, release “Reset” button first and then release G-switch button. The LED should blink red. If you are using a Puff Switch, release “Reset” button first and stop puffing after.
- Select desired cursor speed (slow, medium or fast) by pressing (or puffing) G-switch according to the speed of the red LED light. On the “SLOW” setting LED will blink slowly, on the “MEDIUM” setting LED will blink faster and on the “FAST” setting LED will blink the fastest.
- Upon your choice, press “Reset” button to set the sensitivity or leave the device for 30 seconds after which it will automatically select the chosen sensitivity.
Switch OptionsAs option to GlassOuse Vl.3 compatible parts, G-Switch Series adaptive switches come with a 3.5mm jack plug connector to combine perfectly with GlassOuse Vl.3.Alternatively, you can use it with the “Dwell” feature of your device instead. Offering short circuit low signals, all G-Switch options are specially designed for GlassOuse Vl.3 but if you have any other switch devices using 3.5mm connector, you can connect those to your GlassOuse too.To check out G-Switch options and find more information about them, visit www.glassouse.com.
Which G-Switch is suitable for you to do clicking actions?Bite Switch: Enables you to make clicks via smooth bites.Puff Switch: Enables you to make clicks via puffs.
Finger Switch: Enables you to make clicks via pressing the switch button with your finger or any part of your body.Foot Switch: Enables you to make clicks via pressing the switch with your foot.Press Switch: Enables you to make clicks via pressing the switch surface.Pillow Switch: Enables you to make clicks via pressing the switch surface with your head or cheek.Touch Switch: Enables you to make clicks via touching the switch surface.Proximity Switch: Enables you to make clicks via hovering your fingers, hand or any part of your body over the switch surface.Without Switches: Without any G-Switch, you can use your GlassOuse Vl.3 with dwell software.With Other Switches: If you have any other switch devices offering 3.5mm jack connectors, you can use your own switch device with your GlassOuse Vl.3 to make “clicking” actions.
LED Indicator
Charging: Red LED is seen continuously on the deviceCharging is complete: No LED light on the deviceBluetooth is searching for a connection: LED blinks blueBluetooth connection is active: LED is continuously blueLow battery: LED blinks red
OS Compatibility
- Computer (Windows, Linux, MacOS, Chrome OS)
- Tablet (Android, iPadOS13, Windows, Chrome OS)
- Mobile (Android, iOS13, Windows, Chrome OS)
- SmartTV (Android)
Battery
GlassOuse Vl.3 comes with CEBA 3.7V 360mAh Li-Po battery. The battery life can go up to 150 hours of use.
Power Saving Mode:When the device is kept idle for more than 15 seconds, it will go in standby mode and can be brought back to normal by moving the device or pressing any button.NOTE: Please charge the battery once every three months at least when you do not use your GlassOuse.
Angle of UseGlassOuse Vl.3 can be used in a 180° horizontal or 160° vertical angle. Please do not use it while reclining fully or looking at the ground.
WARNINGS
- Keep GlassOuse away from magnets.
- GlassOuse Vl.3 is foldable as regular glasses. Please fold it carefully.
- Use GlassOuse charging cable only with GlassOuse device.
- Charge and calibrate GlassOuse before the first use.
WARRANTY
GlassOuse Vl.3 comes with a 1-year warranty against defects in materials and workmanship.
Manufacturer: EnnoPro Group LimitedAddress: 7th Floor, Huarong Building,Qiaolian East, Bu long Road,Longgang District, 518129, Shenzhen,Guangdong, ChinaPhone: 0086-755-89205835(PBX)Mail: [email protected]Web: www.glassouse.com
[xyz-ips snippet=”download-snippet”]

