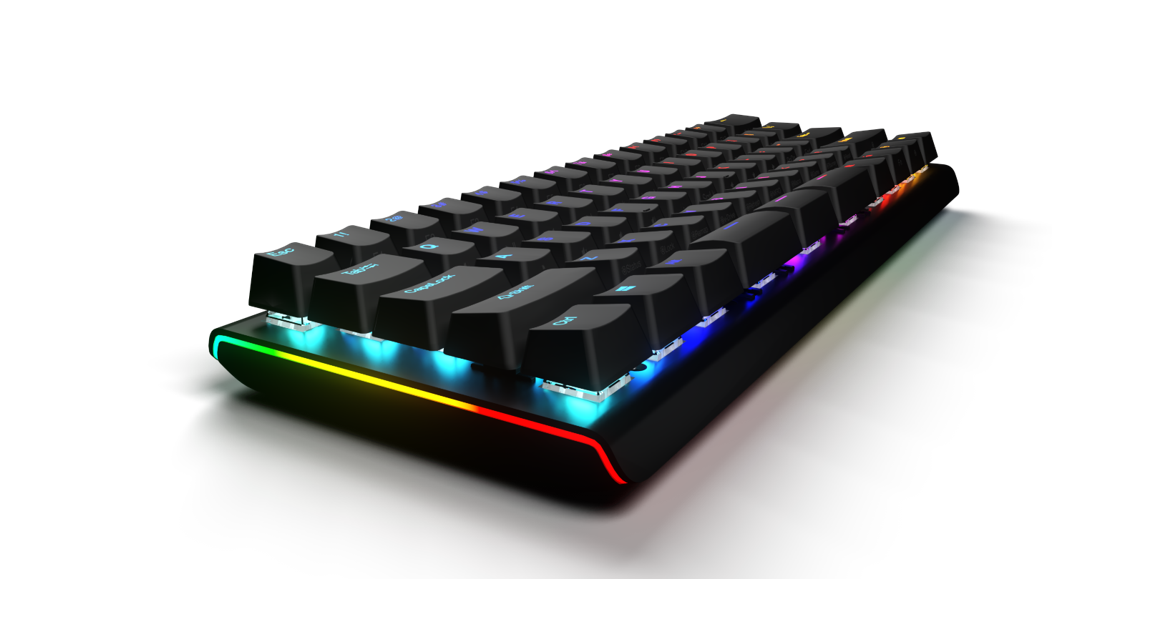

KBTKO Direct Programming Guide
Keyboard models covered by this manual:
- KBTKO-KBW
- KBTKO-KBB
- KBTKO-KBR
Version 1.0.0 (October 5, 2020)
This guide covers features included through firmware version 1.0.0 unless otherwise indicated. To download the latest firmware and to access all support resources visit the TKO Support page: www.KinesisGaming.com/tko-support
© 2020 by Kinesis Corporation, all rights reserved. Kinesis is a registered trademark of Kinesis Corporation. TKO, Hyperspace SmartSet, and v-Driveare trademarks of Kinesis Corporation. All other trademarks are property of their respective owners.
Information in this document is subject to change without notice. No part of this document may be reproduced or transmitted in any form or by anymeans, electronic or mechanical, for any commercial purpose, without the express written permission of Kinesis Corporation.
FCC Radio Frequency Interference Statement
This equipment has been tested and found to comply with the limits for a Class B digital device, pursuant to Part 15 of the FCC Rules. These limits are designed to provide reasonable protection against harmful interference when the equipment is operated in a residential installation. This equipmentgenerates, uses, and can radiate radio frequency energy and, if not installed and used in accordance with the instructions, may cause harmful interference to radio communications. However, there is no guarantee that interference will not occur in a particular installation. If this equipment does cause harmful interference to radio or television reception, which can be determined by turning the equipment off and on, the user is encouragedto try to correct the interference by one or more of the following measures:
- Reorient or relocate the receiving antenna
- Increase the separation between the equipment and receiver
- Connect the equipment into an outlet on a circuit different from that to which the receiver is connected
- Consult the dealer or an experienced radio/TV technician for help
WarningTo assure continued FCC compliance, the user must use only shielded interfacing cables when connecting to a computer or peripheral. Also, any unauthorized changes or modifications to this equipment would void the user’s authority to operate.INDUSTRY CANADA COMPLIANCE STATEMENTThis Class B digital apparatus meets all requirements of the Canadian Interface-causing Equipment Regulations. Cet Appareil numerique de la Classe Brespect routes less exigences du Reglement sure le material broiler du Canada.
Introduction
The TKO is a fully programmable keyboard that does not use any special drivers or software so it can be programmed quickly and easily on all operating systems using the onboard programming shortcuts. Power users have the option to “Direct Program” the keyboard on any operating system (e.g., Windows, Linux, Mac, and Chrome) by editing the simple text (.txt) configuration files stored on the keyboard’s virtual flash drive (the “v-Drive). Once configuration files have been updated on the v-Drive, you will need to use the onboard shortcut to “Refresh” the keyboard or disconnect the v-Drive to implement your changes. Warning: Modifying any of these configuration files will change the operating parameters of your keyboard and should not be attempted before reading this guide and the full User Manual.
Direct Programming Overview
In normal operating mode, the keyboard’s configuration files are read and written by the keyboard during onboard programming, but they are not accessible to the user. To access the configuration text files, a user can use the onboard shortcut (SmartSet + Right Shift + V) to “connect” the v-Drive to their PC and locate the “TKO” removable drive in File Explorer (or equivalent). The v-Drive features 4 sub-folders:
- firmware
- layouts
- lighting
- settings
Firmware Sub-FolderThe “firmware” sub-folder stores the version.txt file. This file is for reference only and should not be edited. If version.txt is accidentally deleted, it will auto-regenerates when the TKO is replugged. The firmware folder is also where firmware update files should be placed (See Section 4 of full User Manual for details).
Layouts Sub-FolderThe “layouts” sub-folder has nine text files (e.g., layout1.txt), each of which controls the Remaps and Macros associated with each of the 9 Profiles. Each time a remap or macro is created, it is written to the corresponding layout .txt file as a discrete line of “code”. If the layout file is deleted, the TKO will automatically regenerate a new blank file the next time it is replugged. Lighting Sub-FolderThe “lighting” sub-folder has nine text files (e.g., led1.txt), each of which controls the Backlighting and Edge lighting effects associated with each of the 9 Profiles. If the lighting file is deleted, the TKO will automatically regenerate a new file with the default lighting effects for the current firmware the next time it is replugged. A Profile comprises a layout file and a lighting file (e.g., layout1.txt + led1.txt represents the totality of the settings for Profile 1). When a Profile is loaded to the keyboard using the onboard shortcut the keyboard reads the contents of the corresponding layout_.txt and led_.txt files and implements those configurations.Settings Sub-FolderThe “settings” sub-folder contains a file named “kbd_settings.txt” which controls the Global Keyboard Settings. Global Keyboard Settings operate independently of the active Profile. Each time a keyboard setting is changed, the change is recorded in the appropriate field in the “kbd_settings.txt” file. The settings sub-folder may also contain a file named “app_settings.txt” which remembers your custom preferences for the SmartSet App (e.g., custom colors, and notification preferences).
Before you Begin
Power Users ONLYDirect editing requires learning to read and write a custom syntax. The insertion of incorrect characters into any of the configuration files can have unintended consequences and could cause temporary problems with even basic keyboard operation. Read the Quick Start Guide and User Manual first and proceed with caution.
![]() Always Eject the v-Drive before disconnecting the v-Drive
Always Eject the v-Drive before disconnecting the v-Drive![]()
![]()
![]()
Non-US UsersYour computer must be configured for the English (US) keyboard layout. Other language drivers use different codes/positions for certain keys which are critical for programming characters such as [], {} and >. Simple Text Files ONLYDo not save configuration files in the Rich Text Format (.rft) as any special characters will lead to errors.
Direct Programming Layouts
The TKO features 9 configurable Profiles, each with its own corresponding “layout” (1-9). Each of the nine layouts is saved as separate .txt files in the “layouts” subfolder on the v-Drive. Only custom remaps and macros are saved to the file, so if no changes have been made to a layout, the file will be empty by design. Users can either write code from scratch or edit keyboard-generated or App-generated code using the syntax rules described below. Deleting a layout file will permanently delete its stored remaps & macros, but the keyboard will automatically regenerate a blank layout file (i.e., a default layout) the next time it is replugged.
- File Naming ConventionOnly the nine numbered layouts can be loaded to the TKO using the onboard Profile shortcut (SmartSet + Right Shift + 1-9). Additional “backup” layouts can be saved as .txt files with descriptive names, but they cannot be loaded to the keyboard without renaming them first. Syntax Overview– Position & Action TokensRemaps and macros are encoded in a layout file using a basic programming syntax:
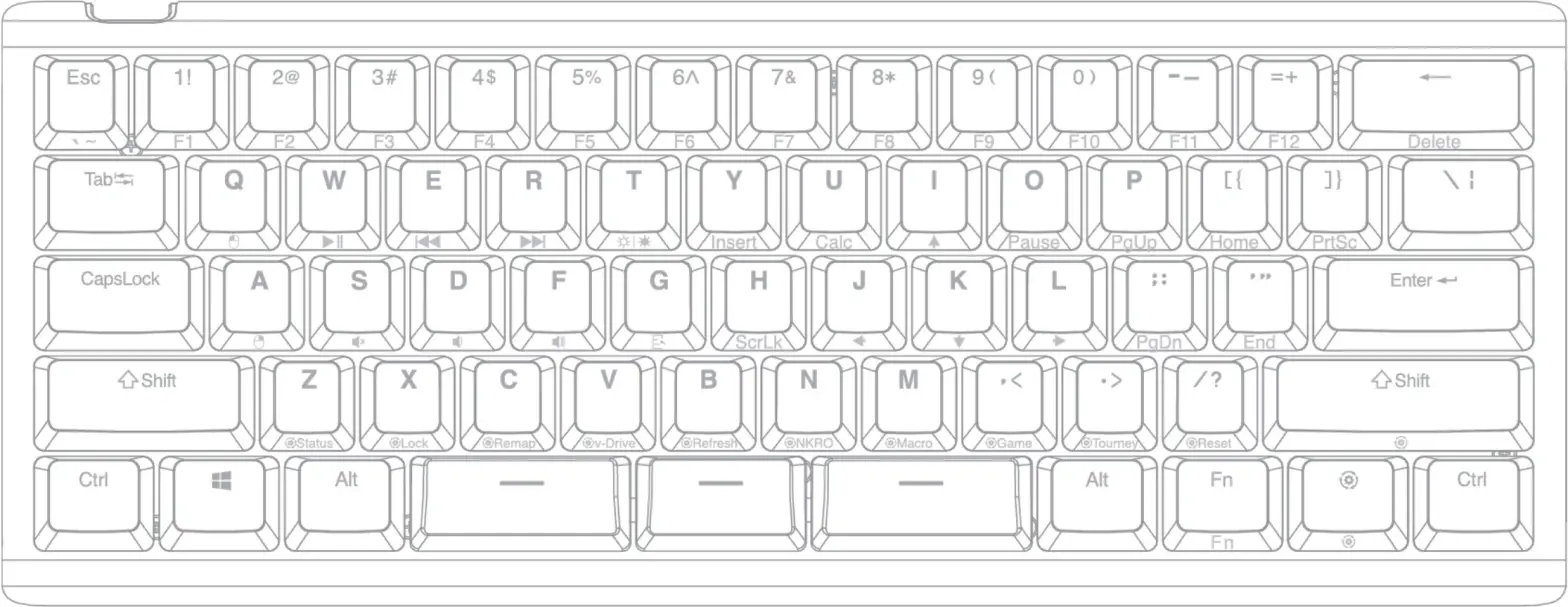
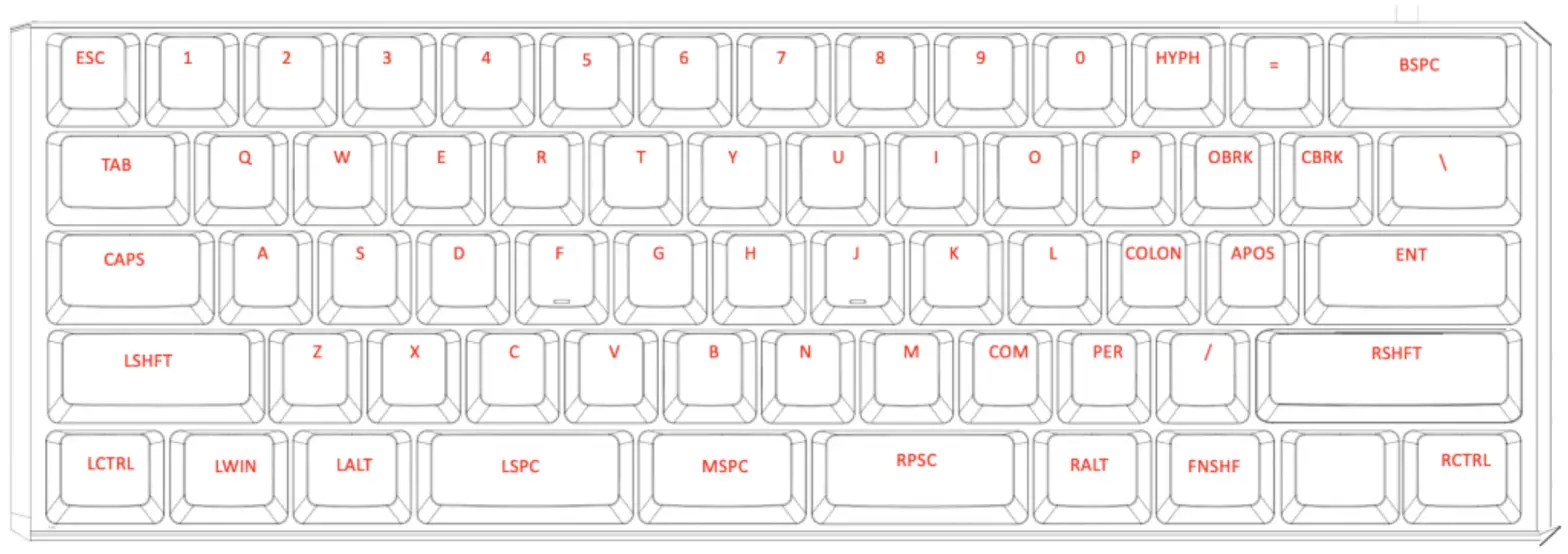
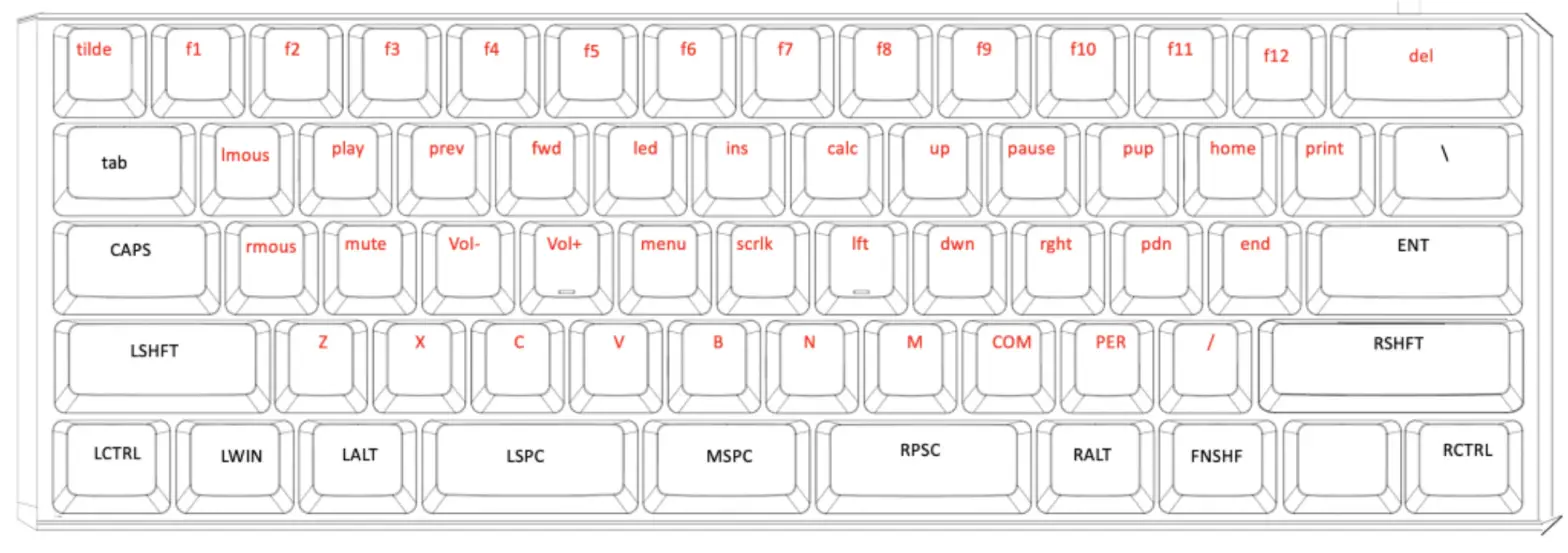
- 62 of the 63 keys have been assigned a unique “Position” token used to identify that key for programming in each layer, the Top Layer and the embedded Fn Layer. Note: The SmartSet Key is dedicated to programming and cannot be re-assigned or moved in either layer.
- Each keyboard & mouse action supported by the TKO has been assigned a unique “Action” token corresponding to a standard USB “scan code”.
To successfully re-program the action for a key, each line of code must include a position token and one or more action tokens. The “>“ symbol is used to separate position tokens from actions tokens, and individual tokens are surrounded by brackets. Examples:
- Remaps are encoded with Square Brackets: [position]>[action]
- Macros are encoded with Curly Brackets: {trigger key position}{modifier co-trigger}>{action1}{action2}…
Layout Programming Tips
- If the keyboard cannot understand the desired remap, then the default action will remain in effect.
- Do not mix and match square and curly brackets in a single line of code
- Separate each line of code with entering/Return
- The order in which the lines of code appears in the .txt file does not generally matter, except in the eventof conflicting commands, in which case the command closest to the bottom of the file will be implemented.
- Tokens are not case-sensitive. Capitalizing a token will not produce the “shifted” action (See Section 6.5).
- A line of code can be temporarily disabled by placing an asterisk (*) at the beginning of the line.
Layout Position TokensTop Layer

Fn LayerTo assign an action to an embedded key position, use the token below proceeded by the prefix “Fn” plus a space (see Section 4.6 and 4.7 for examples).

Action Token DictionaryUse the “action” tokens below to the right of the “>“ to define the remapped action or the macro contents.


Programming RemapsTo program a remap, encode the position token and the action taken in square brackets, separated by “>“.Remap Examples:
|
Remap Examples: |
|
| 1. Escape key performs Q: | [esc]>[q] |
| 2. Embedded W performs Home: | fn [play]>[home] |
| 3. The Embedded Windows key performs Right Shift: | fn [lwin]>[rshft] |
Programming the Fn Key: The TKO supports two different types of Fn layer access: “Shift” and “Toggle”. The default behavior of the Fn key is “Shift” (i.e., momentary). Note: For proper functionality, it is necessary to assign the desired Fn action token to the position token in both layers, otherwise, you’ll get stuck in the Fn layer
Programming MacrosTo program a macro, encode the position token(s) corresponding to the desired trigger key(s) and the action token in curly brackets, separated by “>“. Each layout can store up to 7,200 total macro characters spread across up to 100 macros.Trigger Keys: Any non-modifier key can be assigned as a macro trigger in either layer. A co-trigger can be added by adding a modifier key to the left of “>“. Note: Windows keys are not recommended as co-triggers.Shifted Actions: To produce a shifted key action, it is necessary to encode a macro that includes both the down and upstroke of the shift key surrounding the basic key action. Downstrokes are indicated by placing a “-” inside the bracket and upstrokes are indicated by placing “+”. See example 1 below.Individual Playback Speed Prefix {s_}: By default, all macros play at the selected “Global” playback speed. To assign a custom speed for improved playback performance for a given macro you can use the “Individual Playback Speed” prefix “{s_}”. Choose a number from 1-9 corresponding to the speed scale shown in Section 4.6. The speed prefix should be placed to the right of the “>“ before the macro content. See example 2 below.Multiplay Prefix {x_}: By default, all macros playback continuously while the trigger key is held. To override the repeat feature and restrict a macro to playback a specific number of times you can use the “Macro Multiplay” prefix “{x_}”. Choose a number from 1-9 corresponding to the number of times you want the macro to replay. The multiplay prefix should be placed to the right of the “>“ before the macro content. See example 3 below.If a macro is not playing back properly, try assigning a Multiplay value of 1. The macro may actually be firing multiple times before you are releasing the trigger key.Timing Delays: Delays can be inserted into a macro to improve playback performance or to produce a mouse double-click. Delays are available in any interval between 1 and 999 millisecond ({d001} & {d999}), including random delays ({dran}). Delay tokens can be combined to produce delays of various durations and inserted at any point in a macro. See example 4 below.
Macro Examples:
| Macro Examples: | |
| 1. Tab performs “Hello” with a capital H: | {tab}>{-lshft}{h}{+lshft}{e}{l}{l}{o} |
| 2. Fn Layer Left Ctrl + q performs “qwert” at speed 9: | fn lctrl}{lmous}>{s9}{q}{w}{e}{r}{t} |
| 3. Esc + Left Shift performs “hi” three times: | {lshft}{esc}>{x3}{h}{i} |
Tap and Hold ActionsWith Tap and Hold, you can assign two unique actions to a single key based on the duration of the keypress. Each Layout can support up to 10 Tap and Hold actions. Designate the position token, then the Tap action, then the timing delay from 1 to 999 milliseconds using the special Tap and Hold token ({t&hxxx}), then the Hold Action. Due to inherent timing delays, Tap-and-Hold is not recommended for use with alphanumerictyping keys. Not all key actions support Tap-and-Hold. Note: For most applications, we recommend a timing delay of 250ms.Tap and Hold Example:
- Caps performs Caps when tapped and Esc when held longer than 500ms: [caps]>[caps][t&h500][esc]
Direct Programming Lighting EffectsThe TKO features 9 configurable Profiles, each with its own corresponding series of “lighting configurations” (1-9). Each of the nine lighting configurations is saved as separate .txt files in the “layouts” subfolder on the v-Drive. Each configuration can store up to four effects for that Profile:Deleting a lighting file will permanently delete any custom configurations, but the keyboard will automatically regenerate the default lighting effect for that Profile the next time the keyboard is replugged. Within each Profile, the TKO can perform 4 unique effects:
- Top Layer Backlighting
- Top Layer Edge lighting
- Fn Layer Backlighting
- Fn Layer Edge lighting
Users can either write code from scratch or edit keyboard-generated or App-generated code using the syntax rules described below. Deleting an led file will permanently delete the customizations for that effect, but the keyboard will automatically regenerate the default effect for that Profile based on the current firmware.Note: If an effect is not specified for a Zone or Layer, lighting will be disabled for that Zone/Layer.Backlighting EffectsThere are a number of customizable backlighting effects. Apply the same effect to both layers of a Profile, or assign contrasting effects to signify when you navigate the layers. Each Effect has one or more parameters that can be customized. Lighting effects are encoded using syntax similar to that of the layout files.Basic Syntax: [effect]>[parameter1][parameter2][parameter 3]
Backlighting Level Effect Tokens & Parameters
Monochrome: [mono]>[Color]*Breathe: [breathe]> [Speed] plus [Base Color] or FreestyleWave: [wave]>[Speed][Direction]Spectrum: [spectrum]>[Speed]Reactive: [reactive]>[Color][Speed][Base Color]Starlight: [star]>[Color][Speed][Base Color]Rebound: [rebound]>[Direction][Speed][Base Color]Loop: [loop]>[Color][Speed][Direction][Base Color]Pulse: [pulse]>[Speed]Rain: [rain]>[Color][Speed] [Base Color]Ripple: [ripple]>[Color][Speed] [Base Color]Fireball: [ripple]>[Color][Speed] [Base Color]
Backlighting ParametersColor: When applicable, the Color parameter is defined by inputting a 3-digit value (0-255) for each of the Red, Green, and Blue channels inside square brackets: [RRR][GGG][BBB]. 0 if off and 255 max brightness for that channel. Intermediate values blend colors.
Examples:
| 1. Monochrome Solid Green (Top Layer): | [mono]>[0][255][0] |
| 2. Monochrome Solid Yellow (Top Layer): | [mono]>[255][255][0] |
Speed: When applicable, the Speed parameter is defined by inputting one a number 1-9 inside the speed token: (spdx)
Examples:
| 1. Reactive | Red at Speed 1: [reactive]>[255][0][0][spd1] |
Direction: When applicable, the Direction parameter is defined by inputting one of the following tokens: [dirup], [dirdown], [dirleft], [dirright]
| 1. Loop Up Speed 9 in Purple: | [loop]>[255][0][255][spd9][dirup] |
Base Color: When applicable, the Base Color parameter is defined by inputting adding a separate line of text encoding the monochrome effect AFTER the primary animated effect. If a base color is not specified, the primary effect will playback over unlit keys.
| 1. Green Rebound over Base White: | [rebound]>[dirleft][spd5][0][255][0] [mono]>[255][255][255] |
| 2. Green Rebound over unlit keys: | [rebound]>[dirleft][spd5][0][255][0] |
Freestyle and Breath Backlighting EffectsThe Freestyle and Breath effects allow you to assign a custom color to each of the 63 keys in either layer using the lighting key position token and the color parameter. Note: The lighting position tokens differ slightly from the layout position tokens in the Fn layer. The Fn Layer Lighting position tokens are always the same as the Top Layer, simply add the “Fn “ prefix.
Backlighting Position Tokens
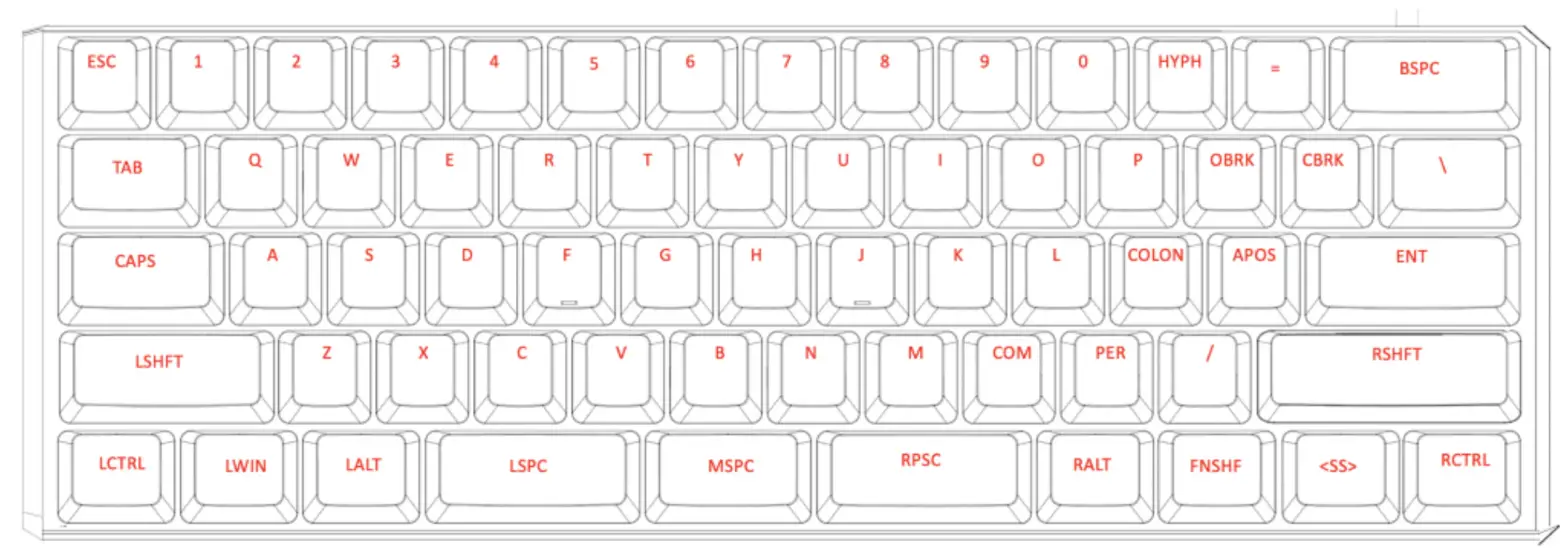

With Freestyle mode, there is no effect parameter, simply define the color values for each key. Keys not specified will be unlit. For Breathe, define the Breathe Effect first, specify the Speed parameter, and then define the color values for each key individually or using the Monochrome effect.Example 1: Set WASD keys to static Red, and embedded WASD to static Green[w]>[255][0][0][a]>[255][0][0][s]>[255][0][0][d]>[255][0][0]fn [w]>[0][255][0]fn [a]>[0][255][0]fn [s]>[0][255][0]fn [d]>[0][255][0]Example 2: Set the keyboard to breathe in White and the WASD keys breathe in Red at speed 5[breathe]>[spd5][mono]>[255][255][255][w]>[255][0][0][a]>[255][0][0][s]>[255][0][0][d]>[255][0][0]
Fn Layer Backlighting EffectProgram the Fn layer effect the same way you would the top layer effect, just use the standard “Fn “ prefix” (with a space) to modify the Effect or the key position token.Example 1: Set the Top layer to Monochrome Green, and the Fn layer to Red Ripple[mono]>[0][255][0]fn [ripple]>[spd5][255][0][0]
Edge LightingEdge lighting effects work in much the same way as the backlighting effects. You can assign an animated effect to either layer, or set the color for each of the 33 LEDs individually like you would with Freestyle. Failure to specify an Edge effect for each layer will result in the lights being off.Edge lighting supports the following Effects with following tokens and parameters Monochrome: [mono_edge]>[Color]*Breathe: [breathe_edge]> [Speed] plus [Base Color] or FreestyleWave: [wave_edge]>[Speed][Direction]Spectrum: [spectrum_edge]>[Speed]Rebound: [rebound_edge]>[Direction][Speed][Base Color]Pulse: [pulse_edge]>[Speed]
Edge Position Tokens
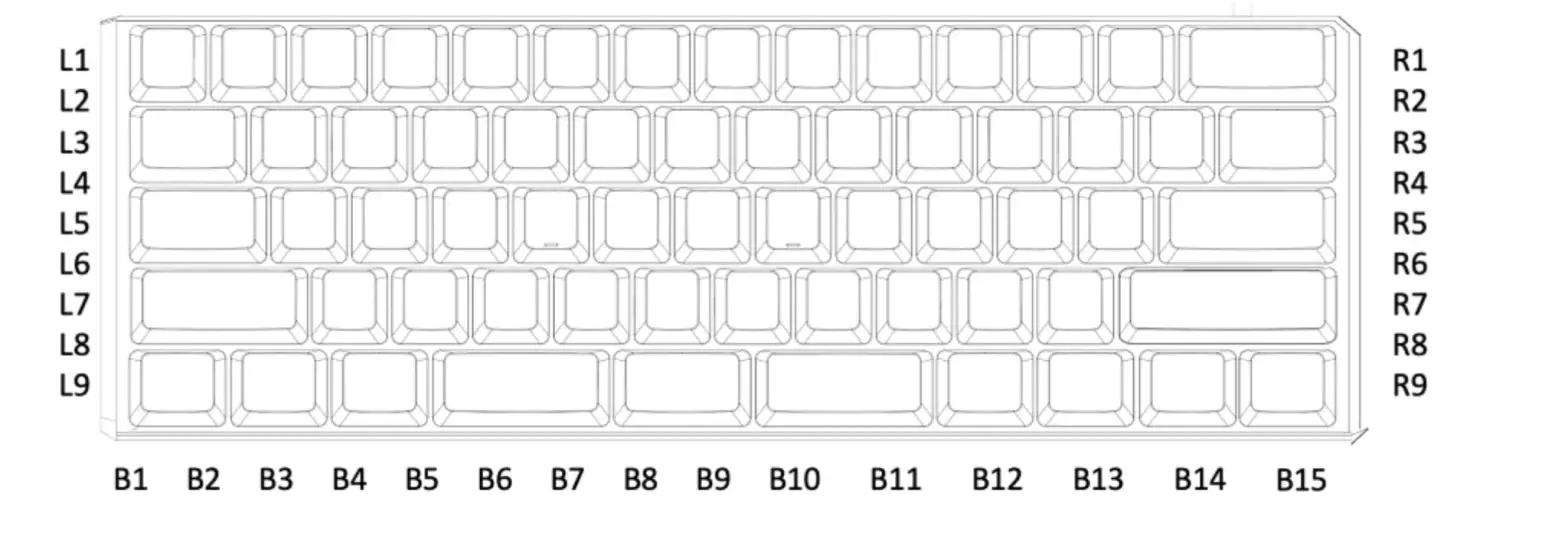

Example 1: Set the left edge to static Blue[L1]>[255][0][0][L2]>[255][0][0][L3]>[255][0][0][L4]>[255][0][0][L5]>[255][0][0][L6]>[255][0][0][L7]>[255][0][0][L8]>[255][0][0][L9]>[255][0][0]
Direct Programming Settings
Keyboard SettingsThe current global settings for the keyboard are saved in the “kbd_settings.txt” file in the “settings” sub-folder.Users can update these settings by modifying the fields in this .txt file and then using the Refresh shortcut (SmartSet + Right Shift + B) to implement them. Note: ON/OFF values are case-sensitive.
- startup_file: Edit the number of the layout_.txt file to instruct the keyboard which Profile (or layout) to load
- Led_mode: Designate the active led.txt file when Profile Sync Mode is disabled.
- macro_speed: Change the Global Macro Speed with “1-9” for speed, or “0” to disable (default = 5)
- game_mode: Disable Game Mode with “OFF” or enable with “ON”
- profile_sync_mode: By setting this value to “OFF”, you can load different pairs of layout and lighting files
- status_play_speed: Change the Status Report Playback speed with “1-4” for speed, or “0” to disable (default = 3).
- program_key_lock: Disable Program Locking with “OFF” or enable with “ON”
- v-drive: Force the v-Drive to open automatically every time the keyboard is plugged in with “auto” or require manual opening with “manual”.
SmartSet App SettingsIn the settings sub-folder, you may also notice the “app_settings.txt” file. This file stores your saved preferences for in-App notifications when using the SmartSet App. “On” disables the notification and “Off” enables the notification.
v-Drive RepairIf you disconnect the v-Drive, unplug the keyboard, or use the Refresh onboard shortcut while the PC was actively writing to one of the files (i.e., without ejecting), the next time you open the v-Drive on a Windows computer you may receive a harmless drive error warning. If you receive this error, follow the prompts in the User Manual to quickly “repair” the drive.
References
[xyz-ips snippet=”download-snippet”]

