
Yamaha YDS-150 Digital Saxophone
Instruction Manual

SIMPLIFIED EU DECLARATION OF CONFORMITYHereby, Yamaha Music Europe GmbH declares that the radio equipment type [model 1, model 2, model 3] is in compliance with Directive 2014/53/EU. The full text of the EU declaration of conformity is available at the following internet address:https://europe.yamaha.com/en/support/compliance/doc.html
Importer: Yamaha Music Europe GmbHSiemensstrasse 22-34, 25462 Rellingen, Germany
- Radio Frequency (Operational Frequency)………2402 MHz to 2480 MHz
- Maximum Output Power (EIRP) …………………….4.0 dBm (2.5 mW)
This device complies with Industry Canada’s licence-exempt RSSs. Operation is subject to the following two conditions:
- This device may not cause interference; and
- This device must accept any interference, including interference that may cause undesired operation of the device.
This equipment complies with IC radiation exposure limits set forth for an uncontrolled environment and meets RSS-102 of the IC radio frequency (RF) Exposure rules. This equipment has very low levels of RF energy that is deemed to comply without testing of specific absorption rate (SAR).
This transmitter must not be co-located or operated in conjunction with any other antenna or transmitter.
This equipment complies with FCC radiation exposure limits set forth for an uncontrolled environment and meets the FCC radio frequency (RF) Exposure Guidelines. This equipment has very low levels of RF energy that is deemed to comply without testing of specific absorption rate (SAR).
PRECAUTIONS
PLEASE READ CAREFULLY BEFORE PROCEEDINGPlease keep this manual in a safe and handy place for future reference.
 WARNING
Always follow the basic precautions listed below to avoid the possibility of serious injury or even death from electrical shock, short-circuiting, damages, fire or other hazards. These precautions include, but are not limited to, the following:
Power
- Do not place the USB cable near heat sources such as heaters or radiators. Also, do not excessively bend or otherwise damage the cord, or place heavy objects on it.
- Only use the voltage specified as correct for the instrument. The required voltage is printed on the name plate of the instrument.
- Check the electric plug periodically and remove any dirt or dust which may have accumulated on it.
Do not open
- This instrument contains no user-serviceable parts. Do not open the instrument or attempt to disassemble or modify the internal components in any way. If it should appear to be malfunctioning, discontinue use immediately and have it inspected by qualified Yamaha service personnel.
Water warning
- Do not expose the instrument to rain, use it near water or in damp or wet conditions, or place on it any containers (such as vases, bottles or glasses) containing liquids which might spill into any openings. If any liquid such as water seeps into the instrument, turn off the power immediately and unplug the power cord from the AC outlet. Then have the instrument inspected by qualified Yamaha service personnel.
- Never insert or remove an electric plug with wet hands.
Fire warning
- Do not put burning items, such as candles, on the unit. A burning item may fall over and cause a fire.
Influences on electro-medical devices
Radio waves or magnetism may affect electro-medical devices.
- Do not use this product near medical devices or inside areas in which the use of radio waves is restricted.
- Do not use this product within 15cm (6 in.) of persons with a heart pacemaker or defibrillator implant.
Battery
- Follow the precautions below. Failure to do so might result in explosion, fire, overheating or battery fluid leakage.
- Do not tamper with or disassemble batteries.
- Do not dispose of batteries in fire.
- Do not attempt to recharge batteries that are not designed to be charged.
- Keep the batteries separate from metallic objects such as necklaces, hairpins, coins, and keys.
- Use the specified battery type (page 15) only.
- Use new batteries, all of which are the same type, same model, and made by the same manufacturer.
- Always make sure all batteries are inserted in conformity with the +/- polarity markings.
- When the batteries run out, or if the instrument is not to be used for a long time, remove the batteries from the instrument.
- When using Ni-MH batteries, follow the instructions that came with the batteries. Use only the specified charger device when charging.
- Keep batteries away from small children who might accidentally swallow them.
- If the batteries do leak, avoid contact with the leaked fluid. If the battery fluid should come in contact with your eyes, mouth, or skin, wash immediately with water and consult a doctor. Battery fluid is corrosive and may possibly cause loss of sight or chemical burns.
If you notice any abnormality
- When one of the following problems occur, immediately turn off the power switch and disconnect the electric plug from the outlet. (If you are using batteries, remove all batteries from the instrument.) Then have the device inspected by Yamaha service personnel.
- The USB cable or plug becomes frayed or damaged.
- It emits unusual smells or smoke.
- Some object has been dropped into the instrument.
- There is a sudden loss of sound during use of the instrument.
- If any cracks or breakages exist on the instrument.
CAUTION
Always follow the basic precautions listed below to avoid the possibility of physical injury to you or others, or damage to the instrument or other property. These precautions include, but are not limited to, the following:
Power
- Do not connect the instrument to an electrical outlet using a multiple connector. Doing so can result in lower sound quality, or possibly cause overheating in the outlet.
- When removing the electric plug from the instrument or an outlet, always hold the plug itself and not the USB cable. Pulling by the USB cable can damage it.
- Remove the electric plug from the outlet when the instrument is not to be used for extended periods of time, or during electrical storms.
- Use the specified USB power adaptor (page 10) only. Using the wrong adaptor can result in damage to the instrument or overheating.
Location
- Do not place the instrument in an unstable position where it might accidentally fall over.
- Before moving the instrument, remove all connected cables, to prevent damage to the cables or injury to anyone who might trip over them.
- When using an electric plug, make sure that the AC outlet you are using is easily accessible in plain view. If some trouble or malfunction occurs, immediately turn off the power switch and disconnect the plug from the outlet. Even when the power switch is turned off, electricity is still flowing to the product at the minimum level. When you are not using the product for a long time, make sure to disconnect the plug from the wall AC outlet.
Connections
- Before connecting the instrument to other electronic components, turn off the power for all components. Beforeturning the power on or off for all components, set all volume levels to minimum.
- Be sure to set the volumes of all components at their minimum levels and gradually raise the volume controls while playing the instrument to set the desired listening level.
Handling
- Do not insert a finger or hand in any gaps on the instrument.
- Never insert or drop paper, metallic, or other objects into the gaps on the panel or keys. This could cause physical injury to you or others, damage to the instrument or other property, or operational failure.
- Do not rest your weight on, or place heavy objects on the instrument, and do not use excessive force on the buttons, switches or connectors.
- Do not use the instrument if the mouthpiece, reed or ligature is damaged.
- Keep small parts out of the reach of infants. Your children may accidentally swallow them.
- Do not use the instrument/device or headphones for a long period of time at a high or uncomfortable volume level, since this can cause permanent hearing loss. If you experience any hearing loss or ringing in the ears, consult a physician.
- When using a strap, make sure the strap is securely attached to the instrument.
- Do not lift the instrument by the strap. It can cause serious injury or damage to the instrument.
- Do not treat the instrument in a rough manner such as swinging it about, etc. The strap on the instrument may detach causing unexpected accidents such as the instrument dropping, etc., or injuring persons close by.
Yamaha cannot be held responsible for damage caused by improper use or modifications to the instrument, or data that is lost or destroyed.
Always turn the power off when the instrument is not in use.Even when the [![]() ] (Standby/On) switch is in standby status (power lamp is off), electricity is still flowing to the instrument at the minimum level. When you are not using the instrument for a long time, make sure you unplug the power cord from the wall AC outlet. Make sure to discard used batteries according to local regulations.
] (Standby/On) switch is in standby status (power lamp is off), electricity is still flowing to the instrument at the minimum level. When you are not using the instrument for a long time, make sure you unplug the power cord from the wall AC outlet. Make sure to discard used batteries according to local regulations.
NOTICE
To avoid the possibility of malfunction/ damage to the product, damage to data, or damage to other property, follow the notices below.
Handling
- Do not connect this product to public Wi-Fi and/or Internet directly. Only connect this product to the Internet through a router with strong password-protections. Consult your router manufacturer for information on security best practices.
- Do not use the instrument in the vicinity of a TV, radio, stereo equipment, mobile phone, or other electric devices. Otherwise, the instrument, TV, or radio may generate noise. When you use the instrument along with an application on your smart device such as a smartphone or tablet, we recommend that you set Bluetooth to on after setting “Airplane Mode” to on on that device in order to avoid noise caused by communication.
- Do not expose the instrument to excessive dust or vibrations, or extreme cold or heat (such as in direct sunlight, near a heater, or in a car during the day) to prevent the possibility of panel disfiguration, damage to the internal components or unstable operation. (Verified operating temperature range: 5° – 40°C, or 41° – 104°F.)
- Do not place vinyl, plastic or rubber objects on the instrument, since this might discolor the panel or key-board.
- Do not leave the instrument for a long period of time with a key pressed, since this might damage the key.
Maintenance
- When cleaning the instrument, use a soft cloth. Do not use paint thinners, solvents, alcohol, cleaning fluids, or chemical-impregnated wiping cloths.
- Be careful not to expose the instrument to water. If any water gets on the instrument, wipe it off using a dry cloth.
Information
About this manual
- The illustrations and LED displays as shown in this manual are for instructional purposes only, and may appear somewhat different from those on your instrument.
- The Bluetooth® word mark and logos are registered trademarks owned by Bluetooth SIG, Inc. and any use of such marks by Yamaha Corporation is under license.

- The company names and product names in this manual are the trademarks or registered trademarks of their respective companies.
About Bluetooth
Bluetooth is a technology for wireless communication between devices within an area of about 10 meters (33 ft.), and employs the 2.4 GHz frequency band.
Handling Bluetooth communications
- The 2.4 GHz band used by Bluetooth compatible devices is a radio band shared by many types of equipment. While Bluetooth compatible devices use a technology minimizing the influence of other components using the same radio band, such influence may reduce the speed or distance of communications and in some cases interrupt communications.
- The speed of signal transfer and the distance at which communication is possible differs according to the distance between the communicating devices, the presence of obstacles, radio wave conditions and the type ofequipment.
- Yamaha does not guarantee all wireless connections between this unit and devices compatible with Bluetooth function.
Your particular instrument does not have Bluetooth capability if a “Y” indication is printed on the upper right corner of the label at the bottom.
Thank you for purchasing the Yamaha Digital Saxophone! This digital saxophone can be used for playing and practicing at home. We recommend that you read this manual carefully so that you can fully take advantage of the advanced and convenient functions of the instrument. We also recommend that you keep this manual in a safe and handy place for future reference.
Included Accessories
- Mouthpiece set (mouthpiece, ligature, cap, reed) × 1
- Strap × 1
- NOTE
- The strap is stored in the pocket inside the special case.
- NOTE
- Replacement O-ring × 1 set (3 pieces included)
- Replacement reed × 1
- Special case × 1
- NOTICE
- Make sure to only store this instrument and the strap inside the special case, since storing other things might damage the keys.
- NOTICE
- Owner’s Manual × 1
Controls and Functions
Front side 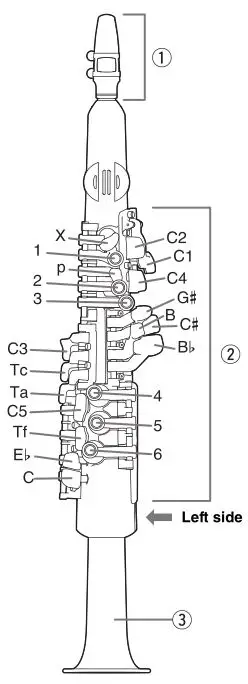
Left side
Back Side 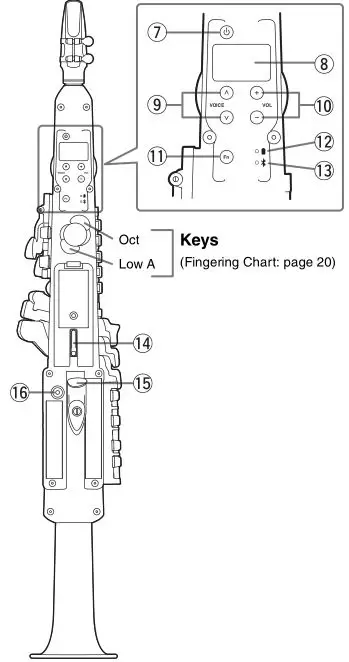
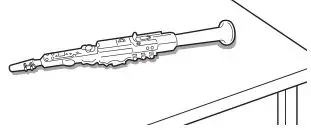
Laying the Instrument DownWhen the instrument is not being played, place it on a flat surface as shown in the illustration below. Do not place the instrument on a chair, music stand, or other such unstable surface, as there is a risk of the instrument falling. Also, never lean the instrument up against a wall, etc.
NOTICE
- Do not stand the instrument up by itself. Doing so can cause damage to the instrument due to the impact if it falls down. If you want to stand the instrument up, please use a commercially available stand.
- Mouthpiece setFor use exclusively with this instrument.
- Keys(Fingering Chart: page 20)
- BellThere is a water drain inside the bell. Water condensation and excess breath moisture can be drained from here.
- 5 V DC-IN/USB TO HOST terminal
- Micro USB Type-B terminal.For connection to a USB power adaptor, USB mobile battery, or PC with a USB cable.
- NOTICE
- Use a USB A to micro B cable of less than 3 meters. Do not use a USB 3.0 cable.
- PHONES jackFor connecting a pair of stereo headphones or other equipment with a mini stereo phone plug (3.5 mm). The instrument’s built-in speakers automatically stop producing sound when plugged in.
- CAUTION
- To prevent hearing loss, avoid using headphones at high volumes for extended periods of time.
- Before connecting the instrument to other electronic components, turn off the power for all components. Before turning the power on or off for all components, set all volume levels to minimum. This can cause permanent hearing loss.
- AUX IN jackFor inputting the sound of an audio player and listening to it through the built-in speaker of the instrument (with a 3.5 mm, mini stereo phone plug). To adjust the input volume from the [AUX IN] jack, adjust the audio play- back volume on the audio device.
- CAUTION
- To avoid possible damage, first turn on the power for the external device, and then for the instrument. When turning off the power, first turn off the power for the instrument, and then for the external device. This can cause permanent hearing loss.
- NOTE
- Use an appropriate adaptor plug if the output jack of the audio device does not match the stereo mini phone plug of the audio cable.
- Use audio cables and adaptor plugs that have no series resistors.
- [] (Standby/On) buttonPress this button to turn on the instrument.
- LED screenDisplays information such as the Voice number in alphanumeric characters.
- VOICE []/[] buttonsChanges the Voice each time a button is pressed.
- VOL [-]/[+] buttonsRaises or lowers the instrument volume each time a button is pressed. Press and hold a button to change the volume quickly.
- Setting range: 0 to 15, od (Default: 13)
- Press the VOL [-] button and VOL [+] button simultaneously to restore the default volume setting.
- [Fn] (Function) buttonPress specific keys while holding this button to call up various functions. This is also used to operate some functions.
- Power lamp
- Bluetooth lamp
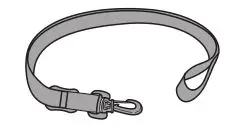
- Strap ringAttach the included strap to this ring.
- How to Attach the StrapFirmly attach the included strap to the ring. You can easily change the length of the strap to adjust it to a length that is easy for you to use.
- How to Attach the StrapFirmly attach the included strap to the ring. You can easily change the length of the strap to adjust it to a length that is easy for you to use.
- Thumb hookUse this hook to support the instrument with your thumb when playing. Wrap your right thumb around the thumb hook to hold the instrument firmly.
- Analog controllerUsed to apply changes to the Voice.

Before Playing
Power Requirements
This instrument can be powered in one of the two ways listed below. Determine which you intend to use, and follow theinstructions for setting up.
NOTICE
- If you connect the instrument to a commercially available USB power adaptor or USB mobile battery while batteries are in the instrument, priority is given to power from the USB cable.
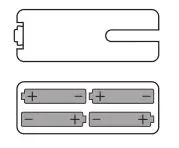
Using batteries
This instrument requires four “AAA” size, alkaline (LR3) batteries or rechargeable nickel-metal hydride batteries (rechargeable Ni-MH batteries).
- Make sure that the power of the instrument is off. The power lamp () will be off when the power is off.
- Place the instrument upside-down on a soft cloth and remove the battery cover.
- Insert the four new batteries, being careful to follow the polarity markings on the inside of the compartment.
Remaining Battery Power
When the remaining battery power drops to about 5 or 10 minutes*, the POWER LED lamp (![]() ) flashes. Further-more, when there is almost no remaining power, the POWER LED lamp turns off and the instrument enters standby mode.
) flashes. Further-more, when there is almost no remaining power, the POWER LED lamp turns off and the instrument enters standby mode.
- Varies depending on the usage environment.
- NOTE
- You should check the Power lamp frequently and takeprecautions that the battery does not run out during aperformance.
- NOTE
Using a USB power adaptor or USB mobile battery (sold separately)
Connect the USB cable to a USB power adaptor or USB mobile battery (sold separately) in the order shown in the illustration. Follow the order shown here in reverse when disconnecting the USB cable. 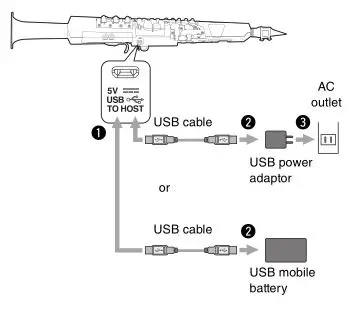
Use only a USB power adaptor or USB mobile battery compatible with the USB standard for power supply.
Output voltage 4.8 V to 5.2 VOutput current 1.0 A or greater
![]() CAUTION
CAUTION
- Before using a USB power adaptor or USB mobile battery, be sure to read the relevant pre- cautions.
Turning on the Power / Setting to Standby
Press the [] (Standby/On) button to turn the power on.
The power lamp (![]() ) is lit in red when the power is on. Adjust the volume as desired while blowing into the mouthpiece.
) is lit in red when the power is on. Adjust the volume as desired while blowing into the mouthpiece.
![]()
CAUTION
- Do not use the instrument or headphones for a long period of time at a high or uncomfortable volume level, since this can cause permanent hearing loss.
NOTICE
- While turning on the power, do not attempt any other operations, such as blowing into the mouthpiece. Doing so may cause the instrument to malfunction.
Press and hold the [] (Standby/On) button for longer than one second to enable standby mode
![]()
CAUTION
- Even when in standby mode, an electric current is still flowing in the instrument at the minimum level. When you are not using the instrument for a long time, make sure to disconnect the USB power adaptor from the AC outlet, or remove the batteries from the instrument.
NOTE
- If over 5 seconds elapses with no keys or buttons operated since the power was turned on, the LED display turns off. Simply operate any button or move the instrument to turn the LED display on again.
Enabling / Disabling Auto Power Off
To prevent unnecessary power consumption, this instrument features an Auto Power Off function that automatically turns the power off if the instrument is not operated for a specified period of time (30 minutes). By default, it is set to On; however, this setting can be changed with the [Fn] button.
NOTICE
- If your instrument is connected to other equipment such as amplifiers and speakers but you do not intend to use it for 30 minutes, we recommend that you turn off all devices as described in the corresponding owner’s manuals. Doing so eliminates the risk of damage to the other equipment. If you do not want the instrument to turn off automatically when connected to other equipment, disable the Auto Power Off function.
Adjusting the Instrument Volume
Adjust the volume.The volume is increased by 1 each time VOL [+] is pressed. The volume is decreased by 1 each time VOL [-] is pressed. You can adjust the volume in a range of 0 to 15, od. The default value is 13. ![]()
The “od” (overdrive) setting is the maximum volume, for the most powerful sound. Keep in mind that there may be distortion in the sound for specific Voices and in the lower ranges.
Initialization
Perform this operation when you want to reset all settings to their factory defaults.
- If the power is on, turn the power off.
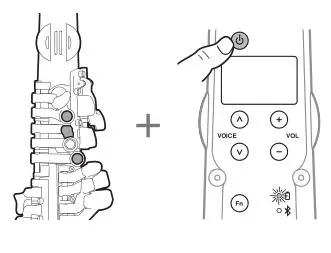
- Turn the power on while holding keys [1], [p], and [3].
Playing the Instrument
Mouth Shape
Position the mouthpiece in your mouth with your upper front teeth resting about 1cm from the tip of the mouth- piece. Cover your lower teeth with your lower lip to keep your teeth from coming into direct contact with the reed. 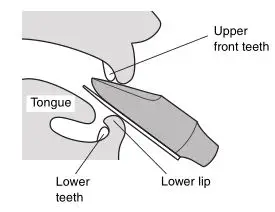
With the reed resting on your lower lip, seal your mouth around the mouthpiece to keep air from leaking out of the corners of your mouth when blowing.* Do not bite hard on the reed or mouthpiece.
How to Play Sound
Put the mouthpiece into your mouth and blow. Blow strongly for a higher volume, and softly for a lower volume. There is no need to vibrate the reed like an acoustic saxophone.
NOTE
- Unlike an acoustic saxophone, changing the degree to which the mouthpiece is inserted into the neck will not change the pitch of the sound.
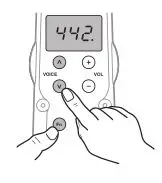
Selecting a Voice
It is possible to select a Voice and tonality you like, such as an alto saxophone, tenor saxophone, etc.
Press VOICE [![]() ]/[
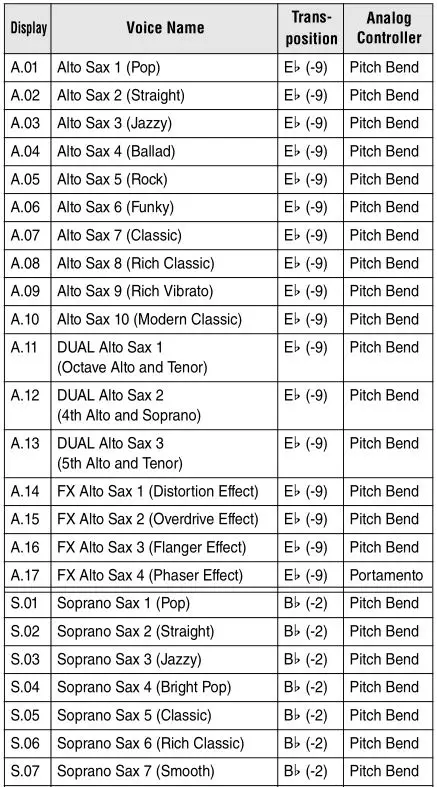
]/[![]() ].The Voice number is displayed on the LED display. Forthe Voice names, refer to the Voice List on page 19.
].The Voice number is displayed on the LED display. Forthe Voice names, refer to the Voice List on page 19.
The display on the LED screen has the following meanings.
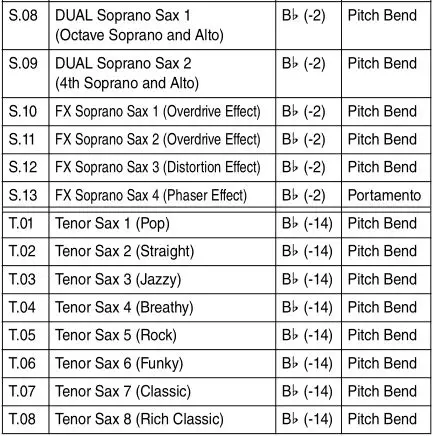
![]() Alto sax Voices (in Eb)
Alto sax Voices (in Eb)
![]() Soprano sax Voices (in Bb)
Soprano sax Voices (in Bb)
![]() Tenor sax Voices (in Bb)
Tenor sax Voices (in Bb)
![]() Baritone sax Voices (in Eb)
Baritone sax Voices (in Eb)
![]() Non-sax Voices (in C)
Non-sax Voices (in C)
![]() You can select user Voices edited in the dedicated app (page 14). For details, refer to the manual for the dedicated app.
You can select user Voices edited in the dedicated app (page 14). For details, refer to the manual for the dedicated app.
Using the Analog Controller
The analog controller has functions assigned by default depending on the selected Voice.
- Raising or lowering the pitch (Pitch Bend)
- Applying vibrato to the sound. (Modulation)
- Smoothing out the pitch slide between notes (Portamento)
For details about the functions assigned to the analog controller for each Voice, see the Voice List at the end of this document. 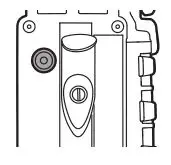
NOTE
- Portamento is a playing technique that smoothly slides the pitch of the performance up and down. When using a Voice with portamento assigned to it, move the thumb controller to smoothly change the pitch.
Press specific keys while holding the [Fn] button to perform settings for the various functions of the instrument.
Basic operations
Use the following procedure to perform settings for each function.
- While holding the [Fn] button, press the key to which the function is assigned. Hold the [Fn] button until you finish performing settings. If you release the button, the value at that moment is set and operation returns to the Voice selection screen.
- While holding the [Fn] button, press VOICE []/[] and select the desired value.
- NOTE
- Press both VOICE []/[] buttons simultaneously to restore the value to the factory default.
- Press both VOICE [
- NOTE
- When you have finished selecting a value, release the [Fn] button.This will complete the setting and return the operation to the Voice selection screen.
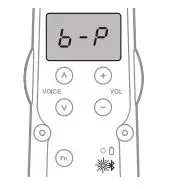
Turning the Bluetooth function on and pairing with your smart device
- Turn the Bluetooth function on.When it is on, the Bluetooth lamp () will flash slowly. Perform pairing when you want to use Bluetooth Audio.
- While holding the [Fn] button, press the C key. This puts the instrument in pairing standby. Keep holding the [Fn] button.
- LED screen: [B–] Pairing standby
- LED screen: [—] Bluetooth function off
- While holding the [Fn] button, press the VOICE [] button to begin pairing. The LED screen will change to the following display and the Bluetooth lamp ( ) will flash rapidly.
- NOTE
- To cancel the pairing, press the VOICE [] button.
- To cancel the pairing, press the VOICE [
- NOTE
- Select the connection on the smart device.Select [YDS-150 Audio] if handling audio.
- When pairing is complete, the Bluetooth lamp will switch from quickly flashing to staying on.If pairing fails, the Bluetooth lamp flashes slowly and the LED display changes to [B–].
- If five minutes elapse since starting pairing in Step 3, pairing fails.
- Release the [Fn] button.Operation returns to the Voice selection screen.
- NOTE
- While paired, the Bluetooth lamp stays lit up.
- Depending on your smart device, audio can play at a high or uncomfortable volume level. Adjust the volume of your smart device before playing audio.
- NOTE
Using the Dedicated App
You can use the dedicated app for this instrument to perform settings for the functions of this instrument more conveniently.
- Install the dedicated app for this instrument on your smart device.
- Connect this instrument and your smart device via Bluetooth.
You can perform the following settings for this instrument on the app. For details, refer to the manual for the app.
- Editing user Voices / editing fingering information / enabling and disabling Voice selection shortcuts, etc.
Instrument Maintenance after Playing
Before storing this instrument in its case, remove the mouthpiece from this instrument and wipe off any moisture near the bell and mouthpiece.
- Loosen the ligature screws and remove the reed and ligature from the mouthpiece.
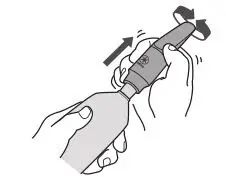
- Hold the mouthpiece firmly and turn it from side to side to slide it off from the neck.
- NOTICE
- When removing the mouthpiece, avoid applying a bending force to the neck base. Excessive force applied to the neck can damage it.
- NOTICE
- Use a cleaning swab (sold separately) to clean the inside of the mouthpiece.
- Be careful not to damage the tip of the mouthpiece.
- Always keep the cleaning swab clean and dry.
- Wipe the bell and keys with a dry, soft cloth.
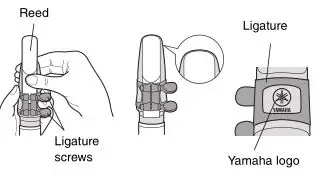
Setting the Reed and Ligature
Slide the mouthpiece onto the body’s neck, turning from side to side. After attaching the mouthpiece, set the reed and ligature onto the mouthpiece.
NOTICE
- The reed tip is delicate so please take care not to damage it with the ligature, etc.
- Slide the ligature onto the mouthpiece from its tapered end.
- Position the reed so that the edge of the mouth-piece is slightly visible over the reed tip. Tighten the two screws on the ligature to secure the reed in place.
- Position the ligature so that the tuning fork logo is centered in the ligature’s open space.
- Position the ligature so that the tuning fork logo is centered in the ligature’s open space.
NOTICE
- Use the dedicated mouthpiece set (mouthpiece, reed, ligature) included with this instrument. Failure to do so can result in sound not being produced properly or other malfunctions.
- Tighten the ligature screws just enough to keep the reed from moving. Take care not to over-tighten.
- Do not wash this instrument or the instrument interior with water. Doing so can result in damage to the instrument.
- Do not apply grease to the instrument neck. Doing so can result in damage to the neck.
- When the connection between the neck and the mouth-piece is getting looser, replace the O-ring with the included replacement one.
- If over the course of use the tip of the reed is broken off or the reed becomes disfigured, replace it with the included replacement reed.
Troubleshooting
Sound does not stop.
- Try turning the power on again.
- Fluid remaining on the hole inside the mouthpiece joint may result in the sound not stopping. Remove fluid from the hole by using a slim cotton swab.
Specifications
- Product name : Digital Saxophone
- Voices : AWM Sampling
- Bluetooth :
- Bluetooth version: 4.2
- Supported profile: A2DP
- Complies with Bluetooth Low Energy MIDI Specification
- Wireless output: Bluetooth Class 2
- Maximum communication distance: About 10 m
- Radio frequency (Operation frequency): 2,402 to 2,480 MHz
- Maximum output power (EIRP): 4 dBm
- Type of modulation: FHSS
- Power supply :
- USB AC adaptor: 5 V / 1 A
- Self-powered USB hub: 5 V / 1 A
- Four “AAA” size alkaline (LR3) or Ni-MH rechargeable (HR3) batteries
- Power consumption : 4.5 W (when using a USB AC adaptor)
- Auto Power Off : Yes
- Size (W x D x H) : 699 mm (W) × 110 mm (D) × 103 mm (H)
- Weight : 1.0 kg (not including batteries)
The contents of this manual apply to the latest specifications as of the publishing date. To obtain the latest manual, access the Yamaha website then download the manual file.Since specifications, equipment or separately sold accessories may not be the same in every locale, please check with your Yamaha dealer.
For electrical and electronic products using batteries.
 Information for users on collection and disposal of old equipment and used batteries:These symbols on the products, packaging, and/or accompanying documents mean that used electrical and electronic products and batteries should not be mixed with general household waste. For proper treatment, recovery and recycling of old products and used batteries, please take them to applicable collection points, in accordance with your national legislation.By disposing of these products and batteries correctly, you will help to save valuable resources and prevent any potential negative effects on human health and the environment which could otherwise arise from inappropriate waste handling. For more information about collection and recycling of old products and batteries, please contact your local municipality, your waste disposal service or the point of sale where you purchased the items.
For business users in the European Union:If you wish to discard electrical and electronic equipment, please contact your dealer or supplier for further information.
Information on Disposal in other Countries outside the European Union:These symbols are only valid in the European Union. If you wish to discard these items, please contact your local authorities or dealer and ask for the correct method of disposal.
![]() Note for the battery symbol (bottom two symbol examples):This symbol might be used in combination with a chemical symbol. In this case it complies with the requirement set by the EU Battery Directive for the chemical involved.
Note for the battery symbol (bottom two symbol examples):This symbol might be used in combination with a chemical symbol. In this case it complies with the requirement set by the EU Battery Directive for the chemical involved.
Important Notice:U.S. LIMITED WARRANTY for Customers in the United States
For detailed information about this Yamaha product and warranty service, please either visit the following website address (printable file is available at our website) or contact Customer Service at the address or telephone number identified below.
Website Address:https://usa.yamaha.com/support/warranty/index.html
Customer Service:Yamaha Corporation of America6600 Orangethorpe Avenue, Buena Park, CA90620-1273 Telephone: 800-854-1569
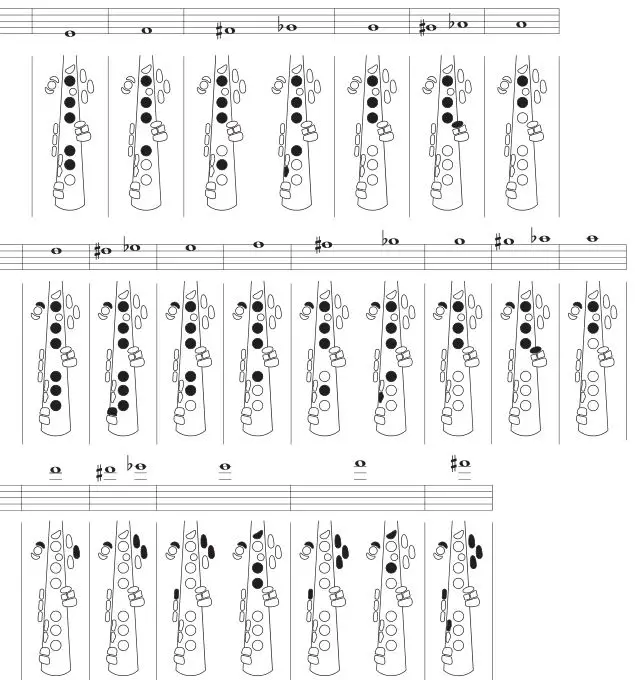
Voice List
Fingering Chart
![]()
Close
![]()
Open
This chart shows typical fingerings for saxophones. The music notation is the written pitch, and not the concert pitch.

PHONES
Make sure the PHONES jack is facing up.
NOTICE• Make sure that the PHONES jack is facing up when storing the instrument in the case. Failing to do so can cause damage to the keys.
4000517700
Manual Development Group©2020 Yamaha CorporationPublished 07/20202020
VDH5520
report this adYamaha YDS-150 Digital Saxophone Instruction Manual – Yamaha YDS-150 Digital Saxophone Instruction Manual –
[xyz-ips snippet=”download-snippet”]