V-TAC VT-5130 Wifi Receiver
INTRODUCTION & WARRANTY
Thank you for selecting and buying V-TAC Product. V-TAC will serve you the best. Please read these instructions carefully before starting the installation and keep this manual handy for future reference. If you have any other query, please contact our dealer or local vendor from whom you have purchased the product. They are trained and ready to serve you at the best. The warranty is valid for 2 years from the date of purchase. The warranty does not apply to damage caused by incorrect installation or abnormal wear and tear. The company gives no warranty against damage to any surface due to incorrect removal and installation of the product. This product is warranted for manufacturing defects only.
WARNING
1. Please make sure to turn off the power before starting the installation.2. Installation must be performed by a certified person.
RECEIVER INSTALLATION
Please follow the below installation diagram to install the receiver.
PAIRING WI-FI RECEIVER WITH V-TAC WIRELESS SWITCHESYou can also now connect V-TAC’s Wi-Fi Receiver with V-TAC Wireless Switches (VT-5131, VT-5132, and VT-5133 & VT-5143). In order to pair the receiver with the switch. Please scan the QR code to access the pairing steps.
APP INSTALLATION
Step 1: Scan the given QR code, or download “V-TAC Smart Light’ from the App Store (iOS) or the Google Play Store (Android).Step 2: Open the V-TAC Smart Light app and tap on register for creating a new account.Step 3:A) Mobile Number: Select the country, then enter your mobile number. Once done, tap ‘Next’.B) E-Mail: Enter your email id and tap on ‘Next’.
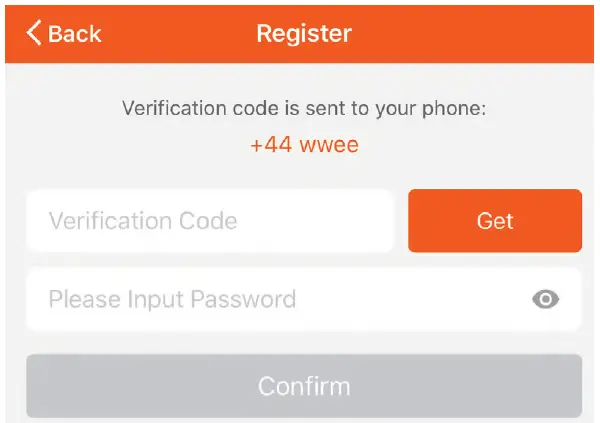
Step 4: Enter the verification code which will be sent to your mobile number/email id, then assign a new password to your account and tap on “Confirm”.
Step 5: Tap on ‘Add Device’ or the + sign. Make sure the lamp is switched on.
Step 6: Select the option “Electrician” and select “Breaker (Wi-Fi)” option.
Step 7: To begin the pairing process, firstly tap and hold the wireless receiver for 5-7 seconds until it starts flashing Green light as shown in the below image.Once the wireless receiver indicates with flashing Green light, it has been successfully connected in pairing mode. Tap on “confirm indicator is blinking rapidly” and enter the Wi-Fi username and password and tap on confirm. (Ensure Wi-Fi Frequency should be 2.4Ghz Only)Troubleshooting: If the wireless receiver is flashing Red color, please wait for 30 – 60 seconds till the light disappears. Then follow the above process to connect the wireless receiver in pairing mode.Note: Before starting the pairing process please ensure the wireless receiver is connected to a device and the power is switched ON.
Step 8: Once you have successfully completed step 7, you will be redirected to below page, where the App searches, registers and initializes the device(lamp) (ref image below)Step 9: Once your device is successfully added, rename the device to your preference.
Step 10: After successfully pairing the Wi-Fi receiver with the app, you can start controlling multiple features of the lamp through your mobile– on/off switch, timing & schedules, and more.
ALEXA SETTINGS
Step1: Install the Amazon Alexa app via the App Store(iOS) or the Play Store (Android) and register. If you already have an existing account with Amazon Alexa, please proceed to logging in.Step2: Once you are on the Amazon Alexa home page, tap on the lower right icon –– where the arrow is pointed–– to add a new device and skill.
Step3: Tap on settings and tap on “skills and games” as shown below.Step4: Search for ‘V-TAC Smart Light’ on the “Skills & Games” page as shown below.
Step5: Enable the Skill.Step6: Enter your V-TAC Smart Light login ID and password and tap on “Link Now”
Step7: Once you tap on Link Now, you will be redirected to a new page requesting for authorization(Ref Image below). Tap on “Authorize”Step8: You will receive confirmation of the account being linked successfully (Ref Image below)
Step8: Discover your smart device on Alexa. Once you have enabled the skillA) You can use voice command ”Alexa discover devices” to the Alexa device which you have.B) To add device manually on home page tap on setting end tap on Add device , select the device a which you are adding and tap on discover device.
Note: Discovering the device must be done every time the device’s name is changed on the app.
ALEXA CommandsNow, you can control your smart device using voice commands on Alexa. Below are a few commands you can use:
- Alexa, turn on/off bedroom light.
- Alexa, set bedroom light to 50 percent.
THINGS TO REMEMBER BEFORE STARTING INSTALLATION:
- V-TAC Smart Light App & Amazon Alexa App
- Make sure you have Amazon Alexa Device(including Echo, Echo Tap, or Echo Dot)
- Smart Device – Lamp
- Stable Wifi network
Step1:a&b) Install the Google Home app via the App Store (iOS) or the Play Store (Android) and register. If you already have an existing account with Google Home, please proceed to logging in.c) Create a New Home/Choose from the existing home if any.d) Power ON the Google Home device and connect it to the App.(Then Proceed to step 2)
Step2: Once you are on the Google home page, tap on the Add “+” icon– to add a new device and skill. And then tap on Set up device as shown in below image.
Step3: Make sure the Smart Bulb is paired with V-TAC Smart Light app before starting step 3. Tap on the arrow section as highlighted in the below image.Step4: Type “V-TAC Smart Light” on the search bar and tap on the icon of “V-TAC Smart Light”
Step5: Sign In with your V-TAC Smart Light Login credentials to Link the Smart Light deviceStep6: Tap on Authorize in order to proceed to linking the device.
Step7 :a. Account will now be linked, please stay on the page you will be redirected in few seconds to select the device to add to your home.b. Select the device and tap on Next as show in image b.
Step8: Select the Home where you would like to add the Smart Light under. (Or) you can create a New home in order to add the Smart Light to it.Step9: You have succesfully added Smart Light device to your Google home App.
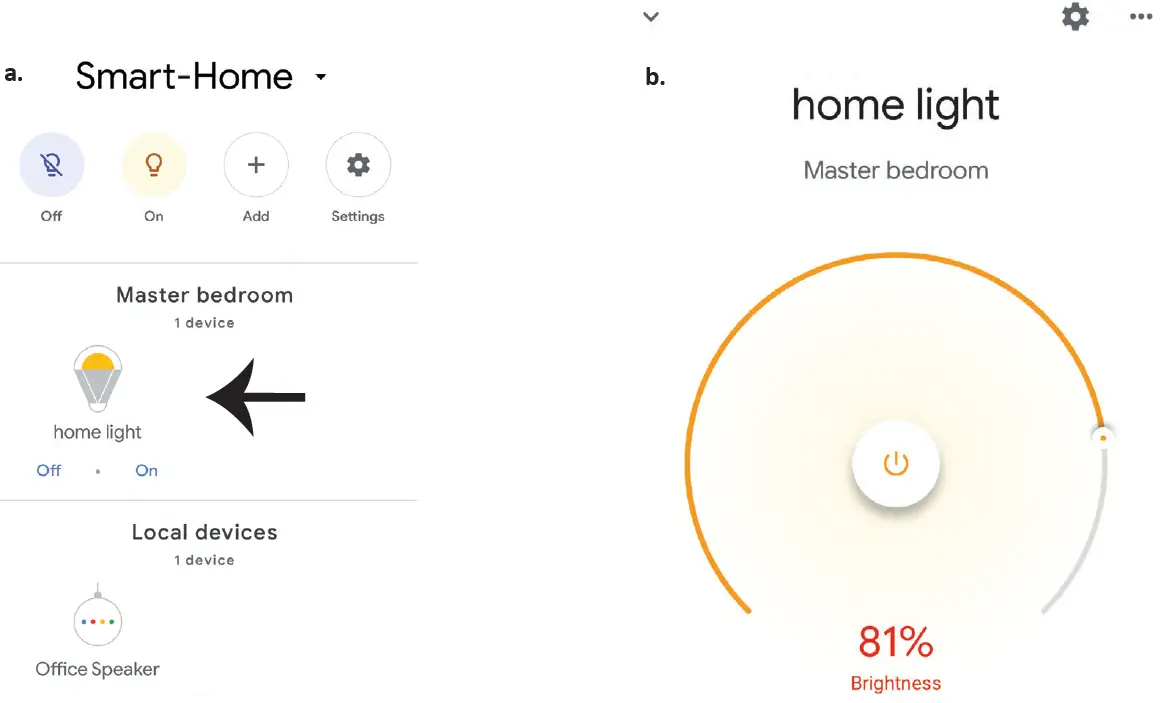
Step10:a. You can turn the Lamp On/OFF by taping on On/Off options as shown below. (OR) You can tap on the Smart Lamp.b. You will be redirected to page(as shown in image b) where you can control the lights “Power and Dimming functionality”.
Google Commands: Now, you can control your smart device using voice commands on Google Home. Below are a few commands you can use:
- OK Google, turn on/off bedroomt. light
- OK Google, set bedroom light to 50 pe r cent.
THINGS TO REMEMBER BEFORE STARTING INSTALLATION:
- V-TAC Smart Light App & Google Home App
- Make sure you have Google Home Device
- Smart Device – Lamp
- Stable Wifi network
report this adIn case of any query/issue with the product please reach out to us at [email protected]V-TAC EUROPE LTD, Bulgaria, Plovdiv 4000, bul.L.Karavelow 9B
[xyz-ips snippet=”download-snippet”]