
![]()
120V∼60Hz 1500W
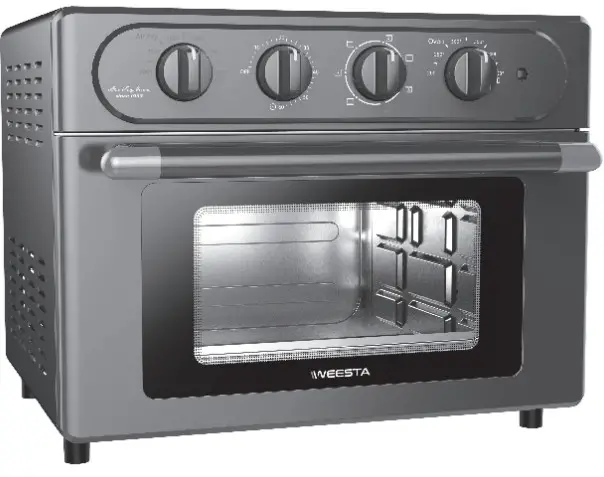
KA23T EVERYDAY AIR FRYER OVENInstruction Manual
Please read these instructions thoroughly before using this appliance, and save it for future reference. Customer Service Email: [email protected]
EVERYDAY AIR FRYER OVEN
IMPORTANT SAFEGUARDS
When using an electrical appliance, basic safety precautions should always be followed. including the following:
- Read al instructions
- Unplug the horn outlet when not In use and before cleaning.
- Allow cooling completely before cleaning or handling.
- Only use the appliance on a stable and dry surface.
- Oo does not use the appliance for anything other than Its intended use.
- This Oven is for household use only.
- Do not use appliances outdoors for commercial purposes.
- Make sure the appliance is deaned thoroughly bete using
- Clam supervision is necessary when the appliance is teed by or near children. Children should be supervised to ensure that they do not May with the appliance.
- Never Sow appliance unattended when In we
- Remove bags and packaging from the appliance before we
- Do not allow the appliance to be covered by or touch flammable material Such fie Cuilekt, draperies, or walls when in operation. Do not MN; any RPM en top of the appliance when In Operation Do not operate under wall cabinets.
- To avoid burns. use extreme caution when lemming accoosorke or disposing of hot geese
- This appliance is not intended for use by persons (providing chicken) with reduced physical sensory or mental capabilities or lads of experience and FaxWedge unless they are provided with supervision and instruction concerning the use of the appliance by a person responsible for then safety.
- Improper use of the appliance can result in property damage or even personal injury.
- Do not store any meter:* other than the manufacturer recommended Demetrios in this
- Do not operate an OM appliance with a damaged cord. damaged plog. after the appliance malfunctions, is dropped or damaged in any Return appliance to the nearest authorized service facility for examination repack or adjustment
- Always be surly o unplug the appliance from the outlet prior to mowings cleaning. storage end when not M tee
- Do not attempt to dislodge food Mien the appliance is plugged into an eleco-Kal outlet
- Oversize foods. the metal fell packages and utensils must not be inserted in the ova, as they may involve a risk of fire or electric shock.
- Do net dean writ metal scouring path.
- Ufa recommended temperature settings for all cocking visaking, broiling, and air frying.
- Do not piece appliance on or near a hot gm burner, hot electric boner, or in a heated oven.
- Extreme caution must be used when removing a Deplane. containing hot oil or other hot liquids
- Tocfcconned sun any coned o– off’, then remove the plug from the wall outlet. Do not let the cord Many hot twines, or hang over the edges of tables or counters.
- Do not place any of the following materials in the oven: paper cardboard, plastic, and similar products.
- The appliances are not intended to be operated by means of an external timer or separate remote-control system.
- Refrain from using attachments that are not recommended by the appliance manufacturer, as this may result in electric shock or personal injury.
- This appliance has a polarized plug (one blade is wider than the other). To reduce the risk of electric shock, this plug will fit in a polarized outlet only one way. If the plug does not completely fit in the outlet, reverse the plug. If it still does not fit, contact a qualified electrician. Do not attempt to modify the plug-in anyway.
- Do not cover any part of the oven with metal foil. This will cause overheating of the oven.
- Turn the appliance OFF, then unplug from the outlet when not in use, before assembling or disassembling parts, and before cleaning. To unplug, grasp the plug and pull from the outlet.
- Never pull from the power cord. If the supply cord is damaged, it must be replaced by the manufacturer, its service agent, or similarly qualified persons in order to avoid a hazard.
- Weesta shall not accept liability for damages caused by improper use of the appliance.
- The exterior surfaces of the appliance can be hot during and after oven operation. Allow the appliance to cool completely before handling.
 caution, hot surface.Special Cord Set Instructions:
- A short power-supply cord is to be provided to reduce the risk resulting from becoming entangled in or tripping over a longer cord.
- An extension cord may be used if care is exercised in its use.
- If an extension cord is used, the marked electrical rating of the extension cord should be at least as great as the electrical rating of the appliance.
- The extension cord should be arranged so that it will not drape over the countertop or
- tabletop where it can be pulled on by children or tripped over unintentionally. If the appliance is of the grounded type the cord set or extension cord should be a grounding-type 3-wire cord.
IMPORTANT SAFEGUARDS: PLEASE READ AND SAVE THIS INSTRUCTION AND CARE MANUAL.
PARTS & FEATURES
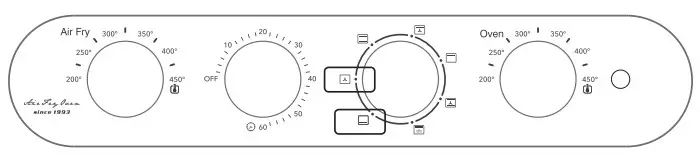
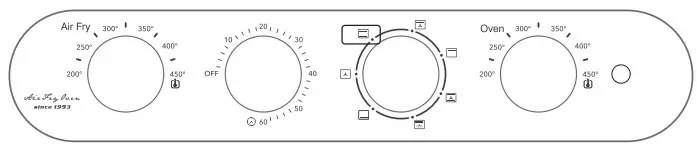
CONTROL PANEL
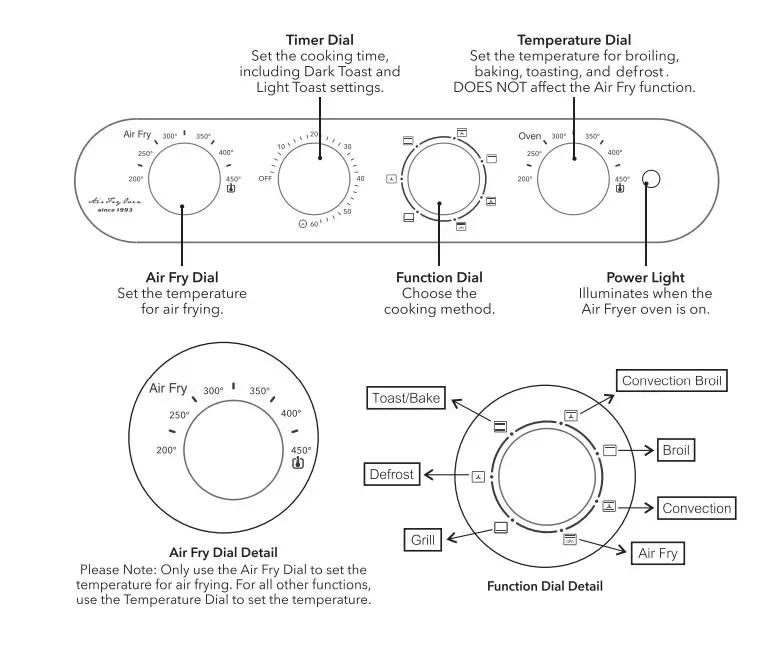
NOTE: Scot diagram in ‘Using Your Everyday Ar Pryor Oven” for pontoon clouds.
USING YOUR EVERYDAY AIR FRYER OVEN
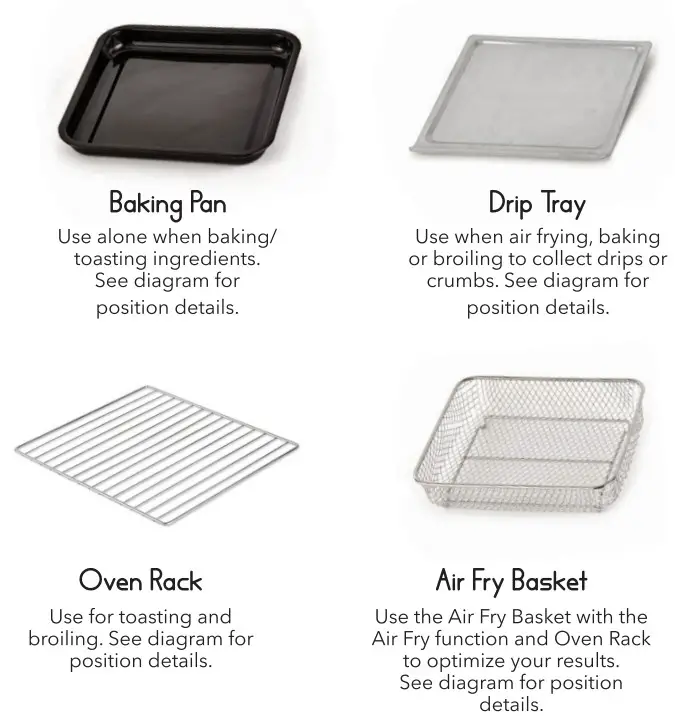
BEFORE USING YOUR EVERYDAY AIR FRYER OVEN:Remove all packaging materials. Before using, move the Everyday Air Fryer Oven 2 to 4 inches away from the wall or from any objects on the countertop. Do not use it on heat-sensitive surfaces. Check that the Air Fryer Oven has no visible damage and that no parts are missing. Before using the Air Fryer Oven for the first time or before using it after prolonged storage, wash and dry the appliance and any accompanying accessories. See “Cleaning & Maintenance” for instructions.![]() NOTE: The first time you use the Air Fryer Oven you may notice a smell or slight light smoke. This should only last for 15 minutes. It is important to run the appliance on Air Fry before using, without food.USING YOUR EVERYDAY AIR FRYER OVEN:The following section will help familiarize you with the different accessories that come with your Everyday Air Fryer Oven and how to use them.
NOTE: The first time you use the Air Fryer Oven you may notice a smell or slight light smoke. This should only last for 15 minutes. It is important to run the appliance on Air Fry before using, without food.USING YOUR EVERYDAY AIR FRYER OVEN:The following section will help familiarize you with the different accessories that come with your Everyday Air Fryer Oven and how to use them.
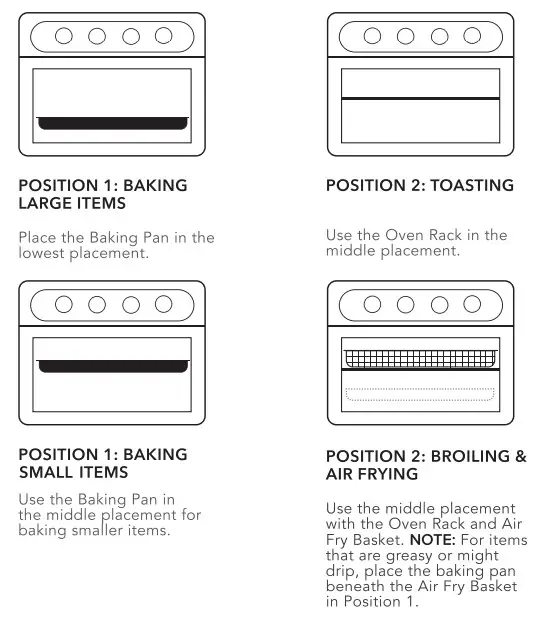
RACK POSITIONSNOTE: Before use, place the Drip Tray beneath the heating element at the bottom of the Air Fryer Oven. Do not rest any accessories directly on top of the heating element.
AIR FRYING
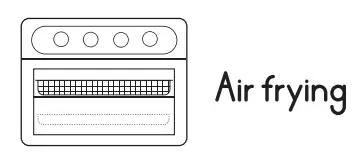
Place the Drip Tray at the bottom of your oven ( below the heating element.) Place the Air Fry Basket onto your Oven Rack at Position 2 for Air Frying/Broiling.Note: For greasy foods like wings, place the Baking Pan below the Air Fry Basket to catch drips.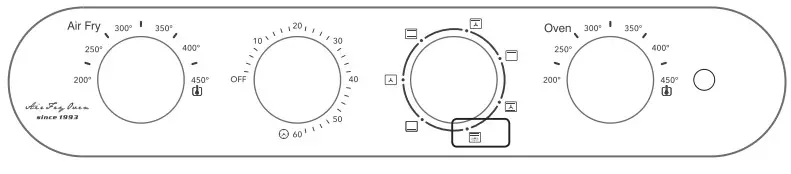
- Close the oven and set your Function Knob to Air Fry.
- Set your Air Fry Knob to the correct temperature. The Air Fry Knob only works with the air fry function. The temperature shown on the Temperature knob does not affect the Air Fry Knob set.
- Then, turn the Turner Knob to the desired cooking time to turn on the oven and begin air frying.
- The Power Light will illuminate. The Timer Knob will when the cycle is complete.
- To stop air frying, turn the Timer Knob to the “off” position.
GRILLING/DEFROST
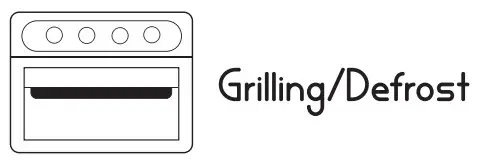 Place the Drip Tray at the bottom of your oven (below the heating element) Place the Baking Pan or Oven Rack at position 2 for Grtiling/Defrost
 Defrost:
For Defrost, set the Function Knob to Defrost, and then rotate the Turner Knob directly (no need to rotate the Temperature Knob). The Defrost will only activate the convection fan to enhance the airflow inside the oven cavity so as to help defrost foods.
Grilling:
- Close the oven and set Function Knob to Grill; Rotate your Temperature Knob to the desired temperature.
- Rotate the Timer Knob to the desired cooking time to turn on the oven.
- The Power Indicator will illuminate. The Timer will ring when the cooking is complete
- To stop grilling, rotate the Timer Knob anticlockwise to the “Off’ position.
BAKING AND TOASTING
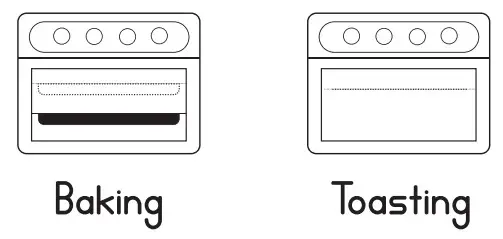
Place the Drip Tray at the bottom of your oven (below the heating element) For Baking, place the Oven Rack at Position 1 or 2 depending on sizes of food For Toasting, place the oven rack at Position 2
- Close the oven and set Function Knob to Baking and Toasting; Rotate your Temperature Knob to the desired temperature.
- For Baking, rotate the Turner Knob to the desired cooking time to turn on the oven. For Toasting, Set the timer to approximately 3 minutes if light toast is needed, or set the timer to approximately 7 minutes if dark toast is needed.
- The Power Indicator will illuminate. The Turner will ring when the cooking is complete.
- To stop baking or toasting, rotate the Timer Knob anticlockwise to the “Off” position.
BROILING / CONVECTION BROILING
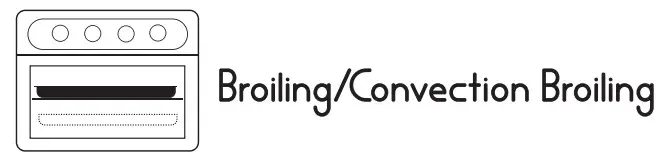 Place the Drip Tray at the bottom of your oven (below the heating element.) Place your Air Fry Basket or Baking Pan in the Air Fryer Oven at Position 2 for Broiling. Convection Broil is similar to Broil, but will activate the convection fan to circulate hot air around the food, which will make the cooking faster.
![]() NOTE: Make sure to place the Air Fry Basket on your Oven Rack.
NOTE: Make sure to place the Air Fry Basket on your Oven Rack.
- Close the oven and set Function Knob to Broil or Convection Broil; Rotate your Temperature Knob to the desired temperature.
- Rotate the Timer Knob to the desired cooking time to turn on the oven.
- The Power Indicator will illuminate. The Timer will ring when the cooking is complete.
- To stop broiling, rotate the Timer Knob anticlockwise to the “Off” position.
CONVECTION
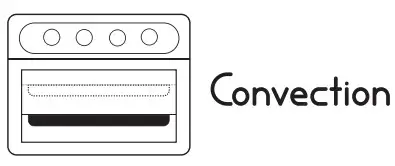
Place the Drip Tray at the bottom of your oven (below the heating element). Place the Balling Pan or Oven Rack at position 1 or 2 for Convection

- Close the oven and set Function Knob to Convection; Rotate your Temperature Knob to the desired temperature.
- Rotate the Timer Knob to the desired cooking time to turn on the oven.
- The Power Indicator will illuminate. The Timer will ring when the cooking is complete.
- To stop convection, rotate the Timer Knob anticlockwise to the “Off” position.
Recommended Cooking Guide
| Food | FunctionSetting | RecommendedAmount | Cooking Time | Recommendedtemperature | RecommendedAccessories | Rack Position |
| French Fry | Air Fry | 400g | 18-22 Minutes | 400°F | Air Fry Basket | Middle |
| Chicken Nuggets | Air Fry | 450g | 10 Minutes | 400°F | Air Fry Basket | Middle |
| Fresh Wing | Air Fry | 900g | 13-16 Minutes | 450°F | Oven Rack | Middle |
| Frozen Wing | Air Fry | 650g | 15-18 Minutes | 450°F | Oven Rack | Middle |
| Popcorn chicken | Air Fry | 600g | 15 Minutes | 450°F | Air Fry Basket | Middle |
| Beef steak | Air Fry | 650g | 10 Minutes | 400°F | Oven Rack | Middle |
| Bread | Toast | Light:4 slicesMiddle:4 slicesDark:4 slices | 3.5-6 Minutes | 450°F | Oven Rack | Middle |
| Pizza (8 inch) | Bake | 400g | 10 Minutes | 400°F | Oven Rack | Middle |
Tips for daily use
- Distributing oil on foods and ingredients can enhance exterior crispiness and browning.
- Oil can also be sprayed or brushed onto foods for air frying. A non-stick cooking spray canalso be used to ensure that fried foods do not stick on the Baking Pan or Air Fry Basket
- Use aluminum foil on Baking Pan for easy cleanup.
- Arranging the food in a single layer in the Air Fry Basket to avoid the need to toss or flip food during cooking. Overcrowding the basket may negatively impact food texture and prolong the cooking cycle.
- This oven can also be used to reheat food. To reheat foods, rotate the Temperature Knob to 300°F for up to 10 minutes.
- The exterior surfaces of the oven can be hot during and after use. To facilitate cooling, set the function to Defrost and rotate the Timer knob to approximately 5 minutes to activate the convection fan.
Maintenance and Cleaning
NOTE: Always allow the Air Fryer Oven to cool completely before deaning. Always unplug the Air Fryer Oven from the electrical outlet before deaning.
- To remove crumbs, take out the crumb tray and discard crumbs. To remove stubborn grease, sink the crumb tray in hot and sudsy water and wipe it with a soft sponge.
- Do not use abrasive cleaners, as the finish may be damaged by those cleaners.
- To clean interior walls, use a damp cloth and a mild liquid soap solution or a spray solution on a sponge. Never use harsh abrasive or corrosive products on the interior of the oven.
- Wipe the outside of the oven with a damp cloth or sponge and dry thoroughly.
- Do not put the air fry basket, bake pan, or oven rack in the dishwasher. Accessories are not dishwasher safe. To clean those accessories, you can wash them in soapy water and a soft sponge.
- There is no need to clean the heating elements. Any food residues or grease that are in contact with the heating elements will burn off on its own.
- Make sure the appliance is unplugged and all parts and accessories are clean and dry before
- Never wrap the cord around the outside of the oven.
- Any other servicing should be performed by an authorized service representative.
| PROBLEM | POSSIBLE SOLUTION |
| The oven does not |
|
| The food is undercooked after recommended time |
|
| The food is not cooked evenly | 1. Too much food in the oven. 2. The food items are placed too closely together. 3. Some foods require flipping halfway through the cooking time to ensure even browning. |
| Heater elements turn off during cooking | The heating elements will turn on and off to control the temperature, this is not a malfunction. |
| White smoke is coming out of the oven. |
|
| The food is not crispy after using the Air Fry function | The crispiness of food depends on the amount of moisture and oil in the food; to enhance crispiness, dry the food properly, or call the food surfaces. |
LIMITED WARRANTY
WEESTA LTD warrants to the original consumer or purchaser, this Air Fryer Countertop Oven is free from defects in material or workmanship for a period of One (1) year from the date of purchase. If any such effect is discovered within the warranty period, WEESTA LTD at its discretion will repair or replace the Product at no cost. This limited warranty is good only for the original purchaser of the product and effective only when used in the United States.For warranty or repair service, Email: [email protected]. Please have your Product’s model number, your name, address, city, state, zip code, and phone number ready.NO OTHER WARRANTY IS APPLICABLE TO THIS PRODUCT. THIS WARRANTY IS IN LIEU OF ANY OTHER WARRANTY, EXPRESS, OR IMPLIED. INCLUDING WITHOUT LIMITATION, ANY WARRANTY OF MERCHANTABILITY OR FITNESS FOR A PARTICULAR PURPOSE. TO THE EXTENT ANY IMPLIED WARRANTY IS REQUIRED BY LAW. IT IS LIMITED IN DURATION TO THE EXPRESS WARRANTY PERIOD ABOVE. NEITHER THE MANUFACTURER NOR ITS U.S. DISTRIBUTOR SHALL BE LIABLE FOR ANY INCIDENTAL, CONSEQUENTIAL, INDIRECT SPECIAL, OR PUNITIVE DAMAGES OF ANY NATURE INCLUDING WITHOUT LIMITATION. LOST REVENUES OR PROFITS OR ANY OTHER DAMAGE WHETHER BASED IN CONTRACT, TORT 0 OTHERWISE, SOME STATES AND/OR TERRITORIES DO NOT ALLOW THE EXCLUSION OR LIMITATION OF INCIDENTAL OR CONSEQUENTIAL DAMAGES OR LIMITATIONS ON HOW LONG AN IMPLIED WARRANTY LASTS SO THE ABOVE EXCLUSION OR LIMITATION MAY NOT APPLY TO YOU. THIS WARRANTY GIVES YOU THE ORIGINAL PURCHASER, SPECIFIC LEGAL RIGHTS AND YOU MAY ALSO HAVE OTHER RIGHTS THAT VARY FROM STATE TO STATE OR TERRITORY TO TERRITORY.
 report this ad
THIS LIMITED WARRANTY DOES NOT APPLY TO
- Failure of the product to perform during power failures and interruptions or inadequate electrical service.
- Damage caused by transportation or handling.
- Damage caused to the product by accident, vermin, lightning, winds, fire, floods, or acts of God.
- Damage resulting from accident, alteration, misuse, abuse, or improper installation, repair, or maintenance. Improper use includes using an external device that alters or converts the voltage or frequency of electricity.
- Any unauthorized product modification, repair by an unauthorized repair center, or use of non-approved replacement parts.
- Abnormal cleaning and maintenance as described in the user’s manual.
- Using accessories or components that are not compatible with this product.The cost of repair or replacement under these excluded circumstances shall be borne by the consumer.
Need help? Contact Customer Support[email protected]
[xyz-ips snippet=”download-snippet”]