
![]() ACTION 2Remote Control Extension RodUser Guide
ACTION 2Remote Control Extension RodUser Guide
Disclaimer and Warning
Congratulations on purchasing your new DJI OSMOw product. The information in this document affects your safety and your legal rights and responsibilities. Read this entire document carefully to ensure proper configuration before use. Failure to read and follow instructions and warnings in this document may result in serious injury to yourself or others, damage to your DJI OSMO product, or damage to other objects in the vicinity. This document and all other collateral documents are subject to change at the sole discretion of DJI OSMO. This content is subject to change without prior notice. For up-to-date product information, visit http://www.dji.com and click on the product page for this product.By using this product, you hereby signify that you have read this disclaimer and warning carefully and that you understand and agree to abide by the terms and conditions herein. You agree that you are solely responsible for your own conduct while using this product and for any consequences thereof. You agree to use this product only for purposes that are proper and in accordance with all applicable laws, rules, and regulations, and all terms, precautions, practices, policies, and guidelines DJI OSMO has made and may make available.DJI OSMO accepts no liability for damage, injury, or any legal responsibility incurred directly or indirectly from the use of this product. The user shall observe safe and lawful practices including, but not limited to, those set forth in this document. Notwithstanding the above, your statutory rights under applicable national legislation are not affected by this disclaimer.OSMO is a trademark of SZ DJI OSMO TECHNOLOGY CO., LTD. (abbreviated as “DJI OSMO”) and its affiliated companies. Names of products, brands, etc., appearing in this document are trademarks or registered trademarks of their respective owner companies.
Safety Guidelines
- DO NOT allow the product to come into contact with any kind of liquid. DO NOT leave the product out in the rain or near a source of moisture. DO NOT drop the product into
- Put out any product fire using water, sand, a fire blanket, or a dry powder fire
- The product should only be used in temperatures from -10° to 45° C (14° to 113° F). Use of the product in environments above 45° C (113° F) can lead to a fire or explosion while use in environments below -10° C (14° F) can lead to permanent
- DO NOT disassemble or pierce the product in any way. Otherwise, the battery may leak, catch fire, or explode.
- DO NOT drop or strike the DO NOT place heavy objects on the product.
- DO NOT heat the product. DO NOT put the battery in a microwave oven or a pressurized
- DO NOT leave the product near heat sources such as a furnace or DO NOT leave the product inside of a vehicle on hot days. DO NOT store the product in environments above 45° C (113° F). The ideal storage temperature is 22° to 28° C (71.6° to 82.4° F).
- DO NOT store the battery for an extended period after fully Otherwise, the battery may over-discharge and cause irreparable damage.
- Discharge and charge the battery completely once every three months to keep it in good working
Introduction
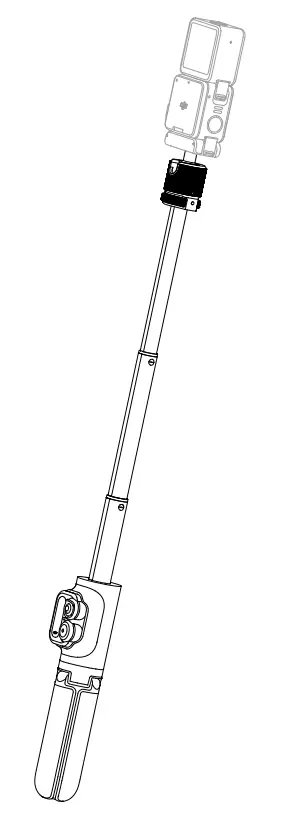
The DJI Action”’. 2 Remote Control Extension Rod expands users shooting capabilities with an extension rod and a tripod. Users can control the camera remotely and capture self ies with the WI Remote Control Pad.
Overview
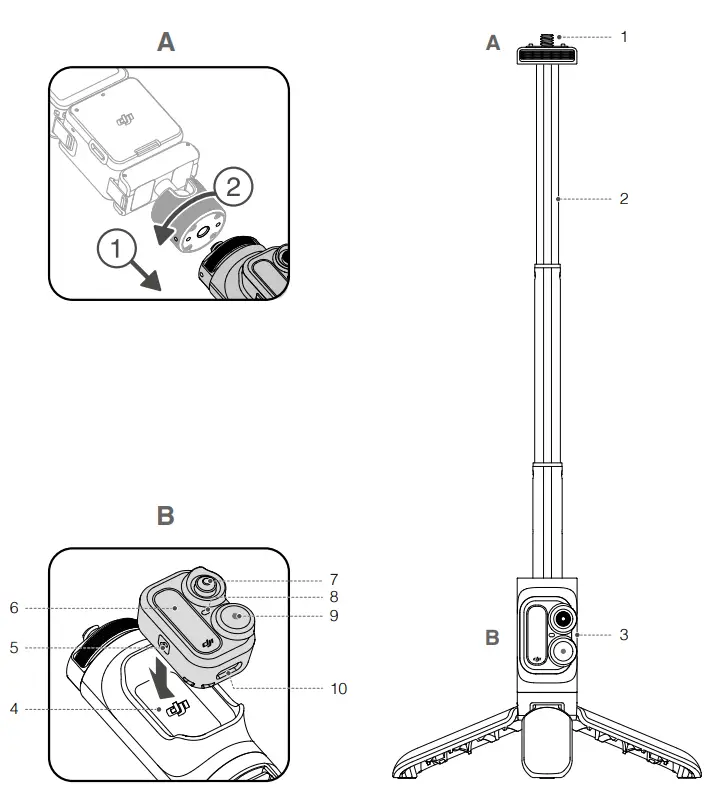
- 1/4″ ScrewCompatible with adapters with 114* threaded
- Extension RodThe length of the extension rod is 16.5 cm when stored and can be extended to up to 37.8 cm. There is also a tripod that can be unfolded for greater stability.
- WI Remote Control PadConnected to the camera via Bluetooth, the remote control pad supports single-camera control and also multi-camera control mode so that users can shoot with up to eight cameras simultaneously.
- WI Remote Control Pad SlotUsed to attach the remote control
- Link ButtonPress and hold the link button for one second to link the remote control pad and the camera.Press and hold the link button and the 50 buttons for tour seconds to forget the Bluetooth connection and start linking. Press and hold the link button and the shutter/record button for four seconds to switch between single-camera control mode and multi-camera control mode and start linking.In multi-camera control mode, press the link button to display the number of cameras connected.
- ScreenWhen controlling a single camera, the screen displays the status and battery level of the connected camera. When controlling multiple cameras, the screen displays the number of cameras connected. The display on the screen varies depending on the camera model. The screen will not enter sleep mode while recording or charging.The screen will enter sleep mode if there is no operation after 3 minutes and the remote control pad will power off if there is still no operation after a further 10 minutes if there is no camera connected and the remote control pad is not charging. When the screen is off, press any button to exit sleep mode and continue using the remote control pad.
- 5D ButtonPress the 50 buttons to enter the camera mode switch screen, push the joystick left or right to select a camera mode, and press again to confirm.
- Status LEDRefer to the Status LED Descriptions section for more
- Shutter/Record ButtonPress and hold for one second to power the remote control pad on or off. After powering on, the remote control pad will automatically search for and connect to any OM Action 2 cameras.Press once to take a photo or to start or stop recording.In multi-camera control mode, press once to take a photo or to start recording and press twice to stop recording.
- USB-C PortConnected to a charger to charge the remote control
 • Installation is shown in Figures A and B. WI Action 2 and the adapters are not included.• The description above is for when controlling a single camera unless otherwise specified.The built-in battery of the remote control pad may run out of power if it is not used for more than six months and will require charging to use again. Charge or discharge the battery to 4060% if it will not be used for 10 days or more.
Status LED Descriptions
|
Status Indicator |
Descriptions |
|
Charging Status |
|
| Solid green for 6 seconds and turns off | Charging completed |
| Blinks green four times | Charging with battery level between 76-100% |
| Blinks green three times | Charging with battery level between 51-75% |
| Blinks green twice | Charging with battery level between 26-50% |
| Blinks green | Charging with battery level between 0-25% |
|
System Status |
|
| Blinks red three times | Powering off |
| Blinks blue | Linking |
|
Work Status |
|
| Solid green | Ready to use |
| Temporarily off | Taking photo |
| Blinks red | Recording video |
Specifications
| General Settings | |
| DJI Remote Control Pad Model BTC01 | |
| Weight | Extension Rod: 110 g; DJI Remote Control Pad: 11 g |
| DJI Remote Control Pad Dimensions | 36.5×27.5×19 mm |
| Extension Rod Dimensions | 30x34x165 mm (Extended: 378 mm) |
|
Bluetooth |
|
| Protocol | BLE5.0 |
| Operating Frequency | 2.400-2.4835 GHz |
| Transmission Power (EIRP)
|
≤8dbm |
|
Built-in Battery |
|
| Battery Type | Li-ion (65 mAh @ 3.7 V) |
| Charging Type | Connected to USB-C port (5 V) |
| Charging Time* | 55 mins |
| Operating Time** | 5 hours |
| Charging Temperature | 5 to 45° C (32° to 113° F) |
| Operating Temperature | -10° to 45° C (14° to 113° F) |
* Measured using a 5V/2A USB adapter in a laboratory environment. Use as a reference only.**Measured using single-camera control mode, with the remote control pad screen on. Use as a reference only.
 WE ARE HERE FOR YOU
 Contact DJI SUPPORT via Facebook Messenger
 http://weixin.qq.com/q/02Y8HiZQ_2eF410000g03MThis content is subject to change without prior notice.
 Download the latest version fromhttps://wvvvv.dji.com/action-2If you have any questions about this document, contact DJI by sending a message to[email protected].
![]() Copyright © 2021 DJI OSMO All Rights Reserved.
Copyright © 2021 DJI OSMO All Rights Reserved.
[xyz-ips snippet=”download-snippet”]