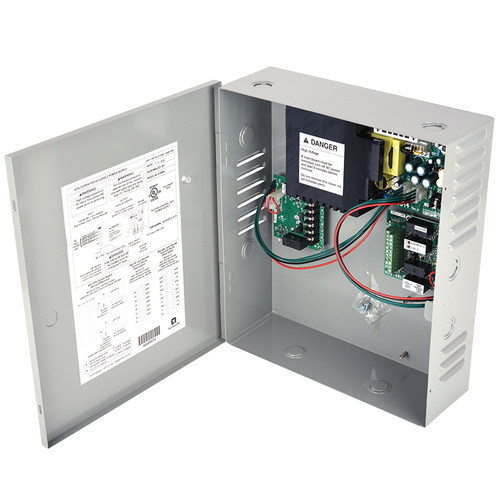
Instructions Manual
Locknetics RDB4
The RDB4 option board is to be used with the LP250 power supply when additional features are required. These features include a distribution of 4 controllable outputs. Each output can be individually configured as powered NO/NC outputs or dry (isolated) NO/NC outputs.
This instruction covers:
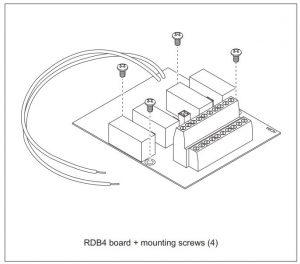
RDB4 Specifications:

Definitions

See Section 7 for an explanation of the Warnings and Cautions used in this booklet.
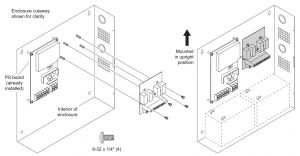
1. RDB4 Installation
 WARNINGTo avoid risk of electric shock, turn off AC power to power supply before installing or wiring option board.
2. RDB4 – Features and Operation
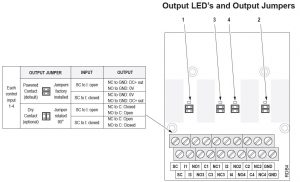
Notes:
- When SC to I is closed, the corresponding red LED for that output will turn on.
- When jumper is set to powered contact, the C terminal always has DC Out voltage on it.
3. Typical Wiring
Wiring methods shall be applied in accordance with the National Electric Code/NFPA 70/NFPA 72/ANSI, and with all local codes and authorities having jurisdiction.
 WARNINGTo avoid risk of electric shock, turn off AC power before installing or servicing LP150/LP250 power supply.
FS & FSE device connected to RDB4 with FACP override (power cut off)


Operation:
- All power to RDB4 NC/NO outputs is completely cut off when FACP contacts open. Any devices connected to them will return to their unpowered state.
- Each output is controlled by its own individual ACC.
Typical Wiring – FS & FSE
FS & FSE device connected to RDB4 without FACP connection
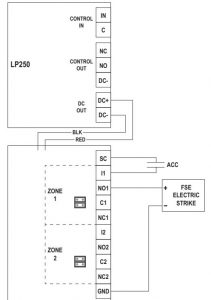
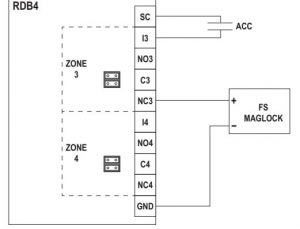
Operation:
- All outputs on the RDB4 are powered and controlled by their individual ACC contacts.
- The FACP contacts are not connected.
Typical Wiring – FACP
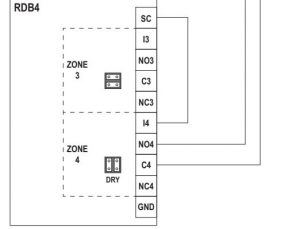
FACP with RDB4 Manual Reset
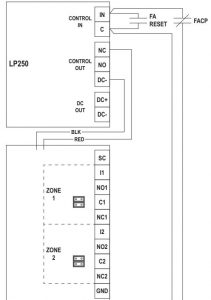
Operation:
- Output 4 is used for FACP manual reset. Outputs 1-3 are available for lock control functions.
- FA RESET contacts must be momentarily closed (and FACP contacts closed) before power can be applied to the RDB4 board. Once power is applied, the RDB4 will function normally. Opening the FACP contacts will disconnect power from the RDB4 board completely. Closure of the FACP contacts will not reapply power to the RDB4. To reapply power for normal operation, momentarily close the FA RESET contacts again.
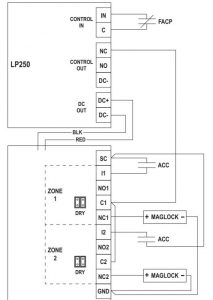
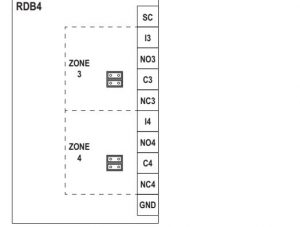
FACP controlling individual zones on RDB4
Operation:
- Outputs 1 and 2 have FACP override and will completely lose power when FACP contacts are open. Outputs 3 and 4 have normal function and will not change if FACP contacts are open.
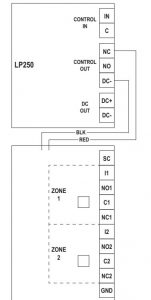
Blank Wiring Diagram
Blank diagram for customer use

4. Wire run lengths
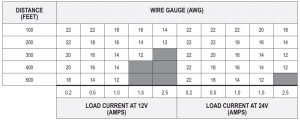
- Use the following table to estimate the gauge of wire required for the application.
- Wire length based on 15% voltage drop at 12 or 24V using stranded copper wire.
- The wire gauge listed is a minimum. The gauge can be increased if desired.
- Distance = total one way wiring distance between power supply and powered device (includes both power wires).
- For UL installations, the minimum permissible wire size to be used shall not be less than 22AWG.
![]() WARNING
WARNING
Keep power-limited wiring separate from non power-limited wiring. Minimum 1/4″ spacing must be provided.
![]()
![]()
![]()
When installing, route field wiring away from sharp projections, corners, and internal components. Deburr all conduit fittings.

5. Maintenance
Unit should be tested at least once a year for proper operation as follows:
- Voltage Output:• Verify the proper DC output voltage by measuring the DC+ and DC- terminals.
- Fire Alarm Release (if used):• Verify proper operation by opening the wiring to the CONTROL IN input. Confirm that all locks on outputs controlled by the CONTROL OUT unlock properly.
6. Troubleshooting
Refer to Section 2 for LED status of outputs and jumper settings to determine the cause for any abnormal condition. Each LED has the definition of its ON or OFF state.
7. Warnings and Cautions


Customer Service
Call: 1-877-671-7011 Visit: www.allegion.com/us
CanadaCall: 1-800-900-4734 Visit: www.allegion.ca


© Allegion 2019Printed in Taiwan829768-00 Rev. 06/19-b
Locknetics RDB4 Instructions Manual – Locknetics RDB4 Instructions Manual –
Questions about your Manual? Post in the comments!

