
![]()
Instruction ManualWildlife Camera

Dear customer, congratulations on purchasing a high-quality product.You have purchased a modern Wildlife Camera with excellent technical features and respective accessory that is particularly easy to operate. Please study all notices carefully and diligently.
1. Contents of box
Carefully unpack camera and check that all of the following components are contained in the box:
- Wildlife Camera
- Wall mount
- Mounting belt
- Mini-USB cable
- Instruction manual
![]() Note:
Note:
- Remove the protective foil from the camera lens by pulling the protruding tab.
- Caution! Keep plastic foil and bags away from babies and small children, as the otherwise danger of suffocation.
1
2. Your camera
2.1. Front view
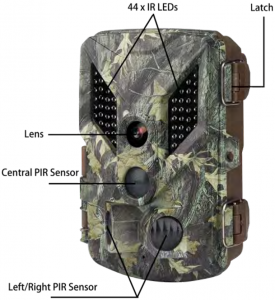
Application
- Camera trap for hunting animal or incident observation.
- Motion triggered security camera for domestic, office or public use.
- Any internal and external surveillance, where evidence of an infringement has to be provided.
2.2. Inside views
2
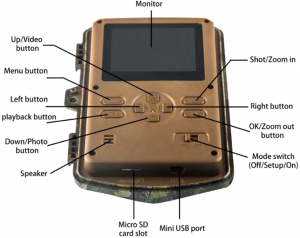
- The monitor is only switched on in the Test mode for changing menu settings or viewing existing photos and videos.
- A Micro SD/TF memory card must have been inserted into the memory card slot in order to save photos and videos.
- Using the mini USB connection (USB 2.0), the camera can be connected to a computer, in order to download photos and videos.
- Using the mode switch, the three operating modes OFF, TEST and ON can be selected.
3

3. Preparing the camera
3.1. Inserting the batteries

The battery compartment is housed in the right, rear part of the camera. Now open the protective cover of the battery compartment by pulling the clamping closure at the top slightly inwards before lifting off the cover. Insert 8 x 1.5V LR6/AA fully charged batteries as shown in the below figure. Make sure to insert each battery with correct polarity (+ and - end against the long spring of each battery slot).
4
![]() Note:
Note:
- Instead of type LR6 (AA) batteries, rechargeable batteries with the same specification (with 680mAh or higher) may be used. We recommend NiMH batteries with low self-discharge (not supplied).
- NEVER INSTALL DIFFERENT TYPES OF BATTERIES or NEW
- AND OLD BATTERIES in the product at the same time.
- Anytime you load or unload batteries, make sure that thecamera is OFF. If using an external power source, do not remove internal batteries.
- An alarm is sounded if the battery charge is too low.
5
3.2. Inserting the memory card
A memory card must have been inserted in order to save photos (in .jpg format) and videos (in .AVI format). Insert a Micro SD (Secure Digital)/TF memory card in the memory card compartment before switching on the camera.

Switch off the camera and open the padlock.Insert the memory card as shown in the adjacent illustration. Push the memory card into compartment until it clicks into place.To remove the memory card by pushing card in again until it is partly ejected.
![]() Note:
Note:
- Micro SD / SDHC (High Capacity) memory cards up to a capacity of 32GB are supported.
- Be sure the camera’s power is switched OFF before inserting or removing SD cards or batteries.
- The camera will not operate without an SD memory card installed.
6
3.3. External power supply
The camera can be operated using power from an external power supply. A 6V power supply with at least 1.5A is required containing a connector with a 3.5mm external and 1.35mm internal diameter (internal plus pole, external minus pole ).

Rechargeable batteries cannot be recharged in the camera using an external power supply.
3.4. Assembly with strap
Use the securing strap supplied to attach the Wildlife Camera to a tree or another object. The illustrations below demonstrate how to fasten the securing strap.


Position the Wildlife Camera as desired and pull the loose end of the securing strap tight until the camera is firmly secured. The best installation height distance from the ground is about 1 meter.To release the securing strap again, pull at the tab of the securing strap.
7
3.5. Using the wall mount/bracket
Using the supplied wall mount, the camera can be securely attached to walls or ceilings. Prior to installing the wall mount ensure that all existing bolts are securely tightened.
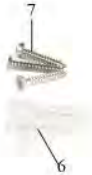

- 1/4″ Tripod bolt
- Counter screw/Lock nut
- Pivot bolt
- Drilled holes
- Hexagonal screw
- Plastic expansion tube/Wall plugs
- Long screw of metal bracket
4. Using the camera
Prior to setting up the camera for surveillance, it must be set up for the respective purpose.For this purpose, there is a test mode available. In addition to changing settings, photos and videos can be taken and existing photos can be viewed in this mode.
4.1. Mode switch
Open the camera and the Mode switch is located at the bottom edge on the right inside. 3 operating modes can be selected:
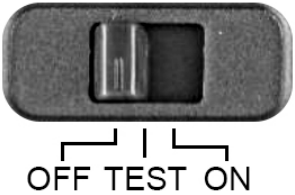
8
- OFF: The camera is completely switched off in the OFF mode.
- TEST: Select TEST mode to adjust settings and make or playback photos and videos.
- ON: The camera is activated to take photos automatically.
Set the mode switch to TEST and the camera and monitor are switched on.Using the operating buttons different functions can now be activated and settings can be changed. For this purpose, the following operating buttons are provided on the display panel:
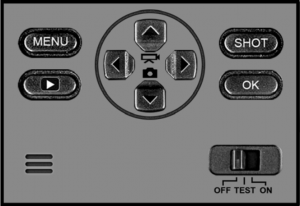
9
In recording mode, all operating buttons are in NO FUNCTION.
Functions of operating buttons in replay mode :
 Select the Replay menu using the MENU button./end the viewing after zoom.
- Press the button to return to recording mode.
- View existing pictures and videos backwards.
- View existing pictures and videos forwards.
- Start and end replay of videos.
- Zoom out the photos.
- Zoom in the photos.
10
Functions of operating buttons in menu:
- Close the Main menu or any sub menu by pressing the MENU button.
- Move up one menu point or increment value by 1.
- Move down one menu point or decrease value by 1.
- Move forwardly to the data setting.
- Move backwardly to the data setting.
- Open selected options or accept selected settings. Confirm each change to a setting by pressing OK. If the change is not confirmed by pressing the OK button, the new setting are lost when leaving the menu.
![]() And
And ![]()
No function (in MENU mode).
11
4.3. Settings
Prior to using the Wildlife Camera, change the settings as required.Slide the mode switch of the Wildlife Camera to the TEST position to start the test mode. In the Photo or Video mode press the MENU button to call up the menu.
5. CUSTOMER SERVICE & WARRANTY
WARRANTYUp to 1 YEAR LIMITED WARRANTY
Your product is warranted to be free from defects in materials and workmanship for 1 year after the date of purchase. This warranty does not cover damages caused by misuse, improper handling, and installation.In the event warranty service is needed, please contact us.
6. TECHNICAL SPECIFICATION
|
Element |
Description |
| Image sensor | 5 MP CMOS sensor |
| Photo resolution | 16MP: 4608×3456; 12MP: 4000×3000;
8MP: 3264×2448; 5MP: 2592×1944; 3MP: 2048×1536; 1MP:1280×960; |
| Screen | 6.1 cm (2.4″) color TFT LCD; 960 x 240 pixels |
| Recording medium | Supports TF/Micro SD cards up to 32 GB (optional) |
| Video resolution | 1920×1080/25 fps; 1280×720/30 fps; 720×480/30fps; 640×480/30fps; 320×240/30fps |
| Lens | f=3.3mm; F/NO 1.8; FOV=100; Auto IR filter |
| Effectiveness | Daytime: 1m-infinitive; Night time: 3m-25m |
| Triggering distance | Up to 25 meters (below 77°F/25°C at the Normal level) |
| Triggering time | Approx. 0.6 second; Pre boot 0.2 second |
| IR flash range | 44 pcs infrared LEDs range 20m |
| Detection angle of sensors | Central sensor zone: 60°; Side sensor zone: each 60° ;
Total sensor angle zone: 120° |
| Spray water protected | Yes (IP protection class67) |
| Storage formats | Photo: JPEG; Video: AVI |
| Connections | Mini USB 2.0 |
| Power supply | 8x batteries type LR6 (AA);
8x NiMH batteries type LR6 (AA) with low self-discharge; external 6V power supply, at least 1.5A (not supplied) |
| Standby time | Approx. 6 months (with 8 batteries) |
| Dimensions | Approx. 135 (H) x 90 (B) x 76 (T) mm |
14
[xyz-ips snippet=”download-snippet”]