
Abbyson Belmont/Corbin Fire Table
Thank you for your purchase
Thank you for your purchase!We are pleased that you have chosen Abbyson living for your outdoor furniture purchase. We hope that you enjoy the unmatched quality, comfort, and style of your new patio set. Every piece is meticulously considered all the way down to the smallest details, exclusively for you, by our world class design team. We know you have a choice when it comes to your patio furniture needs, so from our team to yours, thank you for letting us be a part of your outdoors.
DANGER:FIRE OR EXPLOSION HAZARD If you smell gas:
- Shut off gas to the appliance.
- Extinguish any open flame.
- If odor continues, leave the area immediately.
- After leaving the area, call your gas supplier or fire department.
- Failure to follow these instructions could result in fire or explosion, which could cause property damage, personal injury, or death.
WARNING:Do not store or use gasoline, or other flammable vapors and liquids, in the vicinity of this or any other appliance.An LP-cylinder not connected for use shall not be stored in the vicinity of this or any other appliance.
WARNING: For Outdoor Use Only. Installation and service must be performed by a qualified installer, service agency, or the gas supplier.INSTALLER: Leave this manual with the appliance. CONSUMER: Retain this manual for future reference.WARNING: If the information in this manual is not followed exactly, a fire or explosion may result causing property damage, personal injury, or loss of life.WARNING: Failure to position the parts in accordance with these diagrams or failure to use only parts specifically approved with this appliance may result in property damage or personal injury.
Safety Information
DANGER: If the information in this manual is not followed exactly, a fire or explosion may result, causing property damage, personal injury, or loss of life. Save this manual for future reference.DANGER: Improper installation, adjustment, alteration, service, or maintenance can cause serious injury or property damage. Read and understand the installation, operation, and maintenance information thoroughly before installing or servicing equipment.DANGER: This appliance has been tested to and complies with the ANSI Z 21.97-2017, CSA 2.41- 2017 Outdoor decorative gas appliances. The installation must conform to local codes, or the absence of local codes to the National Fuel Gas Code. ANS Z223.1. Safety precautions are essential when any mechanical or propane fueled equipment is involved. Follow all precautions in this manual carefully.WARNING: This outdoor fire pit table should be thoroughly cleaned and inspected on a regular basis. Clean and inspect the hose before each use of the appliance. If there is evidence of an abrasion, wear, cuts, or leaks, replace with a manufacturer specified hose before using the fire pit.WARNING: The burner should be inspected at least annually by a qualified service professional. The burner must be replaced prior to the appliance being put into operation if it is evident that the burner is damaged. The instructions shall state that the replacement burner shall be that specified by the manufacturer;DANGER: California Proposition 65 (1986) Proposition 65 is a California law protecting drinking water from toxic substances that cause cancer and birth defects. Combustion by-products produced when using this product contain chemicals known to the State of California to cause cancer, birth defects, and other reproductive harm.WARNING: Do not use for cooking.WARNING: Do not operate, light or use this appliance within 10 feet of walls or structures.WARNING: Never store your LP gas tank where temperatures can exceed 125 degrees F. Never keep a filled LP gas tank in a hot car or car tank. Heat will cause the gas pressure to increase, which may open the relief valve and allow gas to escape. Do not store a spare gas tank under or near this fire pit.WARNING: Do not attempt to move the outdoor fire pit table when in use. Allow the outdoor fire pit table to cool before moving or storing.WARNING: This outdoor fire pit table is not to be used in or on boats or recreational vehicles.WARNING: This outdoor fire pit table is not to be operated by children. Carefully supervise children when they are in the area of the appliance. Do not leave a lit outdoor fire pit table unattended, especially around children and pets.WARNING: Follow all leak-checking procedures before operating. To prevent fire or explosion hazard when testing for a leak:
- Always perform a leak test before lighting the outdoor fire pit table and each time the tank is connected for use.
- No smoking. Do not use or permit any possible sources of ignition in the area while conducting a leak test.
- Conduct the leak test outdoors in a wellventilated area.
- Do not use matches, lighters, or a flame to check for leaks.
- Do not use the outdoor fire pit table until any and all leaks are corrected.
If you are unable to stop a leak, disconnect the LP gas supply. Call a gas appliance serviceman or your local LP gas company.
WARNING: Clearances to Combustible Construction:
- Sidewalls: 60” (1.5 m) from edge of table top.
- Ceiling: free of obstruction.
- Flooring: 0” – Can be installed on deck, slab, floor, etc.
CAUTION: To avoid personal injury or damage to the fire pit table, at least two people are needed to carefully place the fire pit table in the upright position.CAUTION: The maximum inlet gas supply pressure is 250 psi. The minimum inlet gas supply pressure is 25 psi.CAUTION: Do not use this appliance if any part has been under water. Immediately call a gas appliance serviceman or your local LP gas company to inspect the appliance and to replace any part of the control system and any gas control that has been under water.WARNING:
- High Surface temperatures: Children and adults should stay away to avoid burns or clothing ignition.
- Young children should be carefully supervised when they are in the area of the appliance.
- Clothing or other flammable materials should not be hung from the appliance, or placed on or near the appliance.
- Any guard or other protective device removed during servicing the appliance shall be replaced prior to operating the appliance.
- Installation and repair should be done by a qualified service person. The appliance should be inspected before use and at least annually by a qualified service person. More frequent cleaning may be required as necessary. It is imperative that the control compartment, burners and circulating air passageways of the appliance are kept clean.
NOTED: Heat output: 38,000 BTU’sWARNING: LP gas tank needed to operate. Only tanks marked “Propane” may be used.
- The LP gas tank must be constructed and marked in accordance with the Specification for LP gas tanks of the U.S. Department of Transportation (DOT) or the Standard for Cylinders, Spheres and Tubes for Transportation of Dangerous Goods and Commission, CAN/CSA -B339.
- The LP gas tank must have a listed Overfilling Prevention Device (OPD).
- The LP gas tank must have a cylinder connection device compatible with the connection for the appliance.
- LP tank must be arranged for vapor withdrawal.
- Never use an LP tank with a damaged body, valve, collar or footing.
- The LP tank should not be dropped or handled roughly.
- Tanks must be stored outdoors, out of the reach of children and must not be stored in a building, garage or any other enclosed area.
WARNING: Solid fuels should not be burned in this fire pit.WARNING: What to do if you smell gas:
- Do not try lighting any appliance.
- Do not touch any electrical switch;.
- Do not call any phone in your building.
- Immediately call your gas supplier from a neighbor’s phone.
- Follow the gas supplier’s instructions.
- If you cannot reach your gas supplier, call the fire department.
WARNING: Properly locate the gas hose out of pathways where people may tip over it or in areas where the hose may be subject to accidental damage.
SET UP YOUR FURNITURE PROPERLY
- Ensure that all parts are assembled properly and fully tightened as per the instructions.
EXAMINE YOUR FURNITURE
- Examine occasionally to ensure that there are no loose parts. If loose parts are found, they must be retightened fully before additional use.
INSTALLATION MEETS REQUIREMENT
- The installation must conform with local codes, or in the absence of local codes with the National Fuel Gas Code ANSI Z223.1 • NFPA 54; National Fuel Gas Code; Natural Gas and Propane Installation Code, CSA B149.1; or Propane Storage and Handling Code, CSA B149.2, as applicable;
INSTRUCTION TO INSPECT THE BURNER
- The burner must be replaced prior to the appliance being put into operation if it is evident that burner is damaged. The replacement burner shall be that specified by the manufacturer.
Warranty
WHAT IS COVERED
- This product is covered under the manufacturer’s 1 -Year Limited Warranty against defects in materials and workmanship. If your furniture frame fails structurally due to inferior metals or welds during normal use within two years of purchase, the manufacturer will repair or replace the defective piece. Resin weave and cushions are warranted for 1 -Year from date of purchase. Peeling, crackling, blistering, discoloration or fading are also warranted for 1-Year from the date of purchase. Warranty is to the original purchaser and is non-transferable. Proof of purchase (dated register receipt) and in some cases, photos of product are required for warranty claims. Lack of original receipt will void the warranty. We reserve the right to make substitutions with similar merchandise, if the model in question is no longer in production.
WHAT IS NOT COVERED
- This warranty excludes: furniture used for commercial use, contract or other non-residential purposes, freight damage, furniture damaged by acts of nature, abuse or lack of proper care, vandalism or improper assembly. Discoloration or fading of straps or f abric or finish as a result of chemicals or spills is not covered. Glass, tile, and stone are not covered against breakage; frames and hardware are not covered against corrosion or rusting. In addition, purchased parts are not covered under this warranty. We reserve the right to make substitutions with similar merchandise, if the model in question is no longer in production. Exclusion also includes time for loss of use, inconvenience, travel, packaging or any other incidental or consequential damages. It remains the customer’s responsibility for freight and packaging charges to and from our service center.
Cold Climates:
Table top must be stored flat (not on its edge) in a dry location where temperatures will not fall below 32° F (0° C).If, within the stated warranty period, this product is found to be defective in material or workmanship, the purchase must contact the customer service department at (888) 457-4442.Email: [email protected]Customer Service hours: Monday to Friday 9AM – 5:00PM PST.
Care and Maintenance
Wash the frame with a mild solution of soap and water, rinse with clean water, and dry thoroughly.Cushions may also be cleaned by hand with a mild solution of soap and water. Rinse the cushion cover thoroughly and allow to drip dry. The back cushion and pillow should be spot cleaned with a soft cloth. Do not machine wash or tumble dry, as cushions may shrink. Do not use bleach or solvents on fabrics. Never use cleaners that contain acid or abrasive materials.Use and operation: To improve the lifespan of this furniture, cover when not use and store in a dry place in the off season.
Pre-Assembly
To prevent damage, place all parts on a soft surface during assembly.Remove all protective caps before beginning assembly. It takes about 40 minutes for one person to complete the assembly.

Assembly
Put the fire glass (B) into top of table frame (A) Cover the pot cover (C).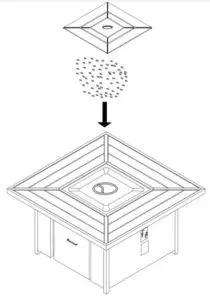
Operation
Connect and disconnect the LP Gas Tank
Connect: Open the door on the table base and place theLP gas tank into the round tank holder. Connect the regular to tank by turning the knob clockwise until it stops.Disconnect: Before disconnecting make sure the LP gastank value is “CLOSED”.Disconnect regular from LP gas tank by turning knob counterclockwise until it is loose.Open the drawer and place the 20 pound gas tank on the tank support .Secure the tank on the bottom base by screw ,and using the strap (D) to fix the tank to prevent the tank from moving . Attach the tank strap to the hook on the drawer panel .Attach the fire bowl to the gas tank with the hose from the fire bowl.Close the drawer.Mix two to three ounces of a soapy solution to check for leaks. Use one part liquid dishwashing detergent and three parts water.Apply several drops of solution where the hose attaches to the regulator.Apply several drops of solution where the regulator connects to the cylinder. Make sure all fire pit and ignition valves are off.Turn the cylinder valve on. If any soap bubbles are visible where the solution has been applied, the connections must be tightened another turn and the leak check must be performed again.
WARNING: Follow all leak-checking procedures before operating. To prevent fire or explosion hazard when testing for a leak:
- Always perform a leak test before lighting the outdoor fire pit table and each time the tank is connected for use.
- No smoking. Do not use or permit any possible sources of ignition in the area while conducting a leak test.
- Conduct the leak test outdoors in a wellventilated area.
- Do not use matches, lighters, or a flame to check for leaks.
- Do not use the outdoor fire pit table until any and all leaks are corrected.
If you are unable to stop a leak, disconnect the LP gas supply. Call a gas appliance serviceman or your local LP gas company.
Lighting the fire pit
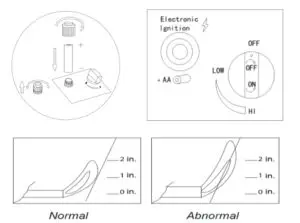
- One AA battery required for use (not included). Twist off the ignitor switch knob and insert 1 AA battery as pictured below. Tighten ignitor switch knob.
- Push and slowly turn the control knob to the LOW position .
- Hold ignitor to light the burner, release control knob after 5 seconds.
- Observe the flame height when lit. Flame should be 3 to 13 inches high .
- lf the burner does not light before the match goes out, immediately turn the control knob to the OFF position.
- Wait approximately five minutes to clear out any gas, and repeat steps 1-4above.
- If your burner fails to light again, turn the control knob to the OFF position and contact your dealer or gas supplier.
Shut Down instructions:
To extinguish your gas burner, turn the control knob to the OFF position. Be sure the control knob is turned fully off to avoid any gas leakage.
NOTE: If burner fails to remain lit, close all valves and wait 5 minutes before attempting to light the fire pit again.
NOTE: When fire pit is on: The burner will display blue and yellow flames. These flames should not be yellow or produce thick black smoke. This would indicate an obstruction of airflow through the burners. The flames should be blue with straight yellow tops. If excessive yellow flames are detected, turn off the burner and consult “Troubleshooting” on page 13.WARNING: Be careful when attempting to manually ignite this fire pit. Improper igniting procedure may cause injury or property damage.
Maintenance
Air flow through the fire pit must remain unobstructed. Keep ventilation openings, controls, burner, and air passages clean and clear of debris. Signs of possible blockage include the following:
- Gas odor with extreme yellow tipping of flame.
- Fire pit does not reach the desired temperature.
- Fire pit glow is excessively uneven. o Fire pit makes popping noises.
- Spiders and insects can nest in the burner or other openings. This dangerous condition can damage the fire pit and render it unsafe for use. Clean burner holes using a heavy-duty pipe cleaner. Compressed air may help clear away smaller particles.
Carbon deposits may create a fire hazard. Clean the dome and burner screen with warm soapy water if any carbon deposits develop.
Care and Cleaning
To enjoy years of outstanding performance from your fire pit, make sure you perform the following maintenance activities on a regular basis:
- Keep exterior surfaces clean.
- Use warm soapy water for cleaning. Never use flammable or corrosive cleaning agents.
- While cleaning your unit, be sure to keep the area around the burner dry at all times.
- Do not submerge the control valve assembly. If the gas control issubmerged in water, do NOT use it again. It must be replaced.
- Keep the appliance area clear and free from combustible materials, gasoline, and other flammable vapors and liquids.
- Do not obstruct the flow of combustion and ventilation air.
- Clean burner holes by using a heavy duty pipe cleaner. Compressed air may help clear away smaller particles.
Storage BETWEEN USES
- Turn the control knob OFF.
- Disconnect the LP source.
- Store the fire pit upright in an area sheltered from direct contact with inclement weather (such as rain, sleet, hail, snow, dust, and debris).
- If desired, cover the fire pit to protect the exterior surfaces and to help prevent build-up in air passages.
NOTE: Wait until the fire pit is cool before covering.
During periods of extended inactivity or when transporting
- Turn the control knob OFF.
- Disconnect the LP source, and move it to a secure, well-ventilated location outdoors.
- Store the fire pit upright in an area sheltered from direct contact with inclement weather (such as rain, sleet, hail, snow, dust and debris).
- If desired, cover fire pit to protect exterior surfaces and to help prevent build-up in air passages.
WARNING: Never leave LP cylinder exposed to direct sunlight or excessive heat. Wait until the fire pit is cool before covering.CAUTION: Always the allow fire pit to cool before attempting service.
Service
Only a qualified service person should repair gas passages and associated components.
Troubleshooting
1. PROBLEM: The burner will not light.POSSIBLE CAUSE:
- The propane cylinder is frosted over.
- An opening is blocked.
- The control knob is not in the ON position.
- There may be too much lava rock covering the burner bowl or small pieces may be blocking the burner holes.
- Battery is dead or not installed properly on ignitor switch.
CORRECTIVE ACTION:
- Wait until the propane cylinder warms up and becomes unfrosted.
- Clear the blockage.
- Turn the control knob to ON.
- Remove a portion of the lava rock.
- Install new AA battery (not included) for the ignitor switch
2. PROBLEM: The burner flame is too low.
POSSIBLE CAUSE:
- The gas pressure is low.
- The outdoor temperature is less than 40°F, and the tank is less than ¼ full.
CORRECTIVE ACTION:
- Wait until the propane cylinder warms up and becomes unfrosted.
- Clear the blockage.
- Turn the control knob to ON.
- Remove a portion of the lava rock.
- Install new AA battery (not included) for the ignitor switch
3. PROBLEM: Carbon build-up and/or thick black smoke is present.
POSSIBLE CAUSE:
- There is dirt or film on the reflector and burner screen.
- The burner is blocked.
CORRECTIVE ACTION :
- Clean the reflector and burner screen.
- Remove any blockage, and clean the burner inside and outside.
 report this ad
Abbyson Belmont/Corbin Fire Table Instructions Manual – Abbyson Belmont/Corbin Fire Table Instructions Manual –
[xyz-ips snippet=”download-snippet”]