Installation Guide

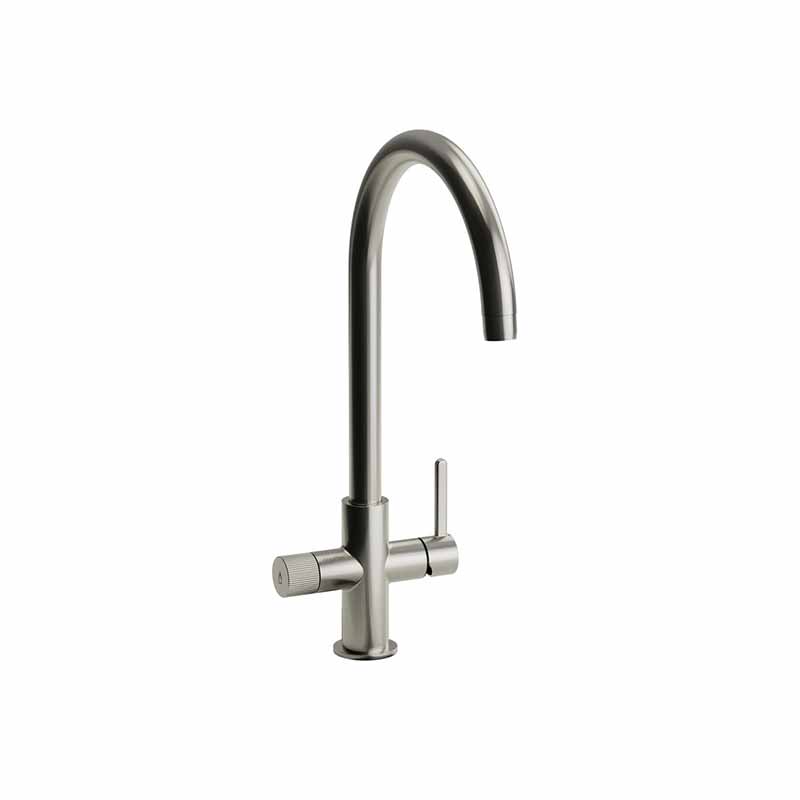
abode Puria Aquifier
Pre-installation preparation:
- Remove the tap and filter from its packaging, check for any transport damage and that all parts are present.
- Shut off the mains water supply; switch off the water heating system, and open hot and cold taps at the lowest point in the building. Allow them to run until empty.
- Remove the old tap and prepare a 35mm diameter hole for the tap, note the tap must not pass through a surface thicker than 40mm.
- Prepare the existing pipework so the hot and cold 15mm copper feed pipes finish below the tap base. Typically the hot water feed should be on the left hand side, we recommend fitting isolation valves before the tap connections to ease any future maintenance. Any debris or swarf that may be in the feed pipes must be flushed to prevent damage to the tap.
Stage 1 – install the tap:
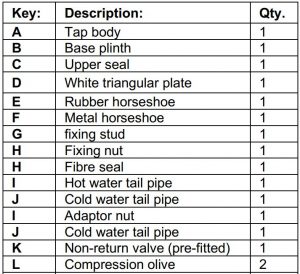
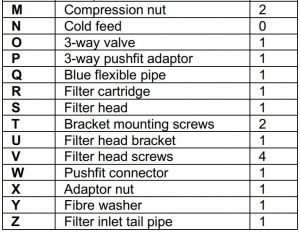
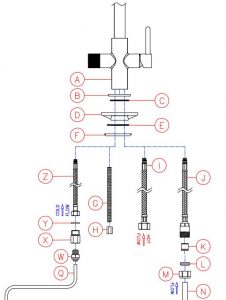
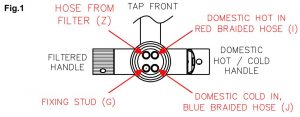
- Screw the fixing stud (G) into the base on the tap (A). Note: Fig.1 identifies the water inlets, viewed from the base of the tap.
- Place the base plinth (B) then the upper seal (C) on to the base of the tap (A).
- Screw the Cold (J), Hot (I) and Filter (Z) tail pipes into the base of the tap.
- Place the tap (A) centrally and straight to the tap hole, passing the fixing stud (G) and tail pipes (J, I & Z) through the sink.
- Pass rubber horseshoe (E) then the metal horseshoe (F) over the fixing stud (G). Note: Only if the tap is to be fitted to a stainless steel sink then the white triangular plate (D) can be fitted where shown to improve the stability of the tap.
- Using a spanner tighten fixing nut (H) onto the fixing stud (G), a box spanner or small basin wrench will help if one is available.
- Screw adaptor (X) to Filter tail pipe (Z) ensuring fibre washer (Y) is placed inside first (see drawing). Note: We advise using PTFE tape on threaded section of adaptor (X) to make a good seal.
- Screw the pushfit fitting (W) into the adaptor nut (X). Note: We recommend using PTFE tape (do not use sealing compound) on the thread of the pushfit fittings to make a good seal without applying excessive force (which may damage the plastic pushfit if overtightened).
- Attach the hot water tail pipe (I) to the water supply.
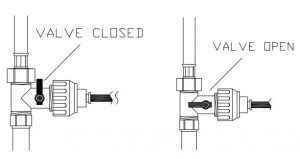
- Attach the 3-way valve (O) to the cold water feed pipe using compression nut (M) and olive (L).
- Attach the 3-way valve (O) to the cold water inlet pipe (J) using a short length of 15mm pipe, compression nut and olive (not supplied).
Stage 2 – install the filter:
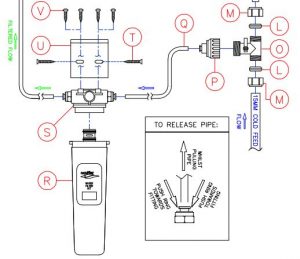
- Locate a convenient position to install the filter (S & R). Leave some room underneath the filter unit (R) to allow it to be changed.
- Screw the filter bracket (U) to the cupboard wall using screws (T).
- Screw bracket (U) to the filter head (S) using screws (V). Note: The direction of flow is marked.
- Write the date of installation onto the label on the filter cartridge (R).
- Insert the filter cartridge (R) into the filter head (S). Align the tabs at the top of the filter cartridge (R) with the gaps in the base of filter head (S), push the filter cartridge (R) up into the filter head (S) then turn the filter cartridge (R) approximately 90 to lock it into place.
- Screw the pushfit adaptor (P) onto 3 way valve (O).
- Cut the blue flexible pipe (Q) so it is slightly longer than the required lengths to and from the filter unit. When cutting the pipe use a sharp Stanley or craft knife, ensuring that the pipe is cut cleanly and square at all ends.
- Firmly push the blue pipe (Q) apx. 12mm into the pushfit adaptor (P) then into the inlet on the filter head (S) as shown.
- Firmly push the blue pipe (Q) apx. 12mm into the pushfit fitting (W) then into the outlet on the filter head (S) as shown.
Stage 3 – setting the tap up:
Slowly turn the hot and cold water supply on; now carefully check the system for any leaks. Turn your filter tap on by turning the knurled filter handle clockwise so filtered water runs through it.
Note: when the filter is new it will take a moment to push any air though the system, you may notice some discoloration in the water at this point, this is normal and will pass with flushing.
The filtered drinking water system performs at a maximum of 2-3 L / min. Turn the mixertap fully on to filtered water, now turn the lever on the three way valve (O) to adjust the flow of filtered water to the correct level.
Clean the tap to remove any marks created during installation as instructed then replace the bagthat has been provided to protect the tap until it is ready for use.
Using the tap:
For best results when using the filtered water always run the tap for a few moments. Running the tap will help to flush the system through and make the water cooler for drinking. When comparing the taste of filtered and unfiltered water always taste the filtered water first.
The triple stage filter is designed to improve the taste, clarity and odour of drinking water, the filter also reduces sediment, the level of chemical impurities and lime scale build up on kettles and cookware. Each filter cartridge has a maximum six month life depending upon your water quality.
For replacement filters call 01226 28 34 34. Abode operate a free replacement filter reminder service, If you would like to take advantage of this service please fill in the enclosed card.
5 Year warrantyTerms and Conditions
In the unlikely event that you should experience any defect in the materials or workmanship of your new Abode mixer within 5 years of purchase, the purchaser’s sole remedy shall be thereplacement (at the manufacturer’s discretion) of all or any part of the product that is defective. All working parts and valves are guaranteed for a period of 5 years from purchase. Decorative surface finishes and O-rings are guaranteed for 1 year from the date of purchase provided that our advice concerning care has been observed and no scouring agents have been used. This is provided that the mixer or tap has been used for normal domestic purposes and that the care, installation and maintenance instructions have been observed. The warranty extends to the original purchaser only.
Marks, scuffs and scratches caused by improper installation or accidental damage are not covered by this guarantee. Neither are shade variations or any damage or defect caused by incorrect installation or abuse of the fitting.
As we are continuously improving and developing our range of products, finishes & colours, in the event of a valid claim, we may not be able to provide an identical replacement for the defective product throughout the guarantee period. Where an identical product is no longer available, we will supply the nearest equivalent from our then current product range. In assessing your claim, we must be given the opportunity to inspect the product as installed prior to removal. Any product returns must be packaged as received and complete.
No other warranties, express or implied, are made, including merchantability or fitness for a particular purpose. Under no circumstances shall the manufacturer be liable for any loss or damage arising from the purchase, use or inability to use this product, or for any special, indirect, incidental or consequential damages. No liability is accepted for consequential damage to other household fixtures, fittings or furnishings arising from this claim, even if attached to the product. No installer, dealer, agent or employee of Abode Home Products Limited has the authority to modify the obligations or limitations of this warranty.
Important Technical Data:
This tap can be used in conjunction with a water softening system and will remove the need for a separate drinking water tap. In this instance 3-way valve (O) must cut into the unsoftened cold mains supply.
These installation instructions have been prepared for your guidance and you must exercise due care at all times. We do not accept responsibility for problems that may occur through improper installation, PTFE tape should be used to ensure watertight joins on threaded connections, do not over tighten connections or allow pipes to be twisted or folded.
If in doubt, ensure that the Mixertap is fitted by a trained and certified plumber. Please ensure that your kitchen mixer is fitted in accordance with Local Water Byelaws.
Maximum Hot Water Temperature: 70°CRecommended Hot Water Temperature: 46°CRecommended Min/Max Hot Water Pressure: 1.0 / 5.5 barRecommended Min/Max Cold Water Pressure: 1.0 / 5.5 bar
Note: If these temperatures or pressures are exceeded, even for short periods, damage can result.
Care Instructions for your Kitchen Sink Mixer:
To maintain the appearance of this tap, ensure that it is regularly cleaned only using a clean, soft damp cloth. A solution of warm water and a mild liquid detergent may be used where necessary, and then the fitting rinsed thoroughly and wiped dry.
Abrasive cleaners, bleaches, scouring cleaners and acidic cleaners must not be used under any circumstances. Avoid contact with all solvents (including chlorinated solvents, ketones or acetones as these may result in surface deterioration or etching). Also avoid contact with any harsh household chemicals such as oven cleaners, drain cleaners, rust removers, paint strippers and toilet bowl cleaners.
Please leave these instructions for your customer, for further information call 01226 28 34 34.
[xyz-ips snippet=”download-snippet”]