
ABYSS AVisual Synthesiser User Manual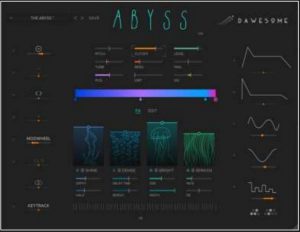
Abyss is a visual synthesiser with character and a bit of fairy dust. It brings to you dark, vibrating drones, vivid cinematic pads and rich evolving textures. With Abyss you find instant inspiration for your music and sound design projects.
The innovative synthesis engine of Abyss represents timbres with colour, giving you unprecedented intuitive access – to design your own signature sound with ease. And with the powerful modulation system it is easier than ever to make any patch nuanced and expressive – even more so if you use an MPE controller like the ROLI Seaboard.
Abyss supports AU and VST3 on macOS / OS X and VST3 for Win 10. Installation ist straightforward and works exactly like installations usually work. You can download the installer from tracktion.com.
We offer a free, unrestricted trial period. To start your free trial or authorise your purchased license, click the UNLOCK button in the lower right and enter your tracktion.com account credentials.
If the plugin is not registered, or your trial period is expired, Abyss will interrupt sound generation every few minutes for a few seconds.
Signal Flow
The signal flow in Abyss is pretty simple. In the center there is a coloured gradient, where each color represents a timbre – the gradient acts as an oscillator with the main parameters being the timbres placed on it and the playing position along the gradient.
A simple Gradient with four timbres and the playing position indicated.
The sound generated from the gradient-oscillator is fed into a resonating filter, an amplitude envelope and from there through four audio effects, namely Shimmer, Delay, Reverb and Phaser.
The FX section featuring Shimmer, Delay, Reverb and Phaser.
The big sliders with images are for dry-wet.

Timbre and Colours
Abyss user interface is presented in one resizable window. The lower half of the window can display one of two views: FX and EDIT.
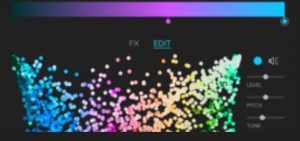
he EDIT view allows fast selection of timbres that can be placed on the gradient.
Pre-listen to any timbre by simply clicking it.
With shift engaged you can drag-and-drop timbres to the gradient. Alternatively, you can use right-click for drag-and-drop.

Timbres with a similar sound have similar colour and are placed close to each other. Less saturated colours are more noisy and dark colours represent lower pitch.
The fastest way to select a timbre is to simply hold the mouse button down and move over the timbres.Once you found a timbre to your liking you can drag-and-drop the timbre onto the gradient. There are three ways to initiate the drag-and-drop:
- Use any modifier key (eg. SHIFT) in conjunction with the mouse
- Perform the drag-and-drop with right-click
- Drag-and-drop the timbre from the coloured dot above the sliders
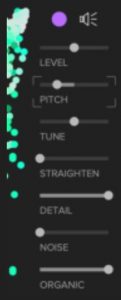
The sliders allow modification of the currently selected timbre.
- STRAIGHTEN – when pushed to the right the sound becomes more static, like a classical oscillator voice.
- DETAIL – when pushed to the left the sound becomes softer, thinner and, well, less detailed.
- NOISE – adds musical noise to the timbre. The tone colour of the noise will vary depending on the timbre itself and the settings of all the other sliders.
- ORGANIC – higher values create a slightly moving, chorused sound- lower values may either be static or introduce temporal variations.

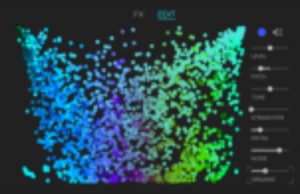
Depending on the slider settings the colour of the timbre changes, both for the selected timbre and for the entire selection panel. This allows searching for a timbre with specific NOISE, DETAIL, ORGANIC etc settings.
Different sounds are represented by different colours – here with low value for DETAIL and high value for NOISE.
After a bit of experimentation you will find the colours quite intuitive to work with – for good reason people use similar words like “dark”, “light”, “warm” or “cold” to describe tone-colours and (real) colours. No more need to browse through lengthy textual descriptions or drop-down menus for finding your sound.
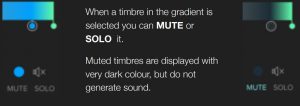
Muting and Soloing Timbres / Audition Mode
Sometimes it is desirable to fine tune timbre parameters. There are a couple of features that support editing of patches.
![]() Normally you hear a timbre only when you click and hold it. As soon as you release the mouse button the sound stops.
Normally you hear a timbre only when you click and hold it. As soon as you release the mouse button the sound stops.
![]() By clicking on the loudspeaker symbol you switch to AUDITION MODE.In this mode the currently selected timbre does not stop playing. You can edit its parameters, or select a different timbre, but playback will continue. To leave AUDITION MODE simply click the loudspeaker symbol again.
By clicking on the loudspeaker symbol you switch to AUDITION MODE.In this mode the currently selected timbre does not stop playing. You can edit its parameters, or select a different timbre, but playback will continue. To leave AUDITION MODE simply click the loudspeaker symbol again.
Modulation
Great instruments offer nuanced response to your playing – hence Abyss is equipped with a powerful modulation system.

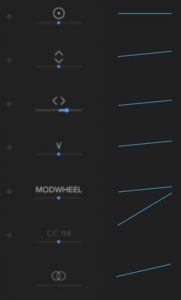
To the left you will find modulation sources of user input, like aftertouch, MPE slide and glide, velocity, modwheel etc.
To the right you find two ADSR envelopes and three LFOs.
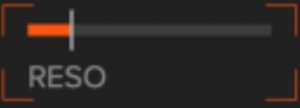
n order to modulate a parameter, you simply select it. The selection will be indicated by coloured corners around the slider.
Here the current selection is RESO (filter resonance).
Below each modulation source there is a slider for the amount of modulation applied to the currently selected parameter.
In this example PRESSURE has some positive influence on the selected parameter that is, with more pressure the parameter value will increase.
For SLIDE the modulation slider is centred – hence SLIDE does not modulate the currently selected parameter.
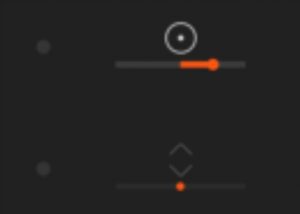
If you put any modulation slider to the left it will have negative influence on the parameter – for example, more PRESSURE would then lead to less RESO.
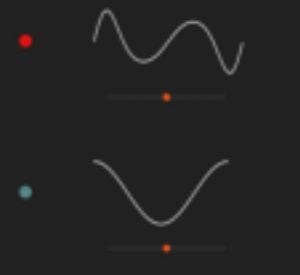
Additionally, you get visual feedback for the current state of modulation:
To the left of every modulator a dot depicts the current value. In this case the upper LFO currently i red, so has a negative value.
The lower LFO has a high value, indicated by a turquoise indicator left to it.
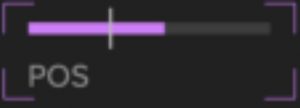
Any modulation of a parameter is indicated by the colour bar of the parameter’s slider – so if a sound has a lot of movement you will also see a lot of movement in the user interface.
In this example the position on the gradient is modulated by an LFO. The purple bar indicates its current value taking all modulations into account.
This gives you a full ‘what-you-see-is-what-you-get’ experience
There are some additional features to make your life easier:
- Use double-click on any slider to move it to its default position
- hold CTRL (win) / COMMAND (mac) while moving a slider to have fine control
- hold CTRL/COMMAND and click a parameter slider to highlight all active modifiers for this parameter
- hold CTRL/COMMAND and double-click the parameter to erase all all modulations for this parameter
- hold CTRL/COMMAND and click any modulators slider to highlight all parameters influenced by that modulator.
- hold CTRL/COMMAND and double-click any modulation slider to erase all modulations for thismodulator
- if a modulator does not modulate anything in the current patch it’s displayed greyed out
The LFOs
Abyss has three powerful LFOs.
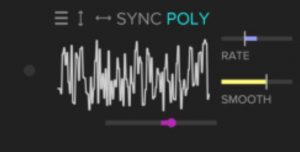
Each LFO displays its waveform, its current value with the circle to the left, and its modulation intensity with the slider below.
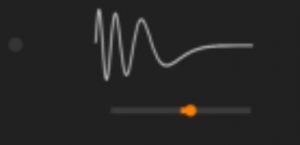
To edit the LFO itself just move the mouse over it.

- RATE – sets the speed of the LFO. This parameter can also be modulated, allowing complex patterns.
- SYNC – when active the LFO is synced to the DAW tempo. This is great for creating rhythmical textures.
- POLY – when active each note has its own LFO that starts from the beginning when a note is played.Deactivate this if you want all played notes to share one LFO that runs continuously.
- QUANT – when you move the slider to the left the LFO becomes a step sequencer. Use the arrows to flip the LFO curve.
Click the Burger Menu ! ![]() to chose from a selection of LFO wave forms.
to chose from a selection of LFO wave forms.
Or simply DRAW freely with the mouse whatever waveform you need.
The first of the three LFOs does not have a QUANT slider, but a SMOOTH function. This works especially well in conjunction with the noisy LFO presets to create all kind of musical randomness.
The ADSR envelopes
There are two ADSR envelopes. The first one always shapes the amplitude of the notes, but it can additionally modulate other parameters. The second envelope can be used for further modulation of parameters.
Edit the ADSR envelopes simply by dragging the dots around.
For fine control when adjusting the envelopes, simply hold any modifier key while dragging.
When the sustain level is put to zero, the envelope becomes an AR envelope.

The other modulators
- RESS – MPE Pressure / Aftertouch
- SLIDE – (mainly used with MPE controllers, CC74)
- GLIDE – Pitchbend; MPE is supported. Click to set the range of pitch modification. You can also use this as modifier for any other parameter.
- STRIKE / VELOCITY
- CC – Midi Control Changes. Modwheel is the default – click in order to assign any other midi control change
- SPREAD – This can be used to modulate a parameter differently for the left and the right channels. Works great with POS, TUNE, DIRT, CUTOFF, or RESO to create width and depth.
The final modulator is KEYTRACK and can be used to modulate a parameter depending on which key has been pressed. You can draw a curve by dragging the lines / dots over the depicted keyboard.

Pitch-snap, Scales and Arpeggios
When you apply a modulator on PITCH the results easily become very “avant garde ish”. This is because all chromatic pitches will be used, and this is often not exactly what you want. This is where Pitch-Snap comes into play. It allows you to put constrains on the notes that are being played.
There are two modes: firstly, you can use the SCALE mode to constrain the absolute pitches that can sound
Simply click to constrain the pitches that can be generated by the synthesiser. In this case only the notes C, D, Eb, G and Ab can be heard – no matter what keys you press or how PITCH is modulated.

Any other note will be mapped to one of these notes. This also is a great feature if you anyways work in a specific tonal scale, and want to create sounds that fit the emotional mood of this scale.
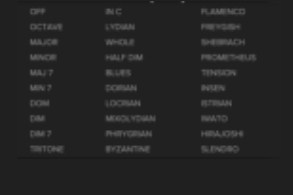
By right-clicking (or clicking between the circles) a popup menu opens that offers a collection of frequently used scales. These can be used as such or as a starting point to explore your own scales.
Secondly, the ARPEGGIO mode constrains the pitches that can sound relative to the pressed key.
In the example a major chord has been chosen. When you now modulate PITCH (let’s say with an LFO), and press, for example G, only notes of the G major chord will be heard. Use this for arpeggiated sounds.

DEALING WITH PRESETS
The easiest way to store the current patch is by clicking the present name and enter a new name. The preset is automatically saved in your User Preset Directory with the name you entered.

Abyss comes with a selection of Factory Presets that are organised in categories. The PREVIOUS and NEXT arrows allow you to browse all presets.
Click on the downwards arrow to open the preset menu:
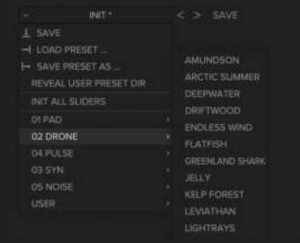
- SAVE … stores the current patch in the user presets.
- LOAD PRESET … opens a file chooser and allows you to load a preset file from the file system.
- SAVE PRESET AS … allows to store the current patch as a file.
- REVEAL USER PRESET DIR … opens the directory where Abyss stores all User Presets. You can use this to rename or delete user presets.
- INIT ALL SLIDERS … puts all sliders into their default positions, including all modulations. The gradient remains untouched.
SOUND DESIGN IDEAS
Abyss has been designed to be an intuitive instrument that allows for fast and simple creation of unique instrument patches, with that certain extra something. Here are a few ideas of how to get the most of Abyss.
Make it yours
Abyss comes with more than hundred handcrafted presets. If you find something that responds in a way that you like, simply go to the edit view and replace / add Timbres in the gradient.
Remember: if you want to have similar sounds chose similar colours.
Here is the gradient of the preset called SIRENS (in PADs).

I like the soft sound and movement, but I quickly exchange all timbres:

Now I have a patch that has similar behaviour, but sounds completely different – and no one else is going to have exactly this patch. It’s truly mine.
Expressive Tension
It is easy to make very expressive sounds that respond in a very nuanced way to your playing, by using the gradient as a “Tension Map”. In this example I have created a simple gradient that starts with a soft, dark tone in the left, has strong tone at two thirds of the gradient and a more aggressive, noisier version of the same timbre at the very right. By assigning the STRIKE/VELOCITY modulator to the Gradient Position (POS) the patch reacts on my playing: soft when I play lightly, and progressively stronger and more aggressive when I hit my keys harder. Additionally, modulating DIRT with PRESSURE gives extra bite to the sound.

Expressive Tension II
Sometimes you want to have an expressive Sound, but you want it to stay in the realm of a certain timbre. In this way you work with shades of the same colour. As a starting point you can chose just one timbre and place it at multiple positions in the gradient.

Now use the timbre modifiers in the EDIT view: in the example, I reduced detail to 60% for the center timbre, and to 30% for the timbre on the very left. I increased noise to my taste for the timbre on the very right:

In this way the timbral spectrum of the patch is very consistent, yet fully nuanced and expressive.To enable fine-tuning, you can hold some keys on your controller while adjusting the timbre sliders.
NOTE: changing the DETAIL, NOISE, ORGANIC or STRAIGHTEN involves a lot of heavy computation for the synthesis engine. You may notice increase CPU usage when moving these sliders a lot. These parameters don’t support being modulated.
Dark Bionics
While classical oscillators create periodic waveforms Abyss has been designed to creates waves that are rich in detail, dirt, and variation – like natural sounds. There is a sweet spot that allows for very nuanced sounds when taking any timbre, setting ORGANIC to a high value, STRAIGHTEN to a very low value and DETAIL somewhere in the mid range. Especially when adding DIRT, you get very dark sounds that are incredibly rich in variation.
Stereo Field
Use the SPREAD modulator on POS. Thats also depicted in the gradient. Here a chord is played and due to SPREAD the position for the left and the right side is different, resulting in additional width and variation. DETUNE, CUTOFF, RESO and DIRT also work quite well with SPREAD.

Back to the 80s
In the 80s, most media technology was still analog … with all of the idiosyncrasies. In order to give a touch of interest and 80s feeling to pads and drones you can do the following: take LFO number 1, chose a random curve, set SMOOTH somewhere in the middle. Then select DETUNE and dial in a bit of modulation by the LFO you just created. The smoothing creates a so called “drunken random walk”, as the LFO does not jump up and down but smoothly goes up and down in a random fashion. Applied on DETUNE it creates the same effect as a VHS video. If you don’t know what VHS is – just ask anyone over 45.
Haunting sounds
The same technique of “Back to the 80s” can be used to dial in some spooky mood – just increase the modulation of DETUNE to higher values. If you have an MPE controller (and you are as bad a keyboard player as I am) click on GLIDE and set it to a very high value. In this way any imprecision in your playing will lead to a detuned note, very much like playing a stringed or wind instrument. This allows for all kind of effects between natural musical expression and spooky ghosts haunting your studio.
Rhythmic Textures
When setting the LFOs to SYNC their RATE can be set relative to your DAW’s tempo. Use this to modulate POS, CUTOFF, DIRT or PITCH ( together with PITCH-SNAP). Your sounds will be tempo-synced with the rest of your arrangement.
You can also explore polyrhythmic structures, by switching SYNC off and using QUANT on LFO2 and LFO3 with incommensurable small values (e.g. 5 and 11). Additionally, you may set them to different RATE. This creates rhythmic patterns that are structured, yet never repeat.
For arhythmic drones you can use two or more LFOs and modulate their RATES by something else (and of course multiple sources!). When you modulate the RATE of LFO1 by LFO2 you do FM on the LFO. If you also modulate the RATE of LFO2 by LFO1 you have created a chaotic dynamic system … enjoy, but don’t try to predict it without a team of mathematicians.
Pitch Variations
Each timbre that you place on the gradient can have its own PITCH and DETUNE values. By detuning the timbres on the gradient you gain another dimension of tone-colour variation to your sound – that changes together with the POS. This works great to add slight or rich in harmonics, e.g. to create nuanced bell sounds.
A variation of this technique is to have different PITCH values for the timbres on the gradient. For example, you can have PITCH in the center position for the timbre to the very left, and PITCH to a diatonic fifth (7 semitones) for the timbre on the very right. By doing so the POS changes the sound from the tonic via a power-chord (tonic + fifth) to the pure fifth. In this way you can blend the line between sound design and harmony.
Apply and modulate FX
Abyss contains four effects to further shape your sound or add movement and texture. Each effect has two parameters (these can also be modulated), and a couple of named presets that change the character of the effect.
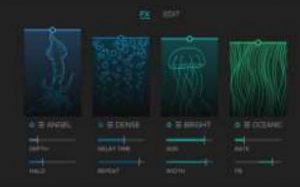
For example, the SHIMMER effect (with the octopus) features presets that add a bright shimmer like SHINE, PEARL or ANGLE, but also presets that create a very dark shimmer (eg AHAB, WRECK, SUNKEN).Experiment to find what works best for your sound. In Abyss these FX are considered not to be a finalising add-on, but rather an integral part of the sound design.
Abyss also features a brickwall limiter. It is designed for maximum transparency when the signal level is not too hot. Even very hot signals won’t exceed 0db output
Product Support
Abyss has been developed and tested with great care to be a premium quality instrument. However, complex software may have bugs or behave in unexpected ways. If you have questions, feedback or want to report a bug, please reach out to [email protected]
Credits
Especially I’d like to thank my awesome beta testers for their detailed and valuable feedback:
- Juan Juez-Sarmiento Ramos
- Florian Mrugalla
- Gustav Scholda
- James Swift
- Andrew Madden
- Frank Gesang
- Philip Rampi
- Leigh Howells
- Adam Wilson
A sincere thank you to Garry Bates for his diligent proofreading of this manual.
A special thanks goes to my kids Aya and Kiro: they tirelessly tried out all my ideas and prototypes and provided brutally honest feedback.
References
[xyz-ips snippet=”download-snippet”]