
ac audiocodes AudioCodes 450HD and C450HD I

1. Before Installing
Congratulations on purchasing your AudioCodes 450HD or C450HD IP Phone!Before installing your phone, make sure the following items are included in the shipped box:
- 450HD or C450HD IP Phone
- AC power adapter (optional)
- Cat 5e Ethernet cable
- Handset
- Handset cord
- Desktop stand
- Wall mount
2. Physical Description

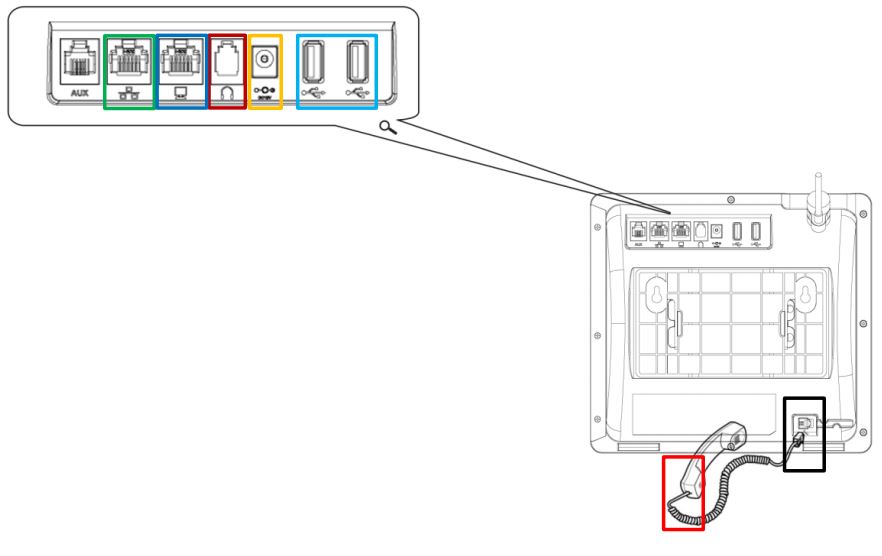
3. Cabling the Phone
![]() Warning: Prior to connecting power, refer to the Compliance and Regulatory Information document at https://www.audiocodes.com/library/technical-documents.
Warning: Prior to connecting power, refer to the Compliance and Regulatory Information document at https://www.audiocodes.com/library/technical-documents.
– To cable the phone:
- [Refer to the illustration below] Connect the short, straight end of the phone cord to the handset and the long straight end of the cord to the handset jack on the phone.
- (Optional) Connect a headset to the RJ-9 headset port, or to one of the two USB ports.
- Connect the RJ-45 LAN port to your LAN network (LAN port or LAN switch/router) with a CAT 5 / 5e Ethernet cable.
- Connect the RJ-45 PC port to a computer with a CAT 5 / 5e straight-through Ethernet cable.
- Connect the connector tip of the AC power adapter to the phone’s DC 12V power socket and connect the two-prong AC adapter directly to the electrical wall outlet. When the phone powers up, all the LEDs momentarily light up.

4. Mounting the Phone on a Desktop or Wall
Desktop: Slide the L-shaped stand’s short or long edge slots onto these rails.Wall: Slide the wall mount fitting onto these rails.

5. Signing In
![]() Note: This section is applicable only to Skype for Business/Teams Compatible.– To sign in with Skype for Business client when using BToE:Refer to the 450HD or the C450HD IP Phone User’s Manual.– To sign in with a PIN code (excludes access to Microsoft Outlook Calendar):1. In the Offline idle screen, touch Sign In and then touch the PIN Code option.2. Enter the phone number and PIN, and then touch Select.
Note: This section is applicable only to Skype for Business/Teams Compatible.– To sign in with Skype for Business client when using BToE:Refer to the 450HD or the C450HD IP Phone User’s Manual.– To sign in with a PIN code (excludes access to Microsoft Outlook Calendar):1. In the Offline idle screen, touch Sign In and then touch the PIN Code option.2. Enter the phone number and PIN, and then touch Select.

– To sign in with a username and password:1. In the Offline idle screen, touch Sign In, and then touch the User name and Password option.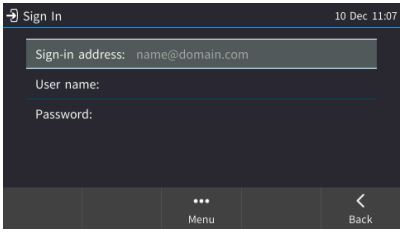 2. Enter the `Sign-in address’ (SIP address), (e.g., [email protected]) and `User name’, (e.g., [email protected]), and then enter the password. Get it from the network administrator (it’s the same as the Windows credentials).3. Touch the Select softkey.
– To sign in with Web Sign-in (Cloud) (applies only to Microsoft Cloud PBX users):1. In the Offline idle screen, touch Sign In, and then select the Web Sign-in (Cloud) option.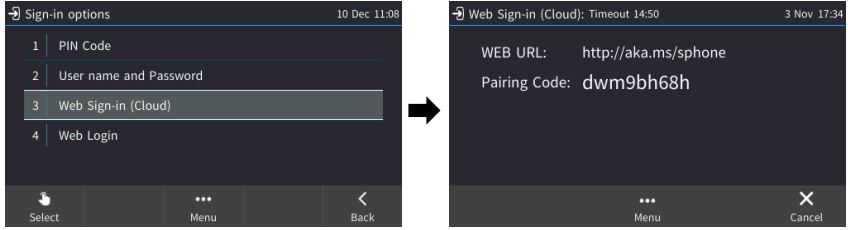 2. Using your web browser, navigate to the URL (Microsoft’s Cloud PBX login page) shown in the Web Sign-in (Cloud) screen (above).3. Enter the pairing code, and then click Next:
4. Enter the `Sign-in address’ (SIP address), (e.g., [email protected]) and `User name’, (e.g., [email protected]), and then enter the password. – To sign in with Web Login:1. In the Offline idle screen, touch Sign In, and then touch the Web Login option.
 2. Using your web browser, navigate to the URL shown in the Web Login screen (above). 3. Enter the `Sign-in address’ (SIP address), `User name’ and ‘Password’, and then click Sign in.
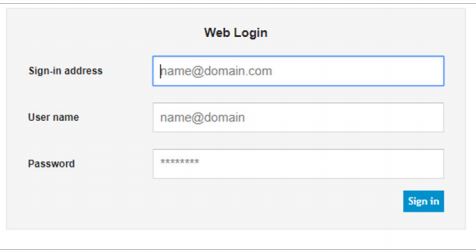
– To sign in with the Device Manager:If the IP phone is managed by the Device Manager, web login is performed using a dedicated web login screen.1. Using your web browser, navigate to the URL shown in the Web Login screen (below).2. Enter the ‘Code ID’, `Sign-in address’ (SIP address), and `User Name’, and then enter the ‘Password’.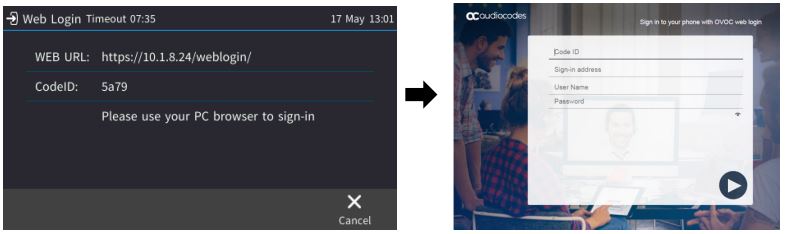 – To sign out: Touch the STATUS menu when the phone is idle, and then touch SIGN OUT.
![]() Note: Some Skype for Business/Teams Compatible features are supported only when signing in with username and password (e.g., Calendar).
Note: Some Skype for Business/Teams Compatible features are supported only when signing in with username and password (e.g., Calendar).
6. Changing your Presence Status
![]() Note: This section is applicable only to Skype for Business/Teams Compatible.
Note: This section is applicable only to Skype for Business/Teams Compatible. – To change your presence: Touch the STATUS menu, touch the required presence option, and then touch the SELECT menu.
– To enable Skype for Business to automatically update presence: Touch the STATUS menu, and then navigate to and select Reset.
7. Basic Phone Operations
– To make a call: Enter a phone number, and then touch the DIAL menu. To call a phone contact, touch the DIRECTORY menu, select the directory contact, and then touch the DIAL menu.
– To redial a number: Press the REDIAL key, select a dialed number, and then touch the DIAL menu.
– To answer a call: Pick up the handset, or press the speaker or headset key.
– To put a call on hold and make another call: Press the HOLD key on the phone, touch the CALL MENU and then select New Call. Enter a phone number, and then press DIAL. To return to the held call, navigate to the held call, and then uncheck the HOLD touch menu.
– To mute yourself: Press the mute key. To unmute yourself, press the mute key again.
– To transfer a call: During a call, press the TRANSFER key on the phone, enter a number in the Transfer to… field, and then press the TRANSFER touch menu.
– To forward incoming calls to another phone:1. When the phone is idle, touch the FORWARD menu, and then touch Forward to a number.2. Enter the number to which you want to forward the calls, and then touch the START menu. To deactivate call forwarding, touch the FORWARD menu, and then select Do not forward calls.
8. Connecting to a Router via Wi-Fi
![]() Note: This section is applicable only to C450HD (models ordered with Wi-Fi functionality).The phone can connect to an Access Point via Wi-Fi. The Wi-Fi interface can be used to make VoIP calls over Wi-Fi when the phone is installed in an environment free of LAN/cables. If an Ethernet cable does not connect the phone to a LAN port, the phone displays a “LAN Link Failure” message and a Networks softkey.
Note: This section is applicable only to C450HD (models ordered with Wi-Fi functionality).The phone can connect to an Access Point via Wi-Fi. The Wi-Fi interface can be used to make VoIP calls over Wi-Fi when the phone is installed in an environment free of LAN/cables. If an Ethernet cable does not connect the phone to a LAN port, the phone displays a “LAN Link Failure” message and a Networks softkey.
You can connect to Wi-Fi by:Touching the Networks softkey in the phone’s main menu -or Navigating to the `Settings’ menu, and then select the Wi-Fi option.
9. Enabling or Disabling Wi-Fi
![]() Note: This section is applicable only to C450HD (models ordered with Wi-Fi functionality).
Note: This section is applicable only to C450HD (models ordered with Wi-Fi functionality).
– To enable Wi-Fi:1. Using the left and right rim of the navigation button on the phone, select Enabled (Wi-Fi is disabled by default):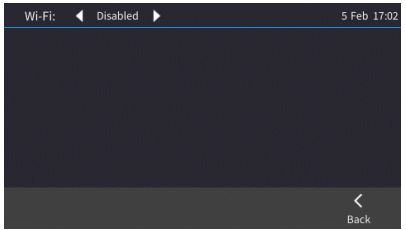 2. After enabling Wi-Fi, “Searching for networks…” is displayed. The phone then displays the available Wi-Fi Access Points. Touch the Refresh softkey to display more networks. Select the desired Wi-Fi Access Point (network):
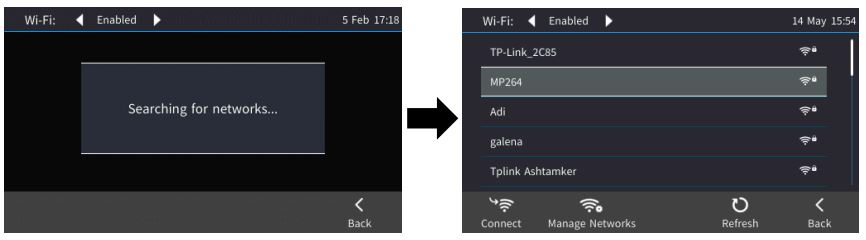 3. Enter the Wi-Fi password if needed, and then touch the Connect softkey:
 4. When connected to the Access Point, “Connected” is displayed:
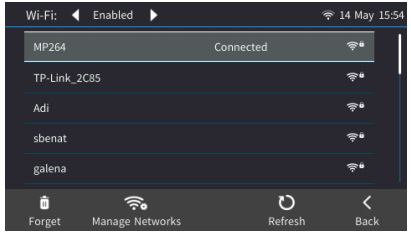
10. Configuring Bluetooth
![]() Note: This section is applicable only to C450HD (models ordered with Bluetooth functionality).The Bluetooth interface is used to connect the phone to a wireless headset or speaker.
Note: This section is applicable only to C450HD (models ordered with Bluetooth functionality).The Bluetooth interface is used to connect the phone to a wireless headset or speaker.
– To pair and connect a remote Bluetooth device:1. Press the phone’s MENU hard key, and then select the Settings option.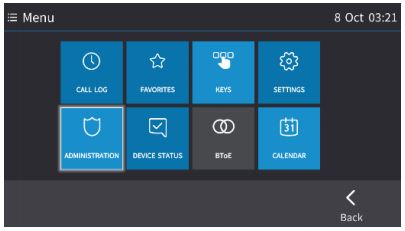 2. In the Settings screen, select the Bluetooth Settings option, and then in the Bluetooth Settings screen, select the Bluetooth Scan option.
 3. The phone starts scanning for Bluetooth devices if there are devices that are not paired:
4. When the scan finishes, the “Scan finished!!” message is displayed.5. Select one of the Bluetooth devices listed, let it enter `pair mode’, and then click the Pair softkey.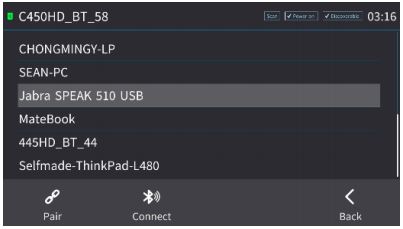 6. Once paired successfully, touch the Connect softkey to connect the remote device; “Connected” is displayed alongside the device:
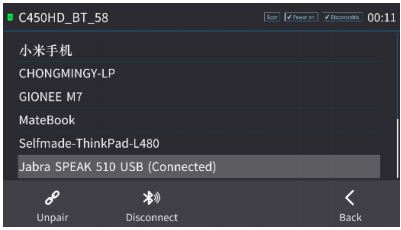
![]() Note: The system does not start scanning automatically if there are paired devices in the list; to scan `manually’, touch the Scan key in the top-right corner of the screen.
Note: The system does not start scanning automatically if there are paired devices in the list; to scan `manually’, touch the Scan key in the top-right corner of the screen.
Notice InformationInformation contained in this document is believed to be accurate and reliable at the time of printing. However, due to ongoing product improvements and revisions, AudioCodes cannot guarantee the accuracy of printed material after the Date Published nor can it accept responsibility for errors or omissions. Updates to this document can be downloaded from https://www.audiocodes.com/library/technical-documents.This document is subject to change without notice.Date Published: May-26-2020Document #: LTRT-13248![]()
References
[xyz-ips snippet=”download-snippet”]