
![]()
acme Smart Wi-Fi Power Strip User Manual

Technical specifications
- Connection: Wi-Fi, IEEE 802.11 b/g/n
- Frequency range: 2.412-2.484 GHz
- Maximal output radio frequency power: 10.84 dBm / 12.13 mW
- Input: AC 100-240 V, 50/60 Hz
- Output: AC 100-240 V
- Maximum load: 10 A
- Maximum power: 2400 W
- Overload protection: Circuit breaker
- USB ports: 4
- Output type: USB, type A
- Total USB output: DC 5V, 5 A (25 W)
- Single USB output: DC 5V, 2.4 A (12 W)
- Idle (off) power consumption: s1 W
- Cable length: 3.0 m
- Sockets: 6
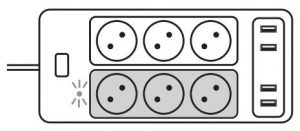
- Socket control: 2 groups of 3 sockets
- Plug type: EU (E, F)
- Socket type: EU (C, F)
- Compatibility: Android 4.1 and above, iOS 8.0 and above
- Application: “Simple Home” for iOS and Android
- Operating temperature: from -20°C to 50 °C
- Dimensions: 260 (L) x 110 (W) x 40 (H) mm
- Material: plastic
- Colour: white
- Weight: 733 g
Power strip overview
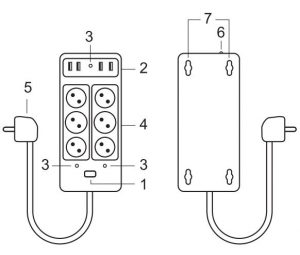
- Power button
- USB ports
- LED indicators
- Socket
- Plug
- Circuit breaker
- Mounting-screw holes
• Power strip has4 wall mounting-screw holes 1f you would lie to hang your power strip on the wall. Wall anchors and screws are not included.
Setting up the device and pairing
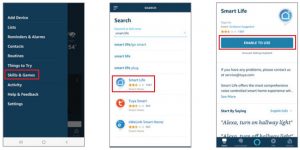
1) Download the application from the Apple Store or Google Play Stare by searching for Simple Home, or you can quickly scan the QR axles below:
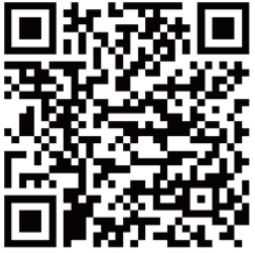
For Android devices
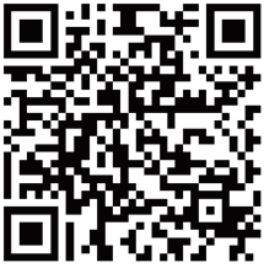
For IOS devices
![]() After installing the application click Allow on all permission requests.
After installing the application click Allow on all permission requests.
![]() Upon registration in a mobile app your personal data shall be transferred to the mobile app manufacturer, who is responsible for your personal data processing. We recommend that you familiarise yourself with the mobile app manufacturer’s privacy policy prior to registration.
Upon registration in a mobile app your personal data shall be transferred to the mobile app manufacturer, who is responsible for your personal data processing. We recommend that you familiarise yourself with the mobile app manufacturer’s privacy policy prior to registration.
2. Start the App and register an account with your email address / mobile number and then log in with the use of the registered account.
3. Insert the power strips plug into a power outlet, then press and hold the button for 5 seconds to enter into the Wi-Fi configuration mode. The LED indicator will blink rapidly (EZ mode) or slowly (AP mode). The EZ mode connection is set as default in Wi-Fi configuration. Press and hold the button for 5 seconds to enable the device to switch between EZ mode and AP mode.
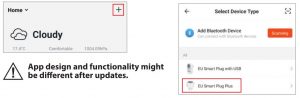
4. Open the application and choose Add device, then select EU Smart Plug Plus. After that choose the connection mode and follow the instructions on your smartphone:
Connection modes
EZ (easy mode) mode: the power strip connects to your home router directly.
AP (access point) mode: the power strip creates an access point which connects to the smartphone and to your home router.
Unpairing:
Press and hold the button on the device for 5 s to unpair it from your smartphone or use the application Remove Device button in the device Settings menu.
Reset:
Open the application device menu and go to Settings, then click Restore Manufacturer Defaults.
![]() Different modes are necessary for particular router types. Try one or another if it does not work with the first try.
Different modes are necessary for particular router types. Try one or another if it does not work with the first try.
Features
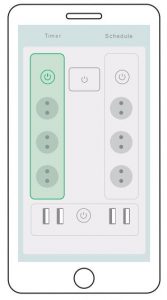
Schedule – schedule the time to turn on/off each group of sockets or USB ports of a power strip at different hours or time intervals.
Timer – use a timer to turn off/on the power strip after the set time.
Remote access – control the power strip from different locations using your mobile data or another Wi-Fi connection.
Easy scenes – easy to program the power strip to use different functions, e.g. to turn on the light while doors are opening (using with door/window sensor).
Controlling the device
Press the power button to turn on/off all the sockets and USB ports of the power strip.
Each socket group can be turned on/off separately in the app.
USB ports can be turned on/off in the app all at once and not individually.
Note: Each USB port provides a maximum output current of 2.4 A. The power strip, with all ports combined, provides a maximum output current of 5 A.
Requirements for Google Home
- A Google Home device or an Android phone with Google Assistant.
- Latest Google Home app.
- A Google account.
- The device display language must be set to English US.
- Simple Home app and a related account.
- A smart device.
Link Simple Home account in Home Control
1. Tap Home Control in the menu on the Google Home app’s home page, then tap +.
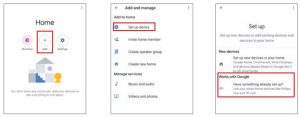
Find Simple Home or Smart Life on the list. In the new window, select your Simple Home account’s region, type your Simple Home account and password, then tap Link Now. After you assign rooms for devices, your devices will be listed on the Home Control page.

![]() App design and functionality might be different after updates.
App design and functionality might be different after updates.
Requirements for Amazon Alexa
- A stable Wi-Fi network which could access to the Amazon server.
- An Echo device, such as Echo, Echo Tap, or Echo Dot.
- A valid Amazon Alexa account.
- Simple Home app and a registered account.
- At least one device under your Simple Home account.
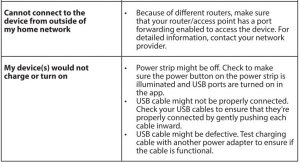
Link Simple Home account to Echo
1. Tap Skills in the slide menu, then search and select Simple Home or Smart Life and tap ENABLE to enable the Skill.
2. You will be re-directed to the account link page. Type in your Simple Home account and password; don’t forget to select the country/region where your account belongs to. Then tap Link Now to link your Simple Home account. The country/region, the account, and the password must match exactly/be the same with the Simple Home account. Close the window when Alexa has been successfully linked with Simple Home notice is prompted out.

![]() App design and functionality might be different after updates.
App design and functionality might be different after updates.
Now you can control your smart devices with your voice
For Google Assistant:
Ok Google, turn on the power strip Ok Google, turn off the power strip
For Amazon Alexa:
Alexa, turn on power strip Alexa, turn off power strip
Safety instructions
- Do not disassemble the product or remove any parts.
- Do not put the product into water or any liquid.
- Do not put the product close to heat source or expose it to high temperature.
- This product is intended for indoor use only.
- Please ensure the security of electricity: the max. current load cannot be higher than 10A. The max. power load cannot be higher than 2400 W.
- Do not connect a device that exceeds the power rating for this power strip.
- Doing so may overheat or cause possible damage to the device or other equipment.
- Do not use the power strip if the cord is damaged in any way, shape, or form.
- Doing so may cause electric shock and possible injury. Extension cords can be used with this power strip; check to make sure that the extension cord can handle the voltage of the power strip.
- Do not use the power strip if it is damaged in any way, shape, or form.
- Do not attempt to repair, disassemble or modify this device under any circumstances.
- Doing so may damage the device or cause electric shock and possible injury.
- Do not operate the power strip in high-humidity environments.
- Do not use any solvents or cleaning solutions on the power strip. Clean only with a soft, dry cloth.
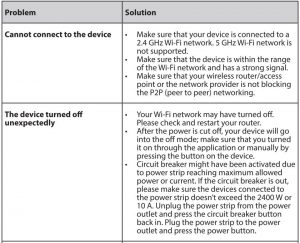
Troubleshooting
Waste Electrical and Electronic Equipment (WEEE) Symbol
 The use of the WEEE symbol indicates that this product may not be treated as household waste. By ensuring this product is disposed of correctly, you will help protect the environment. For more detailed information about the recycling of this product, please contact your local authority, your household waste disposal service provider or the shop where you purchased the product.
EU Declaration
ACC Distribution hereby declares that this equipment is in compliance with the essential requirements and other relevant provisions of: RED 2014/53/EU Directive LVD 2014/35/EU Directive RoHS 2011/65/EU Directive The declaration of conformity can be accessed at: http://www.acme.eu/en-us/declarations-conformity
Warranty Card
Warranty period
Warranty enters into force starting with the day when the buyer acquires the product from the seller. Warranty period is indicated on the package of the product.
Warranty conditions
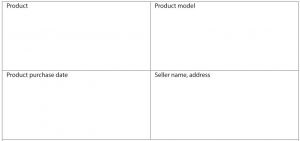
The warranty is valid only by providing an original document of the product acquisition and this warranty sheet, which includes name of the product model, product purchase date, name and address of the seller.
If it is noticed during the warranty period that the product has faults and these faults where not caused by any of the reasons when the warranty is not applied as indicated in the paragraphs below, manufacturer undertakes to replace the product.
The warranty is not applied to regular testing, maintenance and repair or replacement of the parts which are worn out naturally. The warranty is not applied if damage or failures occurred due to the following reasons:
- Inappropriate installation of the product, inappropriate usage and/or operating the product without following the manual, technical requirements and safety standards as provided by the manufacturer, and additionally, inappropriate warehousing, falling from heights as well as hard strikes.
- Corrosion, mud, water and sand.
- Repair works, modifications or cleaning, which were performed by a service not authorised by the manufacturer
- Usage of the spare parts, software or consumptive materials which do not apply to the product.
- Accidents or events or any other reasons which do not depend on the manufacturer, which includes lightning, water, fire, magnetic field and inappropriate ventilation.
- If the product does not meet standards and specifications of a particular country, in which it was not bought. Any attempt to adjust the product in order to meet technical and safety requirements such as those in the other countries withdraws all the rights to the warranty service.
If no failures are detected in the product, all the expenses in relation to the service are covered by the buyer.
Designed in EU by ACC Distribution UAB, Raudondvario pl. 131B, LT-47191, Kaunas, Lithuania E-mail: Rev. 1.0 Printed in China
[xyz-ips snippet=”download-snippet”]