
![]() Instruction Manual5-in-1 Weather Sensormodel 06004RM/VN1TXC
Instruction Manual5-in-1 Weather Sensormodel 06004RM/VN1TXC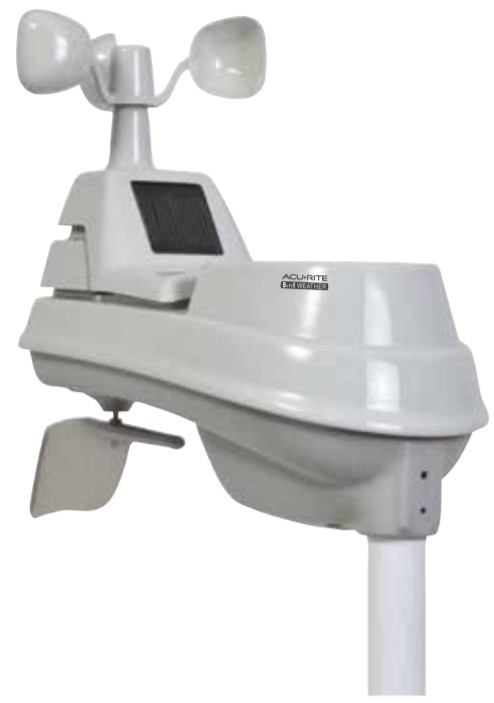
Package Contents
- 5-in-1 Sensor
- Mounting Hardware
- Sensor Mounting Bracket
- Instruction Manual
IMPORTANTPRODUCT MUST BE REGISTERED TO RECEIVE WARRANTY SERVICE
PRODUCT REGISTRATION
Register online to receive 1-year warranty protection www.AcuRite.com

Questions?Contact Customer Support at (877) 221-1252 or visit www.AcuRite.com.
Features & Benefits

5-in-1 SENSOR
- Rainfall Collector Funnel
- Solar Cell PanelConverts sunlight into power to run the internal aspirating fan.Internal Aspirating Fan(not shown) Draws ambient air into the sensor to reduce solar radiation heating, resulting in more accurate temperature measurement.
- A-B-C SwitchID code that must match display’s A-B-C switch to ensure units synchronize.
- Battery Compartment
- Temperature & Humidity Sensors(internal)
- Mounting Point
- Wind Speed Anemometer
- Wind Direction Vane
- Mounting Bracket
- Mounting Hardwareincludes anchors & screws.
Qty Diameter Length 511 #4#4#6 3/4″1/2″1/2″ - Debris FilterPre-installed to prevent debris from entering the rain gauge.
SETUP
5-in-1 Sensor Setup
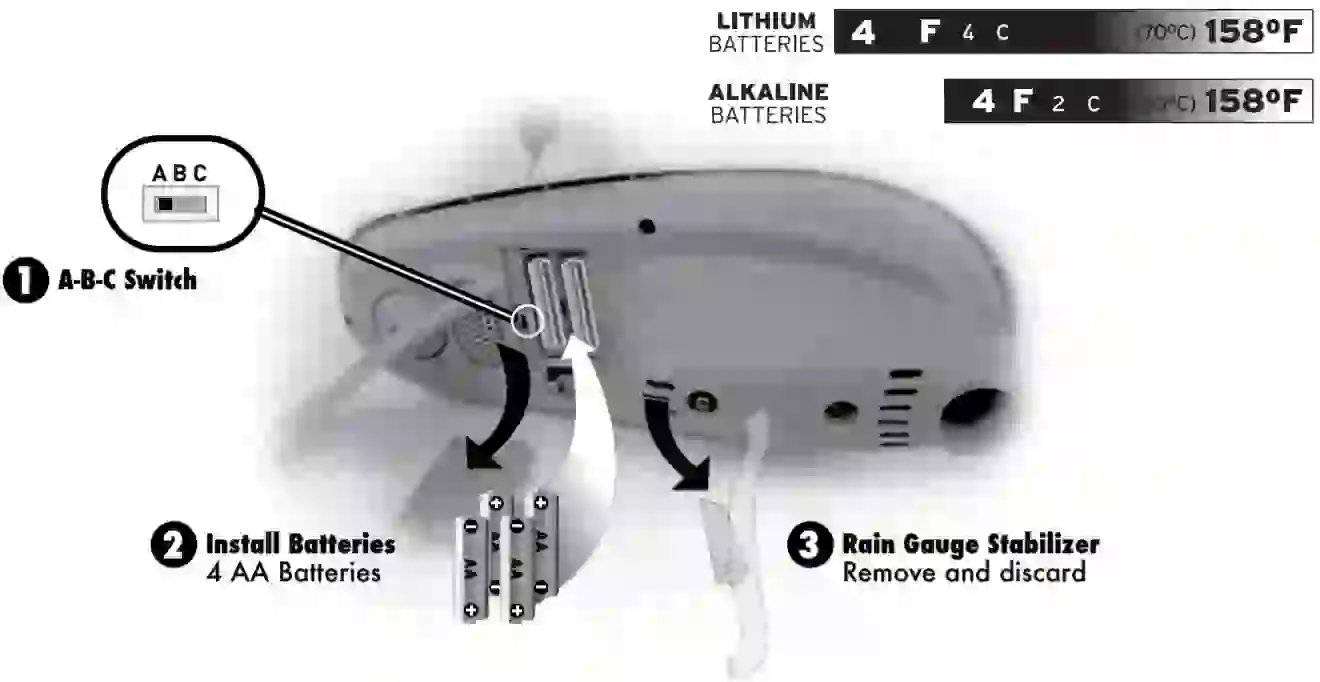
- Set the A-B-C SwitchLocate the A-B-C switch inside the 5-in-1 sensor that requires a lithium battery y compartment. Set the A-B-C switch to A, B, or C. You must select the same letter choice for both the sensor and the companion unit (not included) in order for the units to synchronize.
- Install or Replace BatteriesBatteries MUST be installed for this product to operate. AcuRite recommends high quality alkaline or lithium batteries for the best product performance. Heavy duty or rechargeable batteries are not recommended.The 5-in-1 sensors require lithium batteries in low-temperature conditions. Cold temperatures can cause alkaline batteries to function improperly. Use lithium batteries in the 5-in-1 sensor for temperatures below -4ºF / -20ºC. below -4ºF / -20ºC.
- Remove Rain Gauge Stabilizer Locate and remove the rain gauge stabilizer (plastic tab) taped into the bottom of the sensor. The rain gauge will not function until this is removed.

![]() PLEASE DISPOSE OF OLD OR DEFECTIVE BATTERIES IN AN ENVIRONMENTALLY SAFE WAY AND IN ACCORDANCE WITH YOUR LOCAL LAWS AND REGULATIONS.BATTERY SAFETY: Clean the battery contacts and also those of the device prior to battery installation. Remove batteries from equipment that is not to be used for an extended period of time. Follow the polarity (+/-) diagram in the battery compartment. Promptly remove dead batteries from the device. Dispose of used batteries properly. Only batteries of the same or equivalent type as recommended are to be used. DO NOT incinerate used batteries. DO NOT dispose of batteries in fire, as batteries may explode or leak. DO NOT mix old and new batteries or types of batteries (alkaline/standard). DO NOT use rechargeable batteries. DO NOT recharge non-rechargeable batteries. DO NOT short-circuit the supply terminals.Placement for Maximum AccuracyAcuRite sensors are sensitive to surrounding environmental conditions. Proper placement of the sensor is critical to the accuracy and performance of this product.5-in-1 Sensor Placement
PLEASE DISPOSE OF OLD OR DEFECTIVE BATTERIES IN AN ENVIRONMENTALLY SAFE WAY AND IN ACCORDANCE WITH YOUR LOCAL LAWS AND REGULATIONS.BATTERY SAFETY: Clean the battery contacts and also those of the device prior to battery installation. Remove batteries from equipment that is not to be used for an extended period of time. Follow the polarity (+/-) diagram in the battery compartment. Promptly remove dead batteries from the device. Dispose of used batteries properly. Only batteries of the same or equivalent type as recommended are to be used. DO NOT incinerate used batteries. DO NOT dispose of batteries in fire, as batteries may explode or leak. DO NOT mix old and new batteries or types of batteries (alkaline/standard). DO NOT use rechargeable batteries. DO NOT recharge non-rechargeable batteries. DO NOT short-circuit the supply terminals.Placement for Maximum AccuracyAcuRite sensors are sensitive to surrounding environmental conditions. Proper placement of the sensor is critical to the accuracy and performance of this product.5-in-1 Sensor Placement
![]() The 5-in-1 sensor is designed to remain outdoors all year long. Choose an open location with no obstructions above or around the sensor for the most accurate measurements.Important Placement GuidelinesThe sensor must be within 330 feet (100 m) of the companion unit (not included).MAXIMIZE WIRELESS RANGEPlace sensor away from large metallic items, thick walls, metal surfaces, or other objects that may limit wireless communication.LOCATE AWAY FROM HEAT SOURCESPosition sensor away from heaters, air conditioners, chimneys, exhaust vents, asphalt, and concrete (surfaces that radiate heat).LOCATE AWAY FROM HUMIDITY SOURCESAvoid installing the sensor near pools, spas, or other bodies of water. Water sources may impact humidity accuracy.LOCATE AWAY FROM SPRINKLER HEADSDO NOT install the sensor where it will be sprayed by a sprinkler system. This may force water inside the sensor.LOCATE AWAY FROM WIND & RAIN OBSTRUCTIONSDO NOT mount the sensor with obstructions around it. Consider a location that is a wide-open area, with few structures around to ensure accurate wind measurement. Learn more at: www.AcuRite.com/5in1
The 5-in-1 sensor is designed to remain outdoors all year long. Choose an open location with no obstructions above or around the sensor for the most accurate measurements.Important Placement GuidelinesThe sensor must be within 330 feet (100 m) of the companion unit (not included).MAXIMIZE WIRELESS RANGEPlace sensor away from large metallic items, thick walls, metal surfaces, or other objects that may limit wireless communication.LOCATE AWAY FROM HEAT SOURCESPosition sensor away from heaters, air conditioners, chimneys, exhaust vents, asphalt, and concrete (surfaces that radiate heat).LOCATE AWAY FROM HUMIDITY SOURCESAvoid installing the sensor near pools, spas, or other bodies of water. Water sources may impact humidity accuracy.LOCATE AWAY FROM SPRINKLER HEADSDO NOT install the sensor where it will be sprayed by a sprinkler system. This may force water inside the sensor.LOCATE AWAY FROM WIND & RAIN OBSTRUCTIONSDO NOT mount the sensor with obstructions around it. Consider a location that is a wide-open area, with few structures around to ensure accurate wind measurement. Learn more at: www.AcuRite.com/5in1
 http://www.acurite.com/5in1?utm_source=01502BPDI&utm_medium=qr&utm_campaign=InstructionsView Video
5-in-1 Sensor Installation GuidelinesINSTALLATION HEIGHT Mount the sensor at least 5 feet (1.5 meters) off the ground in an open area. Higher is better for wind measurement- the National Weather Service recommends 33 feet (10 meters) high!MOUNTING OPTIONS The included mounting bracket is designed to screw directly onto wooden posts or surfaces that are 2″x 4″ or larger. The sensor can also be mounted directly to a 3/4″ steel pipe (available at hardware stores and home centers).LEVEL INSTALLATION Use the bubble level on the top of the sensor to ensure level installation for accurate wind and rain measurement.SOLAR CELL INSTALLATION Install the sensor with the solar cell facing SOUTH. This ensures the cell receives as much sun as possible and orients wind direction.
 5-in-1 Sensor Installation
- Fasten mounting base (included) to a postor pole (not included) using the 4 longer screws included in the hardware bag.
- Insert the mounting base into the hole on the bottom of the sensor.
- Make sure the arrows on the top of the sensor are pointed in the proper direction and the bubble level is centered. The solar cell should be facing south to properly orient the wind direction.
- Fasten the sensor into the mounting base using the 2 shorter screws included in the hardware bag.
The 5-in-1 sensor is now ready to use.
Basic Setup is CompleteThe 5-in-1 sensor will now synchronize with the companion unit. It may take a few minutes for synchronization to complete.Calibrate the Rain GaugeThe rain gauge on the 5-in-1 sensor can be calibrated to improve accuracy.Items Needed: 5-in-1 sensor, companion unit, plastic cup, pin, screwdriver
- First, ensure the 5-in-1 sensor is perfectly level using a built-in bubble level.
- Use a compatible companion unit or AcuRite software to monitor during calibration.
- Make a pinhole in the bottom of a plastic cup. Hold the cup over the rain gaugeand fill it with exactly 1 cup (8oz) of water, allowing the water to drip into the rain gauge. You should hear the internal buckets tip and see water drain through the rain gauge.
- A few seconds after each bucket tip, the companion unit displays rainfall is approximately 0.01″ or more increments.
- The cup of water should take more than 20 minutes to empty; a quicker period will result in an inaccurate calibration. Try to simulate a normal steady rainfall. When the cup is empty of water, the companion unit should register 1.06″
Tips
- There should be nearly an equal number of water drops (about 25 water drops) between bucket tips. If not, adjust the calibration screws on the bottom of the 5-in-1 sensor until an equal number of water drops are tipping the buckets.
Adjustment• If the rain gauge doesn’t register close to 1.06″, make an EQUAL adjustment to the two calibration screws on the bottom of the 5-in-1 sensor. Turning screws clockwise increases rainfall; counterclockwise decreases rainfall.
- To adjust the rainfall reading by 2% turn both screws 1/8 of a turn.
- To adjust the rainfall reading by 4% turn both screws 1/4 of a turn.
- To adjust the rainfall reading by 8% turn both screws 1/2 of a turn.
Watch the video at www.AcuRite.com/5n1
Customer Support
AcuRite customer support is committed to providing you with best-in-class service.For assistance, please have the model number of this product available and contact us in any of the following ways:![]() (877) 221-1252
(877) 221-1252![]() [email protected]24/7 support at www.AcuRite.com
[email protected]24/7 support at www.AcuRite.com
► Installation Videos► Instruction Manuals► Replacement Parts► Register your Product► Support User Forum► Submit Feedback & Ideas
Specifications
| TEMPERATURE RANGE | Outdoor: -40°F to 158°F; -40°C to 70°C |
| HUMIDITY RANGE | Outdoor: 1% to 99% |
| WIND SPEED | 0 to 99 mph; 0 to 159 kph*; 0 to 86.03 knots |
| WIND DIRECTION INDICATORS | 16 points |
| RAINFALL | Measured in inches (in) or millimeters (mm)* |
| WIRELESS RANGE | 330 ft / 100 m depending on home construction materials |
| OPERATING FREQUENCY | 433 MHz |
| POWER | 4 x AA alkaline or lithium batteries |
| DATA REPORTING |
Wind Speed: 18 second updates; Direction: 30 second updates Outdoor temperature & humidity: 36 second updates |
* Refer to the manual for the companion unit (display, software, etc.) to determine the types of measurements included.
FCC Information
This device complies with part 15 of FCC rules. Operation is subject to the following two conditions:
- This device may NOT cause harmful interference, and
- This device must accept any interference received, including interference that may cause undesired operation.
WARNING: Changes or modifications to this unit not expressly approved by the party responsible for compliance could void the user’s authority to operate the equipment.NOTE: This equipment has been tested and found to comply with the limits for a Class B digital device, pursuant to Part 15 of the FCC rules. These limits are designed to provide reasonable protection against harmful interference in a residential installation. This equipment generates, uses, and can radiate radio frequency energy and, if not installed and used in accordance with the instructions, may cause harmful interference to radio communications. However, there is no guarantee that interference will not occur in a particular installation. If this equipment does cause harmful interference to radio or television reception, which can be determined by turning the equipment off and on, the user is encouraged to try to correct the interference by one or more of the following measures:
- Reorient or relocate the receiving antenna.
- Increase the separation between the equipment and the receiver.
- Connect the equipment into an outlet on a circuit different from that to which the receiver is connected.
- Consult the dealer or an experienced radio/TV technician for help.
NOTE: The manufacturer is not responsible for any radio or TV interference caused by unauthorized modifications to this equipment. Such modifications could void the user’s authority to operate the equipment.This device complies with Industry Canada licence-exempt RSS standard(s). Operation is subject to the following two conditions:
- This device may not cause interference, and
- This device must accept any interference received, including interference that may cause undesired operation of the device.
Limited One Year Warranty
At AcuRite, we proudly uphold our commitment to quality technology. Chaney Instrument Co. warrants that all products it manufactures be of good material and workmanship and to be free of defects when properly installed and operated for a period of one year from the date of purchase.We recommend that you visit us at www.AcuRite.com for the fastest way to register your product. However, product registration does not eliminate the need to retain your original proof of purchase in order to obtain warranty benefits.Chaney Instrument Co. warrants that all products it manufactures be of good material and workmanship, and to be free of defects when properly installed and operated for a period of one year from the date of purchase. Remedy for breach of this warranty is limited to repair or replacement of the defective item(s). Any product which, under normal use and service, is proven to breach the warranty contained herein within ONE YEAR from the date of sale will, upon examination by Chaney, and at its sole option, be repaired or replaced by Chaney. Transportation costs and charges for returned goods shall be paid for by the purchaser. Chaney hereby disclaims all responsibility for such transportation costs and charges. This warranty will not be breached, and Chaney will give no credit for products it manufactures which have received normal wear and tear, been damaged (including by acts of nature), tampered, abused, improperly installed, damaged in shipping, or repaired or altered by others than authorized representatives of Chaney.The above-described warranty is expressly in lieu of all other warranties, express or implied, and all other warranties are hereby expressly disclaimed, including without limitation the implied warranty of merchantability and the implied warranty of fitness for a particular purpose. Chaney expressly disclaims all liability for special, consequential, or incidental damages, whether arising in tort or by contract from any breach of this warranty. Some states do not allow the exclusion or limitation of incidental or consequential damages, so the above limitation or exclusion may not apply to you. Chaney further disclaims all liability from personal injury relating to its products to the extent permitted by law. By acceptance of any of Chaney’s products, the purchaser assumes all liability for the consequences arising from their use or misuse. No person, firm, or corporation is authorized to assume for Chaney any other liability in connection with the sale of its products. Furthermore, no person, firm, or corporation is authorized to modify or waive the terms of this paragraph, and the preceding paragraph, unless done in writing and signed by a duly authorized agent of Chaney. This warranty gives you specific legal rights, and you may also have other rights which vary from state to state.For in-warranty claims: Chaney Instrument Co.965 Wells St., Lake Geneva, WI 53147
![]()
 It’s More than Accurate, it’s
 ![]() AcuRite offers an extensive assortment of precision instruments,designed to provide you with information you can depend on toPlan your day with confidence™.www.AcuRite.com
AcuRite offers an extensive assortment of precision instruments,designed to provide you with information you can depend on toPlan your day with confidence™.www.AcuRite.com
©Chaney Instrument Co. All rights reserved.AcuRite is a registered trademark of the Chaney Instrument Co.,Lake Geneva, WI 53147.All other trademarks and copyrights are the property of their respective owners.AcuRite uses patented technology.Visit www.AcuRite.com/patents for details.Printed in China06004RMA1 INST 091715
References
[xyz-ips snippet=”download-snippet”]