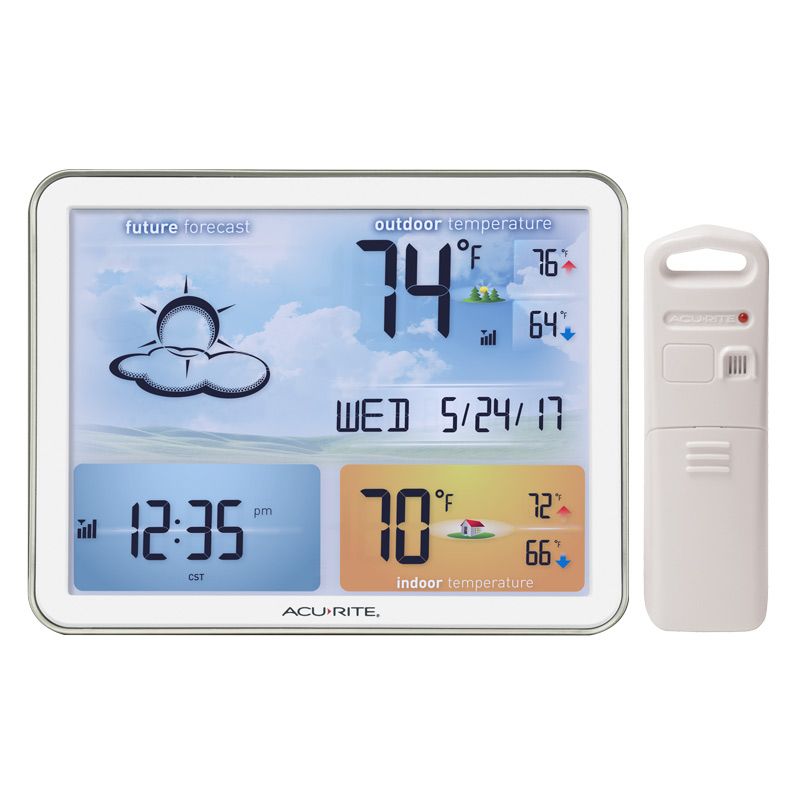
AcuRite 00787 Wireless Weather Station

WIRELESS WEATHER STATION INSTRUCTION MANUAL
Thank you for purchasing this Chaney Instrument electronic weather station. Designed and engineered with the state-of-art technology and components, this instrument provides accurate and reliable measurements of air pressure, indoor and outdoor temperature and humidity together with an Atomix Radio-Controlled perpetual calendar clock. Follow the step-by-step instructions in this manual carefully to set the following functions: setting up the wireless thermometer, synchronizing the atomic clock, and setting the weather forecaster. Other functions explained in this manual include utilizing the dual alarm feature as well as manually setting time, date and weather settings.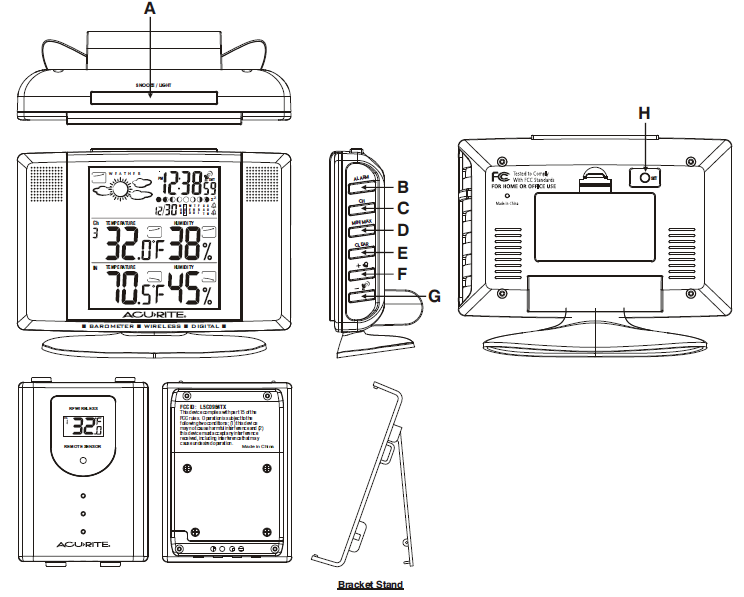
FUNCTION BUTTONS:A =Snooze/Light ButtonB =Alarm ButtonC =CH (Channel) ButtonD =Min/Max ButtonE =Clear ButtonF =G =H =Set Button4
STEP ONE: SETTING UP THE WIRELESS THERMOMETER
Home Receiver Set Up:
For the initial installation, always insert batteries to the home unit first and then the remote sensor. Remove the battery cover on the back and install 2 “AA alkaline or lithium batteries” (not included) according to the polarity indicated. Replace the battery cover. The home unit will start to search for a sensor transmitting outdoor temperature & humidity information during the first 5 minutes after entering the existing weather condition. To enter the existing weather conditions select the correct weather condition by pressing “MIN/MAX” and press “CLEAR” to enter. The home unit will try to seek for a remote sensor after the weather conditions are entered. The outdoor temperature and humidity section will flash during channel registration. If you press the CH key it will disable the registration mode and go to radio controlled clock reception mode.
Remote Sensor Set Up:
Remove the bracket stand and remove the 4 screws with a small Philips head screwdriver. Insert 2 “AAA” alkaline or lithium batteries (not included) according to the polarity indicated. Set Channel 1 for the first remote sensor. You must set to Ch 1 if only one sensor is in use. One sensor is included with the base unit. Additional sensors may be purchased separately. Set channel 2 if using a second sensor or channel 3 if using a third sensor.
- To verify transmission of a signal press the TX button inside the battery compartment of the remote sensor. The red LED on the front of the remote sensor will flash when it successfully transmits a signal. Temperature and humidity of the remote sensor will be updated and displayed on the remote sensor.
- Select Celsius or Fahrenheit by pressing the C/F button inside the battery compartment.
- Replace the cover and tighten the 4 screws.
- When replacing the batteries in the remote sensor remember to clear the corresponding channel on the home receiver unit in this way: Select the respective channel by pressing the CH button, hold the CH button 3 seconds to clear the channel. Placement of Remote Sensor: Place the remote sensor out of direct sunlight and direct exposure to rain or snow. At extremely low temperatures, below 15F, battery voltage output decreases. The low temperatures may cause your outdoor temperature reading to go blank. Using lithium batteries can increase the effective temperature range as they function at lower temperatures than alkaline batteries. For prolonged periods of extreme cold we recommend the remote sensor be brought indoors. Metal structures, walls and electrical interference can shorten the transmission range of the remote sensor. Please try several locations to determine the best reception of the signal by the home unit.
STEP TWO: SETTING THE ATOMIC CLOCK
About The Atomic Clock:
The National Institute of Standard and Technology (NIST) in Fort Collins, Colorado broadcasts the time signal (WWVB at 60kHz AM radio signal) with an accuracy of one second per every 3,000 years. The signal covers a distance up to 2,000 miles from the source.Selecting the Ideal Location: Like a typical AM radio, the Atomic Clock will not receive the WWVB signal in places surrounded by heavy concrete or metal panels. For best reception, please install the home receiver near a window. The time signal reception is also greatly affected by electrical or electronic interference. If the home receiver location you selected does not work, change to a location in another part of the room or building.
Radio Controlled (R/C) Time Reception Set Up:The clock attempts to synchronize with the Atomic time signal AUTOMATICALLY right after the first remote sensor is registered. The unit starts synchronizing the clock after registering the remote sensor thermometer reading. The clock will not respond to any manual settings while attempting to receive the Radio Control Time signal. This reception cycle lasts from 2 to 5 minutes. The tower icon in the left hand corner of the screen appears fixed when reception is successful. To turn the reception off and to enable manual settings, press the ” ” button.Entering the Time Zone:After establishing your time signal, press SET/ ZONE once to select PST/ MST/ CST or EST time zones. A small P, M, C, E icon will appear to the left of the time display for the respective time zone.P = Pacific Standard TimeM = Mountain Standard TimeC = Central Standard TimeE = Eastern Standard Time
How to Manually Synchronize Your Atomic Clock:
Hold the ” ” button for 3 seconds to trigger a manual synchronization. The tower will flash regularly during synchronization. Signal strength level is indicated in this way:
- Very Weak or no signal ( )
- Weak ( )
- Good ( )
- Icon appears fixed (Reception successful)
- Icon does not show (No signal received & decoded)
If signal level is weak and time reception is not successful, move the unit away any source of possible interference and try again in another location. The R/C clock will attempt a dailysynchronization at 1:00 AM everyday. If not successful, the R/C clock will search for the time signal every hour. Each R/C reception cycle lasts from 2 minutes to 5 minutes. To avoid interference, the unit will disable the other button functions during Radio Controlled Time reception. This is not a defect. Simply press ” ” button to turn Radio Controlled Time reception temporarily off.
Daylight Saving Time (DST) Feature:The feature is enabled when the batteries are installed. The DST icon appears in the upper right hand corner. For areas not using DST in summer, select DST off mode as described under Manually Adjusting Clock & Calendar Setting
STEP THREE: SETTING UP YOUR WEATHER FORECASTER
Enter Existing Weather Conditions:To ensure a more accurate weather forecast based on the altitude of your location, enter the existing weather conditions. The unit will relate the existing weather conditions with the current air pressure level. The home unit will ask you to enter the existing weather conditions right after installing the batteries. Please select the correct weather condition by pressing “MIN/MAX” and press “CLEAR” to enter. The home unit will try to seek for a remote sensor after the weather conditions are entered.
Resetting Weather Conditions: If the weather forecast deviates from the existing conditions after the initial setup, you can change the weather offset in this manner:
- Hold the “CLEAR” button for 3 seconds to enter the pressure offset mode. The weather icon will flash.
- Select the existing weather condition by pressing “MIN/MAX.”
- Press “CLEAR” to confirm your selection and exit the setting mode. Selecting Celsius/ Fahrenheit display on home unit: Hold “MIN/MAX” button 3 seconds to select C or F. WEATHER FORECAST with Storm Alert: The built-in precision Barometric pressure sensor will read the atmospheric pressure and calculate the weather conditions for the next 12 hours. The Icons will show:


Pressure, Temperature, Humidity Trend Indicators:Small arrow icons displayed in boxes will indicate: Rising( Refresh rate is once every hour. ), Steady( ), Falling( ).Moon Phase:Moon Phase is shown by the scrolling of the moon icon from left to right. The icon will stop at the existing moon phase for 5 seconds and then resume scrolling.
Manually Adjusting Clock & Calendar Setting:Hold the “SET” button for 3 seconds to enter the clock setting mode. Using “+” or “-” to adjust and “SET” to confirm, the following values can be set in sequence: 12/ 24 hr > Year > Month > Date > Hour > Minutes > DST on/ off. Turning DST off disables the Daylight Saving Time setting.
ADDITIONAL FEATURESUsing ALARM 1( 1 ), ALARM 2( 2 ): This unit has two alarms that can be set independently of one another. Select ALARM 1 or ALARM 2 by pressing the “ALARM” button. Hold the “ALARM” button for 3 seconds. Press “+” or “-” to enter the desired alarm time and press “ALARM” to confirm the setting. Please be sure to note thePM indicator to ensure you have set the alarm for the proper time. To view alarm time 1 and 2, simply press the “ALARM” button to read ALARM 1 and ALARM 2. The alarm time will be displayed for 5 seconds and then revert to the normal clock display. To turn AL 1, AL 2 on and off, press “+” button. When alarm one is set a bell with a number onewill show next to the right of the calendar. When the second alarm is set a bell with a number two will appear to the right of the calendar. If both alarms are set, both bells will appear. The unit will sound a Crescendo Alarm which will last for 2 minutes before turning itself off. Pressing the “Snooze” button will repeat the alarm after 5 minutes. Use the “ALARM” button to turn the alarm off completely.
Low Battery Indicator:
A low battery indicator is shown on the main unit display panel for the home unit itself and all of the remote channels. Replace the batteries and follow the setup procedure as mentioned in this instruction manual.
SPECIFICATIONS
Range of temperature measurement:Indoor unit : -5 C to 50 C (32F to 122F)Remote sensor : -20 C to 60 C (14F to 158F)Transmission : 100 feet (30M) in an open area, RF434 MHzResolution : 0.1 degreeClock : WWVB Radio Controlled Atomic ClockBattery Req. : 2 – “AA” for the main unit, 2 “AAA” for each remote sensorBattery life : 12 months (alkaline batteries recommended, not included)
| CHANNEL | Select Channel 1, 2, or 3 For Viewing | Delete Current Channel Reading |
| + | Advance Setting Forward by 1 Unit Turn Alarm 1 and/or Alarm 2 on & off | Fast Forward Setting |
| – | Change Setting Backward by 1 Unit Start or Stop Radio Controlled | Fast Backward Setting Time Signal Search |
| MAX/ MIN | View max & min memory for temperature & humidity | Hold to select C/F |
| CLEAR | Clear the Max/ Min memory | Weather Offset |
| AL | Read Time Settings for Alarms 1 & 2 Alarm Stop | Set time for Alarms 1& 2 |
| Back Button
SET |
Select Time Zone PST/MST/CST/EST |
Enter clock & calendar setting |
| Top Button |
![]()
[xyz-ips snippet=”download-snippet”]