
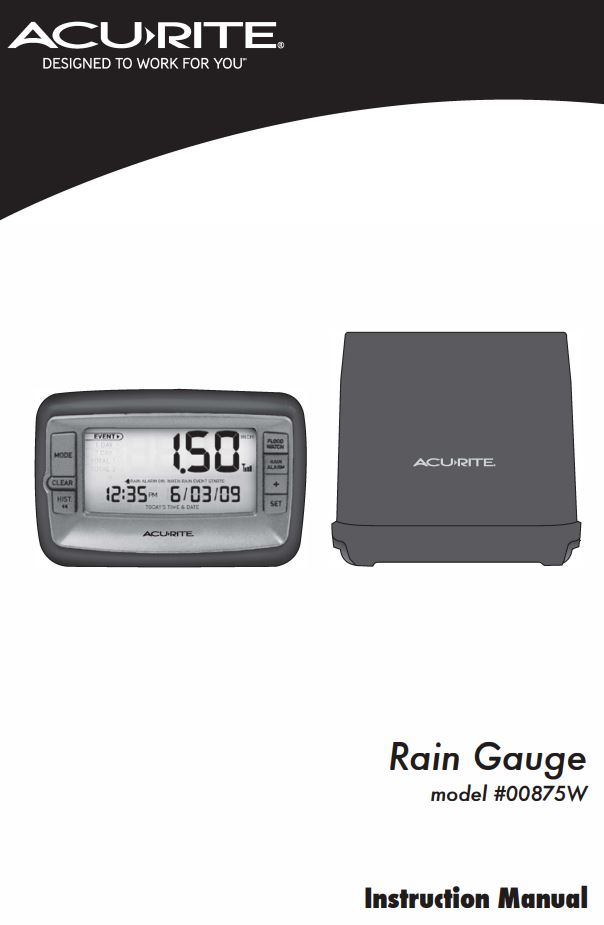
AcuRite 00875W Digital Wireless
Rain Gauge Instruction Manual
Introduction
The AcuRite® rain gauge with self emptying wireless rain collector measures rainfall and sends the data via wireless signal to the display console. This rain gauge has been designed to be easy to install and use.
The sleek display console houses a liquid crystal display (LCD) which will calculate and display all the rainfall data received from the wireless collector outside. The display console features built in memory for record storage, as well as special features such as a rain alarm that will alert you when rainfall is recorded. The Display Console is powered with three “AA” alkaline batteries (not included).
The wireless self emptying rain collector is completely wireless and contains a mechanical tipping bucket for measuring rainfall. The wireless outdoor collector is powered with two “AA” alkaline or lithium batteries (not included).Please read through this manual to learn more about the AcuRite® Professional Weather Center. Keep this manual for future reference.
Parts list model #0087 5W
- Display console
- Wireless rain collector
Overview
Display Console Features

Rain Collector Features

Installing Batteries – Rain Collector
2 “AA” Batteries Required (not included)
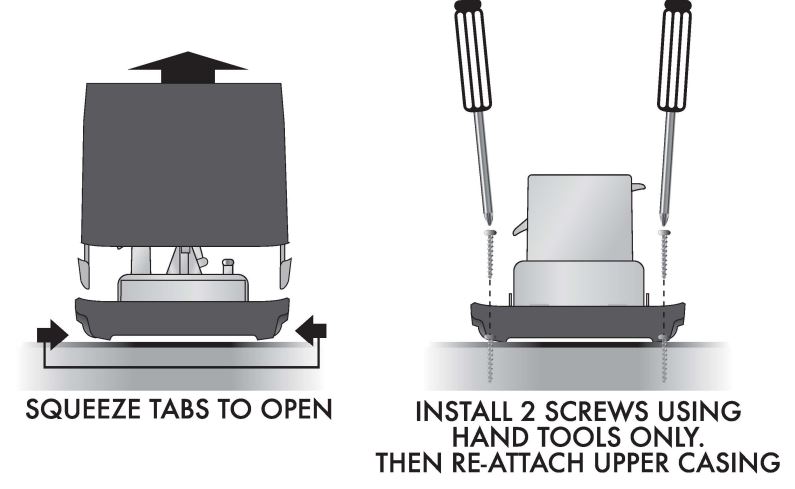
(1) GENTLY SQUEEZE LOWE TABS AND PULL UP ON THE UPPER CASING TO SEPARATE

(2) REMOVE THE BATIERY BOX BY Y SQUEEZING THE TWO LARGE TABS TOGETHER

(3) INSTALL2 FRESH “AA” BATIERIES AND RE-INSTA THE BATIERY BOX

(4) WITH THE BATIERY BOX SECURELY INSTALLE RE-ATIACHTHE UPPER AND LOWERCASING
Installing Batteries – Display Console
2 “AA” Batteries Required (not included)
(1) REMOVE THE BATIERY COMPARTMENT COVER BY SLIDING IT OF(2) INSTALL2 FRESH “AA” BATIERIES

Set Time& Date
This wireless rain gauge is equipped with a history function and alarms, which rely on accurate date settings to function properly. It is very important that you set the date ankle time before placing the collector outside to record rainfall amounts.
To set the time, date, and units egress and hold the “SET” button to enter into setting mode. NOTE the “SET” icon and the flashing hour indicates you are in setting mode.
Press the “+” button to advance the currently selected (flashing) value (press and hold the “+” button for FAST setting).Press the “SET” button again to confirm your adjustment and move on to setting the next value.
The set order is as follows:HOUR (note the “AM” and “PM” indicators)MINUTEMONTHDATEYEARINCH or MILLIMETER display mode
INSTALLATION
Now that setup is complete, you must choose a location to place the wireless rain collector and the display console. The wireless rain collector MUST be placed less than 165 feet (50 meters} away from the display console.
This wireless rain gauge uses radio frequency for communication, which is susceptible to interference from other electronic devices and large metallic items or thick walls. Always place both units at least 3 feel away from appliances ( TV, microwave, radios, etc. } or objects (large metal surfaces, thick stone walls, etc. ) that may interfere with the wireless communication.

Placement of Main UnitPlace the display console in a dry area free of dirt and dust. You may place the display console on a table top or other flat surface.
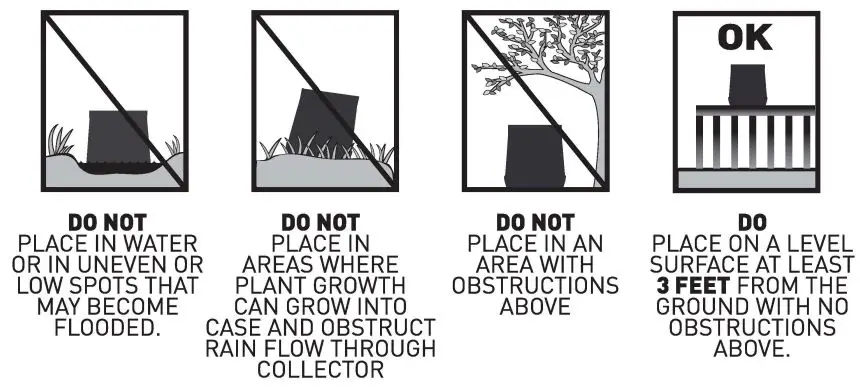
Placement of Rain CollectorThe wireless rain collector MUST BE PLACEDOUTDOORS to record rain measurements and relay the information to the display console. The wireless rain collector must be placed less than 165 feet (50 meters} away. from the display console and MUST be placed on a flat, level surface to allow for ~proper rain measurement. The collector MUST BE PLACEDAT LEAST3 FEETABOVE THE GROUND for optimal wireless communication. Make certain the rain collector is not Placed in a low spot that may become flooded or in an area where there are obstructions above.
Surface Mounting of Rain Collector
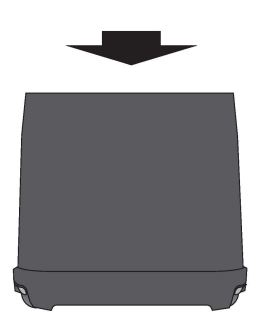
It is recommended that the rain collector be mounted to a solid( level surface with limited grass growth such as a deck railing or similar surface. To mount the rain collector, first separate the lower casing base from the upper casing. Next locate the two holes within the lower casing base. Then, using only hand tools (power tools may slip during use, possibly damaging sensitive rain collector components), secure the lower casing base to tile chosen surface using the appropriate hardware.
Care Instructions for Rain Collector
Debris and Foreign MatterThe Wireless Rain Collector was designed with materials suitable for outdoor use. However, certain environmental conditions may require periodic cleaning of the collector components. If the funnel becomes extremely dirty, rain water may not flow correctly into the rain collector. More extensive clearing out and cleaning of the funnel and other components may be required in these cases. It is recommended that the funnel be checked and cleaned periodically to ensure proper operation of the rain gauge system.
Winter ClimatesThe Wireless Rain Collector is designed to collect and record liquid rainfall only, it will not detect or record snowfall levels. It is recommended that the rain collector be brought indoors if you live in an area that has extreme cold weather, ice and snow during the winter months.
USE
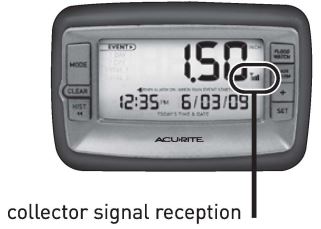
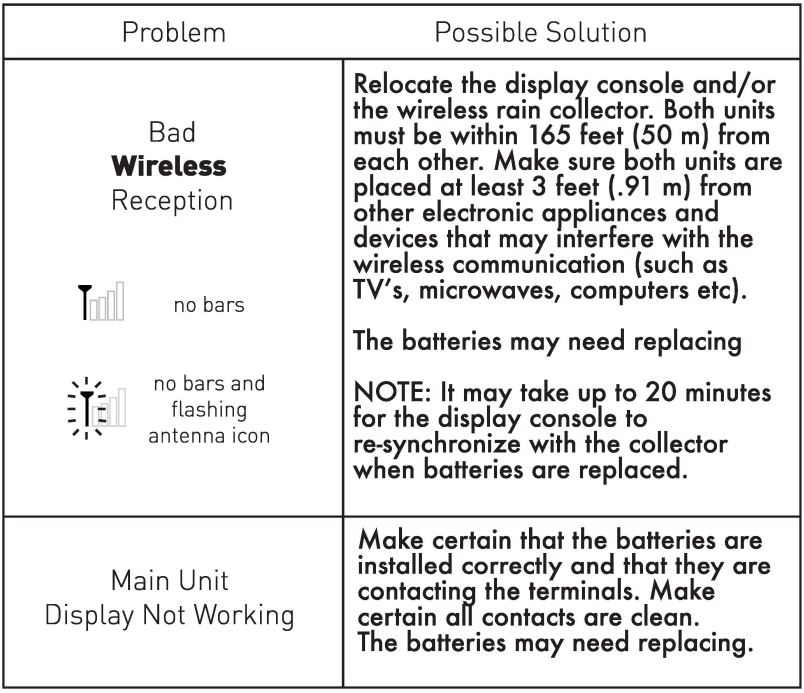
Wireless Reception
The display console has a wireless signal reception icon in the right display area. If there are a low number of “bars” present, you may experience no communication (flashing tower ) or inaccuracy. In either case, you may need to relocate one or both of the units. If most or all 4 of the bars are present, wireless reception is good and no action is required.

(A) Display ModePressing the “MODE” button changes the rain amount display mode. While in the selected mode 1 the history and clear buttons refer to the currently selected moue only.
“Event” Mode:The Event display mode shows the current or most recent rain event total. Events are periods of rain associated with a weather system. Events may be a brief drizzle, or a multi-day storm. The rain event ends when no rainfall has been recorded for at least 8 hours. After that, any new rainfall will be automatically recorded as the next newest event.Calendar Display Modes:1 DAY= One calendar day rain totalWEEK= 1 calendar week rain total (week= SUN through SAT)TOTALA= All-time ram total A (clear to re-set counter)TOTALB= All-time rain total B (clear to re-set counter)

SPECIFICATIONS
(B) History ModePressing the “HISTORY” button will enter into history mode for the currently selected DISPLAYMODE. Each additional time you press the history button, you will step backward in time and see the historical rainfall amounts and the time/date they were recorded. If there is no button activity within a 30 second period, the display will return to current display mode.
Viewing& Clearing” Event” History:
EVENTMODE: Pressing the “HISTORY” button while in EVENT mode steps backward through the last 7 rain event rain totals, one event P.er “HISTORY” button push. The display will show the time/date of each Past recorded event. To clear any event from memory~ press and hold the “CLEAR” button. Clearing any data from the EVENT mode will not affect any of the CALENDAR based rain totals.
Viewing& Clearing Calendar History:
1 DAYMODE: Pressing the “HISTORY” button while in 1 DAY mode steps backward through the last 7 DAYS’ rain totals, one day err “HISTORY” button push. The display. will show the time/date o each past Days rain totals. To clear any says’ rain total from memory, press and hold the “CLEAR” button. Clearing a days rain will also subtract that same amount from the WEEK, and also TOTALA & B
WEEK MODE: Pressing the “HISTORY” button while in WEEK mode steps backward through the last 7 WEEKS’ rain totals , one WEEK P.er “HISTORY” button push. The display will show the start time/date of each past WEEK rain totals. To clear any WEEK rain total from memory, press and hold the “CLEAR” button. Clearing a weeks rain will also subtract that same amount from TOTALA & B.
TOTALA/B MODE: Pressing the “HISTORY” button while in TOTALA/B mode simply displays the total A/B start time/date. These two modes are similar to a cars trip odometer, it keeps counting up until you clear and reset it. To reset the TOTALA or TOTALB counters, press and hold the “CLEAR” button while the total is being displayed.
(C) Flood Watch AlarmPushing the “FLOOD WATCH” button activates the flood watch alarm. The alarm will sound if the display console receives rain data that would indicate any of the flood and saturation conditions, as listed below:
> 3″ in the last 7 days and then >0.7″ in the last two hours or> l” in the last 24 hours> 2.3″ in the last 4 days and then >0.7″ in the last two hours or >l” in the last 24 hours> 1.5″ in the last 2 days and then >0.7″ in the last two hours or >l” in the last 24 hours> 1.4″ in the last two hours> 1.6″ in the last eight hours> 1.8″ in the last 24 hours
If these conditions occur, the alarm will sound for one minute or until any button is pushed, silencing the alarm. If no buttons are pushed, the audible alarm tone will stop sounding after one minute, but the display icon will continue to flash and the win sound three tones on the hour for the next 8 hours.
If no buttons are pressed to silence the flood alarm, the flood alarm feature will automatically be active at the start of the next event.
NOTE: The display console will actively monitor the rain and saturation conditions, even when the flood alarm is off. If the flood alarm is activated, and the audible alert sounds immediately, the conditions for flooding to be possible have already taken place.
(D) Rain AlarmPushing the “RAIN ALARM” button activates the rain alarm. The rain alarm will sound if the display console receives any rain data.
The alarm will sound for up to a 1 minute or until any button is rushed, silencing the alarm. If no buttoners pushed the alarm tone will stop sounding but the display icon will continue to flash for up to 30 minutes.
If no buttons are pressed to silence the alarm, the unit will automatically be reset to come on at the start of the next event.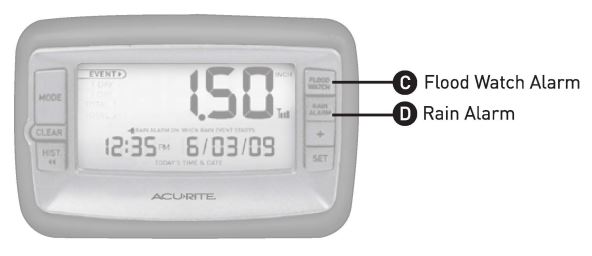
TROUBLESHOOTING
 Please DO NOT return product to the retail store.For technical assistance and product return information, please call Customer Care: 877-221-1252 Mon. – Fri. 8:00 A.M.to 4:30 P.M.[CST)www.chaneyinstrument.com
![]() CAUTIONT: This device is intended to be a weather monitoring device for personal use only. The FLOOD WATCH and RAIN ALARM alerts are for convenience and monitoring use. This device is NOT a safety device or a weather hazard warning device
CAUTIONT: This device is intended to be a weather monitoring device for personal use only. The FLOOD WATCH and RAIN ALARM alerts are for convenience and monitoring use. This device is NOT a safety device or a weather hazard warning device
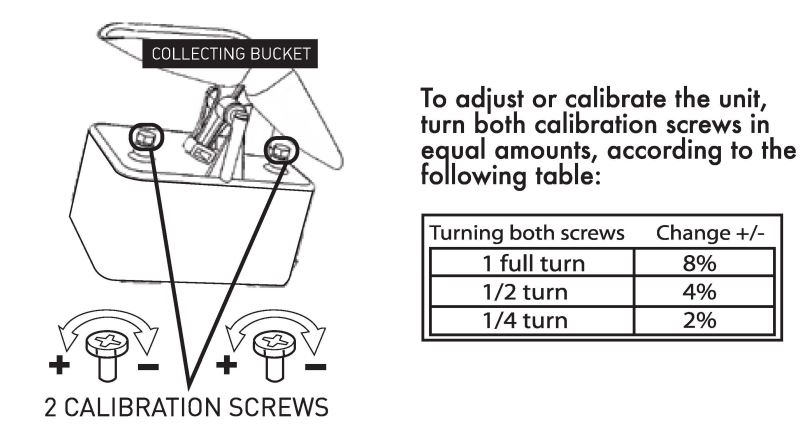
CALIBRATION
To test the unit, slowly drip 8 oz. (236.588ml) of water through the collector funnel. For best results the water should drip through the unit at a very slow rate, similar to how the rain falls. Poking a r.in hole in a small container or cup works well to simulate rain fall . The display should read 2.20 inches
If you need to make adjustments based on the results of the test, see the adjustment chart below.
SPECIFICATIONS
Product FactsBatteries: 4 x “AA’ (not included)
Measurement RangesRainfall: up to 99.99 inches
Wireless Range: 165ft/ 50m MAXDepending on home construction materials
LIMITED ONE YEAR WARRANTYChaney Instrument Company warrants that all products it manufactures to be of good material and workmanship and to be free of defects if properly installed and operated for a period of one year from date of purchase. REMEDY FOR BREACH OF THIS WARRANTY IS EXPRESSLY LIMITED TO REPAIR OR REPLACEMENT OF DEFECTIVE ITEMS. Any product which, under normal use and service, is proven to breach the warranty contained herein within ONE YEAR from date of sale will, upon examination by Chaney, and at its sole option, be repaired or replaced by Chaney. In all cases, transportation costs and charges for returned goods shall be paid for by the purchaser. Chaney hereby disclaims all responsibility for such transportation costs and charges. This warranty will not be breached, and Chaney will give no credit for products it manufactures which shall have received normal wear and tear, been damaged, tampered, abused, improperly installed, damaged in shipping, or repaired or altered by others than authorized representatives of Chaney.
THE ABOVE-DESCRIBED WARRANTY IS EXPRESSLY IN LIEU OF ALL OTHER WARRANTIES, EXPRESS OR IMPLIED, AND ALL OTHER WARRANTIES ARE HEREBY EXPRESSLY DISCLAIMED, INCLUDING WITHOUT LIMITATION THE IMPLIED WARRANTY OF MERCHANTABILITY AND THE IMPLIED WARRANTY OF FITNESS FOR A PARTICULAR PURPOSE. CHANEY EXPRESSLY DISCLAIMS ALL LIABILITY FOR SPECIAL, CONSEQUENTIAL OR INCIDENTAL DAMAGES, WHETHER ARISING IN TORT OR BY CONTRACT FROM ANY BREACH OF THIS WARRANTY. SOME STATES 00 NOT ALLOW THE EXCLUSION OR LIMITATION OF INCIDENTAL OR CONSEQUENTIAL DAMAGES, SO THE ABOVE LIMITATION OR EXCLUSION MAY NOT APPLY TO YOU. CHANEY FURTHER DISCLAIMS ALL LIABILITY FROM PERSONAL INJURY RELATING TO ITS PRODUCTS TO THE EXTENT PERMITTED BY LAW. BY ACCEPTANCE OF ANY OF CHANEY’S EQUIPMENT OR PRODUCTS, THE PURCHASER ASSUMES ALL LIABILITY FOR THE CONSEQUENCES ARISING FROM THEIR USE OR MISUSE. NO PERSON, FIRM OR CORPORATION IS AUTHORIZED TO ASSUME FOR CHANEY ANY OTHER LIABILITY IN CONNECTION WITH THE SALE OF ITS PRODUCTS. FURTHERMORE, NO PERSON, FIRM OR CORPORATION IS AUTHORIZED TO MODIFY OR WAIVE THE TERMS OF THIS PARAGRAPH, AND THE PRECEDING PARAGRAPH, UNLESS DONE IN WRITING AND SIGNED BY A DULY AUTHORIZED AGENT OF CHANEY. THIS WARRANTY GIVES YOU SPECIFIC LEGAL RIGHTS, AND YOU MAY ALSO HAVE OTHER RIGHTS WHICH VARY FROM STATE TO STATE.
For in-warranty repair, please contact:Customer Care DepartmentChaney Instrument Company965 Wells Street Lake Geneva, WI 53147
Chaney Customer Care 877-221-1252 Mon-Fri 8:00 a.m. to ,:30 p.m. CSTwww.chaneyinstrument.com
![]() This device complies with part 15 of the FCC rules. Operation is subject to the following two conditions: 1- This device may NOT cause harmful interference, and 2- This device must accept any interference received, including interference that may cause undesired operation.
This device complies with part 15 of the FCC rules. Operation is subject to the following two conditions: 1- This device may NOT cause harmful interference, and 2- This device must accept any interference received, including interference that may cause undesired operation.
NOTE: This equipment has been tested and found to comply with the limits for a Class B digital device, pursuant to Part 15 of the FCC rules. These limits are designed to provide reasonable protection against harmful interference in a residential installation. This equipment generates, uses and can radiate radio frequency energy and, if not installed and used in accordance with the instructions, may cause harmful interference to radio communications. However, There is no guarantee that interference will not occur in a particular installation. If this equipment does cause harmful interference to radio or television reception, which can be determined by turning the equipment off and on, the user is encouraged to try to correct the interference by one or more of the following measures:
- Reorient or relocate the receiving antenna.
- Increase the separation between the equipment and the receiver.
- Connect the equipment into an outlet on a circuit different from that to which the receiver is connected.
- Consult the dealer or an experienced radio/TV technician for help.
NOTE: The manufacturer is not responsible for any radio or TV interference caused by unauthorized modifications to this equipment. Such modifications could void the user authority to operate the equipment.
00875W INST 111810
Patent numbers: 5,978,738; 6,076,044; 6,597,990 ACURITE® is a registered trademark of the Chaney Instrument Co. Lake Geneva, WI
MADE IN CHINALimited One Year WarrantyInstructions& Warranty EnclosedCustomer Care: 877-221-1252www.chaneyinstrument.com

References
[xyz-ips snippet=”download-snippet”]