![]() DESIGNED TO WORK FOR YOUDisplay Consolemodel #01055Instruction Manual
DESIGNED TO WORK FOR YOUDisplay Consolemodel #01055Instruction Manual

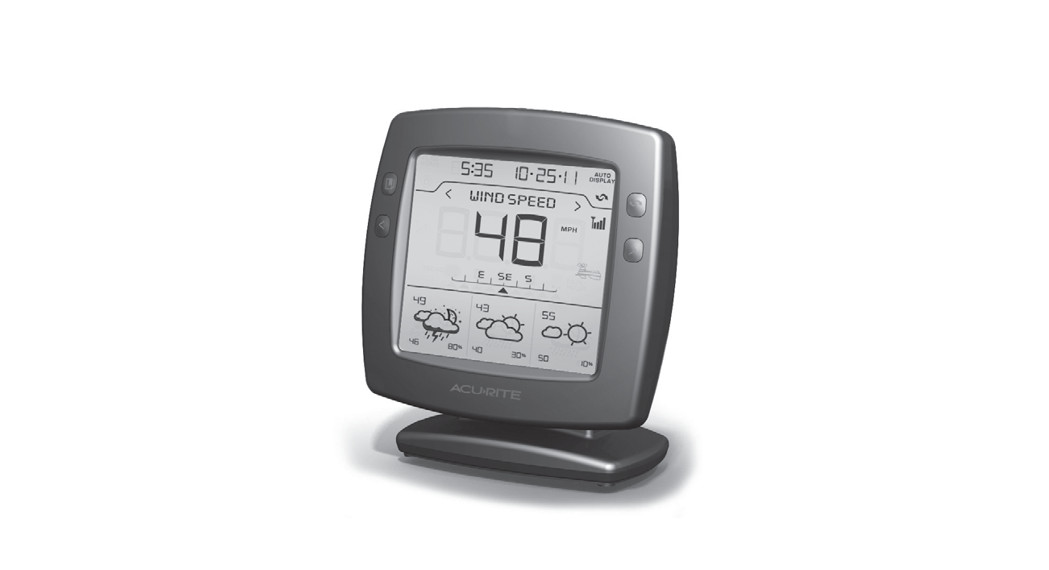
Overview
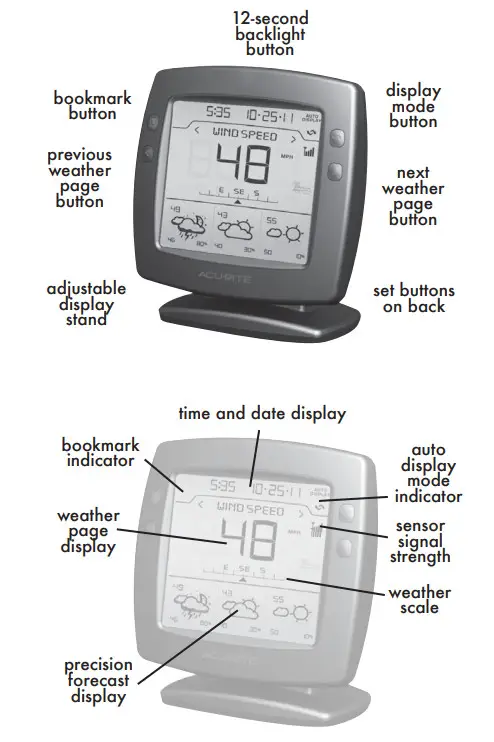
Display Console Features
SETUP
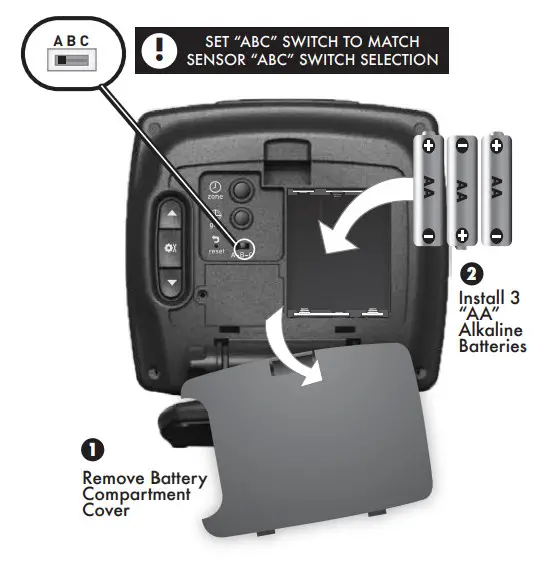
Installing Batteries – Display Console
About the Self Setting Intelli-Time® ClockYour new weather station is equipped with Intelli-Time® technology which is pre-programmed with the correct time and date. Intelli-Time® technology instructs the clock to set itself once batteries are installed. All you need to do is select your Time Zone and Daylight Saving Time preferences. The clock will automatically set itself and change automatically for Daylight Saving Time.
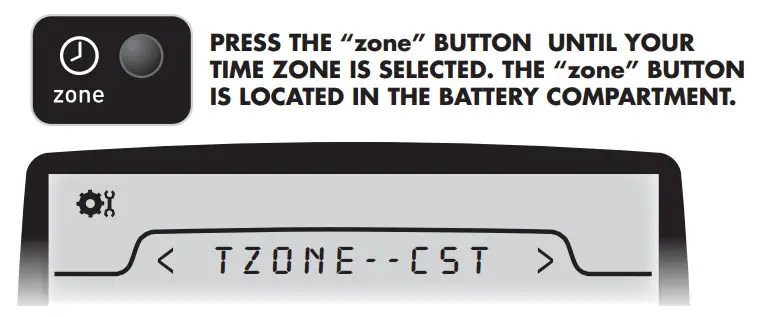
Quick Setup – Display ConsoleAfter installing batteries, the Intelli-Time® clock and calendar will automatically set to the correct time, all you need to do is select your time zone.
NOTE: IF FRENCH OR SPANISH LANGUAGE IS SELECTED (SEE MANUAL SETUP TO CHANGE LANGUAGE), THE TIME ZONE SELECTION ON THE DISPLAY WILL BE G.M.T. -/+ HOURS
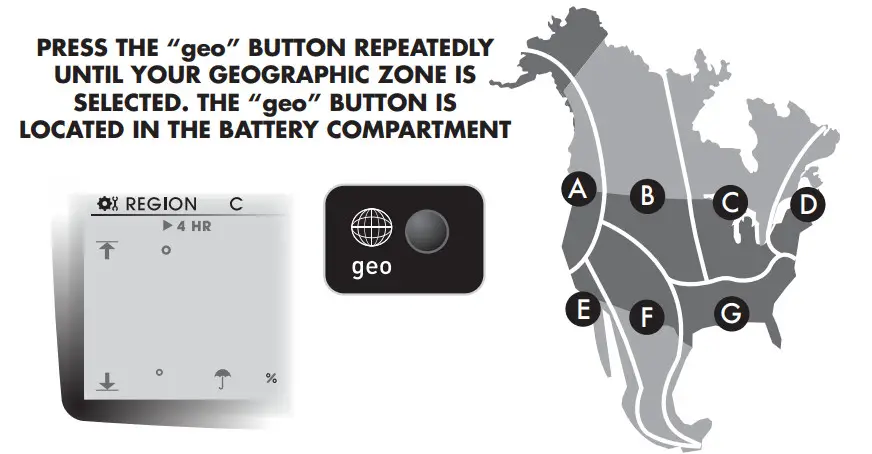
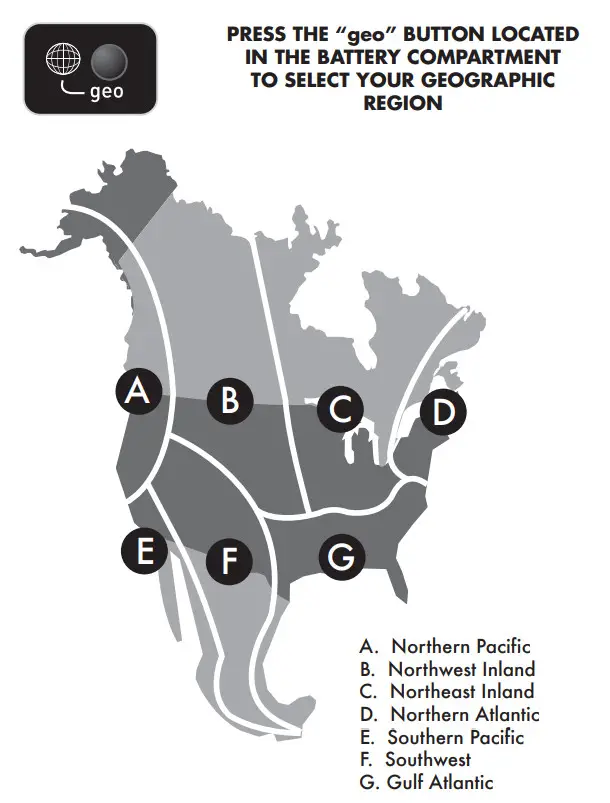
Next, you will need to select your general geographic region for the Micro-Forecast to function properly. The Micro-Forecast feature analyzes outdoor temperature, outdoor humidity, pressure changes, and geographic region information to give you the most accurate forecast a single station forecast can provide.
![]() Manual Setup – Display ConsolePress the SET (
Manual Setup – Display ConsolePress the SET ( ![]() ) button to enter into manual set mode. The currently selected language will display(”ENGLISH is the default) To adjust the currently selected (flashing) preference item, press and release the “
) button to enter into manual set mode. The currently selected language will display(”ENGLISH is the default) To adjust the currently selected (flashing) preference item, press and release the “![]() ” or “
” or “ ![]() ” buttons.To save your adjustments, press and release the “
” buttons.To save your adjustments, press and release the “![]() ” button again to move on to adjusting the next preference. You will automatically exit SET MODE if no entries are made for 30 seconds. You may enter basic setup mode again at any time by pressing and releasing the “SET” button.The preference set order is as follows:LANGUAGE (English, Spanish or French)TIME ZONE (PST MST CST EST AST HAST AKST)AUTO DST (Automatically adjust time -/+ on DST calendar dates)CLOCK HOURCLOCK MINUTECALENDAR MONTHCALENDAR DATECALENDAR YEARUNITS: temperature (ºf or ºc), wind (mph, kph, kn), rain (in. or mm), pressure (in or hpa)SENSOR TYPE: (large 5in1
” button again to move on to adjusting the next preference. You will automatically exit SET MODE if no entries are made for 30 seconds. You may enter basic setup mode again at any time by pressing and releasing the “SET” button.The preference set order is as follows:LANGUAGE (English, Spanish or French)TIME ZONE (PST MST CST EST AST HAST AKST)AUTO DST (Automatically adjust time -/+ on DST calendar dates)CLOCK HOURCLOCK MINUTECALENDAR MONTHCALENDAR DATECALENDAR YEARUNITS: temperature (ºf or ºc), wind (mph, kph, kn), rain (in. or mm), pressure (in or hpa)SENSOR TYPE: (large 5in1  or smaller
 ![]() 3in1 )NOTE: This weather station came with a 5in1 sensor, this display console was designed to work with either a 5in1 OR a 3in1 sensor- but not both at the same time. It is recommended that the larger 5in1 sensor be selected for proper operation.
3in1 )NOTE: This weather station came with a 5in1 sensor, this display console was designed to work with either a 5in1 OR a 3in1 sensor- but not both at the same time. It is recommended that the larger 5in1 sensor be selected for proper operation.
Adjustable Stand – Display ConsoleTo adjust the display for optimum viewing angle, loosen the locking knobs and gently tilt the display to the desired angle. Re-tighten the knobs to set the angle.NOTE: do not set the display angle all the way forward or backward unless you are wall-mounting the display. This will cause the display to tip forward or backward.
USE
Basic FunctionsThe Professional Wireless Weather Center was designed to give you the most useful information at a glance. The following is an overview of basic functions for everyday use.WEATHER PAGE DISPLAY:The weather page display area will show you information about the currently selected weather type. The weather scale will show you additional information, like trend or wind direction. You may also access history records for the currently selected weather page.MANUALLY BROWSE WEATHER PAGES: You may manually browse through the available weather pages at any time by pressing the “< ” or “> ” buttons located on the front of the display consoleWIRELESS SIGNAL RECEPTION ICON: The display console features a “SENSOR” signal reception icon to the left of the clock display area. If there are a low number of “bars” present, you may experience no temperature display ( “–” ) or inaccuracy. Occasionally, due to intermittent physical obstructions (such as vehicle traffic, etc.) or other environmental interference, the signal may be lost. If the sensor batteries are low the signal will be lost as well.After a signal loss- the display console will automatically begin to search for the wireless multi-sensor and attempt to re-acquire the wireless signal. In the event that the signal is lost completely and cannot be re-acquired, the antennae icon will flash with no bars. In the case that the sensor signal is lost completely, you may need torelocate the display console or the wireless multi-sensor.

Display ModesThe weather page display has three distinct viewing modes- Manual, Cycle or Auto-Display. To change between these modes, press the display button “ ![]() ” located on the front of the display console.MANUAL: (default) In manual display mode, whichever weather page you browse to will remain on the display.
” located on the front of the display console.MANUAL: (default) In manual display mode, whichever weather page you browse to will remain on the display.![]() CYCLE: In cycle display mode, the display will automatically cycle through all available weather pages. Each page will be displayed for approximately 5 seconds. Note that you may still manually browse through the weather pages at any time by pressing the browse buttons, but the display will begin to cycle again after 5 seconds of no activity.
CYCLE: In cycle display mode, the display will automatically cycle through all available weather pages. Each page will be displayed for approximately 5 seconds. Note that you may still manually browse through the weather pages at any time by pressing the browse buttons, but the display will begin to cycle again after 5 seconds of no activity.![]() AUTO-DISPLAY: In this mode, whichever weather pages have adverse conditions being reported will display automatically. For example, with auto display mode selected- if it begins to rain, the “RAINFALL” weather page will automatically display. If multiple weather pages report adverse conditions (example; RAINFALL/IN-TEMP), all of the affected weather pages will automatically display in a cycle until the conditions return to “normal”. After conditions normalize, the weather page that was previously selected will display again.
AUTO-DISPLAY: In this mode, whichever weather pages have adverse conditions being reported will display automatically. For example, with auto display mode selected- if it begins to rain, the “RAINFALL” weather page will automatically display. If multiple weather pages report adverse conditions (example; RAINFALL/IN-TEMP), all of the affected weather pages will automatically display in a cycle until the conditions return to “normal”. After conditions normalize, the weather page that was previously selected will display again.![]() BOOK MARK:The bookmark feature allows you to quickly view the weather the page that is most important to you, no matter what display mode you are in.You may “bookmark” your favorite weather page by pressing AND HOLDING the “ ” button. This will bookmark the currently selected category and allow you to quickly go to that category at any time.To go to your bookmarked page, press AND RELEASE the “
BOOK MARK:The bookmark feature allows you to quickly view the weather the page that is most important to you, no matter what display mode you are in.You may “bookmark” your favorite weather page by pressing AND HOLDING the “ ” button. This will bookmark the currently selected category and allow you to quickly go to that category at any time.To go to your bookmarked page, press AND RELEASE the “![]() ” button at any time. Note that the weather page may change after 5 seconds if you are in CYCLE or AUTO DISPLAY modes. If you would like to remain on your bookmarked weather page, press the “
” button at any time. Note that the weather page may change after 5 seconds if you are in CYCLE or AUTO DISPLAY modes. If you would like to remain on your bookmarked weather page, press the “ ![]() ” button to select the manual display mode (<> ).
” button to select the manual display mode (<> ).
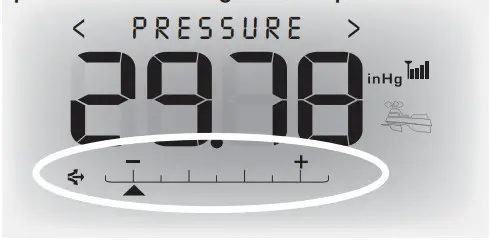
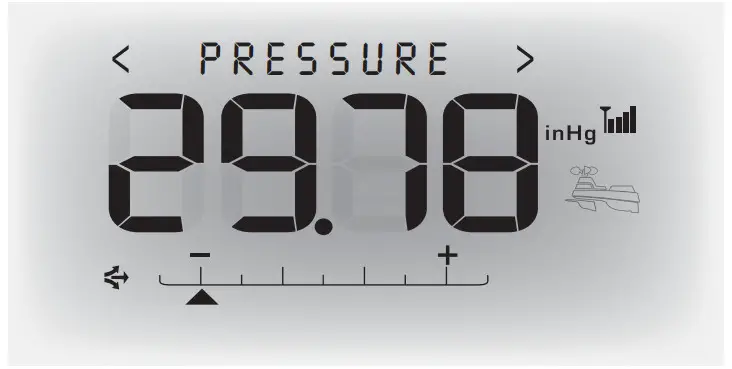
Weather ScaleThe display console features a weather scale, a graphic representation of the rate of change for a particular weather page. For most weather pages, this scale will simply show the rate of increase or decrease.For example, when the pressure weather page is being viewed, the scale example here is showing that the pressure is falling rapidly.
 In this example, the outdoor temperature weather page is being viewed, the scale example here is showing that the temperature is staying relatively steady, with only a slight rise in temperature.
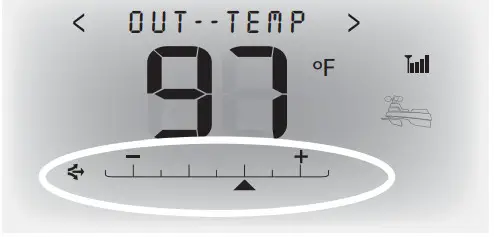
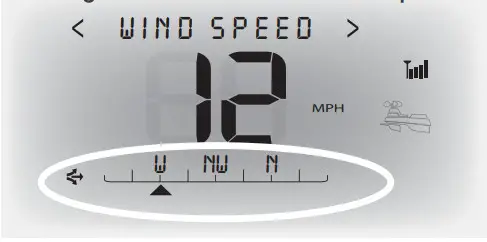
When the wind speed page is displayed, the weather scale converts automatically to show you a linear wind direction scale. In this case, the wind is coming out of the WEST at 12 m.p.h.
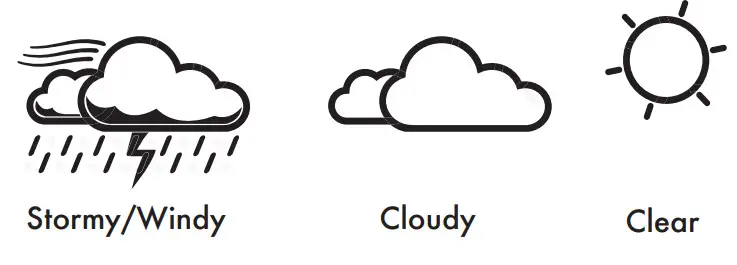
Precision Weather ForecastInitial learning modeThe Forecast will not display predicted high or low temperatures or chance of precipitation for the first few hours after powering on. During this initial learning mode, the weather forecaster will observe minute changes to learn your weather patterns and increase the accuracy of the initial forecast. Note that the forecast will become more accurate as it obtains more information about your microclimate.Forecast DisplayThe forecast display area gives you the predicted weather forecast for the next 4 hours, 4 to 8 hours, and 8 to 12 hour time periods. Each time period will also display the predicted High and Low temperatures, as well as the chance (%) for precipitation. The forecaster is always analyzing the available data, and consistently updates the forecast icons and highs/lows/precipitation chance as time goes on. This will help you to plan ahead for the next 12 hours of weather at any given time.The weather forecast icon will display one of 18 different weather conditions.The Moon will show (as a simplified Moon Phase) instead of the sun when the forecast time period occurs overnight.Below is an example of just three of the 18 forecast icons.
Atmospheric PressureThe display console features a “PRESSURE” weather page.
LEARN MORE>Atmospheric Pressure is defined as the pressure at any location on the Earth, caused by the weight of the column of air above it. At sea level, atmospheric pressure has an average value of one atmosphere and gradually decreases as altitude increases. Also called barometric pressure.The weight of the air mass, or atmosphere, that envelopes Earth exerts pressure on all points of the planet’s surface. Meteorologists use barometers to measure this atmospheric pressure (also called barometric pressure). At sea level, the atmospheric pressure is approximately 1 kilogram per square centimeter (14.7 pounds per square inch), which will cause a column of mercury in a mercury barometer to rise 760 millimeters (30.4 inches). Subtle variations in atmospheric pressure greatly affect the weather. Low pressure generally brings rain. In areas of low air pressure, the air is less dense and relatively warm, which causes it to rise. The expanding and rising air naturally cools, and the water vapor in the air condenses, forming clouds and the drops that fall as rain. In high-pressure areas, conversely, the air is dense and relatively cool, which causes it to sink. The water vapor in the sinking air does not condense, leaving the skies sunny and clear.
RainfallThe RAINFALL weather page will display the rainfall total from the current rain event. A weather system may come into your area very slowly and may rain over many hours or days without any breaks. The rainfall weather page displayed event total accounts for this and will continue to display the total until the rain event is over.![]() TO ACCESS TODAY, WEEK, MONTH, YEAR RAINFALL TOTALS: While viewing the rainfall weather page, pressing the “
TO ACCESS TODAY, WEEK, MONTH, YEAR RAINFALL TOTALS: While viewing the rainfall weather page, pressing the “ ![]() ” button repeatedly will display the recorded RAINFALL TOTALS for TODAY, WEEK, MONTH, and YEAR. Note that the time and date will change to display exactly when the record was observed.To clear out an erroneous record, press and HOLD the “
” button repeatedly will display the recorded RAINFALL TOTALS for TODAY, WEEK, MONTH, and YEAR. Note that the time and date will change to display exactly when the record was observed.To clear out an erroneous record, press and HOLD the “![]() ” button while you are viewing the actual record you want to clear.Wind SpeedCURRENT WIND SPEED:The CURRENT wind speed will display the currently recorded wind speed and is updated every 18 seconds.WIND SPEED PEAK:The WIND SPEED PEAK will display the highest wind speed recorded in the previous 60 minutes.
” button while you are viewing the actual record you want to clear.Wind SpeedCURRENT WIND SPEED:The CURRENT wind speed will display the currently recorded wind speed and is updated every 18 seconds.WIND SPEED PEAK:The WIND SPEED PEAK will display the highest wind speed recorded in the previous 60 minutes.![]() TO ACCESS TODAY, WEEK, MONTH, YEAR HIGHEST WIND RECORDS: While viewing the wind speed weather page, pressing the “
TO ACCESS TODAY, WEEK, MONTH, YEAR HIGHEST WIND RECORDS: While viewing the wind speed weather page, pressing the “ ![]() ” button repeatedly will display the recorded highest WIND SPEED for TODAY, WEEK, MONTH, and YEAR. Note that the time and date will change to display exactly when the record was observed. To clear out an erroneous record, press and HOLD the “
” button repeatedly will display the recorded highest WIND SPEED for TODAY, WEEK, MONTH, and YEAR. Note that the time and date will change to display exactly when the record was observed. To clear out an erroneous record, press and HOLD the “ ![]() ” button while you are viewing the actual record you want to clear.
” button while you are viewing the actual record you want to clear.
Weather HistoryThe display console can display short and long-term records. To access history records for the currently displayed weather page, press the “![]() ” or “ ” buttons located on the back of the display console.
” or “ ” buttons located on the back of the display console.![]() HIGH RECORDS: Pressing the “
HIGH RECORDS: Pressing the “ ![]() ” button repeatedly will display the recorded HIGHS for TODAY, WEEK, MONTH, and YEAR for the currently selected weather page. Note that the time and date will change to display exactly when the record was observed. To clear out an erroneous HIGH record, press and HOLD the “
” button repeatedly will display the recorded HIGHS for TODAY, WEEK, MONTH, and YEAR for the currently selected weather page. Note that the time and date will change to display exactly when the record was observed. To clear out an erroneous HIGH record, press and HOLD the “ ![]() ” button while you are viewing the HIGH record you want to clear.
” button while you are viewing the HIGH record you want to clear.![]() LOW RECORDS: Pressing the “ ” button repeatedly will display the recorded LOWS for TODAY, WEEK, MONTH, and YEAR for the currently selected weather page. Note that the time and date will change to display exactly when the record was observed.To clear out an erroneous LOW record, press and HOLD the “
LOW RECORDS: Pressing the “ ” button repeatedly will display the recorded LOWS for TODAY, WEEK, MONTH, and YEAR for the currently selected weather page. Note that the time and date will change to display exactly when the record was observed.To clear out an erroneous LOW record, press and HOLD the “![]() ” button while you are viewing the LOW record you want to clear.NOTE: For some weather pages, LOW and/or HIGH may not be applicable. For example, rainfall is an accumulative weather type, and would always have a low of “0.0”. For that reason, the rainfall and wind weather pages do not have LOW records display options.
” button while you are viewing the LOW record you want to clear.NOTE: For some weather pages, LOW and/or HIGH may not be applicable. For example, rainfall is an accumulative weather type, and would always have a low of “0.0”. For that reason, the rainfall and wind weather pages do not have LOW records display options.
MAINTENANCE
DISPLAY CONSOLE MAINTENANCE:Clean with a soft damp cloth, do not use caustic cleaners or abrasives as these will damage the finish on the display console. Keep away from dust and dirt and moisture, dust ventilation ports regularly with a gentle puff of air, this will keep the indoor temperature and humidity are accurate.INTEGRATED WIRELESS SENSOR MAINTENANCE:Clean the housing with a damp cloth, do not use abrasive cleaners or any materials that will mar the polished surfaces of the rain collection funnel or the solar panel- this will result in decreased performance and reliability.Occasionally remove the rain collector screen cup and empty it. This will filter out seeds and small sticks, etc. (the rain collector screen cup is located within the rain funnel- remove from the top gently by squeezing and pulling out).Remove any foreign matter on the outside of the housing to allow for free movement of wind vane and anemometer.INSECTS: in most cases, insects will not pose a problem. However, in some instances, insects may cause repeated obstructions to weather measurement by nesting in or contaminating the integrated wireless sensor. In these cases, it may help to spray the housing with a commercially available home insect guard/repellent product (not included) to limit the problem. Please consult the insect repellent manufacturers instructions and safety information before using.BATTERY SAFETY: Clean the battery contacts and also those of the device prior to battery installation. Remove batteries from equipment that is not to be used for an extended period of time. Follow the polarity (+/-) diagram in the battery compartment. Promptly remove dead batteries from the device. Dispose of used batteries properly. Only batteries of the same or equivalent type as recommended are to be used. DO NOT incinerate used batteries. DO NOT dispose of batteries in fire, as batteries may explode or leak. DO NOT mix old and new batteries or types of batteries (alkaline/standard). DO NOT use rechargeable batteries. DO NOT recharge non-rechargeable batteries. DO NOT short-circuit the supply terminals.
SPECIFICATIONS
Product FactsMeasurement RangesOutdoor Temperature: -40ºF to 158ºF, -40ºC to 70ºCOutdoor Humidity: 1% to 99%
Outdoor temperature and humidity sensors are internally fan aspirated to provide accurate readings, even in sunlight.
Wind Speed: 0 to 99mph, 0 to 159 kphWind Direction Indicators: 16 pointsRainfall: 0 to 99.99 in.Indoor Temperature: 32ºF to 122ºF, 0ºC to 50ºCIndoor Humidity: 1% to 99%Backlight: Blue10-second momentary backlightWireless Range: 330 ft / 100 m MAXDepending on home construction materialsTransmission: Updates every 18 sec.
Micro Forecast Geographic Region Selections
CALIBRATION & ADVANCED OPTIONS
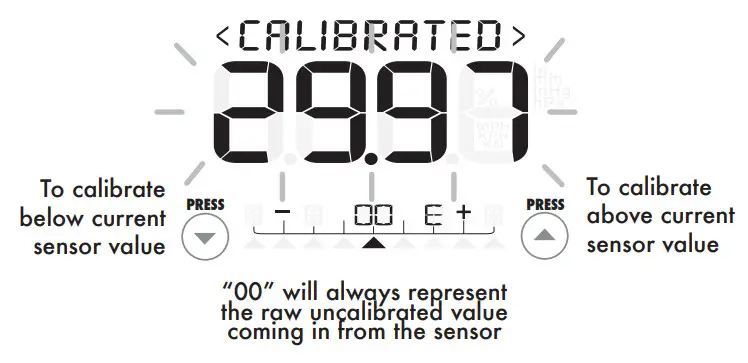
If you find that the temperature and/or humidity is slightly off, this weather device allows for calibration. The barometric pressure may be calibrated as well. To calibrate the weather station, you must enter into the calibration mode.AVAILABLE CALIBRATION OPTIONS: Outdoor Temperature, Outdoor Humidity, Indoor Temperature, Indoor Humidity, Pressure.Calibration Mode To calibrate an available weather value, you must first navigate to the appropriate weather page. Press the “<” or “>” weather page buttons located on the front of the display unit.To access the calibration mode for the currently selected weather page, press AND HOLD the “![]() ” and “
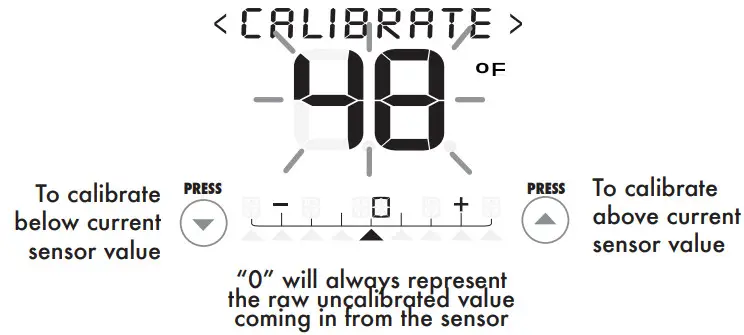
” and “![]() ” buttons (located on the back of the display unit) together for at least 5 seconds. After 20 seconds of inactivity, the display will save your adjustments and automatically exit calibration mode, and return to normal operation.Calibrating Temperature & HumidityCalibrating the temperature or humidity values are all similar. Once you are in calibration mode you may calibrate the value up or down by pressing the “
” buttons (located on the back of the display unit) together for at least 5 seconds. After 20 seconds of inactivity, the display will save your adjustments and automatically exit calibration mode, and return to normal operation.Calibrating Temperature & HumidityCalibrating the temperature or humidity values are all similar. Once you are in calibration mode you may calibrate the value up or down by pressing the “ ![]() ” or “
” or “ ![]() ” buttons. Note the arrow icons indicate if you are calibrating the value above(+) or below(-) the uncalibrated raw temperature (0) coming in from the sensor. Press the “
” buttons. Note the arrow icons indicate if you are calibrating the value above(+) or below(-) the uncalibrated raw temperature (0) coming in from the sensor. Press the “![]() ” button to confirm your calibration changes and return to normal operation.
” button to confirm your calibration changes and return to normal operation.
Barometric Pressure OptionsThe Weather Station is preset from the factory with a “14-day” AcuRite pressure learning mode” that analyzes the differences in pressure to determine your altitude- which is critical for forecasting.The display unit gives you the option to observe this “AcuRite Pressure” value and use that for the pressure weather page AND forecasting, or alternatively, you may use the unadjusted “Station Pressure” value. If you choose to use the “Station Pressure”, you may calibrate the value to match a known good reading in your area if you wish.Calibrating the pressure affects the forecasting feature greatly, for this reason, it is recommended that the pressure be left alone and remain uncalibrated. However, some advanced users may wish to calibrate the pressure reading or change the type of pressure that is displayed- so those options are available.
Barometric Pressure Options MenuTo access the pressure options menu first navigate to the “PRESSURE” weather page, press AND HOLD the “ ![]() ” and “
” and “ ![]() ” buttons (located on the back of the display unit) together for at least 5 seconds.You may now press the “<” and “>” buttons located on the front of the display to choose between 3 pressure display options:
” buttons (located on the back of the display unit) together for at least 5 seconds.You may now press the “<” and “>” buttons located on the front of the display to choose between 3 pressure display options:

Acurite PressureAcurite Pressure is the default pressure mode. This is the most automatic mode and requires no user input for accuracy. This pressure mode requires a 14-day learning period of adjustments to determining your altitude- which is critical for forecasting. As a result, for the first 14 days the pressure value being displayed in the “PRESSURE” weather page and the forecast display may be inaccurate.
CALIBRATION & ADVANCED OPTIONS
Station PressureStation pressure is the second pressure mode. When selected, station pressure will use the unadjusted pressure value to display in the “PRESSURE” weather page. It will also use the unadjusted pressure reading for the forecast feature.Station Pressure Calibration Once you are in STATION PRESSURE CALIBRATION mode you may calibrate the value up or down by pressing the “![]() ” or “
” or “ ![]() ” buttons. Note the arrow icons indicate if you are calibrating the value above(+) or below(-) the uncalibrated raw pressure. Press the “ ” button to confirm your calibration changes and return to normal operation- which will then display your calibrated pressure, as well as using the calibrated value for the forecast display.
” buttons. Note the arrow icons indicate if you are calibrating the value above(+) or below(-) the uncalibrated raw pressure. Press the “ ” button to confirm your calibration changes and return to normal operation- which will then display your calibrated pressure, as well as using the calibrated value for the forecast display.
PLEASE DISPOSE OF OLD OR DEFECTIVE BATTERIES IN AN ENVIRONMENTALLY SAFE WAY AND IN ACCORDANCE WITH YOUR LOCAL LAWS AND REGULATIONS.BATTERY SAFETY: Clean the battery contacts and also those of the device prior to battery installation. Remove batteries from equipment that is not to be used for an extended period of time. Follow the polarity (+/-) diagram in the battery compartment. Promptly remove dead batteries from the device. Dispose of used batteries properly. Only batteries of the same or equivalent type as recommended are to be used. DO NOT incinerate used batteries. DO NOT dispose of batteries in fire, as batteries may explode or leak. DO NOT mix old and new batteries or types of batteries (alkaline/standard). DO NOT use rechargeable batteries. DO NOT recharge non-rechargeable batteries. DO NOT short-circuit the supply terminals.

TROUBLESHOOTING
| Problem | Possible Solution(s) |
| Bad Wireless Sensor Reception |
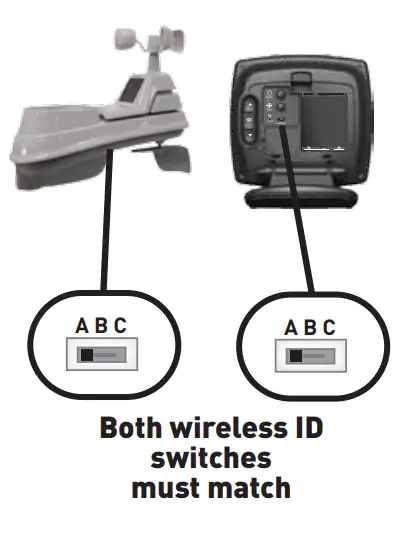
Relocate the main unit and/or the wireless sensor. Both units must be within 330 feet (100 meters) from each other. Make sure both units are placed at least 3 feet (.91 m) from other electronic appliances and devices that may interfere with the wireless communication (such os TVs, microwaves, computers, etc). NOTE: It may take up to 20 minutes for the main unit to re-synchronize with the sensor when batteries are replaced. Use lithium batteries in the sensor when the temperature is below -4°F (-20°C). Make sure the A-B-C switch selection in the battery compartments of the display unit and sensor matches. |
| Display Console Sassen Not Working | Batteries may need replacing.Check that battery are correctly installed. Reset the display unit and wireless sensor. |
| Micro Forecast displaying “- -” for highs/lows/ precipitation% | The Micro Forecast will not display predicted high or low temperatures or chance of precipitation for the first few hours after powering on or resetting. During this initial learning mode, the weather forecaster will observe changes to learn your weather patterns and increase the accuracy of the forecast. |
| Micro Forecast Inaccuracies | As with any weather forecast, 100% accuracy is not possible. However, if the micro forecast seems wildly inaccurate, make certain that your geographic region is selected properly. The geographic region selection can drastically affect the accuracy of the forecast. |
 NOTICE: The display may fail to start properly due to static discharge. Press the reset button located on the back of the display unit to reset the entire unit. Please note that all of the dates and time information will need to be entered manually after a reset. NOTICE: The display may fail to start properly due to static discharge. Press the reset button located on the back of the display unit to reset the entire unit. Please note that all of the dates and time information will need to be entered manually after a reset. |
Set Wireless I.D.
This wireless thermometer uses a long-range 433mhz radio frequency for communication.In the event that you have reception problems due to interference, both the main unit and the wireless sensor have a selectable wireless ID.The ID switches are located within the battery compartments of the display console and the integrated wireless sensor.You may choose A, B or C; but both the main unit and the wireless sensor IDs must match for successful synchronization.
FCC Information
This device complies with part 15 of FCC rules. Operation is subject to the following two conditions:
- This device may NOT cause harmful interference, and
- This device must accept any interference received, including interference that may cause undesired operation.
WARNING: Changes or modifications to this unit not expressly approved by the party responsible for compliance could void the user’s authority to operate the equipment.NOTE: This equipment has been tested and found to comply with the limits for a Class B digital device, pursuant to Part 15 of the FCC rules. These limits are designed to provide reasonable protection against harmful interference in a residential installation. This equipment generates, uses and can radiate radio frequency energy and, if not installed and used in accordance with the instructions, may cause harmful interference to radio communications.However, There is no guarantee that interference will not occur in a particular installation. If this equipment does cause harmful interference to radio or television reception, which can be determined by turning the equipment off and on, the user is encouraged to try to correct the interference by one or more of the following measures:
- Reorient or relocate the receiving antenna.
- Increase the separation between the equipment and the receiver.
- Connect the equipment into an outlet on a circuit different from that to which the receiver is connected.
- Consult the dealer or an experienced radio/TV technician for help.
NOTE: The manufacturer is not responsible for any radio or TV interference caused by unauthorized modifications to this equipment. Such modifications could void the user’s authority to operate the equipment. This device complies with Industry Canada licence-exempt RSS standard(s). Operation is subject to the following two conditions:
- This device may not cause interference, and
- This device must accept any interference received, including interference that may cause undesired operation ofthe device.
Customer Support
AcuRite customer support is committed to providing you with best-in-class service. For assistance, please have the model number of this product available and contact us in any of the following ways: V (877) 221-1252
 [email protected]
24/7 support at www.AcuRite.com
- Installation Videos
- Instruction Manuals
- Replacement Parts
- Register your Product
- Support User Forum
- Submit Feedback & Ideas
Limited One Year Warranty
At AcuRite, we proudly uphold our commitment to quality technology. Chaney Instrument Co. warrants that all products it manufactures to be of good material and workmanship and to be free of defects when properly installed and operated for a period of one year from the date of purchase.We recommend that you visit us at www.AcuRite.com for the fastest way to register your product. However, product registration does not eliminate the need to retain your original proof of purchase in order to obtain warranty benefits.Chaney Instrument Co. warrants that all products it manufactures to be of good material and workmanship and to be free of defects when properly installed and operated for a period of one year from the date of purchase. Remedy for breach of this warranty is limited to repair or replacement of the defective item(s). Any product which, under normal use and service, is proven to breach the warranty contained herein within ONE YEAR from date of sale will, upon examination by Chaney, and at its sole option, be repaired or replaced by Chaney. Transportation costs and charges for returned goods shall be paid for by the purchaser. Chaney hereby disclaims all responsibility for such transportation costs and charges. This warranty will not be breached, and Chaney will give no credit for products it manufactures which have received normal wear and tear, been damaged (including by acts of nature), tampered, abused, improperly installed, damaged in shipping, or repaired or altered by others than authorized representatives of Chaney.The above-described warranty is expressly in lieu of all other warranties, express or implied, and all other warranties are hereby expressly disclaimed, including without limitation the implied warranty of merchantability and the implied warranty of fitness for a particular purpose. Chaney expressly disclaims all liability for special, consequential or incidental damages, whether arising in tort or by contract from any breach of this warranty. Some states do not allow the exclusion or limitation of incidental or consequential damages, so the above limitation or exclusion may not apply to you. Chaney further disclaims all liability from personal injury relating to its products to the extent permitted by law. By acceptance of any of Chaney’s products, the purchaser assumes all liability for the consequences arising from their use or misuse. No person, firm or corporation is authorized to assume for Chaney any other liability in connection with the sale of its products. Furthermore, no person, firm or corporation is authorized to modify or waive the terms of this paragraph, and the preceding paragraph, unless done in writing and signed by a duly authorized agent of Chaney. This warranty gives you specific legalrights and you may also have other rights which vary from state to state.For in-warranty claims:Chaney Instrument Co. | 965 Wells St. | Lake Geneva, WI 53147
References
[xyz-ips snippet=”download-snippet”]