
Home Comfort Monitor01523
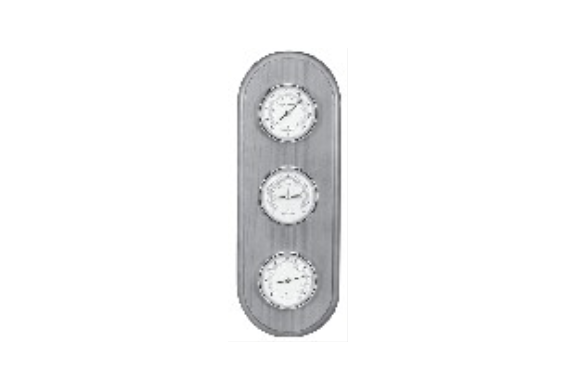
 A. Home Comfort Monitor
Instruction ManualPackage Contents:(1) Home Comfort Monitor (A)(1) Instruction Manual
Thank You for purchasing this ACURITE® product. To fully understand and appreciate your new home comfort monitor, please read this document carefully.
Choosing the correct location
Acurite® home comfort monitors are designed for indoor use only. They should be placed on inside walls and away from heat registers, air conditioners, humidifiers, and out of direct sunlight as these locations may affect the accuracy of the thermometer and hygrometer instruments.
Mount your weather station on the wallThe Acurite® home comfort monitor has keyhole slots cut into the backside for hanging. Use a securely anchored screw, nail or hook to support the weight of the home comfort monitor. Make certain the screw/nail head is large enough to prevent the monitor from slipping off in the event it is jarred or bumped.
Care and cleaning of your home comfort monitor
Wood PlaqueThe solid wood plaque is finished with a clear satin lacquer to protect and preserve the appearance. Although occasional use of a good furniture paste wax is acceptable, we recommend that periodic cleaning with a very lightly dampened soft cloth is best. Be sure to wipe the wood dry with a soft cloth after cleaning.InstrumentsAvoid the use of harsh household cleaners and coarse paper towels which would damage the lacquer coating on the bezel and scratch the lens. Fingerprints and dirt may be removed from the lenses and bezels with a soft cloth lightly dampened with a mixture of water and mild dishwashing liquid. Be sure to dry the lens and bezel with a soft cloth after cleaning.
How your home comfort monitor works
Dial ThermometerThe dial thermometer is designed for indoor use only and will provide an accurate measurement of air temperature in the vicinity of the instrument.Dial thermometers are operated by sensitive bi-metal coil spring mechanisms that respond to air temperature changes. The thermometer instrument has been calibrated at the factory and should not need adjustment. As with all instruments that are placed in a new location, you should always allow a period of several hours for stabilization before determining whether it is reading accurately. Should you determine that an adjustment of the thermometer is needed, this can be achieved by using a small head screwdriver. On the back of the thermometer is a small hole that will allow you to manually calibrate the temperature.Insert the screwdriver head into the gold slot and turn clockwise or counter-clockwise until the indicator hand is pointing to the known temperature reading.
Hygrometer (Humidity Meter)Hygrometers measure relative air moisture percentage indoors. These instruments operate by a sensitive coil spring that is bonded with a moisture-absorbent material.Hygrometers register the percentage of water vapor present compared to the maximum amount that could be present at that air temperature. This is why the instruments are also referred to as Humidity Meters. All air contains microscopic water particles that are invisible to the human eye. If enough water is vaporized into the air, the air will become “saturated”. This is considered to be 100% humidity.
The coils in hygrometers respond slowly and when humidity levels change abruptly, it can take an hour or more for the meter to reach an accurate reading. Remember that the hygrometer is reading indoor humidity, not outdoor humidity as reported by the weather service.
It is not uncommon to have low humidity readings during cold weather when indoor air is heated. Humidity readings of 10% to 25% are typical where humidifiers are not used to add water vapor into the air. The optimum humidity levels should be maintained between 45% and 50% during heating seasons. Low humidity levels can cause health problems and can be hard on wood furnishings.
Acurite® hygrometers are preset at the factory and typically should need no further adjustment. Remember to allow ample time for the instrument to stabilize in its new location before determining whether accurate humidity levels are being indicated. If you do decide that the instrument needs re-adjustments, this can be done as follows:
Soak a folded facecloth or dishcloth with water and place the cloth on a plate, saucer, or another relatively flat container. Remove the hygrometer from the home comfort monitor plaque by simply placing your hand against the backplate and pushing the instrument out of its mounting hole. Carefully lay the back edge of the hygrometer flat on the damp cloth. Allow 30-45 minutes for the hygrometer to read approximately 95% humidity, If the reading is not indicated, carefully rotate the coil by using a small head screwdriver counterclockwise until the indicator hand is reading 95%.
Remount the hygrometer into the wood plaque. The hygrometer will gradually return to indicate the actual condition of the air moisture content. IMPORTANT: Any other method than what has been described to adjust the hygrometer could damage the instrument.
Dial BarometerAcurite® barometers indicate barometric pressure by measuring changes in a small chamber that has a partial vacuum. As atmospheric pressure varies on the chamber and changes shape, it moves a small drive linkage connected to the indicator hand. This linkage movement rotates the hand to register changes in pressure.
Unlike the thermometer and hygrometer instruments, the barometer is not affected by location. Because all buildings have some air leakage, the atmospheric pressure is the same indoors as it is outdoors.
The barometer has been regulated at the factory to function accurately at 950 ft. above sea level. If the altitude in your location is different, the barometer must be re-adjusted or reset using either of the following methods:
1. Contact your local radio/TV/internet weather service to get the correct barometric pressure reading for your location. Now set your barometer to that reading by using a blade screwdriver to turn the small adjustment screw located in the back of the barometer instrument case. Turn the screw to the left or right until the indicator hand moved in the direction you want. Continue to turn the screw until the indicator hand is registering the correct pressure. Lightly tap the center of the lens to make sure that the “adjustable pointer” is moving freely. This ensures that friction from the linkage is not affecting a correct reading by the indicator. CAUTION: Be careful not to force the adjustment screw. If the screw becomes tight in either direction, the end of the adjustment range has been reached.2. Use an existing barometer at your location which is known to be accurate and set the new Acurite® barometer to the same reading using the same procedure as outlined in step one.The capability of a barometer to indicate changes in atmospheric pressure makes it a valuable instrument in weather forecasting. You should take a reading at least once daily, and always rotate the “adjustable pointer” to the exact location of the indicator hand at the time of your reading. The “adjustable pointer” will allow you to tell what changes in pressure have occurred since your last reading. Remember that the rate of pressure change is just as important as the amount of change. This is why multiple readings each day are best for accurate weather forecasting. For the most accurate atmospheric pressure reading, it is a good idea to first lightly tap the lens before checking the exact position of the indicator hand on the dial.
The following meteorological “Rules of Thumb” will help you interpret your Acurite® barometer readings.1. A rise in barometric pressure typically indicates clearing weather can be expected2. A rapid drop in barometric pressure typically indicates that weather disturbances are nearby and could result in precipitation3. A slow but continuous drop in barometric pressure typically indicates that persistent bad weather can be expected4. Steep pressure drops typically indicates approaching storms with strong windsRemember that many factors determine actual weather conditions. Geographic location, temperature, humidity, wind direction, and even the season must be considered when your barometer indicates a rising or falling atmospheric pressure.
![]() Please DO NOT return the product to the retail store.For technical assistance and product return information, please call Customer Care:877-221-1252Mon. – Fri. 8:00 A.M. to 4:45 P.M. (CST)
Please DO NOT return the product to the retail store.For technical assistance and product return information, please call Customer Care:877-221-1252Mon. – Fri. 8:00 A.M. to 4:45 P.M. (CST)
www.chaneyinstrument.comLIMITED WARRANTY-INTERNATIONAL – Consumer may have more remedies at law than follows. Chaney Instrument Co. warrants to the owner, this product to be free from material and workmanship for one year from the date of purchase. Chaney Instrument shall NOT BE LIABLE FOR ANY ACCIDENTAL, INDIRECT, OR CONSEQUENTIAL DAMAGES, WHETHER ARISING IN CONTRACT OR TORT. Chaney Instrument’s obligation (at its option) is limited to repair or replace this product. For in-warranty repair, send the product, accompanied by Guarantee, bearing Dealer’s name and date of purchase, with $5.00 to cover handling and postage to: Chaney Instrument Company965 Wells StreetLake Geneva, WI 53147
References
[xyz-ips snippet=”download-snippet”]