![]()
A22 Class-D Compact Music Amplifier
Item ref: 953.422UKUser Manual
 Caution: Please read this manual carefully before operating Damage caused by misuse is not covered by the warranty
Introduction
Thank you for choosing the A22 to power your sound system. This compact digital amplifier has been designed to provide a piece of flexible background music and public address solution in a discreet and easy-to-use format. Please read and keep this user manual to achieve the best results from your equipment and avoid damage through misuse.
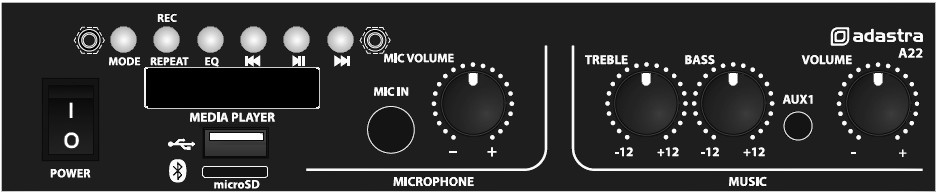
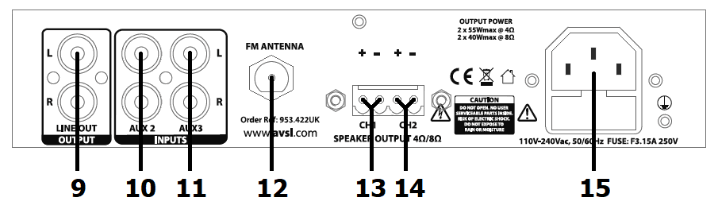
Front panel
1 Power on/off switch2 Media player3 Microphone input 6.3mm mono jack4 MIC VOLUME control5 Music TREBLE EQ control6 Music BASS EQ control7 AUX 1 input 3.5mm stereo jack8 Music VOLUME control
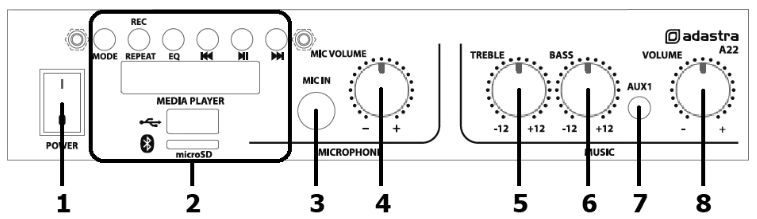
Rear Panel
9 LINE OUT output L+R RCA10 AUX 2 input L+R RCA11 AUX 3 input L+R RCA12 FM antenna connection F-type13 CH 1 speaker out +/- screw terminals14 CH 2 speaker out +/- screw terminals15 IEC mains power inlet and fuse holder
Placement
The A22 amplifier is supplied with 4 mounting brackets, which can be fixed to the sides of the housing with the tab facing upwards to enable the A22 to be mounted under a counter-top The A22 can even be mounted against a wall.
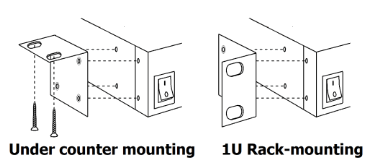
The A22 can even be mounted against a wall.
Alternatively, the A22 may be used free-standing on any flat surface or 2 units can be mounted side-by-side in a 19” rack with one mounting bracket facing forwards at each side, occupying a 1U rack space (the 4 self-adhesive feet will need to be removed to allow this)
Speaker connections
The A22 has 2 speaker outputs – CH1 and CH2 – on a single removable screw terminal block, which can be wired as Left and Right stereo outputs. (13, 14)
Connect the negative “–” screw terminal to the negative “–” speaker terminal(s)Connect the positive “+” screw terminal to the positive “+” speaker terminal(s)
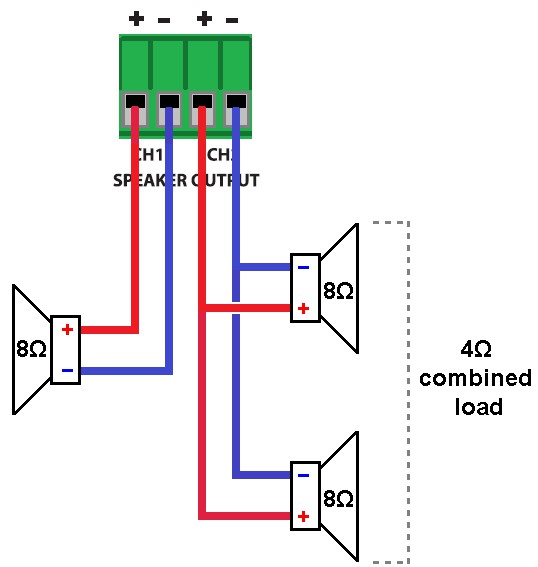
Use speakers with a combined impedance no lower than 4Ω for each output channel.
• If each speaker being connected is 4Ω, then connect only 1 speaker to each channel.• If each speaker is 8Ω, you can connect 1 speaker or 2 speakers in parallel per channel.• Do not connect more speakers to either channel, as this may cause damage to the A22.
An example of wiring 8Ω speakers to the A22 is shown opposite.
A single 8Ω speaker may be connected to a channel or 2 may be connected in parallel to present a combined 4Ω load to the output.
The impedance of the load, measured in “Ohms” (Ω), will also determine the power.
The amplifier delivers its maximum power output at the minimum impedance rating (4Ω). If the impedance is higher (e.g. 8Ω), then the output from that channel will be lower.
The combined load on each output shares the power from that amplifier channel.
This means that if two 8Ω speakers are connected to a single output in parallel, they will each receive half of the full power. If the amplifier is delivering 50W to two 8Ω speakers connected in parallel, they must each be able to handle 25W.
Input connections
The A22 has a 6.3mm microphone input and a media player (2) with several options for stereo music playback, including the internal media player and 3 stereo AUX line inputs.
If a microphone is to be used for announcements, turn the MIC VOLUME control (4) down and connect a wired microphone to the MICROPHONE jack input (3) on the front panel, using a microphone lead terminated with a 6.3mm plug.
A smartphone, tablet, or mp3 player can be connected to the AUX1 jack (3.5mm stereo) on the front panel (7)
Likewise, other stereo audio sources, such as CD player, DAB+/FM tuner, TV, or satellite decoder may be connected via the AUX2 and AUX3 L+R RCA inputs on the rear panel (10, 11)
The 3 AUX inputs are all selected via the MODE button on the built-in media player section.
The other stereo input source options are mp3 playback from USB or microSD, FM tuner and Bluetooth, which is all handled by the built-in media player.
For good reception of FM radio stations (if needed) in the media player, the A22 has an “F” connector (12) on the rear panel which can be connected to an external FM antenna (aerial) This is recommended if the FM tuner is to be used.
For mp3 playback, it is necessary to insert a USB flash drive into the USB port and/or a microSD card into the MicroSD slot on the front panel. These inputs are described in more detail in the Media Player section on the following pages.
The memory devices (USB or microSD) must be formatted to FAT32 and have standard mp3 audio files stored on them.
To link the audio output (music + microphone) of the A22 onto further equipment or as part of a larger sound system, connect the LINE OUT (9) connectors (L+R RCA) to the left and right line input of the additional equipment.
Once all the above connections are made, ensure that the power is switched off (1) and connect the IEC power inlet (15) to the 230Vac mains supply, using the IEC lead provided.
Operation
When all connections have been made as described above, turn down the MIC VOLUME and MASTER VOLUME control and switch on the power.
If a microphone is connected, gradually increase the MIC VOLUME whilst speaking into the microphone until the required level is reached through the speakers.
Note: Avoid pointing the microphone towards the speakers, which may result in feedback (loud whistling or howling caused by the microphone ‘hearing’ its own output)
The A22 has an inbuilt media player section, which governs all background music and playback options (independently of the microphone input). Full details of the media player operation are shown overleaf.
The Media player output level is governed by the music VOLUME control (8).
The tonal character of the media player and line inputs is adjusted via the TREBLE and BASS EQ controls (5, 6)
Turning the TREBLE control clockwise boosts the higher frequencies, whilst turning it anticlockwise reduces the higher frequency content. Reduce the TREBLE level if there is screeching feedback from the microphone or if playback is too thin or tinny sounding. Increase the TREBLE level if the sound is muffled and not clear.
Turning the BASS control clockwise boosts the lower frequencies, whilst turning it anticlockwise reduces the lower frequency content. Reduce the BASS level if there is low howling feedback from the microphone or if playback is too boomy and distorted. Increase the BASS level if the sound is too thin with not enough warmth or depth.
Be aware that a combination of Mic volume, Music volume, Treble and Bass all add up to drive the amplifier and if all are turned up, this can result in overdrive (aggressive and growly or fuzzy output) which can be damaging to connected speakers and the amplifier. Turn the output levels down if this happens until the distorted sound becomes cleaner and clearer.
Before powering the A22 off, ensure that the volume controls are turned down to avoid loud noises or pops through the connected speakers.
Media player
The media player has several different audio source options, which are accessed using the “MODE” button. Five more buttons control the playback (and recording) of tracks, which is displayed in the LED display directly below the buttons.
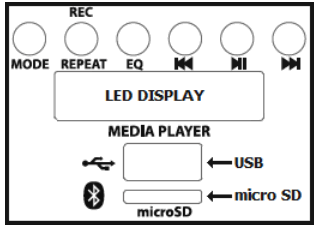
Below the LED display is a USB port for inserting a flash drive (USB pen drive) and below this is a slot for a micro SD card (or TF card)
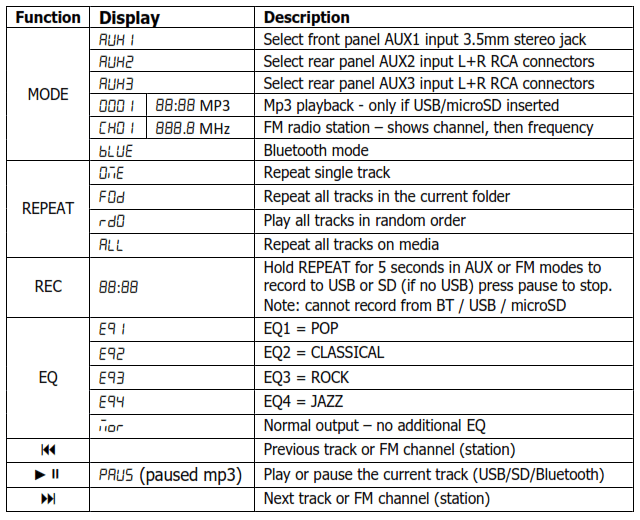
Functions of the media player are described in the table below.
Remote control
The A22 is supplied with a handheld infrared remote control, which shares many of the front panel functions along with some additional controls, as described below.

Bluetooth connection
The Bluetooth function allows the connection of a smartphone or tablet to the media player section for playback of stored files or streamed digital audio. To enable this function, it will be necessary to pair the sending device to the receiver as follows.
- Press the media player MODE button until the display shows “
 ”
” - Open the Bluetooth settings menu on the smartphone or tablet
- Scan for Bluetooth devices and look for “A22” in the list of available devices (ensure that the A22 is powered on with Bluetooth selected and within reception range)
- Select “A22” and the sending device should confirm that it is connected as an audio device.
- Play audio from the sending device, ensuring that volume controls are not turned down or muted
If the sending device goes out of range, the connection will only resume when back in range. Likewise, if a different mode is selected, the connection should resume when Bluetooth mode is re-selected.
If Bluetooth is disabled on the sending device or paired to a different receiver, it will be necessary to re-connect the sending device to the A2 from step 2 above to re-establish a Bluetooth link.
Specifications
- Power supply
- 230Vac, 50Hz (IEC)
- Output impedance
- 4 – 8 Ohms (each channel)
- Output power: 8 Ohms
- 2 x 25W rms / 2 x 40W max. (@ 1kHz 10% THD)
- Output power: 4 Ohms
- 2 x 35W rms / 2 x 55W max. (@ 1kHz 10% THD)
- Inputs: line
- Aux 1 (3.5mm), Aux 2 (L+R RCA), Aux 3 (L+R RCA)
- Input: mic
- 6.3mm jack
- Controls
- Mic Volume, Treble, Bass, Music Volume
- Audio source
- USB/microSD player, FM tuner, Bluetooth
- Antenna connection
- F-type (FM tuner)
- Dimensions
- 215 x 180 x 43mm
- Weight
- 820g
 Disposal: The “Crossed Wheelie Bin” symbol on the product means that the product is classed as Electrical or Electronic equipment and should not be disposed of with other household or commercial waste at the end of its useful life. The goods must be disposed of according to your local council guidelines.
Hereby, AVSL Group Ltd. declares that the radio equipment type 953.422UK is in compliance with Directive 2014/53/EUThe full text of the EU declaration of conformity is available at the following internet address: [pdf]Errors and omissions excepted. Copyright© 2020. AVSL Group Ltd.Unit 2-4 Bridgewater Park, Taylor Rd. Manchester. M41 7JQ
Class-D Compact Music Amplifier A22 User Manual – Class-D Compact Music Amplifier A22 User Manual –