
Adesso NuScan 2500TR User Manual

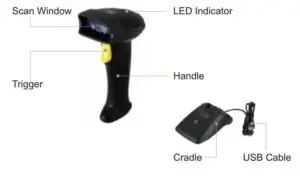
DESCRIPTION
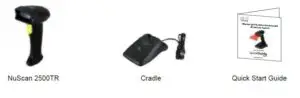
CONTENTS
INVENTORY MODE
Scan below barcode to enter “Inventory Mode”. In inventory mode, the scanner will not display the barcodes you scan and will not output them onto your device. Instead, the scanner will store them in its built-in memory chip.

NORMAL MODE
Scan below barcode to exit “Inventory Mode”. and enter “Normal Mode”. In normal mode your scanned barcodes will be uploaded into your device as your scanning.
LIMITED WARRANTY
Adesso® provides a one year limited warranty for all of its products against defects in materials and workmanship.
During this period, Adesso® will repair or replace any product which proves to be defective. However, Adesso® will not warrant any product which has been subject to improper handling, abuse, negligence, improper installation or unauthorized repair. The warranty will not cover products installed with components not approved by Adesso® and products where the sealed assembly trace has been broken.
If you discover a defect, Adesso® will, at its option, repair or replace the product free of charge, provided you return it during the warranty period with freight charges pre-paid to Adesso®. Before returning any product, you must obtain a Return Merchandise Authorization number (RMA). This RMA # must be clearly marked on the outside of the package you are returning for warranty service. Be certain to also include your name, shipping address (no PO Boxes), telephone number, and a copy of the invoice showing proof of purchase in the package.
SUPPORT
We have listed most of our FAQ’s (Frequently Asked Questions) at: http://www.adesso.com/faqs.asp. Please visit our FAQ Service & Support pages before you contact our E-mail or Telephone Support.
Email Support:If our FAQ’s do not help you resolve your issues, please email
Telephone Support:Toll Free: (800) 795-67889:00AM to 5:00PM PST Monday – Friday
INSTALLATION
1. Turn OFF your computer

2. Plug the USB Cable of the cradle to the USB ports of your computer.
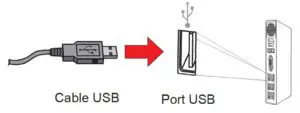
3. Turn ON your computer and the scanner will automatically be recognized by your computer. Your scanner will automatically pair with the cradle. It’s now ready to use.
Windows will detect the driver for the scanner automatically. No driver required.
SLEEP TIMER SETTINGS
Scan below barcodes to set different sleep timers for the scanner. By default sleep timer isset to 30 seconds.

INTRODUCTION:
The Adesso NuScan 2500TR is compatible with a wide range of 1D and 2D barcode symbologies. With the built-in usb receiver inside its cradle, the NuScan 2500TR is completely plug and play, making it extremely reliable.
The wireless receiver inside the cradle is capable of receiving data from the scanner from up to 150 feet away. This makes it ideal in many different applications. The scanner is also made with antimicrobial substances which helps keep away germs and viruses.
The spillproof feature also ensures that fluids from accidental spills won’t stay inside the device. With extra protective design such as the drop protection, the device is less likely to become damaged from accidental drops.
Last but not least, compatible with major 2D barcodes(PDF 417, QR Codes, Micro QR Codes, and Data Matrix), and with 1D barcodes like UPC-A, Code 39, Code 128, and more), the NuScan 2500TR is great for your scanning needs.
COMPATIBLE BARCODE SYMBOLOGIES:

REQUIREMENT:
An Available USB Port
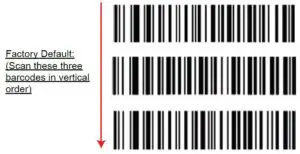
RETURN TO FACTORY DEFAULT
REESTABLISHING CONNECTION TO THE RECEIVER
- The receiver is built inside the cradle. Press and hold the button on the cradle for 3 seconds until the green light is OFF.
- Scan below barcode and your scanner will begin beeping.
- Press and hold the button on the cradle for 3 seconds until the green light is ON.
- The scanner should stop beeping and you have successfully reestablished connection
FCC Caution.
This device complies with part 15 of the FCC Rules. Operation is subject to the following twoconditions:
- This device may not cause harmful interference, and
- This device must accept any interference received, including interference that may cause undesired operation. Any Changes or modifications not expressly approved by the party responsible for compliance could void the user’s authority to operate the equipment.
Note: This equipment has been tested and found to comply with the limits for a Class B digitaldevice, pursuant to part 15 of the FCC Rules.
These limits are designed to provide reasonable protection against harmful interference in a residential installation. This equipment generates uses and can radiate radio frequency energy and, if not installed and used in accordance with the instructions, may cause harmful interference to radio communications.
However, there is no guarantee that interference will not occur in a particular installation. If this equipment does cause harmful interference to radio or television reception, which can be determined by turning the equipment off and on, the user is encouraged to try to correct the interference by one or more of the following measures:
- Reorient or relocate the receiving antenna.
- Increase the separation between the equipment and receiver.
- Connect the equipment into an outlet on a circuit different from that to which the receiver is connected.
- Consult the dealer or an experienced radio/TV technician for help.
* RF warning for Portable device:The device has been evaluated to meet general RF exposure requirement. The device can be used in portable exposure condition without restriction.
Read More About This User Manuals…
 report this ad
Questions about your Manual? Post in the comments!
[xyz-ips snippet=”download-snippet”]