
![]()
Instruction BookAX3

DESCRIPTION OF YOUR AIR PURIFIER AX3
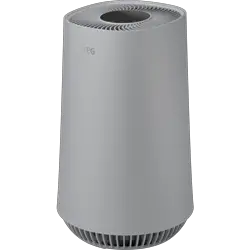
| Appliance:A. Air outletB. UI panelC. Main bodyD. BaseE. Sensor window & Adapter jack | Control panel:F. Fan speed indicatorG. Power on/offH. Fan speed controlI. Air quality indicatorJ. Filter change indicator | K. Toggle mode & Filter resetL. Auto mode indicatorM. Sleep mode indicator |
SAFETY INFORMATION
This USER MANUAL provides specific operating instructions for your model. Use the unit only as instructed in this USER MANUAL. These instructions are not meant to cover every possible condition and situation that may occur. Common sense and caution must be practiced when installing, operating, and maintaining any appliance.WARNING! Avoid fire hazards or electric shocks. Do not use an extension cord or an adaptor plug. Do not remove any prong from the power cord. This appliance can be used in a 50Hz or 60Hz power supply without any change.Do not under any circumstances, cut, remove or bypass the grounding prong.Do not store or use gasoline or other flammable vapors and liquids in the vicinity of this or any other appliance. Read product labels for flammability and other warnings.Do not let water or any other liquid or flammable detergent enter the appliance to avoid electric shock and/or a fire hazard.Do not touch the fan blade when removing the filter.Children and Vulnerable People SafetyWARNING! Risk of suffocation, injury or permanent disability. This appliance can be used by children aged 8 years and above and persons with reduced physical, sensory or mental capabilities or lack of experience and knowledge if they have been given supervision or instruction concerning the use of the appliance in a safe way and understand the hazards involved.Children shall not play with the appliance.Cleaning and user maintenance shall not be made by children without supervision.Children under 3 years of age should be kept away from the appliance unless continuously supervised.Keep all packaging away from children.If the appliance has a child safety device, we recommend you activate it.
Electrical Information
WARNING! Avoid fire hazards or electric shocks. If you are not sure the outlet is adequately grounded or protected by a time-delay fuse or circuit breaker, have a qualified electrician install the proper outlet according to the National Electrical Code and applicable local codes and ordinances.Do not use an extension cord or an adapter plug. Never unplug the unit by pulling on the power cord. Always grip the plug firmly and pull straight out from the receptacle.Do not pinch, bend, or knot the power cord.Do not cut or damage the power cord. If the power cord is damaged, it should only be replaced by an authorized AEG servicer. This unit contains no user-serviceable parts. Always call an authorized AEG servicer for repairs.If the supply cord is damaged, it must be replaced by the manufacturer, its service agent, or similarly qualified persons in order to avoid a hazard.Be sure to unplug the unit before cleaning to prevent shock or fire hazards.
Safety Precautions
CAUTION! Avoid Serious Injury or Death.Do not insert or place fingers or objects into the air discharge area or front grille of the unit.Do not start or stop the unit by unplugging the power cord or turning off the power at the electrical box. In the event of a malfunction (sparks, burning smell, etc.), immediately stop the operation, disconnect the power cord, and call an authorized AEG servicer. Do not operate the unit with wet hands.Do not pull on the power cord.CAUTION! Avoid injury or damage to the unit or other property.Do not direct airflow at fireplaces or other heat-related sources as this could cause flare-ups.Do not climb on or place objects on the unit.Do not hang objects off the unit.Do not place containers with liquids on the unit.Turn off the unit at the power source when it will not be used for an extended period of time.Operate the unit with air filter in place.Do not block or cover the intake grille, discharge area and outlet ports.Ensure that any electrical/electronic equipment is 30 cm away from the unit.DISPOSAL![]() This symbol on the product indicates that this product contains a battery that shall not be disposed of with normal household waste.
This symbol on the product indicates that this product contains a battery that shall not be disposed of with normal household waste.![]() This symbol on the product or on its packaging indicates that the product may not be treated as household waste.www.aeg.com
This symbol on the product or on its packaging indicates that the product may not be treated as household waste.www.aeg.com
To recycle your product, please take it to an official collection point or to an AEG service center that can remove and recycle the battery and electric parts in a safe and professional way. Follow your country’s rules for the separate collection of electrical products and rechargeable batteries.Thank you for choosing the AEG air purifier AX3. Always use original accessories and spare parts to get the best results. This product is designed with the environment in mind. All plastic parts are marked for recycling purposes.
BEFORE STARTING
- Read this manual carefully.
- Check that all parts described are included.
- Pay special attention to the safety precautions!
SET UP
The filters have to be installed before use. Caution: Switch off the device before installing filters.
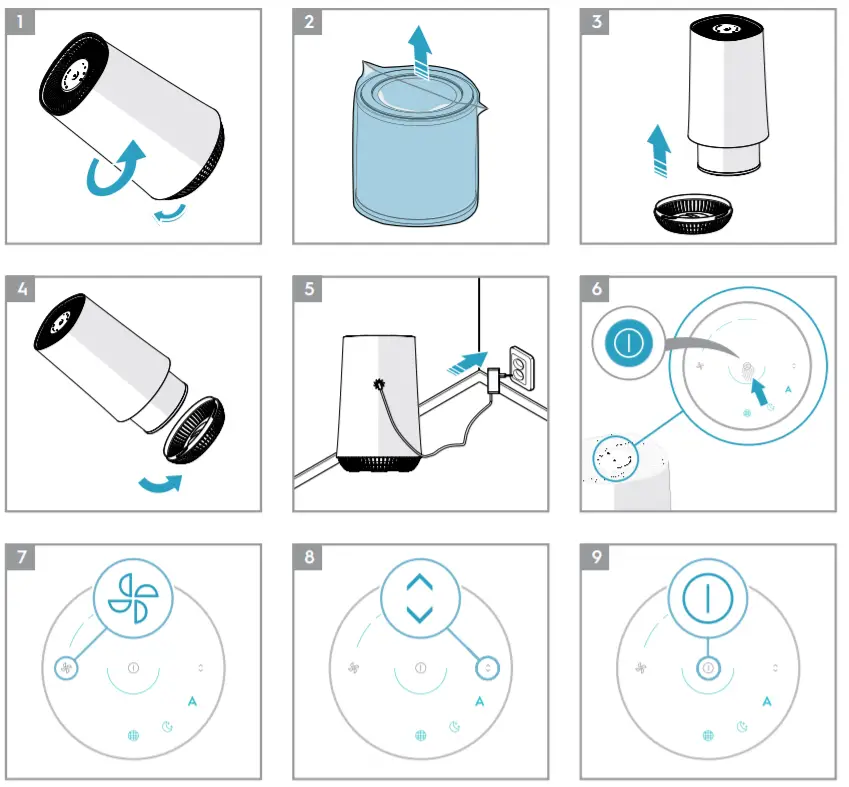
- Open the base of the filterOpen the product by rotating the base in an anticlockwise direction with the handle provided at the bottom till it comes loose (ref. picture 1).
- Take out the filter and remove the filter bagCarefully remove the filter including plastic packaging from the unit and break open the plastic bag and discard it appropriately (ref. picture 2).
- Install the filterCarefully insert the filter back into the product without the plastic packaging (either end of the filter works). Take care that the filter is placed in the center of the cavity (ref. picture 3).
- Close the baseClose the product by rotating the base in a clockwise direction with the handle provided at the bottom till it is securely in place. (ref. picture 4).OPERATIONCaution: Please ensure the filters are correctly inserted in the filter compartment, the equipment is installed on a level surface and the power plug is firmly connected.
- Connect the power plug.
- Power onPower on the product by gently touching the ON/ OFF icon on the center of the product (ref. picture 6).
- Fan speed controlChange the fan speed by gently touching fan icon on the product. If the product is in AUTO mode, it will switch to manual mode on touching the fan icon. (ref. picture 7).
- Auto mode and sleep modeChange between AUTO and SLEEP mode by gently touching the icon labeled “
 “.In AUTO mode the unit will adjust operation according to the latest air quality (PM2.5 level). In SLEEP mode unit will operate at the low noise level and all indicators except for the SLEEP icon will go off.
 - Power offPower down the product by gently touching the ON/OFF icon on the center of the product (ref. picture 9)
- AIR QUALITY INDICATORThe appliance has an air quality sensor that analyzes the air quality.The air quality light will show the real-time air quality through different colors of light. As shown below:
LIGHT’S COLOR PM 2.5 (μg/m3) AIR QUALITY Green 0-12 Very Good Yellow 13-35 Good Orange 36-55 Poor Red >56 Bad - FILTER CHANGE INDICATORThe filter change indicator will light up to remind you to change the filter (Ref. # AFFBRZ2).• When the filter change indicator flickers with red light, please replace the filter and reset the filter change indicator.• When the filter change indicator stop flicking and the red light fix, please replace the filter immediately and reset the filter change indicator.
- Filter change indicator reset operationPress the mode icon labeled “ ” for 3s and the filter change indicator will reset, then the red light will go off.CARE AND CLEANING
- Unplug the appliance before cleaning to prevent shock or fire hazards. Use a damp cloth or a vacuum cleaner with a soft brush to clean your air purifier.
- The plastic part of the cabinet and top may be cleaned with an oil-free cloth or washed with a cloth dampened in a solution of warm water and mild liquid dishwashing detergent. Be sure to wring excess water from the cloth before wiping around the controls. Excess water in or around the controls may cause damage to the appliance.
- Never use harsh cleaners, wax or polish when cleaning the unit.STORAGE
- If you are not planning to use the appliance for a long time, cover it with plastic or return it to its carton.NOTE: The multi-layer filter can not be washed, it can only be replaced.CAUTION!Do not touch the fan blade when removing the multi-layer filter.ERROR CODE
- Fan failure error code, when fan failure occurs, the light of the screen will all go off and the unit can’t be operated then.
- Air quality sensor failure error code, when sensor failure occurs, the light of air quality indicator will go off and the unit can’t be set on auto mode.
TROUBLESHOOTING
 report this ad
When fault indicators show that the system is not operating properly, perform the following check.Commonly Asked Questions & TopicsCarry out the operations below for commonly-occurring questions or faults.
| Questions or Faults Possible Diagnosis Corrective Steps / Reasoning | ||
| Can the filters be washed? | NO | Replace the compound filter instead of wash, the pre-filter can be wiped. |
| The control panel does not seem to work. |
|
1. Please ensure power cord is firmly attached to the unit as well as socket on the wall and then retry pressing the ON/OFF icon.2. Please reopen the bottom of the unit, readjust the filter so it is centrally placed in the cavity and close the bottom. Ensure the bottom is firmly in place & locked and then retry operating the unit.3. If the above two steps do not resolve this issue, then the unit has experienced a fan motor failure and will not operate. Please contact AEG authorized servicer for further troubleshooting or repairs. |
| The equipment emits a lot of noise. | The installation location is not at an even level or the filter is not properly inserted. | Install the equipment on a level surface and re-confirm filter installation position and order. |
| The equipment operates normally but the outgoing air volume is significantly reduced. | The outlet might be blocked by a foreign object or the filter has not been replaced in a timely manner. | Please re-adjust the quipment installation position to ensure enough space is reserved, and confirm that filters have been replaced according to filter replacement indicator status. |
| If the fault encountered is not listed above, please call the Customer Service Hotline. |
References
[xyz-ips snippet=”download-snippet”]