
Aegislink Q106 Fingerprint Entry Door Lock
Safety
Read this section carefully to ensure your safety and to prevent potential damage.
- Do not install or repair this lock without proper authorization. Improper installation may incur additional costs. We highly recommend professional installation.
- Do not use water, alcohol, or any other corrosive materials to clean this lock. Clean it with a dry, soft cloth.
- Do not operate this lock if your hands are wet, and keep liquids away from this lock to avoid malfunctioning or damage.
- Make sure that no unauthorized person has access to your passwords or mechanical keys. For your home security, it is recommended to change the password periodically.
- Make sure that the door is completely closed when going outside.
- Remember to set a new administrator password and fingerprint after resetting the lock. Otherwise, any fingerprint will be able to unlock the door.
- Keep mechanical keys in a safe, secure location. They function as a backup and prevent you from getting locked out of your house if your passwords, fingerprints, and app are all inoperative.
- Check the Reset button regularly to ensure it has not been tampered with
- Replace batteries immediately when you receive a low battery warning. If the battery is low, the lock will notify you via a voice message. If the battery power runs out, charge the lock with a power bank through the emergency power port on the bottom of the lock.
- Restrict access to your phone and passwords to prevent your home from being broken into.
- Do not use excessive force or sharp objects to push the lock buttons as this can damage the lock.
- Be sure to match the poles(+/-) when installing the batteries. Improper installation of the batteries can cause them to burst or corrode.
Packaging
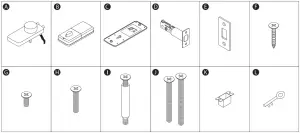
- 1 x Front panel
- 1 x Back panel
- 1 x Iron plate
- 1 x Deadbolt
- 1 x Buckle plate
- 4 x Tapping screws (M4 x 0.8 in)
- 2 x Back panel screws (M4 x 0.4 in)
- 1 x Back panel screw (M4 x 1 in)
- 1 x Connection column & screw (M4 x 1.5 in)
- 4 x Front panel screws (MS x 1.8 in/2.2 in)
- 1 x Buckle box
- 3 x Mechanical keys
Product Overview
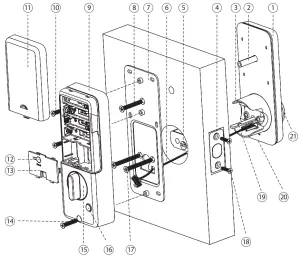
- Front panel
- Connection column (standby
- Front panel block
- Deadbolt
- Packsack
- Wire
- Iron plate
- Standby connection column screw (M4 x 1.5 in)
- Backplane
- Back panel screws (M4 x 0.4 in)
- Battery cover
- Reset button
- Backrower
- Back panel screw (M4 x 1 in)
- Knob
- Switch button
- Front panel screws (MS x 1.8 in/2.2 in)
- Tapping screws (M4 x 0.8 in)
- Pick
- Emergency power port
- Key over
Installation
Finding a Suitable Location for Lock Installation
- Make sure you have a Phillips screwdriver and 4 AA batteries before installation.
- Ensure the door path is clear and install the lock on the correct side of the door.
- Measure the size of the door and drill the required holes accordingly. The distance between the door edge and center of the hole should be 2.4 in-2.8 in.
Note:
- If you are inexperienced in lock installation, we highly recommend you have professionals installing the lock.
- The diameter of the hole you drill should be either 1.5 in or 2.1 in. If it is 1.5 in, remove the front panel block for a proper fit.


Installing the Deadbolt
- Place the deadbolt in the “UP” direction, indicated by the arrow, in the door.
- Install the deadbolt with the tapping screws (M4 x 0.8 in).
Note:
- You can adjust the length of the deadbolt from 2.4 in to 2.8 in to fit your door.
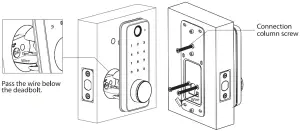
Installing the Front Panel and Iron Plate
- To install the front panel, pass the wire through the hole under the deadbolt, making sure to match the pick with the pick jack. Do not pass the wire through the hole over the deadbolt; otherwise, it may interfere with the deadbolt and impact lock performance.
- To install the iron plate, continue to pass the wire through the iron plate and match the iron plate with the front panel. To match the front panel with the iron plate, make sure the holes in both plates are aligned.
- Fix both plates securely with the front panel screws (MS x 1.8 in/2.2 in).
Note:
- Choose the screws according to door thickness. If the door is 1.4 in-1.8 in thick, install the lock with MS x 1.8 in screws. If the door is 1.8 in-2.2 in thick, use MS x 2.2 in screws.
- If the lock is loose or wiggles slightly, you can drill a 0.8-in diameter hole, 3 inches above the door hole, and reinforce the lock with the standby connection column screw (M4 x 1.5 in). Remember to remove the front panel and iron plate before proceeding with the above operations.
Installing the Back Panel
- Remove the battery cover and back cover, and then pass the wire mentioned above through the back panel.
- Match the back panel to the iron plate and secure using the M4 x 0.4 in screws in the battery box.
- Twist the knob vertically and align the pick with the back panel. You will hear a click when they are properly aligned.
- Insert the wire into the port inside the back cover and close the back cover.
- Reinforce the back panel with the back panel screw (M4 x 1 in).
Installing the Batteries and Back Cover
- Install the batteries and battery cover. When the batteries are properly installed, you will hear an audio alert.
- Install the buckle plate and box.
Lock Calibration
- To reset the lock, open the battery cover and press the Reset button for 3 seconds.
- When the !) button is bright, twist the knob from the vertical position to the horizontal position.
- Press the 7 button for 3 seconds to automatically correct the door position when closed. After this, the door will automatically lock when the door is closed.

Basic Functions
Adding an Administrator
- Press any button on the lock to wake up the screen.
- Press the la button for 3 seconds or the Reset button.
- To add the first administrator, enter your desired password twice and then enroll the fingerprint.a. Password: A valid password can be 6 to 8 digits. Enter your password once, confirm it using the la button; enter it a second time, and confirm using the la button again.b. Fingerprint: Set up a fingerprint by pressing a finger up to the scanner 6 times. When a fingerprint scan is completed, confirm by using the la button.
- To add the second administrator, enter the password or enroll the fingerprint. You can choose password or fingerprint, or do both. This smart lock allows you to add up to 2 administrators.
Note:
- The lock will have voice instructions walking you through each step of the operation.
- When you receive the lock, the default password is set to 1234567890. You will need to reset the lock and add new administrator passwords and fingerprints.
- You cannot set a password such as 123456. Simple passwords will not be accepted by the lock system.
Adding a User
- Press any button on the lock to wake up the screen.
- Press the button for 3 seconds or the Reset button, and verify administrator access via an administrator password or fingerprint.
- To add a user, enter a user password or set up a fingerprint.a. Password: Each time a user enters a password, confirm it by pressing the button. Passwords can be 6 to 8 digits.b. Fingerprint: Each time a user sets up a fingerprint, confirm it by pressing the button. The user will need to press their finger to the screen 6 times to set up a fingerprint.
Note:
- The lock will have voice instructions walking you through each step in the procedure.
- Up to 50 passwords and 50 fingerprints can be added to this lock.

Deleting a User
- Press any button on the lock to wake up the screen.
- Press the button for 3 seconds or the Reset button, and verify administrator access via an administrator password or fingerprint.
- Press the button for 3 seconds again.
- Press the 1 button to delete all user fingerprints, the 2 button to delete all user passwords, and the 3 button to delete all user information.
Note:
- The lock will have voice instructions walking you through each step in the procedure.
- You can only delete users, not administrators. To delete administrators, press the Reset button for 3 seconds to reset your lock. Please note that once you reset the lock, the door can be opened by anyone using their fingerprints until new fingerprints are enrolled
Changing the User Password
- Press any button on the lock to wake up the screen.
- Press the 5 button for 3 seconds on the lock screen; you will hear a voice prompt.
- Enter the old password.
- Enter a new password twice. Each time you enter the password, confirm it by pressing the Ply button.
Note:The old password will be invalid after changing the password. You cannot change the administrator password using this method. To change the administrator password, reset the lock as described.
Resetting the Lock
- Press the Reset button for 3 seconds, and the button will flash blue.
- To reset, verify administrator access by pressing the button and entering the correct password or fingerprint.
- After resetting, all information is removed. You should add a new administrator by following the procedures in the “Adding an Administrator” section.
Note:Before adding a new administrator, please calibrate the lock. Otherwise, you will not be able to wake up the lock screen to proceed.
Using the App to Control the DoorSigning Up in the App
If you already have a TuyaSmart account, skip to the next step.
- Download the TuyaSmart app by searching for “TuyaSmart” in the Apple App Store or Google Play Store, or by directly scanning the QR code.
- Sign up in the TuyaSmart app with a valid phone number or an email address. Enter the verification code sent and set up a password to complete the sign-up procedure.


Adding the Lock to the App
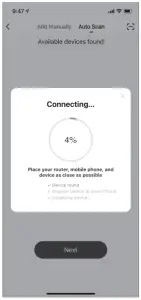
- Turn on Bluetooth in your phone.
- Press the 3 button for 3 seconds, and then verify administrator access.
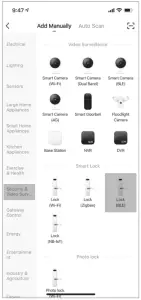
- Tap the+ button on the app page, then add the lock to the system via “Add Manually” or “Auto Scan”. For convenience, we recommend that you use “Auto Scan”.
Auto Scan:The app will automatically find “Bluetooth smart lock”; tap it to start network configuration. You will hear a voice message if the lock is added successfully.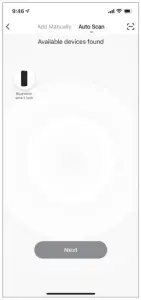
Add Manually:Use the following instructions: Security & Video Surveillance-> Smart Lock
Note:Make sure the router’s Wi-Fi signal type is set to 2.4 GHz. Otherwise, TuyaSmart will be unable to discover any devices.
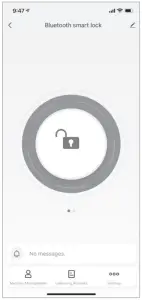
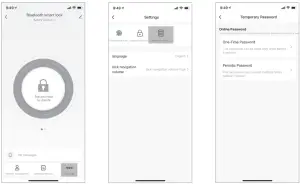
Operating the Lock via the App
- Tap and Hold to Unlock: You can tap and hold to unlock using the app. The lock screen will display the 5 button and the 8 button. If you press them together, the lock will be in regularly open mode.
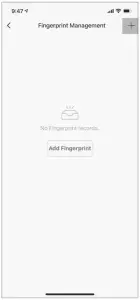
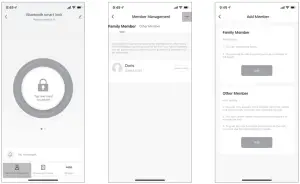
- Fingerprint & Password Management: You can manage fingerprints or passwords in the TuyaSmart app by following the steps in these figures.
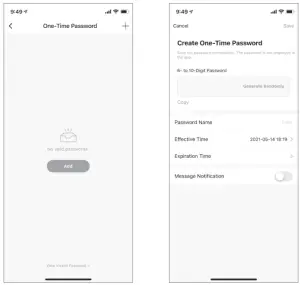
- Temporary Password: You can create a temporary password that can be sent to visitors to unlock the door while you’re away. Slide the app page horizontally and click to get a dynamic password. This password will expire in S minutes after creationYou can also set the time duration of passwords in the “Set” page. When a temporary password is set, an SMS message will be sent.
- Member Management: You can invite your family members to the system and manage the lock in the TuyaSmart app. Administrators can set passwords or fingerprints for themselves and users, and family members can set their own permissions. Family members can only be invited by the administrator to jointly manage the door.
Note:
- Make sure your phone is as close to the door as possible, or at least within 50 ft when operating the lock via the app.
- Some contents shown in the app user interface might slightly differ from those in the user manual due to later software upgrades
Additional Functions
Automatic Locking After Incorrect Passwords or Invalid FingerprintsThe door will lockout for 180 seconds if you enter a wrong password or use an invalid fingerprint 5 times in a row.
Anti-Theft PasswordA default password is 6-8 digits. You can enter a password 9-16 digits long that contains your real password to prevent your password from being stolen. To minimize risk of larceny, you should change your password periodically
Low Power Alarm
When the battery is low, you will hear a voice message every time you open the door. The voice message will play about 50 times in total. If the battery completely dies, charge the lock with a power bank through the emergency power port on the bottom of the lock. Please note that the app functions will not work if the battery is dead.
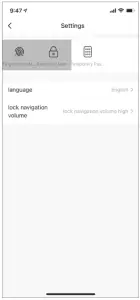
Volume AdjustmentPress the 3 button for 3 times and the ![]() button to adjust the volume (Mute/Low/High). Every time you press the
button to adjust the volume (Mute/Low/High). Every time you press the ![]() button for 3 times and the 9 button, the volume will change from Mute to Low, Low to High, or High to Mute.
button for 3 times and the 9 button, the volume will change from Mute to Low, Low to High, or High to Mute.
Regularly Open ModeYou can keep the door unlocked if needed. Verify administrator access via password or fingerprint and confirm using the ![]() button. Press the 5 button and the 8 button simultaneously to change to regularly open mode. A user or administrator can activate this mode by using their passwords or fingerprints.
button. Press the 5 button and the 8 button simultaneously to change to regularly open mode. A user or administrator can activate this mode by using their passwords or fingerprints.
Frequent Asked Questions
Q: Is this smart lock compatible with Android and iOS?A: Yes, this Aegislink smart lock is compatible with both Android and iOS.
Q: Does this smart lock work if my mobile phone is turned off?A: Yes. You can still lock/unlock the door via password, fingerprint, or key.
Q:What if the door fails to lock automatically when I close the door?A: Make sure you have set up the Auto-Lock function. If not, press 7 for 3 seconds and then enter the administrator password. The door will automatically lock when closed.
If you confirm Auto-Lock and the door will still not lock automatically, verify lock installation and battery power. The Auto-Lock function will not activate if the lock has been installed improperly or if the battery is dead.
Q: Why does the door beep every time I lock or unlock it?A: If you are hearing beeping or voice messages, it may be because the battery power is low. You should replace the batteries for continuous power supply.
Q: Why can’t I open my door via the app when I’m far away?A: Using the app to unlock your door can be influenced by various factors such as obstacles. It is recommended to bring your phone as close to the door as possible, or at least within 50 ft.
Specifications
| Model | Q106 |
| Materials | Plastic |
| Front panel size | 2.6 x 6.4 x 1.2 in |
| Back panel size | 2.9 x 7.4 x 1.8 in |
| Lock weight | 4.1 lb |
| Unlocking methods | App/fingerprint/password/key |
| Power supply | 4 x AA batteries, (not included) |
| Door thickness to fit | 1.4 in-2.2 in |
| Data capacity | Max 50 fingerprints and max 50 passwords |
| Working temperature | 22°F-131 °F |
| Working humidity | < RH 9S% |
Warranty
Aegis link provides their customers with a 60-day refund policy, a 12-month warranty, and lifetime technical support. For any after-sales questions, please contact at [email protected], and we will help you as soon as possible
Environmental Protection
Waste electrical products should not be disposed of with household waste. Please recycle where facilities exist. Check with Local Authorities or retailer for recycling advice.

 report this ad
[xyz-ips snippet=”download-snippet”]