
![]()
AEO RX14x / RX14x-E / RX15x-E SeriesMini Micro ReceiverInstruction Manual
Thank you for choosing AEORC, please read this document carefully before use.
Version selection
Please understand the corresponding basic functions according to the product you purchased.
| NO. | Support Protocol | Specification | |||
| Series NO. | Product NO. | TELEM | 5A/1S Brushed ESC | 5A/1S Brushless ESC | 74/2S Brushless Esc |
| RA1x | x=2 | 59-155 | • | ||
| x=4 | DSMX/2 | • | |||
| x=5 | FRSKY-D16 | • | |||
| x=6 | AFHDA-2A | • | |||
| x=7 | FRSKY-D8 | • | |||
| x=4T | DSMX/2 | • | • | ||
| x=5T | FRSKY-D16 | • | • | ||
| x=6T | AFHDA-2A | • | • | ||
| RX’5-.E | x=2 | SFHSS | • | ||
| x=4 | DSMX/2 | • | |||
| x=5 | FRSKY-D16 | • | |||
| x=6 | AFHDA-2A | • | |||
| x=4T | DSMX/2 | • | • | ||
| x=5T | FRSKY-D16 | • | • | ||
| x=6T | AFHDA-2A | • | • | ||
| RX15x:-E | x=2 | SFHSS | • | ||
| X=4 | DSMX/2 | • | |||
| x=5 | FRSKY-D16 | • | |||
| x=6 | AFHDA-2A | • | |||
| x=7 | FRSKY-D8 | • | |||
| x=4T | DSMX/2 | • | • | ||
| x=5T | FRSKY-D16 | • | • | ||
| x=6T | AFHDA-2A | • | • |
Basic Data
| RX14X | RX14X-E | RX15X-E | |
| Size | 12.0’18.6’6.5mm | 12.0’22.5’6.5mm | 16.0’24.0’6.8mm |
| Weight | 0.9g(without wire) | 1.3g(without wire) | 2.0g(without wire) |
| Working Vol. | 3.0-5.0V | 3.3-4.2V | 6.0-12.6V |
| BEC | 5V boost circuit | 3.9V buck circuit | |
| Mode-1 | Aileron double servo mode | Aileron double servo mode | |
| Mode-2 | 5A/1S Brushed ESC | 5A/1S Brushless ESC | 7A/2S Brushless ESC |
| Mode-3 | automatic frequency matching | automatic frequency matching | automatic frequency matching |
| Mode-4 | TELEM (Specific version) | TELEM (Specific version) | TELEM (Specific version) |
Receiver interface definition
RX14x interface definition: (As Picture 1.1) RX14x-E interface definition : (As Picture 1.2)
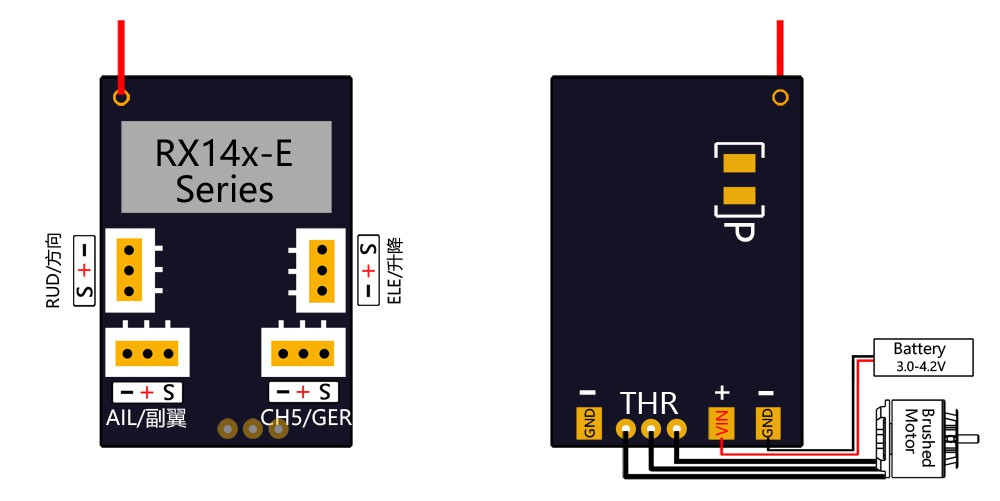 RX152-Einterface definition:(As Picture 1.3)
Combine receiver and transmitter
- Turn on the transmitter and power the receiver. At this time, the receiver is in the state of confirming the transmitter signal, and the LED light flashes slowly.
- If the transmitter signal cannot be confirmed within 15 seconds, then enter the automatic frequency matching mode, the receiver starts to search for the signal and perform frequency matching, and the LED light flashes quickly.
- If the frequency matching is successful, according to different types of remote transmitters , there will be a variety of different LED light feedbacks, including but not limited to the following three LED light flashing methods. Please confirm according to the actual remote control whether the frequency matching is successful or not.

Function introduction
- Aileron double servo mode RX14x-E and RX15x-E (on by default) series receivers have this function. When your fixed wing aircraft needs two aileron servos on the left and right, please use this function to simplify the connection of servo and the setting of remote control. Short circuit the pad at “P” in the figure below to open this function. At this time, CH3 is set to CH4 inverted output. If want to cancel this function, please disconnect the pad at “P”(As picture 1.2 1.3)
- How to use the integrated ESC (5A/1S brushed ESC, 5A/1S brushless ESC, 7A/2S brushless ESC) RX14x series integrates 5A/1S brushed ESC, RX14x-E series integrates 5A/1S brushless ESC, RX15x-E series integrates 7A/2S brushless ESC. The brushless ESC supports the DSHOT protocol, doesn’t need to calibrate the throttle stroke; in addition, the DSHOT signal transmission is faster and the refresh rate is higher; the response speed of the ESC is much higher than that of the traditional brushless ESC.
How to use ESC:RX14x SeriesConnect the positive pole of the brushed motor to”M+” and the negative pole to “M-“to replace the throttle channel, as picture 1.1. The integrated brushed ESC has the lock function of preventing accidental touch. After the receiver is powered on, the throttle channel remains at the lowest position for more than 2 seconds, then this function can be cancelled and the brushed ESC can be used normally.
RX14x-E SeriesConnect the three wires of the brushless motor to the “THR”. Please pay attention to the rotation direction of the motor. If you need to change the rotation direction of the motor, please change the position of any two of the three wires. As picture 1.2
RX15x-E Series:Connect the three wires of the brushless motor to the “THR”. Please pay attention to the rotation direction of the motor. If you need to change the rotation direction of the motor, please change the position of any two of the three wires. As picture 1.3.
3.Automatic frequency matchingAfter the receiver is powered on after 15 seconds, it still fails to complete the frequency alignment, the receiver will enter the automatic frequency matching mode. At this time, the LED light will change from slow flashing to fast flashing, then please complete the frequency matching according to the frequency matching operation of the transmitter.
4.TELEM Function Introduction,Firstly, you need a remote control with TELEM to use this TELEM function. This function could realize real-time monitoring to battery voltage, receiver voltage, receiver signal strength and receiver operating temperature, allowing users to master the working status of receiver and battery in real time to avoid unexpected situations in flight.
[xyz-ips snippet=”download-snippet”]