Range Extender 7 user guide. : Aeotec Group
Range Extender 7 user guide.Modified on: Mon, 16 Mar, 2020 at 2:06 AM
Aeotec Range Extender 7.

Aeotec Range Extender 7 was developed to amplify Z-Wave Z-Wave Phi (http://aepotec.com/z-wave-Pius) signals. It is powered by Aeotec’s Gen7 ( (https://aeotec.com/z-wave-home-automation/zwave-gen7.html) technology. You can find out more about Range Extender (hittp://aeotec.com/wave-repeater)7 by following that link.
To see whether Range Extender 7 is known to be compatible with your Z-Wave system or not, please reference our Z-Wave gateway comparison (http://aeotec.com/z-wave-gateways) listing. The technical specifications of Range Extender 7 (https://aeotecireshdesk.com/a/solutions/articles/6000226828) can be viewed at that link.
Important safety information.
Please read this and other device guides carefully. Failure to follow the recommendations set forth by Aeotec Limited may be dangerous or cause a violation of the law. The manufacturer, importer, distributor, and/or reseller will not be held responsible for any loss or damage resulting from not following any instructions in this guide or in other materials.Keep product away from open flames and extreme heat. Avoid direct sunlight or heat exposure.Range Extender 7 is intended for indoor use in dry locations only. Do not use in damp, moist, and/or wet locations.
Quick start.
Adding your Range Extender into a Z-Wave network.Getting your Range Extender up and running is as simple as plugging it into a wall outlet and adding it to your Z-Wave network. There are 2 methods to pair your Range Extender depending on the capabilities of your Z-Wave gateway/controller/hub.SmartStart Inclusion.You can use this method of inclusion only if your Z-Wave gateway/controller/hub supports SmartStart.
- Open up your Z-Wave gateway/controller/app.
- Select SmartStart inclusion.
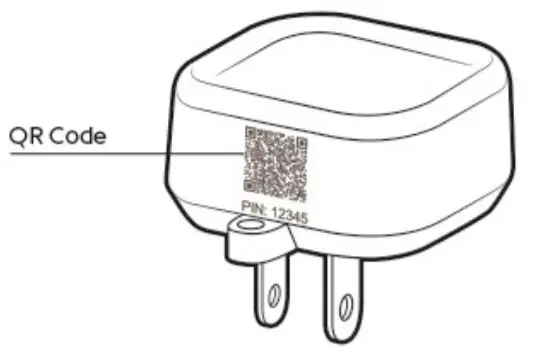
- Scan the QR code located on the Range Extender 7.

- Within 10 minutes after powering your Range Extender 7, it will automatically get included in your Z-Wave gateway/controller/hub.LED will flash for 1 second after Repeater is powered, if successful, the LED will become a solid bright light for 2 seconds.
Classic Inclusion.
- Decide on where you want your Range Extender to be placed and then plug it into a wall outlet.https://aeotec.freshdesk.com/support/solutions/articles/6000226827-range-extender-7-user-guide-Make sure that the LED is breathing its white LED.
- Set your Z-Wave Controller into pairing mode.
- Press the Z-Wave Button on your Range Extender and quickly release the button (should only be a quick tap action on the button).Range Extender 7 will quickly flash its white LED for up to 30 seconds or until it is paired successfully. If successfully paired, the LEDs light will become brighter.If your repeater failed to pair, the LED will return to slow breathing LED. If it is this case, please return to step 2.
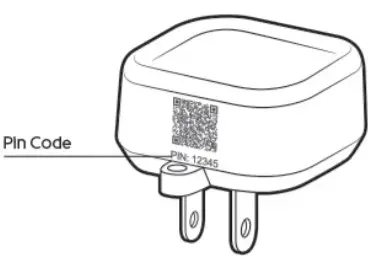
- If you pair with S2 encryption/security, enter the first 5 digits of the DSK into your controller/gateway/hub interface when requested.

The DSK is printed on the Range Extender 7 itself located right under the QR code.
General LED Status
There are a few LED indications that you will need to pay attention to for the Range Extender 7.Unpaired from the network.Slow breathing white LEDWhile paired to an existing network.The LED state is configurable, there are 2 states that you can choose, the LED will remain in a solid-state as off or on:LED on.LED off.
Advanced Functions.
Removing your Range Extender from a Z-Wave network.
Your Range Extender can be removed from your Z-Wave network at any time. You’ll need to use your Z-Wave network’s main controller. To set your Z-Wave controller/gateway into removal mode, please refer to the respective section within your controller instruction manual.
- Set your Z-Wave Controller into device removal mode.
- Press the Z-Wave Button on your Range Extender.
- If-Range Extender has been successfully removed from your network, its LED will return to a slow breathing light.
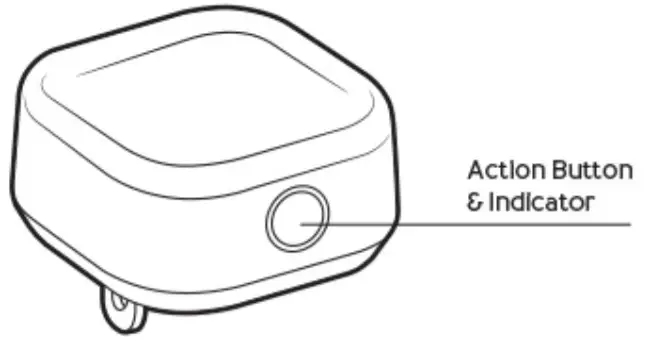
Control LED of Range Extender 7.You can turn the LED on or off by using the action button of your Range Extender 7:
- Tap the Action Button 2x times.
- LED should turn on or off each time you do so.
Testing Health Connectivity.NOTE – This health detection function is only good for determining the direct connection to the gateway (within communication distance to your gateway without any other repeater nodes).You can determine the health of your Range Extender 7 connectivity to your gateway using its manual button press, hold, and release function which is indicated by the LED.You gateway/controller/hub must support displaying Z-Wave device health in order for you to see the health of your Range Extender 7 to your Z-Wave gateway.Follow these steps to test the health of your Range Extender to your Z-Wave gateway/controller/hub:
- Press and hold the Z-Wave Button for 5-10 seconds to test the communication health of your Range Extender 7.•@1 second, LED will turn off.•@2 seconds, LED will breathe its LED•@5 seconds, LED will flash its LED•Release the Action Button to test the health.If the LED sped up its flashing, you have held it for too long.
Once the test is finished, the Range Extender 7 will forward a Power Level Report command to your Z-Wave gateway to display the communication quality. Some gateways do not support Power Level Command Class in their interface and may not show.
Manually resetting your Range Extender.If at some stage, your primary controller is missing or inoperable, you may wish to reset all of your Range Extender’s settings to their factory defaults.Make sure to only do this if your Z-Wave gateway/controller/hub is non-functioning or missing.Follow these steps to factory reset:
- Press and hold the Z-Wave Button for 20 seconds to completely factory reset your Range Extender 7.https://aeotec.freshdesk.com/support/solutions/articles/6000226827-range-extender-7-user-guide-•@1 second, LED will turn off.•@2 seconds, LED will breathe its LED•@5 seconds, LED will flash its LED•@10 seconds, LED will speed up its flashing.•@20 seconds, LED will become solid for 2 seconds, then start breathing its LED slowly to indicate it was factory reset.•You may now release the button.
- If successful, the LED should enter a slow breathing state to indicate it is ready to be paired to a new gateway/controller/hub.
15/05/2020
References
Loading…
Z-Wave repeater and range extender • Aeotec Range Extender 7 (ZW189) Aeotec gen7 z-wave Z-Wave security 2 z-wave smart start Z-Wave 300 series Z-Wave 500 series Z-Wave security 0 700 series z-wave Gen7 Z-Wave S2 Z-Wave 150 metre antenna range 492 feet ante
s3.amazonaws.com/cdn.freshdesk.com/data/helpdesk/attachments/production/6092688953/original/_fdmSXMa0pYFEk5-fJ7LnUDHsYqf_pPy1A.jpg?1569349905
Support – Aeotec
Range Extender 7 user guide. : Aeotec Help Desk
s3.amazonaws.com/cdn.freshdesk.com/data/helpdesk/attachments/production/6092688974/original/XXtfDRRovnOxezqd-i__TioFwwXtpxzUYQ.jpg?1569349942
Support – Aeotec
s3.amazonaws.com/cdn.freshdesk.com/data/helpdesk/attachments/production/6092689127/original/akCJJhLJXYLh31XQCDsXYlu9MkvmDerskA.jpg?1569350068
s3.amazonaws.com/cdn.freshdesk.com/data/helpdesk/attachments/production/6092688969/original/kPnUJo2JO7n77_BrgI_B-5_qwkbDKNABWw.jpg?1569349931
Support – Aeotec
[xyz-ips snippet=”download-snippet”]


