
Dimmer Switch ZWA037-A
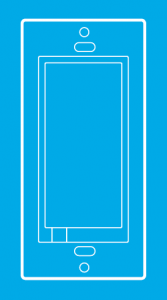
Used in this guide.

Important safety information.
Please read this and the online guide(s) at support.aeotec.com/dimmerswitch carefully. Failure to follow the recommendations set forth by Aeotec Limited may be dangerous or cause a violation of the law. The manufacturer, importer, distributor, and / or reseller will not be held responsible for any loss or damage resulting from not following any instruction in this guide or in other materials.
![]() Warning:Risk of electrical shock. The main circuit breaker or fuse must be shut off during installation. Do not operate or install with wet or moist hands. A licensed electrician with knowledge and understanding of electrical systems and electrical safety should complete the electrical installation. A faulty connection or use may result in fire or electrical shock. Observe local, regional, national and other legal regulations and electrical codes. Note that even when turned off, voltage may be present in the device’s electrical terminals. Any maintenance introducing changes into the configuration of connections or the load must be always performed with disabled circuit breaker or fuse.Maximum load: Dimmer Switch current can not exceed 4.16 amps. Its maximum rated power output is 500 watts for 110 / 120V using incandescent / halogen type bulbs or 150W using LED type bulbs.
Warning:Risk of electrical shock. The main circuit breaker or fuse must be shut off during installation. Do not operate or install with wet or moist hands. A licensed electrician with knowledge and understanding of electrical systems and electrical safety should complete the electrical installation. A faulty connection or use may result in fire or electrical shock. Observe local, regional, national and other legal regulations and electrical codes. Note that even when turned off, voltage may be present in the device’s electrical terminals. Any maintenance introducing changes into the configuration of connections or the load must be always performed with disabled circuit breaker or fuse.Maximum load: Dimmer Switch current can not exceed 4.16 amps. Its maximum rated power output is 500 watts for 110 / 120V using incandescent / halogen type bulbs or 150W using LED type bulbs.
Pre-installation checks.
- illumino Dimmer Switch is designed only for use with permanently installed fixtures.
- Works with regular 3-way on/off for 2 locations control. Can only be connected with a regular 3-way on/off switch; do not use to control a smart switch or any other kind of connected or remotely controllable switch or dimmer switch.
- The colours of your wires may not match those in our diagrams; ensure you’ve identified all wires correctly based upon their source and not just their colour.
- Dimmer Switch requires a Neutral for installation. Do not use with fans. Use 14 AWG solid core wires.
- Ensure light compatibility (must not exceed maximum load)• To be used with dimmable lighting only.• Must not be directly used with wireless smart bulbs.• Voltage: 110/120VAC, 60Hz only Maximum Load• 500W incandescent or Halogen• 150W Trailing Edge LED Bulbs• 150W CFL Bulbs Minimum Load: 5W
Wire illumino Dimmer Switch.
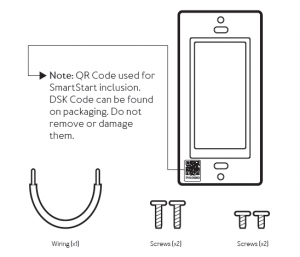
Tutorial installation videos can be access by scanning the QR codes below or visiting support.aeotec.com/dimmerswitch
QR code for 2 way
QR code for 3 way
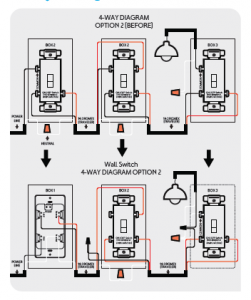
1. Life saving: Shut off electricity at circuit breaker. If installed in a multi-switch box, turn off all circuits. Confirm that power is off using a voltage tester to check Live wire and terminal.2. Detach any existing light switch you are replacing.3. Wire your Dimmer Switch utilizing a diagram that follows as befits your installation. Note: when wiring, make sure that you put all wire ends into the holes rather than around the screws.
Note – Ground wire is not used in any of these diagrams, be sure to safely cap them in your gang box.
Single Pole wiring.

3-way wiring.

4-way wiring.
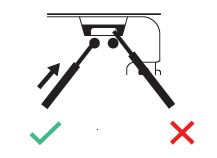
4. Make sure all screws are tightened.5. Fit Dimmer Switch within the wall box, affix it in place, and install any fascia as needed.6. Turn electricity circuit back on at circuit breaker.5. Test Dimmer Switch by pressing the top and bottoms paddle to turn the light on and off.
Need help wiring? Email us.To better assist you with your wiring or have a question, please send us photos or schematics of your wiring layout in the gang-box you wish to install illumino Dimmer Switch to.Email us at
Connect illumino Dimmers Switch to a hub.
- If using Aeotec AutoPilot: a. Select Devices. b. Select + Add new. c. Select +. d. Select + Add. e. Tap the top or bottom switch of illumino Dimmer Switch once. The LED will flash a white LED while attempting to connect. f. If prompted by AutoPilot, enter the 5 digit DSK or scan Dimmer Switch’s QR code.
- If using Aeotec Smart Home Hub or SmartThings:a. Open SmartThings app.b. Tap +.c. Tap Device.d. Find and select Aeotec.e. Tap Switch / dimmer.f. Tap Aeotec Switch / Dimmer.g. Tap Start, then follow the remaining instructions to pair illumino Dimmer Switch.h. When prompted by your hub, tap the top or bottom switch of illumino Dimmer Switch once. The LED will flash a white LED while attempting to connect.i. If prompted, enter the 5 digit DSK if on browser or scan Dimmer Switch’s QR code.
- If using Z-Stick Gen5 or Z-Stick Gen5+: a. Unplug Z-Stick Gen5, then press it’s Action Button to put it into its `add device’ mode. b. Tap the top or bottom switch of illumino Dimmer Switch once. The LED will flash a white LED while attempting to connect.
- SmartStart QR code scanning: a. If your Z-WaveTM gateway supports SmartStart you can scan the QR code on illumino Dimmer Switch using the gateway’s app. Your sensor will join your Z-Wave network automatically.
- For most other hubs;a. Set your Z-Wave hub to connect new Z-Wave devices.b. Tap the top or bottom switch of illumino Dimmer Switch once. The LED will flash a white LED while attempting to connect.c. If prompted, Scan the QR code or 5 digit DSK number on your Dimmer Switch.
Need help? Contact us.If the connection steps were followed correctly, the LED will change from a flashing white to one of these LED states depending on success or failure.Success: LED will be solid green LED for 2 seconds.Fail: LED will be solid red LED for 2 seconds.
Not connecting? Try these steps;
- If possible move your hub or illumino Dimmer Switch closer together.
- Set hub to remove Z-Wave Devices.
- Tap top or bottom Dimmer Switch 3x times within 2 seconds.
- The LED will blink purple to indicate it is attempting to remove itself. a. If successful, the LED will fade in and out to indicate it is ready to be connected to a new hub.
- Try connecting illumino Dimmer Switch again. 6. Get further help and tutorials at support.aeotec.com/dimmerswitch.
Using your illumino Dimmer Switch:
Scan these QR Codes to get more help on how to use illumino Wall Switch with these specific hubs.
Need more assistance with a specific hub?
Scan this QR code or visit support.aeotec.com/dimmerswitch to get more help with hubs and software including Home Assistant, Hubitat, and SmartThingsDon’t see what you need? Contact us.

Need help? Contact us.Contact our support teams at aeotec.com/support.
Having trouble?
- Can’t add Dimmer Switch to your hub?• Try removing your light switch, these steps can be carried out even if it isn’t paired.• Try moving your hub closer to your light switch.
- Can’t control lights?• Try power cycling your Dimmer Switch• Check your wiring• Remove and then connect your Dimmer Switch which should set this switch to default settings
- The connected light might not be compatible, check the operation with a common incandescent bulb.
Gateway compatibility.To see if your dimmer is known to be compatible with your Z-Wave gateway, please refer to support.aeotec.com/compat.
Manufactured for the importer by Aeotec Limited (#704, Bright Way Tower, 33 Mong Kok Rd, Mong Kok, Hong Kong) contactable via aeotec.com/contact. Imported into the European Union by Aeotec Group GmbH (Große Johannisstraße 7, Hamburg 20457, Germany). The importer and / or distributor of this device can both be reached separately with the company from whom you have purchased this device from responsible for warranty, technical support, and compliance related queries.
IOT Holdings, LLC, dba Aeotec Americas, is the exclusive licensee for Aeotec products in North America. All products sold by Aeotec Americas through and to their authorized resellers in the United States are also covered by one or more claims of patents: http://sipcollc.com/patent-list/ All rights reserved.
Disposal guidelines and WEEE. Aeotec devices may contain batteries; remove when not in use. Do not dispose of device as unsorted municipal waste, use separate collection facilities. Contact your local government for further information.One-Year Limited Warranty. Aeotec Limited warrants included Aeotec branded hardware device when purchased new and delivered in new condition and in its original container against defects in materials and workmanship for one year from the date of original purchase from an authorized reseller when purchased and used in the region of original export. In line with the terms of sales between Aeotec and the authorized importer / reseller of this device, any claims against the foregoing warranty are to be handled by the authorized distributor / reseller directly. The foregoing warranty is subject to the proper installation, operation, and maintenance of the device in accordance with installation instructions and the operating manual supplied to customer and further documentation made available digitally. Liquid damage, including, but not limited to, internal liquid damage caused by improper use, closure or affixing of the hardware, is not covered by this warranty. Splash, water, and dust resistance are not permanent conditions and resistance might decrease as a result of normal wear. Not warranted for damage from open flames and heat, and exposure to sun. Not warranted for battery leak damage; always remove all batteries from products that not being used. Aeotec does not warrant against normal wear and tear, nor damage caused by accident or abuse. Please be sure to read this device’s support notes, digital materials, and quick start guide fully. Subject to the full terms of obtaining service within 30 days of the manifestation of a problem, if you submit a valid claim under this warranty, Aeotec shall provide further information in obtaining warranty services from the authorized importer and / or seller of this device. The full warranty, including warranty exclusions and liabilities, are available at support.aeotec.com/warranty Aeotec’s English language warranty and instructional information is paramount to translations provided in any other language and prevails over any such translations.FCC Notice. The edition of this device made and certified for the US market and marked as such complies with part 15 of the FCC rules. Operation is subject to the following two conditions: (1) this device may not cause harmful interference, and (2) this device must accept any interference received, including interference that may cause undesired operation. The manufacturer is not responsible for any radio or TV interference caused by unauthorized modifications to this equipment. Such modifications could void the user’s authority to operate the equipment. This equipment has been tested and found to comply with the limits for a Class B digital device, pursuant to part 15 of the FCC Rules. These limits are designed to provide reasonable protection against harmful interference in a residential installation. This equipment generates uses and can radiate radio frequency energy and, if not installed and used in accordance with the instructions, may cause harmful interference to radio communications. However, there is no guarantee that interference will not occur in a particular installation. If this equipment does cause harmful interference to radio or television reception, which can be determined by turning the equipment off and on, the user is encouraged to try to correct the interference by one or more of the following measures: (1) Reorient or relocate the receiving antenna. (2) Increase the separation between the equipment and receiver. (3) Connect the equipment into an outlet on a circuit different from that to which the receiver is connected. (4) Consult the dealer or an experienced radio/TV technician for help (5) Ensure this device and its antenna(s) are not be co-located or operating in conjunction with any other antenna or transmitter.RF Exposure Statement. The device has been evaluated to meet FCC / CE general RF exposure requirement. The device can be used without restriction.California Proposition 65. WARNING: This product contains a chemical known to the State of California to cause birth defects or other reproductive harm. Use only for intended purposes. Do not use for other purposes including, but not limited to, the consumption of food and drinks.Specifications. Z-Wave devices operate between 908.42 MHz depending on local restrictions. It uses up to -8.21dBm ERP transmit power, enabling wireless connectivity. Full information on device specifications and certifications at support.aeotec.com/dimmerswitch/specs
Intertek 5012446Conforms to UL 1472:2015 Ed.2+R:10Nov2017 Certified to CSA C22.2#184.1:2015 Ed.2+U1 FCC ID: 2AOGIZWA037 Aeotec is a ® Registered Trademark of Aeotec Limited amongst other intellectual property. A non-exhaustive list can be found at aeotec.com/legal/. All rights reserved. In Europe, contact Aeotec via Aeotec Group GmbH; Groß Johannisstraße 7, 20457 Hamburg, Germany
While the information in this guide has been compiled with care, it may not be deemed an assurance of device characteristics. All information, including, but not limited to, information regarding the functionality, features, and / or device specifications are subject to change. Aeotec Limited reserves all rights to revise or update its products or documentation without any obligation to notify any individual or entity. Aeotec Limited shall be liable only to the degree specified in the terms of sale and delivery.
© & ® Aeotec Limited.Version: AL501003700001 – AA www.aeotec.com
References
Support – Aeotec
Freshdesk | Customer Service Software by Freshworks Inc
Contact Us – Aeotec
illumino Dimmer Switch : Aeotec Help Desk
Privacy policy & Terms of Use • Aeotec Aeotec Aeotec Group Newsletter updates from Aeotec Aeotec on LinkedIn Aeotec on YouTube Aeotec on Twitter
Patent-list | Sipco
illumino Dimmer Switch technical specifications : Aeotec Help Desk
Compatibility of Aeotec products with Z-Wave and Zigbee gateways Aeotec Loading Aeotec Group Newsletter updates from Aeotec Aeotec on LinkedIn Aeotec on YouTube Aeotec on Twitter
Aeotec – Aeotec. Automated buildings using Z-Wave and Zigbee.
[xyz-ips snippet=”download-snippet”]