User’s Manual AP20AQIPlease read this manual carefully before using the product.
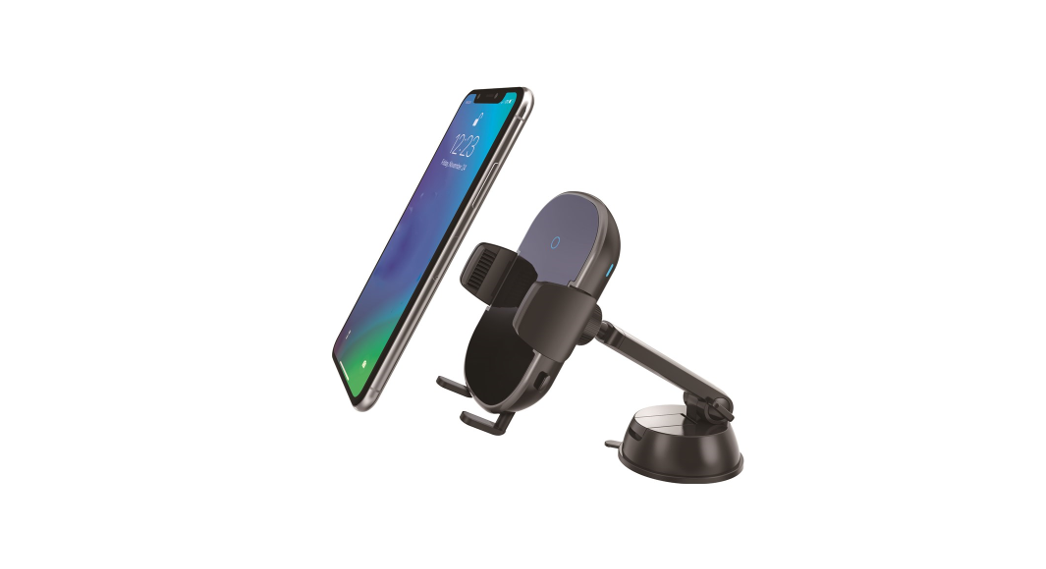
Product Description
- WirelessChargingSliding Coil LED
- LED Indicator (See diagram in Cautions)
- Multi-function Button
- Touch Sensor Panel
- Sliding Coil Knob (Correlates to l
- Vent Clip
- Flexible Adhesive Base
- Extendable Stalk with Suction Base
Before Wireless Charging
- USB Charger to be connected The USB charger to be connected to this product requires a capacity of 5V/ 2.0A or higher. Use a Qualcomm QC3.0 charger with 9V output for fast wireless charging. ‘Please visit aerpro.com to see our range of compatible QC 3.0 car chargers’ Co0C, enter Wireless charging is possible when using a 5V charger. However, fast charging is not supported.
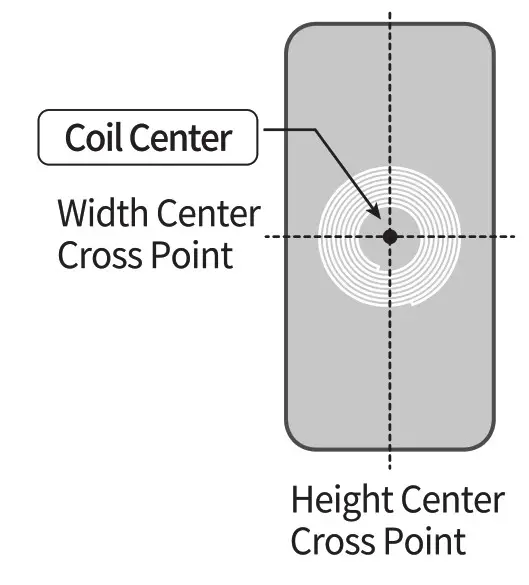
- Finding center position of a wireless coil on smartphone Cross Fast wireless charging of smanphones with less heat requires perfect alignment between the wireless charging coils of holder and smartphone. Most smanphones have a wireless charging coil in the center of the phone as shown.
Product Assembly
Auto Sensor Operation and Wireless Charging
- Connect a USB cable to the car charger and holder. Sliding coil LED and LED indicator light up.
- Put phone on foot stand at an angle as shown in the picture. Move the sliding coil knob on the back of the holder ® up or down to perfectly align the coils of the smartphone and wireless charging holder.
 Ensure foot stand is pulled out completely and place phone on foot stand to align coils.
 - Whilst holding a phone, lightly touch the touch sensor panel with finger or phone and the grips will automatically open.® M The touch sensor panel works only when the •:-/ grips are completely closed. Touch panel with finger for phones with thick cases.Alternatively, by pressing the multi-function button the grips will open without touching the touch sensor panel ®.
- The grips close automatically when wireless charging begins after mounting smartphone.If wireless charging does not begin, the grips will remain open. Please check the alignment of the wireless coils again.Be careful not to have fingers in between grips when they are retracting.Please touch only the area where the touch sensor panel sticker is on the front. No other part of the holder will respondto the sensor.
Phone Removal
- Hold phone and press the multi-function button to open grips.
- When a phone is removed, wireless charging stops, and grips will automatically close after 2 seconds. Wait approximately two seconds for the grip to close automatically before performing the next operation.If a phone is removed while wireless charging is not performing Qnormally, the grips will not close automatically. In this case, press the multi-function button ® to close the grips.
- In case power is not connected, gently twist the phone away from the holder to remove as shown.

Wireless Charging ON / OFFFrequent charging or continued charging when fully charged may reduce life of phone battery. By turning off the wireless charging function, the product can work as only a phone holder. In this case, phones that do not support wireless charging can also be mounted.
- Press and hold the multi-function button 3 for about 3 seconds. The sliding coil LEDO switches off and wireless charging function is disabled.
- Grips will close automatically.
- To reactivate wireless charging, press the multi-function button 3 for 3 seconds again.
![]() If wireless charging is disabled, the auto sensor function works normally. However, the grips will not close automatically. To close the grips, press the multi-function button 3.
If wireless charging is disabled, the auto sensor function works normally. However, the grips will not close automatically. To close the grips, press the multi-function button 3.
![]()
Vent Clip and Adhesive Flexible Base Installation[Vent Clip]
- Unfasten clip sufficiently by rotating the clip lever and inserting clip to the center of the 3 vent blades as shown.If this way of fixing the clip is not possible, attach an anti-shake plate to the vent frame and vent blade. Please note, if the vent frame and vent blade are not parallel, it can not be installed.
- Ensure 3 vent blades are sitting parallel as shown below. Push vent clip deeply with no gap as marked by the arrows below with one hand and fasten lever tightly with another hand.
- Check if the vent clip is fixed firmly and correctly by trying to pull out the vent clip and shake slightly.
![]()
[Adhesive Flexible Base]Please install adhesive flexible base in the below circumstances.
- If the holder is overheated due to hot air from the heater and charging is slow or frequently interrupted.
- The vent blades are too narrow to insert a vent clip.
- Unable to adjust the airflow direction.
- If condensation occurs on the holder due to cold air.
- The location of the air vent is not suitable.
![]() Cautions for using double sided tape – Read Carefully
Cautions for using double sided tape – Read Carefully
- After attaching the base to the surface, press it for 10 seconds or more with force to prevent any gaps.
- Carefully select installation position as strength of the double-sided tape will deteriorate if once removed.
- It is recommended to wait at least 2 hours for perfect attachment to surface before connecting holder to base.
- Attaching the tape to oily or dusty areas will limit adhesive strength. Clean the area where the base is to be attached with the supplied alcohol pad.
- Can not be installed on surfaces of materials that cause unstable attachment due to the weight of the holder and phone. (soft dashboards, leather surface, carpet, etc.)
- The adhesive base is made of flexible material and can be attached to curved surfaces. However, ensure that the surface should be as flat as possible.
![]()
Suction Base Installation
- Carefully choose where to install the suction base considering the height and distance of the holder. For more stable installation, it is strongly recommended to use the provided suction plate 7.Do not install the suction base or plate on a curved surface or soft dashboard.In the case of using the suction plate, be sure to wait 2 hours to get sufficient strength A of 3M tape before attaching the sticky gel suction base on it.
- Prior to attaching the suction base or suction plate, ensure to clean the attachment surface with the provided alcohol pad.
- Peel off the transparent gel pad protective sheet.
- Unlock suction lever vertically and press the sticky gel pad down strongly as shown in the diagram below to avoid air leakage. Press lever ® to lock and secure. The sticky gel pad can be cleaned with water to maintain stickiness. After washing, check the stickiness and ensure to check it has perfectly dried before installation.
- Make sure that the suction base is firmly installed by slightly shaking it.
- After adjusting to desired angle, tighten the angle fixer so that it does not shake when driving.[How to Adjust Stalk Angle and Length]To use at a low angle for a better driving view, reassemble stalk as shown below. V.) Pull out and adjust stalk to desired
- Adjust the holder to desired direction and angle, and tighten the fastening cap.
Setting Holder Direction and Angle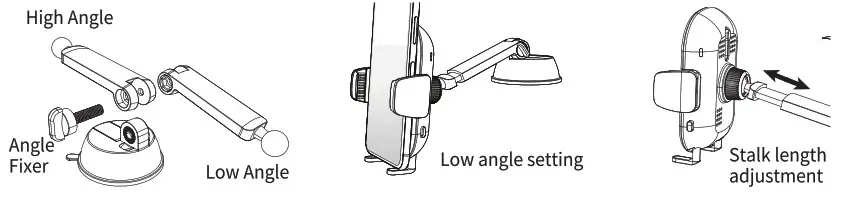
![]() To mount the phone horizontally, fold the foot stand and move the phone left or Wright to the desired position. In this case, ensure to align the coil centers of the phone and holder.
To mount the phone horizontally, fold the foot stand and move the phone left or Wright to the desired position. In this case, ensure to align the coil centers of the phone and holder.![]() CAUTIONS
CAUTIONS
- Check the LED indicator 2 periodically to ensure wireless charging is working correctly. The LED indicator lights up as follows according to the charging status.
Power ON White LED (Off after 3 seconds) Charging Blue LED Errors White/Blue LED Blinking Overvoltage & over current, low voltage & low current, Overheating, Misalignment, Foreign Object Detection
- If the phone case thickness exceeds 2.5mm, wireless charging may be slow or stop.
- If the temperature of the charging environment exceeds 28°C, the overheating protection circuit may activate and slow down or stop wireless charging.
- If using an app requiring use of GPS signals, such as navigation whilst wireless charging, the app may stop working instantly in areas where the GPS signal is weak. In this case, turn off the wireless charging function temporarily.
- For any phone where the wireless coil is extremely lower than the center of the phone, fold the foot stand and align wireless coils.
- Periodically check the tightness of the vent clip/adhesive strength to prevent unexpected dropping of phone.
- The sticky gel pad may leave a mark on the attached surface when used for an extended period of time. It can be removed with a neutral detergent or will naturally disappear after a certain period of time.
- This product is designed for indoor usage as well by connecting to a wall charger.
SpecificationsAndroid phones: lOW (Max)iPhone phones: 7.5W (Max)Input 5V/3.0A 9V/2.0AOutput 5-10WQi Certificate ID-8656![]() Technical assistanceIf you need assistance setting up or using your Aerpro product now or in the future, call Aerpro Support Australia TEL: 03 – 8587 8898 FAX: 03 – 8587 8866 Mon-Fri 9 am – 5 pm AESTIf you would like to download a digital copy of this manual, or other Aerpro manuals/software,please visit the http://aerpro.com website. This manual is considered correct at the time of printing but is subject to change. For the latest manuals and updates refer to the website.
Technical assistanceIf you need assistance setting up or using your Aerpro product now or in the future, call Aerpro Support Australia TEL: 03 – 8587 8898 FAX: 03 – 8587 8866 Mon-Fri 9 am – 5 pm AESTIf you would like to download a digital copy of this manual, or other Aerpro manuals/software,please visit the http://aerpro.com website. This manual is considered correct at the time of printing but is subject to change. For the latest manuals and updates refer to the website.
[xyz-ips snippet=”download-snippet”]