![]() APBABY 1
APBABY 1
Baby Seat Alarm SystemQUICK START GUIDE
https://aerpro.com/APBABY1For more information on this product go to our website aerpro.com![]()
INCLUSIONS:Sensor Pad, 12V Accessory plug receiver, USB powered LEDindicator light, Seatbelt buckle sensorPlease retain this user guide for future reference.
Installation instructions
Step 1:Place the sensor pad under the cushion of the child seat.
Step 2:Insert the 12V Accessory plug receiver into the vehicle’s accessory socket.
Step 3:Insert the USB interface of the USB-powered LED indicator into the 5V/2.4A USB charging interface of the 12V Accessory plug receiver. This will not work if plugged into the QC3.0 charging interface. This is a charging port for other supporting devices. Fix the indicator light using 3M adhesive strip supplied in an easily seen position on the dash for an additional visual warning light if the receiver is hidden from view.
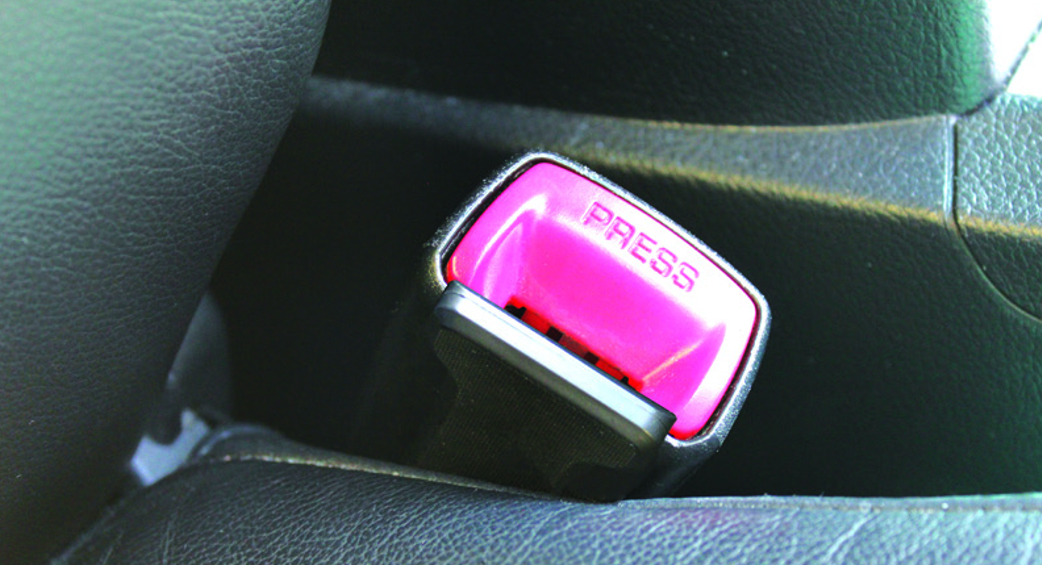
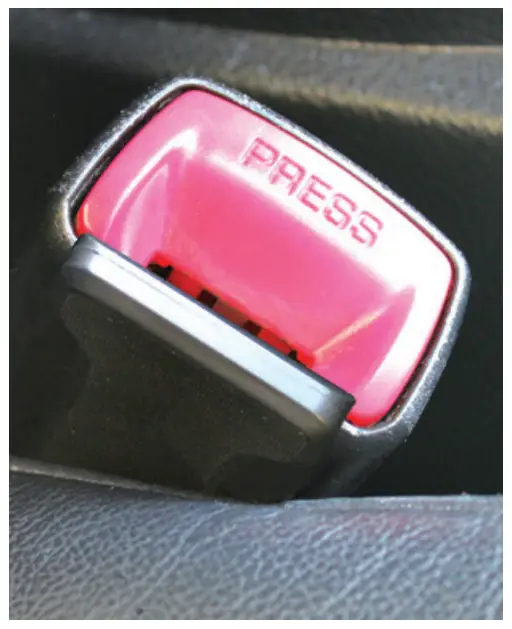
Step 4:Attach the seatbelt buckle sensor to the driver’s seat belt socket and make sure it is firmly attached by using 3M adhesive strip supplied. This has a magnetic strip at the top with a groove that needs to be positioned close to the metal part of the seat belt. See the picture beside for reference.
How to Use
Step 1:Place the child in the child seat where the sensor pad has been installed.
Step 2:The driver should fasten their seat belt to activate the seat belt buckle sensor.
Step 3:Turn the vehicle’s accessories to the (ON) position for the receiver to automatically wirelessly pair with the sensor pad. For vehicles with constant power in their accessory socket, the vehicle will not have to be switched on.
Step 4:The display face on the receiver will turn green to show it’s active and receiving a signal from the sensor.
Step 5:The USB-powered LED indicator light will illuminate white to show it’s active and receiving a signal from the sensor.
Alarm description
| Visual display |
Response & Cause |
 |
Device paired and active– sensor pad senses pressure |
 |
Alarm activated with 3 beeps– sensor pad does not sense pressure– vehicles accessories turned OFF when active– driver’s seat belt unbuckled |
 |
Flashing Display & Alarm activated– sensor pad does not sense pressure– vehicles accessories turned OFF when active– driver’s seat belt unbuckled |
 |
Not active after 15 Minutes |
 |
Not active after 1 Hour |
Alarm activation
These visual and audio alerts will occur when the sensor pad does not sense pressure or the accessory power is turned (OFF). Eg: If the child moves out of their seat. If the driver unbuckles their seat belt activating the seat belt buckle sensor or the driver turns (OFF) the accessories of the vehicle.
Resetting the device
In the event, an alarm has been triggered simply place the child back on the sensor pad to reset the device. Alternatively, you can press the reset button on the 12V accessory receiver.
Troubleshooting Guide
- Use the specified voltage for the product, DC 9 – 16V, if you use a voltage value other than the specified voltage, it may cause the device to work abnormally, or may damage the product.
- If the product fails to alarm normally when the seat belt is unfastened, please make sure that the position of the seat belt buckle sensor is correct and secure.
- When the USB indicator light is fitted and does not work correctly, please check whether the indicator lights USB plug has been correctly inserted into the 5V/2.4A charging
- If a child sits on the sensor pad for at least five minutes and the receiver still does not receive the signal from the This could mean that the sensor may be damaged, or the battery is flat; therefore, the sensor pad needs to be replaced, or the batteries need to be replaced.
- If the system detects that the battery of the sensor pad is low and the child sits in the car seat for 5 minutes after the vehicle is switched on, the receiver will emit a beep 5 times and then return to normal.
- If there is no child in the car seat, the display will not display and or send a signal of low battery.
Specifications
Sensor pad (Inductive transmitter)
- Working voltage: DC 6V (CR2016 X 2)
- Working current: <10pA
- Working frequency: 433.92±0.5MHz
- Working temperature: -20°C—+60°C
Seatbelt buckle sensor:
- Working voltage: DC 3V (CR2032)
- Working current: <10pA
- Working frequency: 433.92±0.5MHz
- Working temperature: -20°C—+60°C
12V Accessory plug receiver
- Working voltage: DC 9-16V
- Working current: <100pA
- Working frequency: 433.92±0.5MHz
- Alarm volume: 70-90dB
- Working temperature: -20°C—+60°C
- USB1 output interface: support QC3.0 protocol
- USB2 output interface: 5V/2.4A
- TYPE-C output interface: 5V/2.4A
|
|
 WARNING:
Technical assistance
For Australasian support
 report this ad
TEL: 03 — 8587 8898FAX: 03 — 8587 8866Mon-Fri 9am — 5pm AESTEMAIL – [email protected]
If you would like to download a digital copy of this manual, or other Aerpro manuals please visit the aerpro.com website and click on ‘Firmware & Manuals” for information on where to find the manuals/software.
This manual is considered correct at the time of printing but is subject to change. For the latest manuals and updates refer to the website.
Copyright © 2017 by TDJ AustraliaAll rights reserved. No part of this publication may be reproduced, distributed, or transmitted in any form or by any means, including photocopying, recording, copying or other electronic or mechanical methods, without the prior written permission of the author.
[xyz-ips snippet=”download-snippet”]