![]()
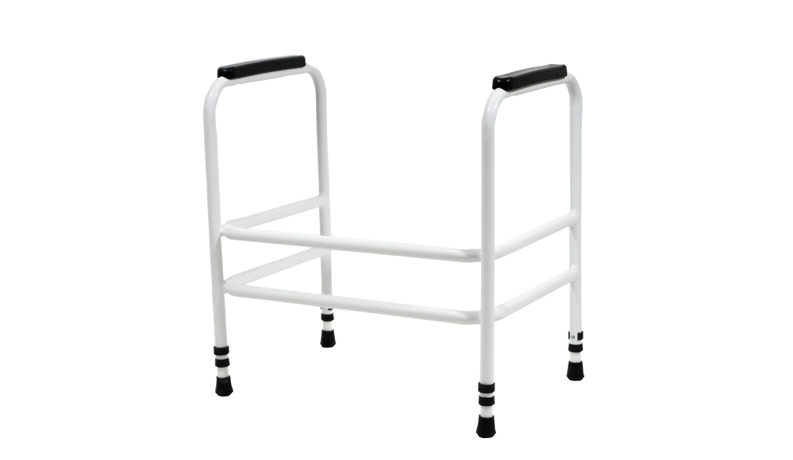
Ashford Toilet FrameVR205SPUsage and Maintenance Instructions
INTRODUCTION
Thank you for deciding to purchase the Toilet Frame from Aidapt. When used correctly it is designed to give many years of reliable, trouble-free service.N.B. This equipment must be installed by a competent person.190 kg (30st.) weight limit.Do not exceed the weight limit stated doing so could put the user at risk.
BEFORE USE
Carefully remove all packaging. Avoid using any knives of other sharp instruments as this may damage the surface of the product.Check the product for any visible damage if you see any damage or suspect a fault, contact your supplier for support.NB. In this case, please do not use your product as it may compromise your safety.
CLEANING
All of the product components are manufactured from quality materials. However, it is very important that you only clean your toilet frame using a non-abrasive cleaner or mild detergent with a soft cloth avoid using limescale remover. Abrasive cleaners e.g. AJAX and or abrasive cleaning pads may seriously damage your product beyond repair.Do not exceed 50oC when cleaning the armrests as this could permanently damage the plastic.N.B. Regular daily cleaning will reduce the build-up of lime scale on your product.
UNDER NO CIRCUMSTANCES, use any abrasive cleaners or materials on any of the components. Also, check that the cleaner you intend to use is suitable for ABS, Vinyl, Polymer Plastics and Thermoplastic rubbers and Polyurethane Rubber.
ASSEMBLY
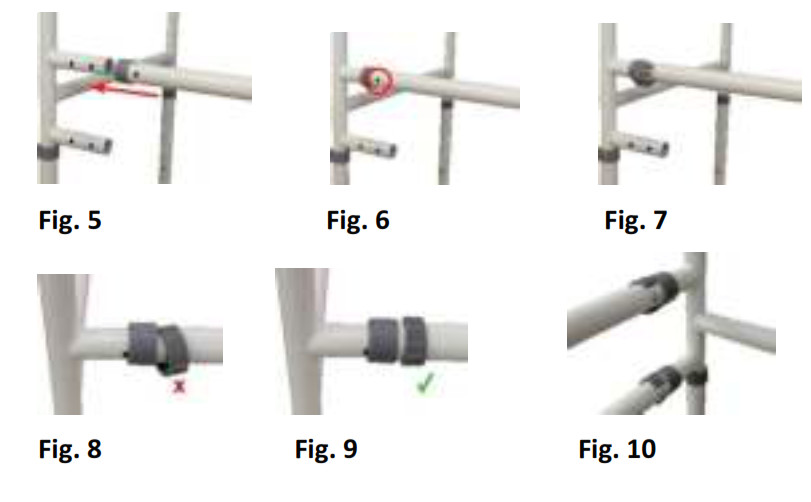
- Slide crossbar in place (Fig.5) ensuring locating holes are lined up correctly (Fig.6)
- Insert `E’-clip ensuring it passes through the tube correctly (Fig.7)
- Ensure the `E’ clip is installed correctly. This is very important. (See Fig.8 and Fig.9)
- Repeat on each side for both cross bars. (Fig. 10)

ADJUSTMENTS TO EXTENSION LEGS
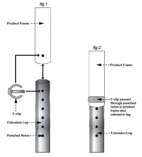
Remove the `E’ clip from the extension leg and extend all four legs evenly to the desired height ensuring you do not exceed the last punched hole of the extension leg. (see fig. 1)Once you have achieved the desired height; reinstall the `E’ clip, ensuring that it has passed through the extension leg and is fitting neatly and snug around the outside leg. (see fig. 2).Never install the extension legs unevenly or slanting, this will compromise the safety of the user.Correct Leg adjustment is illustrated in Fig. 3 & incorrect installation in Fig. 4.
REISSUE
If you reissue or are about to reissue this product, please thoroughly check all components for their safety.This includes:
- Tightness of all nuts/ bolts/castors
- Other screw in/ bolt in/ push in components.
If in any doubt, please do not issue or use, but immediately contact your supplier for service support.
CARE & MAINTENANCE
Please make a safety check of the product at regular intervals or if you have any concerns.
IMPORTANT INFORMATION
Please exercise common sense and do not take any unnecessary risks when using this product; as the user, you must accept liability for safety when using the product.Please do not hesitate to contact the person who issued this product to you or the manufacturer (detailed below) if you have any queries concerning the assembly/use of your product.Aidapt Bathrooms Ltd, Lancots Lane, Sutton Oak, St Helens, WA9 3EXTelephone: +44 (0) 1744 745 020 · Fax: +44 (0) 1744 745 001 · Web: www.aidapt.com Email: [email protected]
[xyz-ips snippet=”download-snippet”]