
Aidapt® Canterbury Multi-Table Fixing and Maintenance Instructions
INTRODUCTION
Thank you for deciding to purchase the Canterbury Mobile Multi-Table from Aidapt. This product is manufactured from the finest material and components and, when used and maintained correctly, is designed to give many years of reliable trouble-free service.
NB. This equipment must be installed by a competent person.
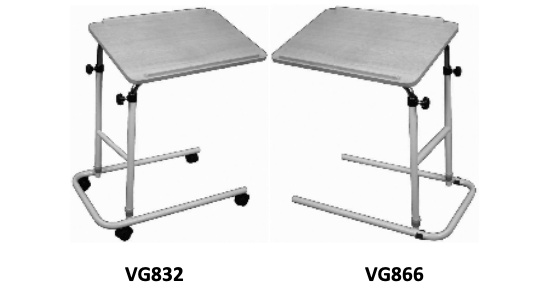
VG832 – Self Assembly
VG866 – Fully Assembled
15 kg weight limit.
Do not exceed the weight limit stated doing so could damage the equipment or put the user at risk.
BEFORE USE
Carefully remove all packaging. Avoid using any knives of other sharp instruments as this may damage the surface of the product.
Check the product for any visible damage If you see any damage or suspect a fault, do not use your product, but contact your supplier for support.
CONTENTS
- Wood finished table top with integrated chrome plated tubes
- Painted tubular `H’ section with black threaded locking nuts x 2
- Stainless Steel `L’ shaped brackets
- U-shaped base with two short uprights
- `E’-clips x 2
ASSEMBLY INSTRUCTIONS
- Carefully unpack your Canterbury Table and examine all parts for any damaged or, loose fitments. Should you find any fault, please return your table to your supplier for exchange.
- After inspection, place the wooden finished table-top face down onto a soft surface to avoid scratches and raise both the fixed chrome plated tubes vertically and level.
- Take the two painted tubular sections with the black threaded locking nuts attached and slide these OVER each of the chrome plated tubes with the black locking-nuts facing downward towards the table top. Tighten the threaded nuts onto the chrome plated tube.
- The black locking nuts are designed to be tightened onto the chrome tubing, allowing the tabletop to be put at any height or angle without the risk of collapse under its intended use. However the design of this unit is only meant to be adjusted to a `finger tight’ pressure, over tightening of the locking nut could result in the plastic housing being damaged.
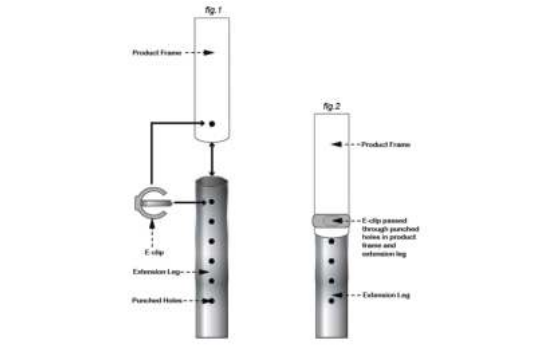
- If already installed, remove the E clips from uprights on the U shaped base.
- Take the U shaped base with the two welded painted tubular uprights with pre punched locating holes and place the welded tubular uprights into the two tubular sections (fig. 1).
- Ensure the pre punched holes align with the holes found on the two painted tubular sections. You may have to loosen the black locking nuts, be sure to retighten the black locking nuts once you have achieved the alignment.
- Insert the two E shaped clips provided through the pre punched holes, ensure that the E clip is fully located (fig. 2). FAILURE TO DO SO WILL MAKE THE TABLE UNSTABLE.N.B. Please note that over tightening the nuts in this way will invalidate the warranty on this item, as this is misuse of the intended application.
- Turn your table over with the U section on the floor and your table is now ready for use . If you wish to angle the top you can do so by up to 45o. To achieve the desired angle release the black locking nut furthest away from you and raise the tabletop to the desired height, then retighten the black locking nut to avoid the top sliding back downward.
CLEANING
A useful guide to decontamination is MHRA leaflet DB2003(06).
Do not use abrasive cleaners as this could damage the surface of the equipment. For cleaning, wipe with a clean cloth soaked in detergent solution and wring out. Depending on the detergent manufacturer’s instructions the solution may be heated.
Wipe all surfaces of the equipment and the cloth should be re-immersed periodically and the detergent changed frequently. The detergent should be rinsed or wiped off using a clean cloth immersed in clean water and wrung out.
To disinfect make sure the equipment has been cleaned and dried and then wipe over with a clean cloth and a compatible liquid disinfectant. After disinfecting clean with clean water and dry.
When using detergent or disinfectants then please refer to manufacturers’ instructions and if unsure then consult your local Infection Control Specialist for advice.
The metal frame of this equipment can be cleaned/disinfected by moist heat at 80oC for a minimum of 1 minute or autoclaved at 80oC for at least 1 minute. After cleaning or disinfecting treat all joints with a water dispersing agent, e.g. WD40.
NB. The wooden table top is not suitable for cleaning with moist heat or autoclaving.
REISSUE
If you reissue or are about to reissue this product, please thoroughly check all components for their safety.
If in any doubt, please do not issue or use, but immediately contact your supplier for service support.
CARE & MAINTENANCE
Please make a safety check of the product at regular intervals or if you have any concerns.
IMPORTANT INFORMATION
The information given in this instruction booklet must not be taken as forming part of or establishing any contractual or other commitment by Aidapt Bathrooms Limited, Aidapt (Wales) Ltd or its agents or its subsidiaries and no warranty or representation concerning the information is given.
Please exercise common sense and do not take any unnecessary risks when using this product; as the user you must accept liability for safety when using the product.
Please do not hesitate to contact the person who issued this product to you or the manufacturer (detailed below) if you have any queries concerning the assembly/use of your product.
Aidapt Bathrooms Ltd, Lancots Lane, Sutton Oak, St Helens, WA9 3EX
Telephone: +44 (0) 1744 745 020 · Fax: +44 (0) 1744 745 001 · Web: www.aidapt.co.uk
Email: [email protected] · [email protected] · [email protected]
References
[xyz-ips snippet=”download-snippet”]