
AIMS DC to AC Power Inverter PWRIC150012W Instruction Manual
SAVE THIS MANUAL
You will need the manual for the safety warnings and precautions, assembly instructions, operating and maintenance procedures, parts list and diagram. Keep your invoice with this manual. Write the invoice number on the inside of the front cover. Keep the manual and invoice in a safe and dry place for future reference.
Basic Operation
- Make sure that you choose the right operating voltage for both input and output of the inverter.
- When unpacking, make sure that the inverter is in good condition. If any parts are missing or broken, please call AIMS Power, Inc. at the number found on the warranty card.
- Place the power inverter on a flat surface. Make sure it has adequate ventilation and is not in direct sunlight. Fasten the inverter securely to the surface, using screws or some other means. If holes are to be drilled, follow safe, proper installation techniques.
- Before you connect the battery cables, make sure the power switch is in the off position. Connect Red (+) battery cable to Red (+) inverter terminal. Connect Black (-) battery cable to Black (-) inverter terminal. Connect Red (+) battery cable to Red (+) battery terminal. Connect Black (-) battery cable to Black (-) battery terminal. Alligator clamp cables may be used but only to connect to the battery. Do not use clamps on inverter terminals. Alligator clamps are not a permanent solution. You may see a spark during connection.
- Connect the ground cable to an earth ground, such as a metal water pipe or to the vehicle ground when used in a vehicle if the inverter includes a ground port.
- Turn the power switch to the on position, which is located on the front of the inverter. The green LED light will confirm that AC power is present.
- Before plugging the equipment into the inverter, make sure the equipment AND the inverter are off. Turn inverter on first, then turn on the equipment.
- The power inverter can be used either while the engine is running or off.
- Charging: The AC input port on the back of the inverter will throughput AC and charge the battery (s) when AC power is available. This is done automatically. The included AC cable must be plugged into a wall outlet or 120V outlet on a generator. If the inverter doesn’t receive AC power it will automatically switch to inverter mode. To charge the battery, AC power must be supplied to the inverter and the charger switch must be in the reset position. The switch will be illuminated when charging. To turn charger off put switch into off position and supplied AC power will only be bypassed and no DC charge. Inverter does not clean up or line filter the supplied AC input voltage. The AC output will be the same as the supplied AC input during bypass mode.
Warnings
- Unplug the inverter when it is not in use.If the AC inverter makes a beeping sound, turn off the equipment, unplug the inverter and restart the vehicle’s engine. The beeping sound is simply the low-battery warning, which indicates that the voltage of your battery is getting low. If you do not re-start your engine and continue operating the inverter, the inverter will automatically shut off, leaving your vehicle’s battery at about 10. 5 VDC. This will allow you to start your engine and resume operation of the inverter. It also reduces the fear of being stranded with a dead battery (dependent on health of battery).
- This device should only be serviced by a qualified technician. This item does not have any serviceable parts.
- Prevent body contact with grounded surfaces such as pipes, radiators, ranges, and refrigerator enclosures during installation.
- Do not operate the inverter if under the influence of alcohol or drugs. Read warning labels on prescriptions to determine if your judgement or reflexes are impaired while taking drugs. If there is any doubt, do not operate the inverter.
- People with pacemakers should consult their physician(s) before using this product. Electromagnetic fields in close proximity to a heart pacemaker could cause interference to or failure of the pacemaker.
- Keep children away. Children must never be allowed in the work area. Do not let them handle machines, tools, or extension cords.
- Store idle equipment. When not in use, inverter must be stored in a dry location to prevent rust. Always lock up tools and the inverter and keep out of reach of children.
- Size the inverter properly. Size the inverter for the surge rating of your equipment. The inverter’s continuous rating should be MORE than the surge rating of your equipment. Example: Power tool runs at 1500 watts but surges at 2500 watts. You should use an inverter >3000 watts.
- Keep the inverter well-ventilated. Do not place any objects on top of or next to the inverter or allow anything to cover the cooling fans; doing so can cause the inverter to overheat, causing a potential fire hazard and/or damage to the inverter. Leave adequate ventilation space underneath the inverter as well; thick carpets or rugs can obstruct air flow, causing the inverter to overheat.
- Avoid unintentional starting. Be sure the switch is in the OFF position when not in use and before plugging in any appliance.
Note: Performance of this unit may vary depending on the available battery power or appliance wattage.
Warning: The warnings, cautions, and instructions discussed in this instruction manual cannot cover all possible conditions and situations that may occur. It must be understood by the operator that common sense and caution are factors which cannot be built into this product, but must be supplied by operator. Guard against electric shock. Do not open the metal case; risk of electric shock.
![]()
Battery Use
- To avoid over-discharging your vehicle battery, we recommend running your engine for 10-20 minutes to recharge the vehicle’s battery if battery voltage drops <11V.
- To properly size your battery, use the following formula: Volts * Amps = Watts or Watts/Volts = Amps. Example: 1000 watt inverter / 12 volts DC = 83.3 DC amps. In this example, you will need 83.3 amps to power a 1000 watt load for 1 hour. If you need to power 1000 watts for 2 hours you will need 83.3 * 2 = 166.66 DC amps available. A 100 amp hour battery will give you 100 amps / 166.66 = .6 hours so you will need two batteries if using 100 amp battery. This is if you fully deplete your batteries. We do NOT recommend fully depleting your batteries. This is just an example. Your power requirements may be different.
- If you choose to use a female 12 Volt DC adapter for your inverter or to the inverter make sure wire size is correct.
- IF YOU CONNECT THE WIRES TO THE INCORRECT TERMINALS, YOU WILL REVERSE THE POLARITY AND DAMAGE THE INVERTER.
- REVERSED POLAR ITY WILL INSTANTLY VOID THE WARRANTY OF YOUR INVERTER, SO BE CAREFUL TO CONNECT YOUR INPUT WIRES PROPEPLY.
- If you choose to operate a battery charger to replenish your battery’s voltage, be sure to check with charger manufacture before damaging the charger.
- CONNECTING THE INVERTER’S DC INPUT TO A BATTERY CHARGER WILL VOID THE WARRANTY, AND MAY DAMAGE THE INVERTER.
- Make sure that the battery voltage does not exceed 15 volts DC.
- CONNECTING THE INVERTER TO A DC POWER SOURCE GREATER THAN 15 VDC WILL VOID THE WARRANTY, AND MAY DAMAGE THE INVERTER.
Cables
We recommend that you refrain from using battery cables longer than 12 feet between the DC power source and the DC input of the inverter. Longer battery cables on the DC input will create a voltage drop which results in a reduction of efficiency and output. If you require more than 12 feet, use a bigger cable. We recommend using an extension cord between the AC output and AC appliance. You may use up to 100ft, high quality extension cord. A longer cord may result in reduced output. See Specifications chart for recommended battery cable size.
Digital Display
This inverter includeds a digital display to monitor input DC volts, DC amps, AC output watts and error codes.
A display selector button allows the user to advance the display readout to the next readout. The status of a LED shows which function is being shown on the digital display.
The display and button are used to help diagnose problems if they occur.
Function:
- Green LED: DC Input Voltage
- Red LED: AC Output Voltage
- Orange LED: AC Output Wattage (Kilowatts)
- Not Lit: Diagnostic Codes
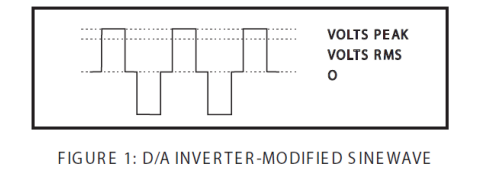
Measuring the AC Voltage
The output waveform of the inverter is a MODIFIED SINE WAVE. If you choose to measure the AC output voltage, you must use a TRUE RMS MULTI METER. Using any other type of voltage measuring device will result in an AC voltage reading of 10 to 30 volts lower than actual voltage. When using a true RMS multi meter, you will get an accurate reading.
SAFETY PRECAUTIONS
- Do not open the case of the inverter. The high voltage inside the unit is the same type of power as your electrical outlets at home.
- Do not let the cord of the inverter, or any appliance cord get wet. If you are operating the inverter in a moving vehicle, we recommend that you secure the inverter to prevent it from shifting around while the vehicle is moving.
- Do not operate this inverter in or around water. Water can damage the inverter, and water damage is not covered under warranty. Also, do not operate the inverter with wet hands. The AC voltage of the unit makes it an electrical shock hazard if operated with wet hands.
- Allow at least 12 inches of clearance around the Inverter for air flow. Ensure the ventilation openings on the rear and bottom of the unit are not obstructed.
- Do not connect the inverter directly to another AC power source. Damage may result, and such damage will void the inverter warranty.
- Know the wattage requirements of your appliance. Use only those appliances which are limited by the capacity of this unit.
- Use common sense. This device produces power just like your wall outlets at home and should be treated seriously. Keep it away from children.
- Reversed polarity of AC power outlet LINE /NEUTRAL will void the warranty.
- If there is anything wrong with the inverter, disconnect all of the power and contact technical support.
TROUBLESHOOTING
If the Inverter does not appear to be functioning properly, check the following possible causes:
- Poor contact: Clean contact parts thoroughly.
- If the low battery alarm sounds, this means the input voltage is too low and battery needs to be recharged.
- If you are getting a low output voltage, try reducing the load to minimize watts. You may have overloaded the inverter. Reduce your load. Also, keep input voltage above 10.5 volts to maintain a constant flow of power
- If you are not getting any power output, turn the power switch Off and On again, until the green power light comes on. Your devices may draw too much power to operate them. The inverter may be in thermal shutdown. Let it cool down and make sure there is adequate ventilation around the unit.
- If the green light turns red one of the following has happened:A. input voltage is too lowB. input voltage is too highC. short circuitD. inverter is close to overload
- Battery voltage is too low: Start the engine to recharge the battery. Replace or recharge battery if needed.
- Shuts down on overload: Reduce the wattage of your load.
- Thermal shutdown: Under heavy loads for extended period, the inverter will shut down to prevent damage from excess heat. Simply reduce your load and allow the Inverter to cool down.
- Low-battery shutdown: Recharge your battery and resume operation.
MAINTENANCE
Very little maintenance is required to keep your inverter operating properly. You should disconnect input power first and then clean the exterior of the unit periodically with a dry cloth to prevent accumulation of dust and dirt. At the same time, tighten the screws on the DC input terminals.
PLEASE READ THE FOLLOWING CAREFULLY
Neither the manufacturer nor distributor makes any representation or warranty of any kind to the buyer that he or she is qualified to make any repairs to the product or that he or she is qualified to replace any parts of the product. In fact, the manufacturer and/or distributor expressly states that all repairs and parts replacements should be undertaken by certified and licensed technicians and not by the buyer. The buyer assumes all risk and liability arising out of his or her repairs to the original product or replacement parts thereto, or arising out of his or her installation of replacement parts thereto.
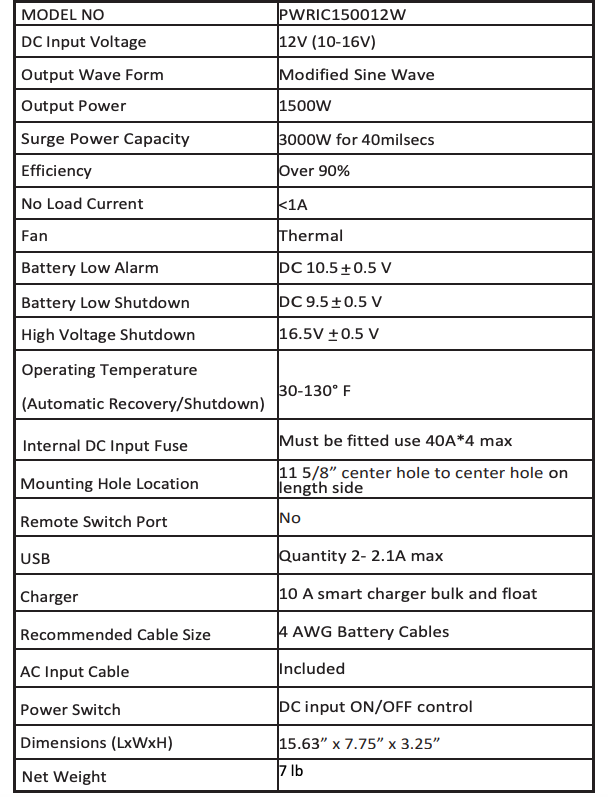
SPECIFICATIONS
WARRANTY
AIMS Corp., Inc. dba AIMS Power Warranty Instructions:
This product is designed using the most modern digital technology and under very strict quality control and testing guidelines. If, however, you feel this product is not performing as it should, please contact us: [email protected] or (775)359-6703
We will do our best to resolve your concerns. If the product needs repair or replacement, make sure to keep your receipt/invoice, as that will need to be sent back along with the package and RMA# prepaid to AIMS. You have a full 1 year warranty from date of purchase.
This warranty is valid worldwide with the exception that freight and duty charges incurred outside the contiguous 48 United States will be prepaid by customer.
Except as provided above, AIMS makes no warranty of any kind, express or implied, including without limitation the implied warranties of merchantability and fitness for a particular purpose. In no event shall AIMS be liable for indirect, special or consequential damages. This warranty only applies to AIMS Power branded products. All other name brand products are warranted by and according to their respective manufacturer. Please do not attempt to return non-AIMS Power branded products to AIMS Power.
For additional products such as:
- Modified sine wave inverters
- Pure sine wave inverters
- Low Frequency Inverters
- Solar Charge Controllers
- Micro Grid Tied Inverters
- Inverter Chargers and Automatic transfer switches
- Converters DC-DC
- Custom cut cables
- Batteries
- Solar Panels & Racks
Please visit our web site: www.aimscorp.net
To find out where to buy any of our products, you may also e-mail: [email protected] or call (775)359-6703.
References
[xyz-ips snippet=”download-snippet”]