AIREMAX Portable Air-conditioner APE514C User Manual![]()
Thank you very much for selecting this new model of Portable Air Conditioner, please read this Use and Care Manual carefully before installing and using this appliance. Please keep this Use and Care Manual properly for future reference.
Safety Instructions
- AII wiring must comply with local and national electrical codes and be installed by a qualified electrician. If you have any questions regarding to the following instructions, please contact a qualified electrician.
- The unit must be installed in accordance with national wiring regulations. Check available power supply and resolve any wiring problems before installation and operation of this unit.
- For your safety and protection, this unit will be grounded through the power cord plug when plugging into a matching wall outlet. If you are not sure whether the wall outlet at your home are properly grounded, please consult an electrician. If supply cord is damaged, it must be replaced by the manufacturer, its service agent or similarly qualified person in order to avoid any hazards.
- This appliance is not intended for people (including children) with reduced physical, sensory or mental capabilities, or lack of experience and knowledge, unless they have been given supervision or instruction concerning use of the appliance by a person responsible for their safety. Young children should be supervised to ensure that they do not play with the appliance.
![]() WARNING
WARNING
To reduce the risk of fire, electrical shock or injury when using your air conditioner, follow up these basicprecautions:
- Indoor use only, it is prohibited to use this unit outdoors or in humid environment such as bathroom etc.
- Do not remove ground prong.
- Do not use an adapter. * Do not use an extension code. * Never share the power outlet with other appliances.
- Never connect or disconnect the power plug with wet hands to avoid electric shocks.
- Never turn off the unit by unplugging. * Unplug air conditioner before servicing. * Never dismantle, repair or modify the unit without authorization to avoid body injury or property damage, be sure it repaired by manufacturer or professionals.
- After the air conditioning installation, please ensure that the wires plug in good condition and securely inserted into the power socket, and always maintain the power cord placement rules orderly, avoid someone stumbled or pull the plug out.
- Never put any objects into the unit. * Never cover or obstruct air inlet or outlet to prevent overheating.
- Never hit or shake the unit to prevent damage.
- Never spray water or place the unit near water to prevent electric shocks. * Never place the unit near gas appliances, fire or flammable liquids.
- Move and install the unit by two or more people. * The unit should be far away from the gas, flammable gas, stoves, or other heat source
- This appliance can be used by children aged from 8 years and above and persons with reduced physical, sensory or mental capabilities or lack of experience and knowledge if they have been given supervision or.instruction concerning use of the appliance in a safe way and understand the hazards involved. Children shall not play with the appliance. Cleaning and user maintenance shall not be made by children without supervision.
Cautions
- Please make sure that the unit is placed on a flat, dry place. Keep the unit between the walls around has more than 0.5meters.
- Keep the unit at least 1 meter away from TV or radios to avoid electromagnetic interference.
- Do not expose the unit under direct sun light to avoid surface color fading.
- Do not tilt the unit for more than 35 degrees or upside-down while transporting.
- Keep the drain hose in good condition without flexure then connect with unit.
- Empty the condensed drainage pan before putting the unit in storage to prolong the unit lifetime end of the season.
- Do not use insecticide spraying or other combustible material near the air conditioning.
- Do not use chemical solvents (e.g. Benzene, alcohol-glazer) to clean the unit surface, do not scratch or damage the unit.
- Make sure to cut off the power before disassembling or installing the filter.
- Do not break the vanes off with your hands while the machine is running, which may damage the motor.
Remark: The optimal ambient temperature for cooling mode is 17-35 °C, and the optimum ambient temperature for heating mode is 8-25 °C..
Function and Technical Specification
- This unit offers cooling, dry, dehumidification and fan modes.
- This unit is with three fan-speed level accessible by panel control and remote control.
- Temperature setting range of this unit is 62.6-86°F ( 17-30°C).
- This unit is designed with various protection functions such as 24-hour programmable timer, auto condensate circle, super intelligent temperature sensor and water-full control and warning etc.
Features and Identification of Parts
1, Features
- New appearance with compact design, more luxury and upscale.
- Outlet louver swing automatically and wind direction up to consumer needs.
- Beautiful and simple appearance, humanized design for remote control storage, which can be placed in storage bracket at the back of the unit body.
- Simple operation, LED digital display control panel.
- Winding pillar and universal socket can protect power cord better.
- 24-hour Timer function, unique on/off reminding music.
- 24-hour Timer function, unique on/off reminding music.
- 3-minute re-start delay protection to compressor and other multiple protection functions.
- Unique exhaust hose and fasteners, convenient installation.
2. Identification of Parts
- Control panel 11. Upper filter assembly
- Wind Grille 12. Lower filter assembly
- Display Screen 13. Drain hole and cover
- Front shell 14. Remote Control
- Universal wheel 15. Exhaust hose assembly
- Handle 16. Exhaust hose adapter
- Universal socket 17. Window seal-plate assembly
- Wire winding pillar
- Chassis
- Back Shell
Operation and Settings
- Control panel instructions
Program the time from 1 hour to 24 hours for the unit to turn ON or OF F. When a TIME DELAY isprogrammed, the Timer indicator light will illuminate.While the unit is operating:
- Press the TIMER button.
- Press the UP/DOWN arrow buttons to select the number of hours you want the unit to continue to operate before turning off.Note: wait approximately 5 seconds for the Turn-Off time to be saved.
While the unit is off:
- Press the TIMER button.
- Press the UP/DOWN arrow buttons to select the number of hours you want the unit to continue to operate before turning on.Note: wait approximately 5 seconds for the Turn-On time to be saved. To clean the timer: press the TIMER button once, the hours remaining will flash, press the TIMER button again and the timer will be canceled.
The fan speed can be adjusted from Low speed to High speed when the unit is either in COOL or FAN mode.Press the FAN SPEED button to toggle among the two speeds. The corresponding fan speed indicator will illuminate.Note: The fan speed cannot be adjusted when the unit is in DRY mode.C. UP AND DOWN ARROW BUTTONAdjust the temperature or Hours in Time Delay. To set the temperature:
The temperature can be set between 62°F and 86°F(17°C and 30°C)when the air conditioner is in COOL mode.
- Press the MODE button until the COOL mode is selected.
- Press the UP ARROW or DOWN ARROW buttons to select the temperature.Note: The temperature cannot be set when the air conditioner is in either FAN or DRY mode.
Press MODE button to toggle among the operating options. The corresponding indicator will illuminate.COOL – Cools the room to the set temperature.DEHUM – Reduces the humidity in the room.FAN – Circulates the air in the room without cooling.
E. POWER BUTTONTurns ON/OFF power to the air conditioner. Turn on the unit by pressing the POWER button, the Power indicator will illuminate.Note: Turning off power by pressing the POWER button does not disconnect the appliance from the power supply.
F. CONTROL PANEL DISPLAY
Displays the set temperature in degrees Fahrenheit or degrees Celsius, or the hours remaining in a Time Delay. The corresponding indicator light will illuminate.
2, Remote Control Operation![]()
- The operation interface of this remote controller is as follows:1. Power button : Press this button to start unit when it is energized or stop the unit when it is in operation;
- Timer button: Press this button to set unit automatic on and off time;
- Fan button: press this button to select high, medium or low speed of fan running (except dehumidify mode);
- Up button: press this button to increase temperature or timer setting;
- Down button: Press this button decrease temperature or timer setting.
- Mode button: press this button to select Heat mode, Cool mode,Dehumidification mode or Fan mode;
- Sleep button: Increases the set temperature by 2°F (1°C) after 2-hours, and then increases the temperature by an additional 2°F (1°C) after another 2- hours.
- Air sweep: Press this button to open or close auto swing function.2) Battery installation: Before using your remote, install the AAA batteries into remote control.
- Press and glide the battery cover on the back of the remote control, then you can remove the cover.
- Insert two new alkaline AAA batteries into the battery compartment. Be sure to note the proper polarity.
- Reattach the battery cover and make sure the locking tab clicks into place.
Notes:
- Use alkaline batteries only. Do not use rechargeable batteries.
- When replace batteries, always replace both batteries with new batteries, do not mix old and new batteries.
- If the air conditioner will not be used for an extended period of time, remove the batteries from the remote control.
1 ) Storage of remote control
This machine has the storage area of remote control (photo 4). Please put the remote control in this area to prevent the loss of remote control.
CAUTION
- If the liquid from the batteries gets onto your skin or clothes, wash it well with clean water, do not use the remote control if the batteries have any leakage.
- If you eat the liquid from the batteries, brush your teeth and see doctor. The chemicals in batteries could cause burns or other health hazards.
Protection functions
- Water-full protect:Use Water switch to achieve water-full protect, water switch is always off, it will be on when it works. both water-full indicator and “FL” on LED window is flashing.
- Anti-freeze protection function Compressor, water spraying motor will turn off when compressors are running over 10 minutes and tube temperature (Tp) is continuously ~ 2t: for 20 seconds under cooling mode, E4 will show on LED display window.Once the tube temperature ~ 8 ‘C, the protection is relieved to recover into original status, and compressor apply to to 3-minute delay protection.
- Delay protection function of compressorThis unit offers restart protection to compressor. Except that the compressor may start immediately when the unit is energized at first time, there is 3-minute start delay after compressor is shut down.
- Coil and room temperature sensors auto-diagnosis(1) Sensor test at the first time or power up state.(2) When room temperature sensor tests out failure, unit will be off and display Error Code E2;When Coil temperature sensor test out failure, unit will be off and display Error Code E1. If sensors test ok, unit restore original state of work or enter into standby state when energized.
Handling and Transportation
- Handle and move the unit1) Hold handles on side panels to move the unit in upright position.
Note:
- Do not hold the louver.
- Make the unit in the upright position whatever handling or moving it.
- Drain the water in the unit completely to prevent water leakage and wet the floor or carpet before handling or moving the unit.
- Take out the remote control from the storage area and keep it.
- Take out the exhaust hose assembly and its adapter from plastic bag.
- Extend the exhaust hose at one end, screw the round end of adapter into exhaust hose at anticlockwise direction
1.2 Installation of window seal-plate
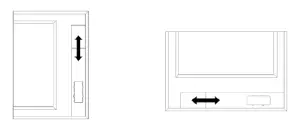
- Open the window in half, put the seal-plate into window, determine in vertical or horizontal position according to window open direction.
- Extend seal plate parts, adjust it to the length of window and fix it with screws then.Remarks: 1) Keep two ends of window seal-plate to meet the window edges well, to assure seal effect.2) Fix the screw in good position.

1.3 Installation of the unit
- Move the unit together with its exhaust hose assembly in front of the window and keep the unit at least 50cmaway from the walls or other objects.
- Install the rectangle end of exhaust hose adapter into the corresponding rectangle hole in window seal-plateassembly, fix it with screw and close the window.A. Align the 4 locks on window seal-plate with corresponding 4 fasteners on exhaust hose adapter and setthem together, then slide adapter downwards.B. Lock self-tapping screw cp4mm into adapter hole.
- Remarks:• Slide the adapter downwards and assure the adapter installed in good position.• Lock the cp4 screw tightly to avoid fall off.• Exhaust hose can’t be bent or with flexure higher than 45°, in order to keep good ventilation of exhaust hose.
Important notes:The exhaust hose is 280mm-1500mm long and which is determined by the specification of the air-conditioner (s). Do not use prolonged the hose or replace it with other different hoses as this may affect the functions of the air-conditioner. The exhaust hose must be smooth or it may lead air-conditioner overheat and trip because exhaust hose is obstructed.
Drainage Instruction
This portable air conditioner has two drain ports, higher one and lower one and we can use two drainage methods: manual drainage and continuous drainage;
- Manual Drain:This unit is designed with high efficient self-evaporative system and It is suggested to use manual drainage in cooling mode, all condensate will recycle in the unit to ensure enough water to recycle in the unit to cool condenser and enhance cooling performance advance; however in extreme humidity, water tank at chassis will be full,“FL” will show on LED display, it need to be drained manually from lower drain port.
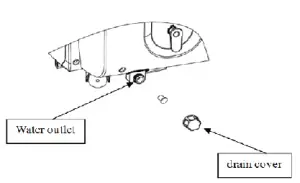
- Put the tray below the water outlet at the back of the unit.
- Screw off the drain cover; unplug the water stopper for water flow into the tray.
- Plug in stopper and screw the water cover tightly onto water outlet after drainage.
Notes:
- Move the unit carefully to avoid the leakage if it is necessary.
- Protect the drain cover and water stopper properly.
- Tilt the unit slightly backwards when draining. dmincov~r
- Block the drain hole as soon as possible before the tray is full if it can’t hold all water in the unit to prevent the water leakage and wet the floor or carpet.
- Water stopper and drain cover must be tightly installed, to avoid new condensate to wet the floor or carpet when the unit re-starts working.
2. Continuous drain: (strongly recommend to use this method and drain from lower drain port under heating mode, because self-evaporative cooling system doesn’ t work under heatingmode)
- Screw off the drain cover.
- Connect drain-hole with q>13mm PVC drain hose, as deep as possible to avoid leakage.
- Pull the drain hose to bathroom or outdoor.
Notes:
- Drain hose must be installed before unit starts working.
- It is suggested to use manual drainage when unit in cooling mode, to ensure enough water to recycle in the unit to cool condenser and enhance cooling performance.
- Put the drain hose in an inaccessible place, not higher than drainage hole and keep drain hose straight without any flexure.
- Keep the drain cover and its stopper properly installed when continuous drainage is adopted.
3. Continuous drain in dehumidification mode: higher drain port is the best.
- Screw off the drain cover and unplug the water stopper.
- onnect drain-hole with cp13mm PVC drain hose, into depth of 8mm-10mm.
- Pull the drain hose to bathroom or outdoor.
Notes:
- Drain hose must be installed before unit starts working. Drain hose
- Put the drain hose in an inaccessible place, not higher than water outlet and keep drain hose straight without any flexure.
- Keep the drain cover and its stopper properly installed when continuous drainage is adopted.
Maintenance and Service
Turn off the unit and pull out the plug before maintenance or send the unit to service center.
- Surface cleaningClean the unit surface with wet and soft cloth, but do not use chemical solvents such as alcohol and gasolineto avoid any damage to unit.
- Filter cleaningClean the filter every two weeksNote: If filter is blocked by dust or any other things, it would influence the unit performance.
3.1 Clean filter
- Grip the filter handle and take it out gently in correct direction shown by the arrow.
- Hold hand positions with your hands, take filters out in correct direction shown by the arrow.Note: 1) Use even force to take out the filter to avoid any twist or damage to filter.
- Clean the filters gently in warm water (about 40°C) mixed with detergent, and dry in the shade.
Notes: 1, Do not squash the mesh.2, Do not hit the mesh with sharp objects or brush.
3.2 Installation of the filter
1 ) Aim at slot and push filters in even force toward into slot gently to avoid any damage.3. Clean of handle position and remote control storage area.1) Take out the remote control.
2) Clean the handle position and remote control storage area with wet and soft cloth.Note: Do not drip water into the unit.
End of Season Storage
- Screw off the drain cover, and then pull out the stopper to drain water completely.Note: The tilt angle of the unit must be~ 30·
- Keep the unit running in fan mode half day to dry inside of unit completely and prevent from going mouldy.
- Turn off the unit, pull out plug then wrap the power cord around the wire-winding pillar, insert the plug into the universal fixing hole at the back panel of the unit, install the water plug and drain cap.
- Remove the heat exhaust hose assembly, clean and keep it properly.Note: 1) Hold the exhaust hose assembly with both hands when removal. 2) Push the fasteners aside on exhaust air outlet using your thumbs, then pull out exhaust hoseassembly.
- Pack the air-conditioner properly with soft plastic bag and put it in dry place with appropriate dust-proof measures and keep the unit away from children.
- Take out the batteries from the remote control and keep it properly.Note: Assure the unit is stored in a dry place. All accessories of the unit shall be properly protected together.
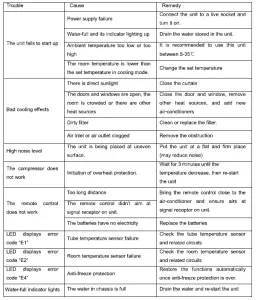
Troubleshooting
Please check the unit and suggestions below before asking for professional service, but neverdismantle or repair the unit by yourself, it may cause harm to you and your property.
Appendix
Schematic diagram of the air conditioner
For specific technical parameters of the model, refer to rating label on the product.
Correct Disposal of this product – This marking indicates that the product should not be disposed with other household wastes throughout the world. To prevent possible harm to the environment or human health from uncontrolled waste disposal, recycle it responsibly to promote the sustainable reuse of material resources. To return your used device, please use the return and collection systems or contact the retailer where the product was purchased. They can take this product for environmental safe recycling.
Warranty Terms 8 Conditions
Question about your product? We are here to help.Visit us at: www.airemaxusa.comOr call our Customer service hot-line: 1- 855 475 9647
Under normal operations, the product will guarantee a 1-year full warranty provided by AIREMAX (effective from the date of purchase). In Order to Make a Warranty Claim During the First 90 Days from the Date of Original
Purchase:
- Properly pack your unit. We recommend using the original carton and packing materials.
- Include in the package a copy of the sales receipt or other evidence of date of original purchase. Also print your name and address and a description of the defect.
- Pictures may be required for some returns to ensure an item is not damaged prior to its return. Customer should always follow the operating instructions. The warranty does not apply to:
- Labor costs for on-site installation, check-up, repair, replacement of parts and other transportation costs.
- Damages caused by accidents of any kind (including material transfer and others)
- Operating failures resulting from applying incorrect voltage, improper usage, andunauthorized installations or repairs.
This warranty is invalid if:
- The product is used for any commercial or or industrial purposes.
- The product is repaired or modified by unauthorized personnel, or unauthorized parts are installed.
- The serial No. is modified, damaged, or removed from the product.
WARNING
report this adManufacturer and seller expressly disclaim any and all liability for personal injury, property damage or loss, whether direct, indirect, or incidental, resulting from the incorrect attachment, improper use, inadequate maintenance, or neglect of this product.
Read More About This Manual & Download PDF:
[xyz-ips snippet=”download-snippet”]