
INSTRUCTION MANUALBagless VacModel no. OP2011
 |
|
|
|
 |
|
 |
|
 |
|
IMPORTANT SAFEGUARDS
READ THESE INSTRUCTIONS BEFORE USING THE APPLIANCE:
Whenusingtheappliance,itisnecessarytofollowsome basic precautions:
- Always make sure that the voltage of the mains electricity supply is the sameas that indicated on the rating plate of the appliance and that the system is compatible with the appliance power.
- The appliance may only be used for its intended purpose, which is for vacuuming dust from surfaces within the home. Any other use is to be considered improper and therefore, dangerous. The manufacturer may not be held liable for any damages caused by improper, incorrect or unreasonable use.
- Do not use to vacuum hot ash, large pieces of glass, rubble, sharp or pointed items, or liquids.
- To prevent dangerous overheating, always unwind the power cord fully and unplug the appliance from the mains when the appliance is not in use.
- 5 Only plug the appliance into an AC socket.
- Never use the appliance without a bag or motor filter or if the bag or filter are broken or damaged.
- Never use the appliance on wet surfaces.
- Never suck up liquids.
- NEVER PLACE THE APPLIANCE IN WATER OR OTHER LIQUIDS.
- Do not touch the appliance when hands or feet are wet or moist.
- Never use the appliance with bare feet.
- Do not leave the appliance exposed to the elements (rain, sun, etc.).
- Donotstoretheapplianceinproximityto sourcesofheat(e.g.radiators).
- Always unplug the appliance before cleaning it or changing the filters.
- This appliance is not intended for use by persons (including children) with reduced physical, sensory or mental capabilities, or lack of experience and knowledge unless they have been given supervision or instruction concerning the use of the appliance by a person responsible for their safety.
- Children should be supervised to ensure that they do not play with the appliance.
- Never unplug the appliance by pulling on the power cord.
- Make sure that the power cord does not come into contact with sharp or hot surfaces.
- Never use the appliance if the power cord is damaged.
- Ifthecordisdamaged,it must bereplacedbytheManufacturer, by an authorized Technical Assistance Centre or in any case, by a similarly qualified person, in order to prevent any risks.
- Unplug the appliance from the main’s electricity after each use.
- In the event that you decide to dispose of the appliance, we advise you to make it inoperative by cutting off the power cord. We also recommend that any parts that could be dangerous be rendered harmless, especially for children, who may play with the appliance or its parts.
- Packaging must never be left within the reach of children since it is potentially dangerous.
DO NOT THROW AWAY THESE INSTRUCTIONS
DESCRIPTION OF THE APPLIANCE (Fig. 1)
- Cord rewinder button
- Release button
- On/off switch
- Dustcontainerlock/release button
- Dust container handle
- Suction device coupling
- Dust container
- Appliance body
- Manual air inlet valve
- Top carry handle
- Carpet head
- Telescopic rod
- Slider device
- Suction device
- Attachment storage compartment
- Dusting brush
- Crevice nozzle
- Handle
ATTACHMENTS
Carpet head (11)Ideal for cleaning any type of surface. Use the device on the top of the attachment to – retract the bristles when cleaning carpets or rugs; – lower the bristles for smooth floors such as PVC, parquet, or tiles.
Dusting brush (16)This can be used to remove dust from books or other delicate items, such as picture frames, etc. It is suitable for cleaning upholstered furniture, mattresses, cushions, curtains, etc… This attachment can also be fitted directly to the handle (18).
Crevice nozzle (17)This suction device is ideal for cleaning between the folds on fabrics, joints, corners, or niches that are impossible to reach using the floor cleaning device. This attachment can also be fitted directly to the handle (18).
VACUUM CLEANER ASSEMBLY
WARNING: Before fitting or removing the attachments, always make sure that the vacuum cleaner has been unplugged from the power mains.
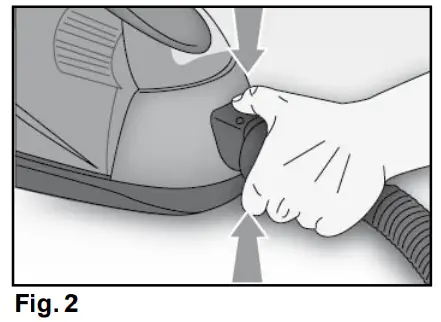
– Fit the suction device (14) into the air inlet opening (6) and press it in until it clicks into place. To remove it, it is necessary to press the two release buttons (2) at the same time and to pull it out (Fig. 2).– Insert the telescopic rod (12) into the handle (Fig. 3).– Push the slider device (13) forward and pull the bottom section of the rod out to the required length (Fig. 4). Then simply release the slider and the device will return to its original position.– Fit the required attachment to the telescopic rod.
USING THE APPLIANCE
Caution: Before using the vacuum cleaner, remove all large or sharp objects from the floor to avoid any possible damage to the cleaner itself.
First of all, before using this appliance, unwind the power cord completely and plug the appliance into the main socket. To switch on the appliance, press the switch(3)on the thevacuumcleaner. Whileusingtheappliance, pull it along behind you as if it were a trolley.
Important: In some cases, the appliance may “whistle” when switched on. This is not a fault and the noise will go away with time.
Secondary air valve (9)The secondary air valve (9) is on the handgrip (18) and it is used to regulate suction power. The wider the valve is opened, the less the suction power and vice versa.– To open the valve, push it upwards, and to close it, push downwards.Open the valve to prevent curtains and the like from being sucked into the cleaner.– Minimum suction power for curtains and delicate materials.– Medium suction power for cushions, mattresses, and carpets.– Maximum suction power for tiled, wood, or other resistant floor surfaces that are heavily soiled.
WARNING: Switch off the vacuum cleaner immediately if the air inlets, brushes, or telescopic rods become blocked. Remove the cause of the blockage before switching the vacuum cleaner on again.
After using the vacuum cleanerSwitch off the appliance after use by pressing the switch (3), with your hand or foot. After this, unplug the appliance and wind the cord back inside its housing by holding down the cord rewinder button (1). The cord will rewind itself immediately inside its housing.WARNING: While rewinding the power cord, guide it in the right direction by hand to prevent any risk of injury to yourself.
Put the appliance away, fitting the attachment storage compartment (15) on the handle (18) and hooking on the crevice nozzle (17) and dusting brush (16) (Fig. 5).
Carrying the vacuum cleanerThis vacuum cleaner has a handle on the top (10) for carrying purposes.
CLEANING AND MAINTENANCE
WARNING: Before carrying out any cleaning or maintenance operation, switch off the appliance and unplug it from the mains power. The dirt vacuumed up will enter the dust container (7). The air is then cleaned through a permanent washable filter inside the dust container, by a filter to protect the motor, and by an air outlet filter, located on the underside of the appliance.WARNING: Never use the vacuum cleaner if any filter is missing or damaged. Any dust cleaned up will enter the appliance and damage the motor.WARNING: Clean the filters regularly or in any case, whenever the suction power seems to be reduced.
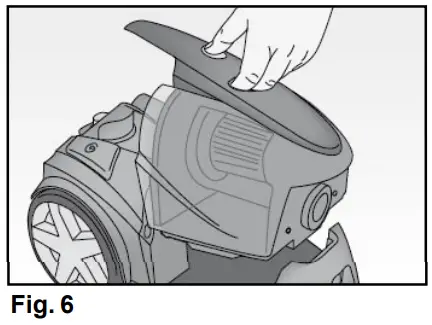
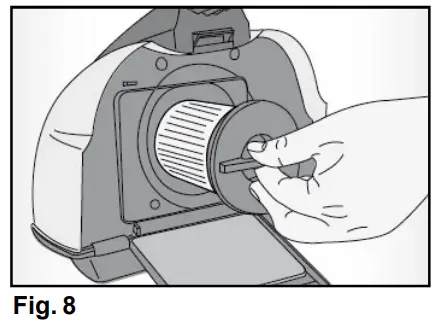
Emptying the dust container (7)The transparent surface of the dust container makes it easy to see when this needs to be emptied.– Press the release button (4) and at the same time, remove the dust container (7) using the rel- event handle (5) (Fig. 6).– Use the two levers at the back to open the relevant hatch (Fig. 7).– To clean the inside of the container (7), it is possible to remove the washable filter by turning it counterclockwise and pulling it outwards (Fig. 8).– Empty the dust container (7) (Fig.9).– To refit thefilteronthedustcontainer(7),insertitandturnitclockwise. Clickthehatchshut.– Refit the dust container (7) onto the body of the appliance (8) so that it clicks into place.
IMPORTANT: When the dust container becomes full, it is advisable to place a plastic bag over the top and empty it inside the bag itself to prevent dust and dirt from leaking out.
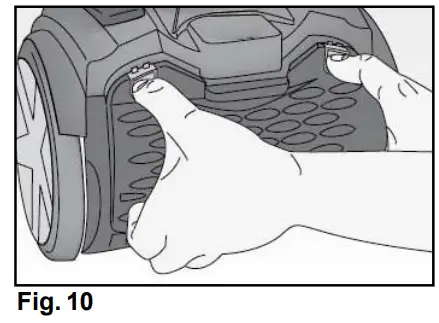
Cleaning the motor filterand its special covering needs to be cleaned on a regular basis.– Use the two levers and lower the hatch in the back section of the appliance (Fig. 10).– Remove the filter and clean it under running water (Fig. 11). Leave it to dry thoroughly.– Refit the filter and click the hatch shut.
WARNING: Only wash the filter in clean water, without using soap or detergents.WARNING: This operation is necessary at least once every 6 months or in any case when the suction power is notably reduced.
Cleaning the air outlet filterThis filter cleans the air one last time before it leaves the vacuum cleaner. To clean the filter, proceed as follows:– Remove the dust container (7) and open the grid of the air outlet filter (Fig. 9).– The air outlet filter can be seen once the grid has been opened.– Clean the filter in cold water and leave it to dry.– Refit the clean (or new) air outlet filter into the grid and return this to the appliance, pressing it down until it clicks into place.
report this adWARNING: Only wash the filter in clean water, without using soap or detergents.
Cleaning the vacuum cleanerThe casing, dust container and filter seats can be wiped with a damp cloth if necessary. No liquid must enter the vacuum cleaner in the process. Never use heavy-duty cleaning substances (stain removers, thinners) because they can corrode the plastic surfaces. Only put the plug back into the main socket when you are sure that all parts are thoroughly dry.Important: Do not lubricate or oil any rotating parts, since this could cause dirt and fluff to stick even further
Cleaning the brushesWhile the appliance is switched on, move your hand between the bristles on the brush to free them of any trapped dust, which will then be sucked into the cleaner.
TROUBLESHOOTING
Thermal cutout switchThe vacuum cleaner is equipped with a thermal cutout switch to protect it in the event that the motor overheats. If the vacuum cleaner suddenly switches off by itself, proceed as follows:– Switch off the vacuum cleaner and unplug it from the mains power.– Lookfortheoriginoftheoverheating(blocked suction pipe, dirty filter, etc.)– Clean the house, empty the dust container and clean the filters, if necessary.– Wait for about 30-40 minutes to allow the motor to cool down.– After 30-40 minutes, insert the plugin in the mains socket and switch on the vacuum cleaner.The vacuum cleaner should now work.– If the vacuum cleaner still does not work, wait another 20 minutes and then try again.– If the cleaner still does not work, contact an Assistance Centre.
[xyz-ips snippet=”download-snippet”]