
AirLink® XR90 Quick Start Guide
What’s In The Box
- AirLink XR90 High Performance Multi-Network Router
- LPWA antenna
- Locking DC power cable
- This Quick Start Guide for quick router configuration and connection
- XR Services guide to ALMS router registration and configuration
STEP 1: Register with AirLink Management Service (ALMS)
One year of access to ALMS is included in the router’s purchase price. Use ALMS to register, configure and monitor your router (or router fleet).Refer to the included XR Services guide to create an ALMS account (if you do not have one), register your router and activate your subscription.
- Follow the instructions in the XR Services guide to register and preconfigure your router.Your router will automatically connect to ALMS the first time it powers on, then complete its registration and apply any preconfiguration.
STEP 2: Install the SIM Cards
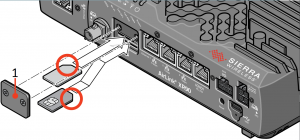
- Use a #1 Phillips screwdriver to remove the SIM card cover.
- Slide the SIM card(s) into the SIM card slots until they click into place.(Note the position of the notched corners.)• XP1 cellular radio—Insert SIM in upper slot• XP2 cellular radio —Insert SIM in lower slot
- Re-attach the cover
Note: The LPWA radio uses an embedded SIM with connectivity (included as part of your XR Services) —no external SIM is required.
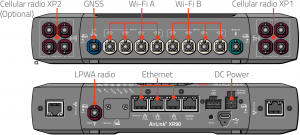
STEP 3: Connect and Power On the Router
![]()
- Connect color-coded cellular, Wi-Fi and GNSS FAKRA-connector antennas to the back panel.
- Connect the LPWA antenna to the LPWA radio connector on the front panel.
- Power on the XR90 by providing 7–36 VDC to the DC Power connector (using the DC power cable or an optional XR Series AC power adapter).Once powered on, the router uses an available Internet connection to connect to ALMS, completes its registration and applies any preconfiguration done in STEP 1.(The LPWA LED turns green and pulses to indicate activity.)
Important: DO NOT REMOVE POWER during an LED ‘chase’ (all LEDs flashing in sequence) as this indicates a device update is occurring.
* If not using an AC adapter, Ignition Sense must be connected to vehicle ignition or the positive terminal of your power supply.
STEP 4: Complete the Router Configuration (Recommended Procedure)
- For your first XR90 router or a router in your fleet requiring custom configuration, connect your computer to the router (use any chassis Ethernet port) and use the router’s AirLink OS web interface — follow the instructions in Configure the Router Locally with AirLink OS, below.
- If additional XR90 routers in your fleet will use the same configuration, use ALMS to make a template from this router. Then, when needed, use ALMS to push the template to those routers. Refer to the AirVantage documentation at source.sierrawireless.com/airvantage for details.
Configure the Router Locally with AirLink OS (Optional Procedure)
To locally configure your router, log in to AirLink OS (the router’s web interface).
- Connect to the router through a LAN connection (e.g. a configured Ethernet port or Wi-Fi connection).
- Open a browser window and enter https://airlink./ or 192.168.1.1, and bypass any certificate notifications in your browser. The login screen appears.
- Enter the administrator Name (admin) and factory default Password (printed on the label on the base of the router), and click SIGN IN.The Dashboard screen appears, and you can now make configuration changes to your router.Note: The default password is recorded only on the label, which also has a QR code that contains the password and the router’s serial number.
For system security, please change the default password as soon as possible.
Configure and Monitor the Router Remotely with ALMS (Optional Procedure)
Use ALMS to remotely monitor your router, and to perform maintenance activities and additional configuration. For details, refer to the XR Services guide. To configure your router:
- Open a browser window, connect to AirVantage (e.g. na.airvantage.net, eu.airvantage.net), and log in to ALMS. Your ALMS account Dashboard is displayed.
- Select Monitor > Systems to display your registered devices.
- Find your router in the list, then click the router name to display the system details.
- Click the Configuration button to display the configuration interface.
- Make and save any required configuration changes. These changes will be applied to the router the next time it connects to ALMS.
For more information, refer to the following resources available from source.sierrawireless.com:
- Sierra Wireless XR Series Hardware User Guide
- AirLink OS User Guide available at source.sierrawireless.com/airlinkos
Sierra Wireless Contact Information
Sales information and technical support, including warranty and returns
Web: sierrawireless.com/company/contact-usGlobal toll-free number: 1-877-687-7795
Corporate and product information Web: sierrawireless.com
![]() © 2020 Sierra Wireless All Rights Reserved PN 5305868 Rev. 1
© 2020 Sierra Wireless All Rights Reserved PN 5305868 Rev. 1
References
[xyz-ips snippet=”download-snippet”]