Airmate F40A Stand Fan
PRODUCT FAMILIARISATION OF F40A
ASSEMBLY OF F40ASTAND FAN
- Insert the upper base on the lower one and remove the screws from the base
- Locate the adjustable stand on the base and fix the screws through the stand to the base. Make sure all the screws are tightened.
- Lower-the stand joint cover on the base.
- Insert the control stand to the upper stand and lock the stand screw behind.

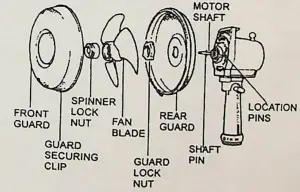
- Remove the spinner lock nut and guard lock nut from the motor shaft spindle.
- Fit the rear guard by positioning on location pins. Secure the guard to the motor body with the guard lock nut.
- Push the fan blade onto the motor shaft by matching the slots on the base of the blade with the shaft pin.Secure the blade with the spinner lock nut. The spinner lock nut must be tightened by turning it in an anticlockwise direction. Check that the I an blade rotates freely by turning with your hand.
- Open the securing clip at the bottom of the front guard and loosen the clip screw. Position the top clip on the uppermost part of the rear guard. Push the top clip down and press rim of the front guard onto the rear guard. Close the bottom clip and tighten the screw.

HEIGHT ADJUSTMENT
- Loosen the stand shaft lock knob.
- Adjust the height and tighten the lock knob again.
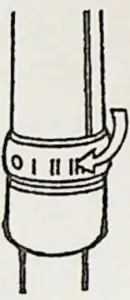
SPEED CONTROLS
Turn the switch to adjust the air speed
OFF LOW MED HIGH
TILTING
The stand fans incorporate an angular tilt facility which can be adjusted by a control knob located on the fan pedestal underneath the motor housing.Loosen the control knob in an anti-clockwise direction, then make the desired tilt adjustment, then tighten the control knob.
OSCILLATION
The oscillation control knob is positioned on the top of the rear motor housing. Press the knob down to make the fan oscillate. and pull it up to stop the oscillation. When operating this control, we suggest that it is best not reach over the guards. There is possibility of loose items of clothing, sleeves, etc., entering the guard.
CARE AND MAINTENANCE
ENSURE THC: MAINS SUPPLY PLUG IS REMOVED FROM THE SUPPLY SOCKET BEFORE ATTEMPTING ANY CLEANING OR MAINTENANCE OPERATION. To dismantle for cleaning or long term storage, reverse the assembly instruction order. The fan blade may be washed in warm water with a little mild detergent. Alternatively it may be wiped over with a soft damp cloth. Ensure it is completely dry before re-fitting. The front and rear guards can be cleaned with a soft brush or soft damp cloth. The motor housing and pedestal can be wiped clean with a soft damp cloth.DO NOT IMMERSE IN WATER.DO NOT USE HARSH ABRASIVE CLEANERS.First check that the voltage marked on the product corresponds to your supply voltage.
IMPORTANT
ON NO ACCOUNT MUST THE FAN BE USED OR TAKEN INTO THE BATHROOM. Ensure the location is level so that the fan is stable.Position the fan out of reach of children. Do not insert anything into the guard grille. If moving the fan to a different location. switch off and unplug from the mains.
ATTENTION
Supply Cord and PlugAlways unplug from mains supply when not in use. Do not abuse or damage the power cord. If the supply cord is damaged, it must be replaced by the manufacturer or its service agent or a similarly qualified person in order to avoid a hazard. Do not let the supply cord touch hot surfaces.

[xyz-ips snippet=”download-snippet”]