
Quick Start GuideAiwa Prodigy Air Max
Aiwa CorporationUS: [email protected] | 888-982-8561Europe: [email protected]
PACKING LIST
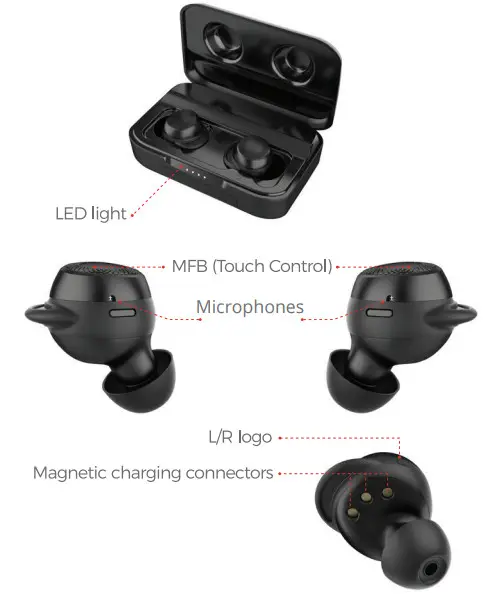
DIAGRAM
FINDING THE RIGHT FIT
Because fit is crucial for the enjoyment and comfort of an earphone, the Prodigy Air Max was designed in close consultation with audiologists. Designed not just to fit into the ear canal with different sized silicon tips, but also to comfortably and securely fit the Concha.The Prodigy Air Max does this not only with interchangeable ear tips but also interchangeable silicon wings. The earbuds come installed with medium sizes of both. If you find the fit is not perfect, you may wish to remove the wing accessory and experiment with the other included eartips, followed by trying different sizes of wings.The correct size wing should fill the ear’s Concha and be held securely in place by the Antihelix and Antitragus
POWER ON
- The earphones will automatically turn on and start pairing when you open the charging case. If they have been previously paired, they will reconnect with the most recently connected device.
- If the earphones have gone to sleep outside of the case (after ten minutes without use) they can be turned on by simultaneously pressing and holding the MFB of both earbuds for 2 seconds.
POWER OFF
- Option #1: Put the earphones back in the charging case and close the case to turn them off.
- Option #2: If the earphones are not in the charging case, just press and hold the MFB of both earbuds for 5 seconds to power them off. (Music must be stopped and calls ended to power off.)
PAIRING
- When the charging case is opened, they will automatically enter pairing mode. The LED light will flash white and red.2. From your phone’s Bluetooth menu, select “Aiwa Prodigy Air Max.”For convenience, the Prodigy Air Max earphones are designed to automatically reconnect to the most recently paired device. To pair to a new device, disconnect the Bluetooth from the last device. The earbuds will automatically enter pairing mode.
MUSIC
- Volume Up / Down• Volume +: press and hold the MFB button of the Right earbud to turn up the volume• Volume -: press and hold the MFB button of the Left earbud to turn down the volume
- Next / Previous Track• Next Track: double touch the MFB of the Right earbud.• Previous Track: double touch the MFB of the Left earbud.
- Play / Pause• Touch the MFB of either earbud once.
INCOMING CALL
- Answer / Hang Up• Double touch the MFB of either earbud.
- Reject• Press and hold the MFB of either earbud for 1 second.
DIGITAL ASSISTANT
- Triple-touch the MFB of either earbud to initiate Google Assistant or Siri
RESET
While in the charging case, simultaneously press and hold the MFB of both earbuds for 5 seconds. When the LED light flashes red, the device has reset and cleared the previousdevice connections.
CHARGING
-The color of the LED on the front of the case will show how much charge in the case remains:Red: less than 35% charge remainingPink: between 35% and 75% chargedBlue: greater than 75% charge remains-Do not put the earbuds in the charging case when the earbuds are wet.
Miscellaneous Notes/Troubleshooting
-When you return the earbuds to the charging case the MFB LED should illuminate (red if charging, white if fully charged) and they should disconnect from the phone automatically. if they do not, then either they are not well seated in the case or the case is fully discharged.
FCC STATEMENT
Any changes or modifications not expressly approved by the party responsible for compliance could void the user’s authority to operate the equipment.This device complies with part 15 of the FCC Rules. Operations is subject to the following two conditions:
- this device may not cause harmful interference, and
- this device must accept any interference received, including interference that may cause undesired operation.
FCC Radiation Exposure Statement:
report this adThis equipment complies with FCC radiation exposure limits set forth for an uncontrolled environment.
FCC Caution:
This device complies with part 15 of the FCC Rules. Operation is subject to the following two conditions: (1) This device may not cause harmful interference, and (2) this device must accept any interference received, including interference that may cause undesired operation.Any changes or modifications not expressly approved by the party responsible for compliance could void the user’s authority to operate the equipment.Note: This equipment has been tested and found to comply with the limits for a Class B digital device, pursuant to part 15 of the FCC Rules. These limits are designed to provide reasonable protection against harmful interference in a residential installation. This equipment generates uses and can radiate radio frequency energy and, if not installed and used in accordance with the instructions, may cause harmful interference to radio communications. However, there is no guarantee that interference will not occur in a particular installation. If this equipment does cause harmful interference to radio or television reception, which can be determined by turning the equipment off and on, the user is encouraged to try to correct the interference by one or more of the following measures:-Reorient or relocate the receiving antenna.-Increase the separation between the equipment and receiver.-Connect the equipment into an outlet on a circuit different from that to which the receiver is connected.-Consult the dealer or an experienced radio/TV technician for help.The device has been evaluated to meet general RF exposure requirements. The device can be used in portable exposure conditions without restriction.
References
[xyz-ips snippet=”download-snippet”]